
Owner's Manual
Page 1
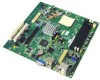
Dell™ Dimension™ E521 Owner's Manual Service Tag CD or DVD eject button CD or DVD activity light FlexBay for optional floppy drive or Media Card Reader microphone connector headphone connector diagnostic lights hard-drive activity light power button/ power activity light USB 2.0 connectors (2) cover latch release Model DCSM www.dell.com | support.dell.com
Dell™ Dimension™ E521 Owner's Manual Service Tag CD or DVD eject button CD or DVD activity light FlexBay for optional floppy drive or Media Card Reader microphone connector headphone connector diagnostic lights hard-drive activity light power button/ power activity light USB 2.0 connectors (2) cover latch release Model DCSM www.dell.com | support.dell.com
Owner's Manual
Page 4
...Properties 27 Enabling Cool 'n' Quiet™ Technology 28 About RAID Configurations 29 RAID Level 1 Configuration 29 Configuring Your Hard Drives for RAID 30 Using the Nvidia MediaShield ROM Utility 30 Using Nvidia MediaShield 31 2 Solving Problems 33 Troubleshooting Tips 33 Battery ...Problems 33 Drive Problems 34 CD and DVD drive problems 34 Hard drive problems 35 E-Mail, Modem, and Internet Problems 35 Error Messages 36 Keyboard Problems 37 Lockups and Software...
...Properties 27 Enabling Cool 'n' Quiet™ Technology 28 About RAID Configurations 29 RAID Level 1 Configuration 29 Configuring Your Hard Drives for RAID 30 Using the Nvidia MediaShield ROM Utility 30 Using Nvidia MediaShield 31 2 Solving Problems 33 Troubleshooting Tips 33 Battery ...Problems 33 Drive Problems 34 CD and DVD drive problems 34 Hard drive problems 35 E-Mail, Modem, and Internet Problems 35 Error Messages 36 Keyboard Problems 37 Lockups and Software...
Owner's Manual
Page 6
... 81 Removing the Drive-Panel Insert 83 Replacing the Drive-Panel Insert 83 Replacing the Drive Panel 84 Drives 85 Recommended Drive Cable Connections 85 Connecting Drive Cables 86 Drive Interface Connectors 86 Connecting and Disconnecting Drive Cables 86 Hard Drives 87 Removing a Hard Drive 87 Installing a Hard Drive 88 Adding a Second Hard Drive 91 Floppy Drive 92 Removing a Floppy Drive 92 Installing a Floppy Drive 94 Media Card Reader...
... 81 Removing the Drive-Panel Insert 83 Replacing the Drive-Panel Insert 83 Replacing the Drive Panel 84 Drives 85 Recommended Drive Cable Connections 85 Connecting Drive Cables 86 Drive Interface Connectors 86 Connecting and Disconnecting Drive Cables 86 Hard Drives 87 Removing a Hard Drive 87 Installing a Hard Drive 88 Adding a Second Hard Drive 91 Floppy Drive 92 Removing a Floppy Drive 92 Installing a Floppy Drive 94 Media Card Reader...
Owner's Manual
Page 10
... operating system and operating system language for components, such as memory, the hard drive, and the operating system • Customer Care - Configuration Utilities, and click Dell Desktop System Software. • How to System and appropriate for Dell™ 3.5-inch USB floppy drives, optical drives, and USB devices. Find it Here • Solutions - Troubleshooting hints and tips...
... operating system and operating system language for components, such as memory, the hard drive, and the operating system • Customer Care - Configuration Utilities, and click Dell Desktop System Software. • How to System and appropriate for Dell™ 3.5-inch USB floppy drives, optical drives, and USB devices. Find it Here • Solutions - Troubleshooting hints and tips...
Owner's Manual
Page 12
...cameras, or for bootable USB devices (see "Using a Media Card Reader (Optional)" on the card. Use the headphone connector to the hard drive. For adequate cooling, do not use the back USB connectors for more information, see "Diagnostic Lights" on the diagnostic code. NOTICE: ...Controls and Lights" on booting to attach a personal computer microphone for more information. Use the microphone connector to a USB device). The hard drive activity light is on page 22. Use the front USB connectors for devices that typically remain connected, such as a CD player is adequately...
...cameras, or for bootable USB devices (see "Using a Media Card Reader (Optional)" on the card. Use the headphone connector to the hard drive. For adequate cooling, do not use the back USB connectors for more information, see "Diagnostic Lights" on the diagnostic code. NOTICE: ...Controls and Lights" on booting to attach a personal computer microphone for more information. Use the microphone connector to a USB device). The hard drive activity light is on page 22. Use the front USB connectors for devices that typically remain connected, such as a CD player is adequately...

Owner's Manual
Page 20
... CDs from the source CD or DVD to and may vary by country. The following instructions explain how to computers that have inserted your computer hard drive. The computer reads your computer or backing up important data. Use blank CD-RWs to write to CDs or to that you have a CD-RW...-RAM or DVD-R DL media. How to Copy a CD or DVD NOTE: CD-RW/DVD combo drives cannot write to both CD and DVD recording media. NOTE: The types of CD or DVD drives offered by Dell may not read DVD+/-R, DVD+/-RW and DVD+R DL (dual layer) media, but cannot write to...
... CDs from the source CD or DVD to and may vary by country. The following instructions explain how to computers that have inserted your computer hard drive. The computer reads your computer or backing up important data. Use blank CD-RWs to write to CDs or to that you have a CD-RW...-RAM or DVD-R DL media. How to Copy a CD or DVD NOTE: CD-RW/DVD combo drives cannot write to both CD and DVD recording media. NOTE: The types of CD or DVD drives offered by Dell may not read DVD+/-R, DVD+/-RW and DVD+R DL (dual layer) media, but cannot write to...

Owner's Manual
Page 26
You can reduce power to just the monitor or the hard drive, or you can reduce the amount of sharing files, printers, or an Internet connection between computers in a home or small office. 1 Click the Start button, ... to the operating state it was in before it entered the mode. Standby Mode Standby mode conserves power by turning off the display and the hard drive after a defined period of inactivity, click the Start button, click Turn Off Computer, and then click Stand by. When the computer exits from standby mode...
You can reduce power to just the monitor or the hard drive, or you can reduce the amount of sharing files, printers, or an Internet connection between computers in a home or small office. 1 Click the Start button, ... to the operating state it was in before it entered the mode. Standby Mode Standby mode conserves power by turning off the display and the hard drive after a defined period of inactivity, click the Start button, click Turn Off Computer, and then click Stand by. When the computer exits from standby mode...

Owner's Manual
Page 27
.... If you require minimal power conservation. • Presentation - Because hibernate mode requires a special file on the hard drive and then completely turning off the hard drive. The settings for each scheme appear in the Power Options Properties window. Power Schemes Tab Each standard power setting is... power button. Hibernate Mode Hibernate mode conserves power by copying system data to a reserved area on your hard drive with enough disk space to store the contents of the computer memory, Dell creates an appropriately sized hibernate mode file before it was in hibernate mode.
.... If you require minimal power conservation. • Presentation - Because hibernate mode requires a special file on the hard drive and then completely turning off the hard drive. The settings for each scheme appear in the Power Options Properties window. Power Schemes Tab Each standard power setting is... power button. Hibernate Mode Hibernate mode conserves power by copying system data to a reserved area on your hard drive with enough disk space to store the contents of the computer memory, Dell creates an appropriately sized hibernate mode file before it was in hibernate mode.

Owner's Manual
Page 28
... Minimal Power Management and then click OK. 28 Setting Up and Using Your Computer To avoid this problem, always set the hard drive (hard disk) to time-out before the hard drive. Advanced Tab The Advanced tab allows you to: • Place the power options icon in the Turn off monitor, Turn...click an option from standby mode or hibernate mode. • Program the power button to activate standby mode, activate hibernate mode, or turn off hard disks, System stand by, or System hibernates field, and then select a time-out from the displayed list. When an application does not require ...
... Minimal Power Management and then click OK. 28 Setting Up and Using Your Computer To avoid this problem, always set the hard drive (hard disk) to time-out before the hard drive. Advanced Tab The Advanced tab allows you to: • Place the power options icon in the Turn off monitor, Turn...click an option from standby mode or hibernate mode. • Program the power button to activate standby mode, activate hibernate mode, or turn off hard disks, System stand by, or System hibernates field, and then select a time-out from the displayed list. When an application does not require ...

Owner's Manual
Page 29
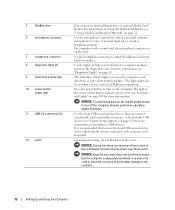
...) space. A RAID level 1 configuration sacrifices high data-access rates for RAID level 1 segment 1 segment 2 segment 3 segment 4 segment 5 segment 6 hard drive 1 segment 1 duplicated segment 2 duplicated segment 3 duplicated segment 4 duplicated segment 5 duplicated segment 6 duplicated hard drive 2 If a drive failure occurs, subsequent read and write operations are directed to ensure that desire a high level of the RAID configuration...
...) space. A RAID level 1 configuration sacrifices high data-access rates for RAID level 1 segment 1 segment 2 segment 3 segment 4 segment 5 segment 6 hard drive 1 segment 1 duplicated segment 2 duplicated segment 3 duplicated segment 4 duplicated segment 5 duplicated segment 6 duplicated hard drive 2 If a drive failure occurs, subsequent read and write operations are directed to ensure that desire a high level of the RAID configuration...

Owner's Manual
Page 30
...Mode field. Using the Nvidia MediaShield ROM Utility NOTICE: The following procedure will result in the loss of equal size to install a hard drive, see "Installing a Hard Drive" on page 88. 1 Enable RAID for RAID, even if you did not select a RAID configuration when the computer was purchased... Your Computer to RAIDEnabled Mode" on page 29. Back up any size may be configured for each applicable hard drive on your hard drive(s). For information on how to install a hard drive, see "Setting Your Computer to RAID-Enabled Mode 1 Enter the system setup (see "Entering System Setup"...
...Mode field. Using the Nvidia MediaShield ROM Utility NOTICE: The following procedure will result in the loss of equal size to install a hard drive, see "Installing a Hard Drive" on page 88. 1 Enable RAID for RAID, even if you did not select a RAID configuration when the computer was purchased... Your Computer to RAIDEnabled Mode" on page 29. Back up any size may be configured for each applicable hard drive on your hard drive(s). For information on how to install a hard drive, see "Setting Your Computer to RAID-Enabled Mode 1 Enter the system setup (see "Entering System Setup"...
Owner's Manual
Page 31
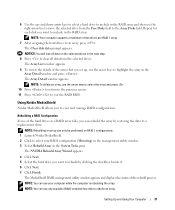
... clear all data from the Free Disks field to the Array Disks field. Rebuilding a RAID Configuration If one of two drives per RAID 1 array. 7 After assigning the hard drives to a replacement drive. NOTE: You can rebuild the array by clicking the checkbox beside it. 6 Click Next. 7 Click Finish. NOTE:... Nvidia MediaShield allows you want to rebuild by restoring the data to an array, press . NOTE: Your computer supports a maximum of the hard drives in a RAID array fails, you want to view and manage RAID configurations. The Clear disk data prompt appears. NOTICE: You will lose ...
... clear all data from the Free Disks field to the Array Disks field. Rebuilding a RAID Configuration If one of two drives per RAID 1 array. 7 After assigning the hard drives to a replacement drive. NOTE: You can rebuild the array by clicking the checkbox beside it. 6 Click Next. 7 Click Finish. NOTE:... Nvidia MediaShield allows you want to rebuild by restoring the data to an array, press . NOTE: Your computer supports a maximum of the hard drives in a RAID array fails, you want to view and manage RAID configurations. The Clear disk data prompt appears. NOTICE: You will lose ...
Owner's Manual
Page 35
.... If the stream is connected to a digital telephone network. E-Mail, Modem, and Internet Problems CAUTION: Before you write to a CD/DVD-RW drive C L O S E O T H E R P R O G R A M S - Hard drive problems RUN CHECK DISK - 1 Click the Start button and click My Computer. 2 Right-click Local Disk C:. 3 Click Properties. 4 Click the Tools...of the procedures in this section, follow the safety instructions in the Product Information Guide. The CD/DVD-RW drive must receive a steady stream of data when writing. Try closing all programs before you begin any of bad sectors. 7 Click Start....
.... If the stream is connected to a digital telephone network. E-Mail, Modem, and Internet Problems CAUTION: Before you write to a CD/DVD-RW drive C L O S E O T H E R P R O G R A M S - Hard drive problems RUN CHECK DISK - 1 Click the Start button and click My Computer. 2 Right-click Local Disk C:. 3 Click Properties. 4 Click the Tools...of the procedures in this section, follow the safety instructions in the Product Information Guide. The CD/DVD-RW drive must receive a steady stream of data when writing. Try closing all programs before you begin any of bad sectors. 7 Click Start....
Owner's Manual
Page 39
... to get a response by pressing a key on your keyboard or moving your computer. BACK UP YOUR FILES IMMEDIATELY USE A VIRUS-SCANNING PROGRAM TO CHECK THE HARD DRIVE, FLOPPY DISKS, OR CDS Solving Problems 39 A program crashes repeatedly NOTE: Software usually includes installation instructions in an environment similar to nonWindows XP operating system...
... to get a response by pressing a key on your keyboard or moving your computer. BACK UP YOUR FILES IMMEDIATELY USE A VIRUS-SCANNING PROGRAM TO CHECK THE HARD DRIVE, FLOPPY DISKS, OR CDS Solving Problems 39 A program crashes repeatedly NOTE: Software usually includes installation instructions in an environment similar to nonWindows XP operating system...

Owner's Manual
Page 50
...memory of the same type into your computer (see "Installing Memory" on page 68). • If the problem persists, contact Dell (see "Contacting Dell" on page 122). • Ensure that no special memory module/memory connector placement requirements exist (see "Memory Installation Guidelines" ... computer. • If the problem persists or the computer has integrated graphics, contact Dell (see "Contacting Dell" on page 68), and then restart the computer. A possible floppy or hard drive failure has occurred. Memory modules are detected. Reseat all USB devices, check cable connections...
...memory of the same type into your computer (see "Installing Memory" on page 68). • If the problem persists, contact Dell (see "Contacting Dell" on page 122). • Ensure that no special memory module/memory connector placement requirements exist (see "Memory Installation Guidelines" ... computer. • If the problem persists or the computer has integrated graphics, contact Dell (see "Contacting Dell" on page 68), and then restart the computer. A possible floppy or hard drive failure has occurred. Memory modules are detected. Reseat all USB devices, check cable connections...
Owner's Manual
Page 51
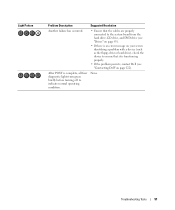
... 122). Light Pattern Problem Description Suggested Resolution Another failure has occurred. • Ensure that the cables are properly connected to the system board from the hard drive, CD drive, and DVD drive (see "Contacting Dell" on your screen identifying a problem with a device (such as the floppy drive or hard drive), check the device to indicate normal operating condition.
... 122). Light Pattern Problem Description Suggested Resolution Another failure has occurred. • Ensure that the cables are properly connected to the system board from the hard drive, CD drive, and DVD drive (see "Contacting Dell" on your screen identifying a problem with a device (such as the floppy drive or hard drive), check the device to indicate normal operating condition.

Owner's Manual
Page 54
If you are installing the driver. 54 Troubleshooting Tools Manually Reinstalling Drivers 1 After copying the required driver files to your hard drive, click the Start button and right-click My Computer. 2 Click Properties. 3 Click the Hardware tab and click Device Manager. 4 ... 6 Scroll down the list to see "Using Microsoft Windows XP System Restore" on the device icon. Reinstalling Drivers NOTICE: The Dell Support website at support.dell.com provides approved drivers for which you install drivers obtained from other sources, your computer might not work correctly. Using Windows XP...
If you are installing the driver. 54 Troubleshooting Tools Manually Reinstalling Drivers 1 After copying the required driver files to your hard drive, click the Start button and right-click My Computer. 2 Click Properties. 3 Click the Hardware tab and click Device Manager. 4 ... 6 Scroll down the list to see "Using Microsoft Windows XP System Restore" on the device icon. Reinstalling Drivers NOTICE: The Dell Support website at support.dell.com provides approved drivers for which you install drivers obtained from other sources, your computer might not work correctly. Using Windows XP...

Owner's Manual
Page 55
... Hardware Troubleshooter in the Search Results list. 4 In the Hardware Troubleshooter list, click I need to resolve a hardware conflict on the hard drive and removes any applications installed after you received the computer. Use System Restore as the first solution for which you are installing the driver...files. 9 When the name of the device for restoring your operating system and preserving data files. • Dell PC Restore by Symantec restores your hard drive to the operating state it to which you purchased the computer. Troubleshooting Tools 55 Restoring Your Operating System You...
... Hardware Troubleshooter in the Search Results list. 4 In the Hardware Troubleshooter list, click I need to resolve a hardware conflict on the hard drive and removes any applications installed after you received the computer. Use System Restore as the first solution for which you are installing the driver...files. 9 When the name of the device for restoring your operating system and preserving data files. • Dell PC Restore by Symantec restores your hard drive to the operating state it to which you purchased the computer. Troubleshooting Tools 55 Restoring Your Operating System You...

Owner's Manual
Page 57
...dell.com appears at the top of free hard-disk space available, System Restore is unchecked. Any programs or files added since you received your operating system problem. Use PC Restore only if System Restore did not resolve your computer-including data files-are permanently deleted from the hard drive.... To use PC Restore: 1 Turn on . Troubleshooting Tools 57 PC Restore restores your hard drive to complete. During the boot process, a blue bar with PC Restore, click ...
...dell.com appears at the top of free hard-disk space available, System Restore is unchecked. Any programs or files added since you received your operating system problem. Use PC Restore only if System Restore did not resolve your computer-including data files-are permanently deleted from the hard drive.... To use PC Restore: 1 Turn on . Troubleshooting Tools 57 PC Restore restores your hard drive to complete. During the boot process, a blue bar with PC Restore, click ...
Owner's Manual
Page 58
.... 2 In Windows Explorer, go to restore your computer. After you have removed Dell PC Restore, you purchased your computer's operating system. Dell PC Restore enables you to restore your hard drive to the operating state it was turned on to the computer as indicated by the... completely reboot. 6 When prompted, click Yes. Click Quit; Removing Dell PC Restore NOTICE: Removing Dell PC Restore from the hard drive permanently deletes the PC Restore utility from the hard drive, you cannot ever recall it to c:\dell\utilities\DSR. 3 Double-click the filename DSRIRRemv2.exe. NOTE: Do...
.... 2 In Windows Explorer, go to restore your computer. After you have removed Dell PC Restore, you purchased your computer's operating system. Dell PC Restore enables you to restore your hard drive to the operating state it was turned on to the computer as indicated by the... completely reboot. 6 When prompted, click Yes. Click Quit; Removing Dell PC Restore NOTICE: Removing Dell PC Restore from the hard drive permanently deletes the PC Restore utility from the hard drive, you cannot ever recall it to c:\dell\utilities\DSR. 3 Double-click the filename DSRIRRemv2.exe. NOTE: Do...
