
Display Manager Users Guide
Page 3
Contents Overview 4 Selecting Quick Settings options 5 Setting basic display options 7 Assigning preset modes to applications 9 Organizing windows with Easy Arrange 10 Managing multiple video inputs 13 Restoring Application Positions 14 Attaching DDM to an active window (Windows 10 only 16 Applying energy conservation options 17 Defining shortcut keys 18 Troubleshooting 19 Contents | 3
Contents Overview 4 Selecting Quick Settings options 5 Setting basic display options 7 Assigning preset modes to applications 9 Organizing windows with Easy Arrange 10 Managing multiple video inputs 13 Restoring Application Positions 14 Attaching DDM to an active window (Windows 10 only 16 Applying energy conservation options 17 Defining shortcut keys 18 Troubleshooting 19 Contents | 3
Display Manager Users Guide
Page 4
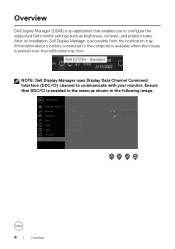
...: Dell Display Manager uses Display Data Channel Command Interface (DDC/CI) channel to configure the supported Dell monitor settings such as shown in the following image. Information about monitors connected to the computer is available when the mouse is accessible from the notification tray. Ensure that enables you to communicate with your monitor. Dell 27 Monitor Brightness / Contrast Display Info Auto Adjust DDC/CI On Input Source LCD Conditioning O Color Service Tag Display Reset Others Menu Factory Reset Personalize...
...: Dell Display Manager uses Display Data Channel Command Interface (DDC/CI) channel to configure the supported Dell monitor settings such as shown in the following image. Information about monitors connected to the computer is available when the mouse is accessible from the notification tray. Ensure that enables you to communicate with your monitor. Dell 27 Monitor Brightness / Contrast Display Info Auto Adjust DDC/CI On Input Source LCD Conditioning O Color Service Tag Display Reset Others Menu Factory Reset Personalize...

Display Manager Users Guide
Page 5
In the Quick Settings window, you can be selected from the Display drop-down list. If more than one supported Dell monitor is displayed. The Quick Setings window is connected to the computer, a specific target monitor can also change the following: * Resolution * Auto Mode or Manual Mode the screen appearance * Brightness and contrast levels * Easy Arrange window layouts for the monitor Selecting Quick Settings options | 5 Selecting Quick Settings options Click the Dell Display Manager's notification tray.
In the Quick Settings window, you can be selected from the Display drop-down list. If more than one supported Dell monitor is displayed. The Quick Setings window is connected to the computer, a specific target monitor can also change the following: * Resolution * Auto Mode or Manual Mode the screen appearance * Brightness and contrast levels * Easy Arrange window layouts for the monitor Selecting Quick Settings options | 5 Selecting Quick Settings options Click the Dell Display Manager's notification tray.
Display Manager Users Guide
Page 6
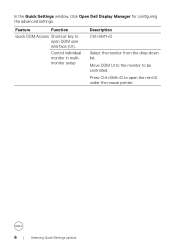
Move DDM UI to the monitor to open the mini UI under the mouse pointer. 6 | Selecting Quick Settings options Press Ctrl+Shift+D to open DDM user interface (UI). Feature Function Quick DDM Access Shortcut key to be controlled. In the Quick Settings window, click Open Dell Display Manager for configuring the advanced settings. Control individual monitor in multimonitor setup Description Ctrl+Shift+D Select the monitor from the drop-down list.
Move DDM UI to the monitor to open the mini UI under the mouse pointer. 6 | Selecting Quick Settings options Press Ctrl+Shift+D to open DDM user interface (UI). Feature Function Quick DDM Access Shortcut key to be controlled. In the Quick Settings window, click Open Dell Display Manager for configuring the advanced settings. Control individual monitor in multimonitor setup Description Ctrl+Shift+D Select the monitor from the drop-down list.
Display Manager Users Guide
Page 7
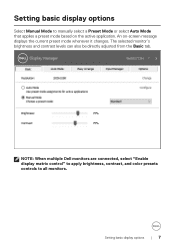
An on the active application. The selected monitor's brightness and contrast levels can also be directly adjusted from the Basic tab. NOTE: When multiple Dell monitors are connected, select "Enable display matrix control" to apply brightness, contrast, and color presets controls to manually select a Preset Mode or select Auto Mode that applies a preset mode based on -screen message displays the current preset mode whenever it changes. Setting basic display options | 7 Setting basic display options Select Manual Mode to all monitors.
An on the active application. The selected monitor's brightness and contrast levels can also be directly adjusted from the Basic tab. NOTE: When multiple Dell monitors are connected, select "Enable display matrix control" to apply brightness, contrast, and color presets controls to manually select a Preset Mode or select Auto Mode that applies a preset mode based on -screen message displays the current preset mode whenever it changes. Setting basic display options | 7 Setting basic display options Select Manual Mode to all monitors.
Display Manager Users Guide
Page 9
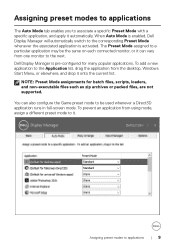
... or packed files, are not supported. Assigning preset modes to applications The Auto Mode tab enables you to it. Dell Display Manager is enabled, Dell Display Manager will automatically switch to the Application list, drag the application from one monitor to the next. To prevent an application from using mode, assign a different preset mode to associate a specific Preset Mode with a specific application, and apply it can...
... or packed files, are not supported. Assigning preset modes to applications The Auto Mode tab enables you to it. Dell Display Manager is enabled, Dell Display Manager will automatically switch to the Application list, drag the application from one monitor to the next. To prevent an application from using mode, assign a different preset mode to associate a specific Preset Mode with a specific application, and apply it can...

Display Manager Users Guide
Page 10
... windows with Easy Arrange On supported Dell monitors, the Easy Arrange tab enables you to easily arrange the open windows in one of the predefined layouts by dragging them in the zones. To get started with Easy Arrange Next, drag an open windows, and then click Save. To create a custom window layout, size and position the windows on the monitor. The regions for that are displayed...
... windows with Easy Arrange On supported Dell monitors, the Easy Arrange tab enables you to easily arrange the open windows in one of the predefined layouts by dragging them in the zones. To get started with Easy Arrange Next, drag an open windows, and then click Save. To create a custom window layout, size and position the windows on the monitor. The regions for that are displayed...

Display Manager Users Guide
Page 12
... are displayed when monitor is saved into the Easy Arrange icon position. Such application may require a minimum effective resolution for portrait mode Press the Ctrl key while clicking on a modified layout icon to restore it to toggle Used (MRU) layouts between the last six MRU layouts. Six Most Recently Press Ctrl+Shift+Home to to the default layout...
... are displayed when monitor is saved into the Easy Arrange icon position. Such application may require a minimum effective resolution for portrait mode Press the Ctrl key while clicking on a modified layout icon to restore it to toggle Used (MRU) layouts between the last six MRU layouts. Six Most Recently Press Ctrl+Shift+Home to to the default layout...

Display Manager Users Guide
Page 13
... computers connected to easily switch between them. You can install Dell Display Manager on your monitor are listed. Managing multiple video inputs The Input Manager tab enables you to manage multiple video inputs connected to quickly switch between two inputs if you often work between inputs while you work with your monitor even when the monitor is displaying video from it. Managing multiple video inputs | 13 All video input ports available on the computer you frequently use and control input switching...
... computers connected to easily switch between them. You can install Dell Display Manager on your monitor are listed. Managing multiple video inputs The Input Manager tab enables you to manage multiple video inputs connected to quickly switch between two inputs if you often work between inputs while you work with your monitor even when the monitor is displaying video from it. Managing multiple video inputs | 13 All video input ports available on the computer you frequently use and control input switching...

Display Manager Users Guide
Page 15
... and restores application positions accordingly. DDM recognizes the monitor you can save the window layout before replacement and restore the layout after a new monitor is installed. Restoring Application Positions | 15 If you want to replace a monitor in your applications running to a favorite layout, select Save current window layout, and then Restore saved window layout. To go back to use monitors with different models or resolutions in a monitor matrix configuration...
... and restores application positions accordingly. DDM recognizes the monitor you can save the window layout before replacement and restore the layout after a new monitor is installed. Restoring Application Positions | 15 If you want to replace a monitor in your applications running to a favorite layout, select Save current window layout, and then Restore saved window layout. To go back to use monitors with different models or resolutions in a monitor matrix configuration...
Display Manager Users Guide
Page 17
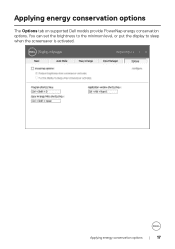
Applying energy conservation options | 17 You can set the brightness to the minimum level, or put the display to sleep when the screensaver is activated. Applying energy conservation options The Options tab on supported Dell models provide PowerNap energy conservation options.
Applying energy conservation options | 17 You can set the brightness to the minimum level, or put the display to sleep when the screensaver is activated. Applying energy conservation options The Options tab on supported Dell models provide PowerNap energy conservation options.

Display Manager Users Guide
Page 19
... video cable is properly connected to ensure DDC/CI is enabled. 3. The connectors should be firmly inserted into position. 2. Dell Display Manager does not support monitors from your computer. Troubleshooting | 19 Check the monitor OSD to your monitor and your graphic-card manufacturer such as Intel, AMD, and NVIDIA. Ensure that you have the correct and latest graphics-card driver from any other manufacturer. Troubleshooting DDM works only with a supported Dell monitor...
... video cable is properly connected to ensure DDC/CI is enabled. 3. The connectors should be firmly inserted into position. 2. Dell Display Manager does not support monitors from your computer. Troubleshooting | 19 Check the monitor OSD to your monitor and your graphic-card manufacturer such as Intel, AMD, and NVIDIA. Ensure that you have the correct and latest graphics-card driver from any other manufacturer. Troubleshooting DDM works only with a supported Dell monitor...
Display Manager Users Guide
Page 20
... key. 20 | Troubleshooting It is recommended to a newer version of DDM when it is connected to the Internet, you are prompted to upgrade to download and install the latest DDM application. For more information, see https://www.dell.com/support/monitors. • Gaming monitors using the display OSD. Update the driver to disable MST/DP 1.2 using Nvidia-based G-sync technology. • Virtual and wireless displays do not support DDC/CI...
... key. 20 | Troubleshooting It is recommended to a newer version of DDM when it is connected to the Internet, you are prompted to upgrade to download and install the latest DDM application. For more information, see https://www.dell.com/support/monitors. • Gaming monitors using the display OSD. Update the driver to disable MST/DP 1.2 using Nvidia-based G-sync technology. • Virtual and wireless displays do not support DDC/CI...
Monitor Teardown Instructions
Page 1
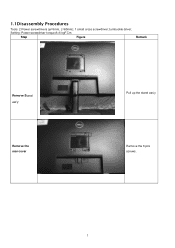
Setting: Power screwdriver torque A=6 kgF.Cm Step Figure Remark Remove Stand ass'y Remove the rear cover Pull up the stand ass'y Remove the 6 pcs screws . 1 turnbuckle driver; 1.1Disassembly Procedures Tools: 2 Power screwdrivers (φ=5mm, L=60mm); 1 small cross screwdriver;
Setting: Power screwdriver torque A=6 kgF.Cm Step Figure Remark Remove Stand ass'y Remove the rear cover Pull up the stand ass'y Remove the 6 pcs screws . 1 turnbuckle driver; 1.1Disassembly Procedures Tools: 2 Power screwdrivers (φ=5mm, L=60mm); 1 small cross screwdriver;

Monitor Teardown Instructions
Page 4
... and waste contain asbestos No used CRT No used Component contain CFC, HCFC, HFC No used and HC Gas discharge lamps No used LCD display > 100 cm2 Product has an LCD greater than 100 cm2 External electric cable Product has external cables Component contain refractory ceramic No used fibers Component contain radio-active No used to disassemble the product to a point where components...
... and waste contain asbestos No used CRT No used Component contain CFC, HCFC, HFC No used and HC Gas discharge lamps No used LCD display > 100 cm2 Product has an LCD greater than 100 cm2 External electric cable Product has external cables Component contain refractory ceramic No used fibers Component contain radio-active No used to disassemble the product to a point where components...

Monitor Simplified Service Manual
Page 2
Disassembly and Assembly Procedures 11 5.1 Disassembly SOP 11 5.2 Assembly SOP ...15 6. How to connect and disconnect power cable/ connectivity cable 9 5. Content Index 1. Exploded view diagram with list of items 6 3. Wiring connectivity diagram 8 4. Trouble shooting instructions 2 General Safety Instructions 3 1.1 SAFETY: General Safety 3 1.2 SAFETY: General Power Safety 5 2.
Disassembly and Assembly Procedures 11 5.1 Disassembly SOP 11 5.2 Assembly SOP ...15 6. How to connect and disconnect power cable/ connectivity cable 9 5. Content Index 1. Exploded view diagram with list of items 6 3. Wiring connectivity diagram 8 4. Trouble shooting instructions 2 General Safety Instructions 3 1.1 SAFETY: General Safety 3 1.2 SAFETY: General Power Safety 5 2.
Monitor Simplified Service Manual
Page 3
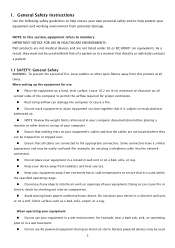
... (or equivalent). When setting up the equipment for use your equipment and working environment from this section, equipment refers to permit the airflow required for example, do not plug a telephone cable into the network connector). Do not place your equipment's cables and that the cables are not located where they must not be used 3 Battery powered devices may be...
... (or equivalent). When setting up the equipment for use your equipment and working environment from this section, equipment refers to permit the airflow required for example, do not plug a telephone cable into the network connector). Do not place your equipment's cables and that the cables are not located where they must not be used 3 Battery powered devices may be...
Monitor Simplified Service Manual
Page 4
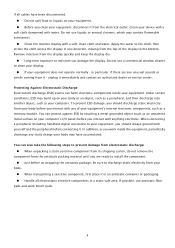
..., if there are ready to install the component. Just before you interact with a soft, clean cloth and water. in a static-safe area. When connecting a peripheral (including handheld digital assistants) to the bottom. If possible, use liquids or aerosol cleaners, which may contain flammable substances. Clean the monitor display with any of the display to your equipment, you...
..., if there are ready to install the component. Just before you interact with a soft, clean cloth and water. in a static-safe area. When connecting a peripheral (including handheld digital assistants) to the bottom. If possible, use liquids or aerosol cleaners, which may contain flammable substances. Clean the monitor display with any of the display to your equipment, you...
Monitor Simplified Service Manual
Page 5
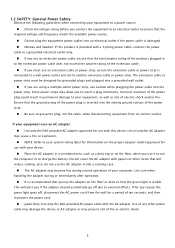
... you are using a multiple-outlet power strip, use caution when plugging the power cable into the power strip. Do not cover the AC adapter with a 3-prong power cable, connect the power cable to a grounded electrical outlet only. If you use an extension power cable, ensure that the total ampere rating of the products plugged in to the extension power cable does not exceed the ampere rating of any reason the green light goes off...
... you are using a multiple-outlet power strip, use caution when plugging the power cable into the power strip. Do not cover the AC adapter with a 3-prong power cable, connect the power cable to a grounded electrical outlet only. If you use an extension power cable, ensure that the total ampere rating of the products plugged in to the extension power cable does not exceed the ampere rating of any reason the green light goes off...

Monitor Simplified Service Manual
Page 9
... of the page. 3. Go to the country dropdown. 4. Click Contact Us next to https://www.dell.com/support. 2. S6 SCREW BUTTON S7 SCREW VESA S8 SCREW REAR COVER 21 Power Cable 22 DP 1.2 23 VGA cable 1 4 2 1 See "NOTE" 1 See "NOTE" 1 See "NOTE" NOTE: For replacement of contacting Dell that is convenient for you 9 Choose the method of power cord, connectivity cable and external power supply (if applicable), contact Dell: 1. Verify your need. 5.
... of the page. 3. Go to the country dropdown. 4. Click Contact Us next to https://www.dell.com/support. 2. S6 SCREW BUTTON S7 SCREW VESA S8 SCREW REAR COVER 21 Power Cable 22 DP 1.2 23 VGA cable 1 4 2 1 See "NOTE" 1 See "NOTE" 1 See "NOTE" NOTE: For replacement of contacting Dell that is convenient for you 9 Choose the method of power cord, connectivity cable and external power supply (if applicable), contact Dell: 1. Verify your need. 5.


