Users Guide
Page 5
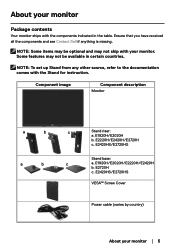
... NOTE: To set up Stand from any other source, refer to the documentation comes with the Stand for instruction. E2220H/E2420H/E2720H c. E2420HS/E2720HS Stand base: a. E1920H/E2020H/E2220H/E2420H b. E1920H/E2020H b. E2420HS/E2720HS VESA™ Screw Cover Power cable (varies by country) About your monitor │ 5 About your monitor Package contents Your ...be available in the table. Component image Component description Monitor a b c a b c Stand riser: a. Ensure that you have received all the components and see Contact Dell if anything is missing. E2720H c.
... NOTE: To set up Stand from any other source, refer to the documentation comes with the Stand for instruction. E2220H/E2420H/E2720H c. E2420HS/E2720HS Stand base: a. E1920H/E2020H/E2220H/E2420H b. E1920H/E2020H b. E2420HS/E2720HS VESA™ Screw Cover Power cable (varies by country) About your monitor │ 5 About your monitor Package contents Your ...be available in the table. Component image Component description Monitor a b c a b c Stand riser: a. Ensure that you have received all the components and see Contact Dell if anything is missing. E2720H c.

Users Guide
Page 24
... Switch-off - - - Off Less than 0.3 W Power Consumption PON 9.37 W Total Energy Consumption(TEC) 29.75 kWh E2220H VESA Modes Horizontal sync Vertical sync Video Power Power indicator consumption Normal operation Active Active Active White 18 W (maximum)** 13 W (typical) ...Glowing) Switch-off - - - The following table shows the power consumption and signaling of this automatic power saving feature. E1920H VESA Modes Horizontal sync Vertical sync Video Power Power indicator consumption Normal operation Active Active Active White 13.8 W (maximum)** 10 W ...
... Switch-off - - - Off Less than 0.3 W Power Consumption PON 9.37 W Total Energy Consumption(TEC) 29.75 kWh E2220H VESA Modes Horizontal sync Vertical sync Video Power Power indicator consumption Normal operation Active Active Active White 18 W (maximum)** 13 W (typical) ...Glowing) Switch-off - - - The following table shows the power consumption and signaling of this automatic power saving feature. E1920H VESA Modes Horizontal sync Vertical sync Video Power Power indicator consumption Normal operation Active Active Active White 13.8 W (maximum)** 10 W ...

Users Guide
Page 25
... mode Inactive Inactive Blanked White Less than 0.3 W (Glowing) Switch-off - - - Off Less than 0.3 W Power Consumption PON 12.34 W Total Energy Consumption(TEC) 38.52 kWh E2420HS VESA Modes Horizontal sync Vertical sync Video Power Power indicator consumption Normal operation Active Active Active White 24 W (maximum)** 17 W (typical) Active-off - - - Off Less than...
... mode Inactive Inactive Blanked White Less than 0.3 W (Glowing) Switch-off - - - Off Less than 0.3 W Power Consumption PON 12.34 W Total Energy Consumption(TEC) 38.52 kWh E2420HS VESA Modes Horizontal sync Vertical sync Video Power Power indicator consumption Normal operation Active Active Active White 24 W (maximum)** 17 W (typical) Active-off - - - Off Less than...

Users Guide
Page 26
... Blanked White Less than 0.3 W Power Consumption PON 14.03 W Total Energy Consumption(TEC) 44.38 kWh **Maximum power consumption with max luminance and contrast. E2720HS VESA Modes Horizontal sync Vertical sync Video Power Power indicator consumption Normal operation Active Active Active White 30 W (maximum)** 23 W (typical) Active-off - - - Changing the factory...
... Blanked White Less than 0.3 W Power Consumption PON 14.03 W Total Energy Consumption(TEC) 44.38 kWh **Maximum power consumption with max luminance and contrast. E2720HS VESA Modes Horizontal sync Vertical sync Video Power Power indicator consumption Normal operation Active Active Active White 30 W (maximum)** 23 W (typical) Active-off - - - Changing the factory...

Users Guide
Page 29
... is not attached when the monitor is applicable for the stand that shipped with your monitor. b. a. Attach the stand assembly to the monitor groove. b. Attach VESA cover. Assemble the stand riser to stand base. d. a. c. Insert the bracket towards monitor until it locks in place. NOTE: The following procedure is shipped from...
... is not attached when the monitor is applicable for the stand that shipped with your monitor. b. a. Attach the stand assembly to the monitor groove. b. Attach VESA cover. Assemble the stand riser to stand base. d. a. c. Insert the bracket towards monitor until it locks in place. NOTE: The following procedure is shipped from...

Users Guide
Page 30
... of desk. b. a. Insert the bracket towards monitor until it locks in the correct direction down onto the stand base until it clicks into place. 2. Attach VESA cover. 30 │ Setting up the monitor Connecting the stand NOTE: The stand is not attached when the monitor is applicable for the stand that...
... of desk. b. a. Insert the bracket towards monitor until it locks in the correct direction down onto the stand base until it clicks into place. 2. Attach VESA cover. 30 │ Setting up the monitor Connecting the stand NOTE: The stand is not attached when the monitor is applicable for the stand that...

Users Guide
Page 31
... in place. a. Attach the stand assembly to the monitor groove. c. d. To attach the monitor stand: E2420H 1. Slide the monitor stand body in the correct direction down onto the stand base until it clicks into place. 2. Attach VESA cover. NOTE: The following procedure is shipped from the factory. Align the stand assembly bracket...
... in place. a. Attach the stand assembly to the monitor groove. c. d. To attach the monitor stand: E2420H 1. Slide the monitor stand body in the correct direction down onto the stand base until it clicks into place. 2. Attach VESA cover. NOTE: The following procedure is shipped from the factory. Align the stand assembly bracket...

Users Guide
Page 32
Assemble the stand riser to the monitor. Attach the stand assembly to stand base. c. Insert the bracket towards monitor until it 's securely fastened. 2. d. Attach VESA cover. 32 │ Setting up the monitor Connecting the stand NOTE: The stand is not attached when the monitor is applicable for the stand that ...
Assemble the stand riser to the monitor. Attach the stand assembly to stand base. c. Insert the bracket towards monitor until it 's securely fastened. 2. d. Attach VESA cover. 32 │ Setting up the monitor Connecting the stand NOTE: The stand is not attached when the monitor is applicable for the stand that ...

Users Guide
Page 33
... thumbscrew clockwise till it 's securely fastened. b. Align the stand assembly bracket to the monitor groove. d. To attach the monitor stand: E2420HS/E2720HS 1. Setting up the monitor │ 33 c. Attach the VESA cover. 3. b. Setting up the monitor Connecting the stand NOTE: The stand is not attached when the monitor is applicable for the...
... thumbscrew clockwise till it 's securely fastened. b. Align the stand assembly bracket to the monitor groove. d. To attach the monitor stand: E2420HS/E2720HS 1. Setting up the monitor │ 33 c. Attach the VESA cover. 3. b. Setting up the monitor Connecting the stand NOTE: The stand is not attached when the monitor is applicable for the...

Users Guide
Page 35
... stand, ensure that shipped with your monitor. Organizing cables Use the cable-management slot to route the cables connected to access the release button. 2. a. a. Remove VESA cover to your monitor. NOTE: The following procedure is applicable for the stand that the monitor is released, remove the base away from stand riser...
... stand, ensure that shipped with your monitor. Organizing cables Use the cable-management slot to route the cables connected to access the release button. 2. a. a. Remove VESA cover to your monitor. NOTE: The following procedure is applicable for the stand that the monitor is released, remove the base away from stand riser...

Users Guide
Page 36
... cloth along the desk. Removing the stand NOTE: To prevent scratches on the screen when removing the stand, ensure that shipped with your monitor. Remove VESA cover to access the release button. 2. To remove the stand: E2220H 1.
... cloth along the desk. Removing the stand NOTE: To prevent scratches on the screen when removing the stand, ensure that shipped with your monitor. Remove VESA cover to access the release button. 2. To remove the stand: E2220H 1.

Users Guide
Page 37
To remove the stand: E2420H 1. Place the monitor on a soft and clean surface. Use a long and thin screwdriver to access the release button. 2. Removing the stand NOTE: To prevent scratches ... the latch is applicable for the stand that the monitor is placed on a soft cloth along the desk. Setting up the monitor │ 37 Remove VESA cover to push the release latch located in a hole just above the stand. a. NOTE: The following procedure is released, remove the base away from stand...
To remove the stand: E2420H 1. Place the monitor on a soft and clean surface. Use a long and thin screwdriver to access the release button. 2. Removing the stand NOTE: To prevent scratches ... the latch is applicable for the stand that the monitor is placed on a soft cloth along the desk. Setting up the monitor │ 37 Remove VESA cover to push the release latch located in a hole just above the stand. a. NOTE: The following procedure is released, remove the base away from stand...

Users Guide
Page 38
... the release button. 2. Place the monitor on a soft and clean surface. Loosen the stand base thumbscrew fully to remove the base from the monitor. Remove VESA cover to push the release latch located in a hole just above the stand. NOTE: The following procedure is released, remove the base away from the...
... the release button. 2. Place the monitor on a soft and clean surface. Loosen the stand base thumbscrew fully to remove the base from the monitor. Remove VESA cover to push the release latch located in a hole just above the stand. NOTE: The following procedure is released, remove the base away from the...


