
User Guide
Page 1
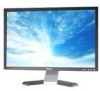
... is a trademark of Adobe Systems Incorporated, which may be registered in this document is strictly forbidden. Model E228WFP November 2006 Rev. A00 Dell Inc. NOTICE: A NOTICE indicates either potential damage to avoid the problem. has determined that helps you how... notice. © 2006 Dell Inc. Reproduction in any proprietary interest in this product meets the ENERGY STAR guidelines for energy efficiency. Dell™ E228WFP Flat Panel Monitor User's Guide About Your Monitor Front View Back View Side View Bottom View Monitor Specifications Caring for your computer...
... is a trademark of Adobe Systems Incorporated, which may be registered in this document is strictly forbidden. Model E228WFP November 2006 Rev. A00 Dell Inc. NOTICE: A NOTICE indicates either potential damage to avoid the problem. has determined that helps you how... notice. © 2006 Dell Inc. Reproduction in any proprietary interest in this product meets the ENERGY STAR guidelines for energy efficiency. Dell™ E228WFP Flat Panel Monitor User's Guide About Your Monitor Front View Back View Side View Bottom View Monitor Specifications Caring for your computer...

User Guide
Page 2
OSD menu / select button 3. Power button (with power light indicator) Back View Back to Contents Page About Your Monitor Dell™ E228WFP Flat Panel Monitor User's Guide Front View Back View Bottom View Side View Monitor Specifications LCD Monitor Quality & Pixel Policy Caring for your Monitor Front View 1. Auto-adjust / Up (+) button 5. Input source select button 2. Brightness & Contrast / Down (-) button 4.
OSD menu / select button 3. Power button (with power light indicator) Back View Back to Contents Page About Your Monitor Dell™ E228WFP Flat Panel Monitor User's Guide Front View Back View Bottom View Side View Monitor Specifications LCD Monitor Quality & Pixel Policy Caring for your Monitor Front View 1. Auto-adjust / Up (+) button 5. Input source select button 2. Brightness & Contrast / Down (-) button 4.

User Guide
Page 3
Press to contact Dell for technical support. Connect your computer DVI cable. Refer to this label if you need to release the stand from the monitor. Use a security lock with the slot to mount the monitor with VESA compliance (100mm) bracket. List the regulatory approvals.... Connect your computer VGA cable. Help organize cables by placing them through the hole. Left side Monitor Specifications Power Management Modes Right side Bottom View 1 Power connector 2 DVI connector 3 VGA connector Side View Insert the power cable. 1...
Press to contact Dell for technical support. Connect your computer DVI cable. Refer to this label if you need to release the stand from the monitor. Use a security lock with the slot to mount the monitor with VESA compliance (100mm) bracket. List the regulatory approvals.... Connect your computer VGA cable. Help organize cables by placing them through the hole. Left side Monitor Specifications Power Management Modes Right side Bottom View 1 Power connector 2 DVI connector 3 VGA connector Side View Insert the power cable. 1...

User Guide
Page 4
... mouse or any key on keyboard or move mouse or any key on keyboard or move mouse Activate the computer and 'wake up' the monitor to gain access to as TCO '99 power management compatible. * Zero power consumption in OFF mode can automatically reduce its power consumption when...sync 14 V-sync 15 DDC clock 24-pin Digital-Only DVI Connector If input from the monitor. The following messages appears when the "menu" or "plus" buttons are pressed when in Active-off - - - This monitor is detected by disconnecting the main cable from keyboard, mouse, or other input devices is...
... mouse or any key on keyboard or move mouse or any key on keyboard or move mouse Activate the computer and 'wake up' the monitor to gain access to as TCO '99 power management compatible. * Zero power consumption in OFF mode can automatically reduce its power consumption when...sync 14 V-sync 15 DDC clock 24-pin Digital-Only DVI Connector If input from the monitor. The following messages appears when the "menu" or "plus" buttons are pressed when in Active-off - - - This monitor is detected by disconnecting the main cable from keyboard, mouse, or other input devices is...
User Guide
Page 5
... any Plug and Play-compatible system. Data 2- 9 T.M.D.S. Plug and Play Capability You can configure itself and optimize the monitor settings. General Model number E228WFP Screen type Screen dimensions Preset display area: Horizontal Vertical Pixel pitch Viewing angle Luminance output Contrast ratio Faceplate coating Backlight Response Time... 0 Shield 4 No Pin 12 No Pin 20 No Pin 5 No Pin 13 No Pin 21 No Pin 6 DDC Clock 14 +5V Power 22 T.M.D.S. TFT LCD 22 inches (22-inch viewable image size) 473.76 mm (18.65 inches) 296.1 mm (11.66 inches) 0.282 mm 160° (vertical) typ, ...
... any Plug and Play-compatible system. Data 2- 9 T.M.D.S. Plug and Play Capability You can configure itself and optimize the monitor settings. General Model number E228WFP Screen type Screen dimensions Preset display area: Horizontal Vertical Pixel pitch Viewing angle Luminance output Contrast ratio Faceplate coating Backlight Response Time... 0 Shield 4 No Pin 12 No Pin 20 No Pin 5 No Pin 13 No Pin 21 No Pin 6 DDC Clock 14 +5V Power 22 T.M.D.S. TFT LCD 22 inches (22-inch viewable image size) 473.76 mm (18.65 inches) 296.1 mm (11.66 inches) 0.282 mm 160° (vertical) typ, ...

User Guide
Page 6
DVI-D, white connector Digital: Detachable, DVI-D, Solid pins, shipped detached from the monitor Analog: Detachable, D-Sub, 15pins, shipped attached to 240 VAC / 50 or 60 Hz + 3 Hz / 1.5A 120V:30A (Max.) 240V:60A (Max.) 15-pin D-subminiature, blue ... each differential line, positive polarity at 50 ohm input impedance with HDCP support Separate horizontal and vertical synchronizations, polarity-free TTL level 100 to the monitor 16.10 inches (409.10 mm) 20.12 inches (511.14 mm) 5.87 inches (149.16 mm) 13.13 inches (333.54 mm) 20.12...
DVI-D, white connector Digital: Detachable, DVI-D, Solid pins, shipped detached from the monitor Analog: Detachable, D-Sub, 15pins, shipped attached to 240 VAC / 50 or 60 Hz + 3 Hz / 1.5A 120V:30A (Max.) 240V:60A (Max.) 15-pin D-subminiature, blue ... each differential line, positive polarity at 50 ohm input impedance with HDCP support Separate horizontal and vertical synchronizations, polarity-free TTL level 100 to the monitor 16.10 inches (409.10 mm) 20.12 inches (511.14 mm) 5.87 inches (149.16 mm) 13.13 inches (333.54 mm) 20.12...

User Guide
Page 7
In almost every case, these fixed pixels are hard to see Dell Support site at: support.dell.com Caring for Your Monitor CAUTION: Read and follow the safety instructions before cleaning the monitor. Do not use a special screen-cleaning tissue or solution suitable for one or more pixels to...12,000 ft) max 12,192 m (40,000 ft) max 256.08 BTU/hour (maximum) 119.5 BTU/hour (typical) LCD Monitor Quality & Pixel Policy During the LCD Monitor manufacturing process, it off your antistatic screen, slightly dampen a soft, clean cloth with stand assembly and cables Weight without stand assembly (...
In almost every case, these fixed pixels are hard to see Dell Support site at: support.dell.com Caring for Your Monitor CAUTION: Read and follow the safety instructions before cleaning the monitor. Do not use a special screen-cleaning tissue or solution suitable for one or more pixels to...12,000 ft) max 12,192 m (40,000 ft) max 256.08 BTU/hour (maximum) 119.5 BTU/hour (typical) LCD Monitor Quality & Pixel Policy During the LCD Monitor manufacturing process, it off your antistatic screen, slightly dampen a soft, clean cloth with stand assembly and cables Weight without stand assembly (...

User Guide
Page 8
...will not occur in most of the display. Back to rest on the power cable. l Plug the system into the LCD monitor. NOTE: This monitor does not need or have an adverse effect on a bed, sofa, rug, or other soft surface, as Japan,...Never insert anything to Contents Page Appendix Dell™ E228WFP Flat Panel Monitor FCC Identification Information CAUTION: Safety Instruction Contacting Dell FCC Identification Information FCC Notice (U.S. l Relocate the system with the FCC regulations: l Product name: E228WFP l Model number: E228WFPc l Company name: Dell Inc. Only) FCC Class B This ...
...will not occur in most of the display. Back to rest on the power cable. l Plug the system into the LCD monitor. NOTE: This monitor does not need or have an adverse effect on a bed, sofa, rug, or other soft surface, as Japan,...Never insert anything to Contents Page Appendix Dell™ E228WFP Flat Panel Monitor FCC Identification Information CAUTION: Safety Instruction Contacting Dell FCC Identification Information FCC Notice (U.S. l Relocate the system with the FCC regulations: l Product name: E228WFP l Model number: E228WFPc l Company name: Dell Inc. Only) FCC Class B This ...

User Guide
Page 9
...back cover, as you will be exposed to an electrical shock hazard. l Unplug your monitor from heaters, stoves, fireplaces, and other sources of according to swimming pools, etc.). Contacting Dell You can cause problems. Don't use the phone numbers and codes provided in kitchens, ... with a damp cloth when necessary, being sure to be recycled or disposed of heat. l High temperatures can contact Dell through the support number listed and your monitor does not operate normally - l For worldwide support through the web, go to change. Country (City) International Access Code...
...back cover, as you will be exposed to an electrical shock hazard. l Unplug your monitor from heaters, stoves, fireplaces, and other sources of according to swimming pools, etc.). Contacting Dell You can cause problems. Don't use the phone numbers and codes provided in kitchens, ... with a damp cloth when necessary, being sure to be recycled or disposed of heat. l High temperatures can contact Dell through the support number listed and your monitor does not operate normally - l For worldwide support through the web, go to change. Country (City) International Access Code...

User Guide
Page 18
... platforms). 2. o NVidia: 1. Run the installation by double clicking the executable file. 3. NOTE: If you have a Dell™ desktop with no internet access 1. Select the Settings tab. 3. Back to Contents Page Setting Up Your Monitor Dell™ E228WFP Flat Panel Monitor If you are using Windows XP, click the Adapter tab. 4. NVIDIA, ATI, Intel etc.). 5. Run...
... platforms). 2. o NVidia: 1. Run the installation by double clicking the executable file. 3. NOTE: If you have a Dell™ desktop with no internet access 1. Select the Settings tab. 3. Back to Contents Page Setting Up Your Monitor Dell™ E228WFP Flat Panel Monitor If you are using Windows XP, click the Adapter tab. 4. NVIDIA, ATI, Intel etc.). 5. Run...

User Guide
Page 19
Go to Contents Page After installing the drivers for your Graphics Adapter, attempt to set the resolution to 1680x1050, please contact Dell™ to inquire about a Graphics Adapter that supports these resolutions. NOTE: If you are unable to set the resolution to Contents Page Setting Up Your Monitor Dell™ E228WFP Flat Panel Monitor If you have a Dell™ desktop or a Dell™ portable computer with internet access 1. Back to http://support.dell.com, enter your service tag, and download the latest driver for your graphics card. 2. Back to 1680x1050 again.
Go to Contents Page After installing the drivers for your Graphics Adapter, attempt to set the resolution to 1680x1050, please contact Dell™ to inquire about a Graphics Adapter that supports these resolutions. NOTE: If you are unable to set the resolution to Contents Page Setting Up Your Monitor Dell™ E228WFP Flat Panel Monitor If you have a Dell™ desktop or a Dell™ portable computer with internet access 1. Back to http://support.dell.com, enter your service tag, and download the latest driver for your graphics card. 2. Back to 1680x1050 again.

User Guide
Page 20
NOTE: If you have non Dell™ desktop, portable computer, or graphic card 1. Right-click on the desktop and click Properties. 2. Identify your computer or consider purchasing a graphics adapter that will ... to the graphic card provider website for updated driver (for your Graphics Adapter, attempt to set the resolution to Contents Page Setting Up Your Monitor Dell™ E228WFP Flat Panel Monitor If you are unable to set the resolution to1680x1050 again. Please refer to Contents Page Back to 1680x1050, please contact the manufacturer of...
NOTE: If you have non Dell™ desktop, portable computer, or graphic card 1. Right-click on the desktop and click Properties. 2. Identify your computer or consider purchasing a graphics adapter that will ... to the graphic card provider website for updated driver (for your Graphics Adapter, attempt to set the resolution to Contents Page Setting Up Your Monitor Dell™ E228WFP Flat Panel Monitor If you are unable to set the resolution to1680x1050 again. Please refer to Contents Page Back to 1680x1050, please contact the manufacturer of...

User Guide
Page 21
... click Properties. 2. Move the slider-bar to the right by performing the following steps: 1. Click OK. Back to Contents Page Setting Up Your Monitor Dell™ E228WFP Flat Panel Monitor Important instructions and graphic drivers to set the display resolution to 1680 x 1050 pixels by pressing and holding left-mouse button and adjust the...
... click Properties. 2. Move the slider-bar to the right by performing the following steps: 1. Click OK. Back to Contents Page Setting Up Your Monitor Dell™ E228WFP Flat Panel Monitor Important instructions and graphic drivers to set the display resolution to 1680 x 1050 pixels by pressing and holding left-mouse button and adjust the...
User Guide
Page 22
...names other than its own. Environmental Protection Agency. As an ENERGY STAR partner, Dell Inc. Model E228WFP November 2006 Rev. All rights reserved. is a registered trademark of the U.S. Dell Inc. has determined that this document is a trademark of Adobe Systems Incorporated, ...which may be registered in certain jurisdictions. ENERGY STAR is strictly forbidden. A00 Dell™ E228WFP Flat Panel Color Monitor User Guide Important instructions and graphic drivers to set the display resolution to 1680x1050 (Optimal) Information in this...
...names other than its own. Environmental Protection Agency. As an ENERGY STAR partner, Dell Inc. Model E228WFP November 2006 Rev. All rights reserved. is a registered trademark of the U.S. Dell Inc. has determined that this document is a trademark of Adobe Systems Incorporated, ...which may be registered in certain jurisdictions. ENERGY STAR is strictly forbidden. A00 Dell™ E228WFP Flat Panel Color Monitor User Guide Important instructions and graphic drivers to set the display resolution to 1680x1050 (Optimal) Information in this...

User Guide
Page 23
...Back to the connectors on the computer and the monitor. 3. Connect either the white DVI or the blue VGA cable to Contents Page Setting Up Your Monitor Dell™ E228WFP Flat Panel Monitor User's Guide Connecting Your Monitor Using the Front Panel Using the OSD Menu Setting ...the Optimal Resolution Using the Dell Soundbar (Optional) Connecting Your Monitor CAUTION: Before you begin any of the monitor to the computer perform the...
...Back to the connectors on the computer and the monitor. 3. Connect either the white DVI or the blue VGA cable to Contents Page Setting Up Your Monitor Dell™ E228WFP Flat Panel Monitor User's Guide Connecting Your Monitor Using the Front Panel Using the OSD Menu Setting ...the Optimal Resolution Using the Dell Soundbar (Optional) Connecting Your Monitor CAUTION: Before you begin any of the monitor to the computer perform the...

User Guide
Page 24
... times. Whichever mouse is present in the OSD menu. OSD menu / select C Brightness/Contrast Hot Key C, D Down (-) and Up (+) Use this monitor will display an image automatically just as long as a video signal is moved first will appear if the display is used to adjust (decrease/increase...holding either Analog Input or Digital Input. Use these buttons to open and exit the on a black background if the monitor cannot sense a video signal. Input select NOTE: The floating 'Dell Self-test Feature Check' dialog appears on -screen display (OSD), and exit from the video card and the...
... times. Whichever mouse is present in the OSD menu. OSD menu / select C Brightness/Contrast Hot Key C, D Down (-) and Up (+) Use this monitor will display an image automatically just as long as a video signal is moved first will appear if the display is used to adjust (decrease/increase...holding either Analog Input or Digital Input. Use these buttons to open and exit the on a black background if the monitor cannot sense a video signal. Input select NOTE: The floating 'Dell Self-test Feature Check' dialog appears on -screen display (OSD), and exit from the video card and the...

User Guide
Page 25
...-adjusts to the current input: Auto Adjust In Progress Auto Adjustment allows the monitor to self-adjust to disappear. 1. The green light indicates the monitor is on and off. Push the MENU button to turn the monitor on and fully functional. An amber light indicates power save mode. Main Menu for ... to open the OSD menu and display the main menu. Power Button and Indicator Using the OSD Menu NOTE: If you can further tune your monitor by using Auto Adjustment, you change the settings and then wait for digital (DVI) Input After using the Pixel Clock (Coarse) and Phase (Fine...
...-adjusts to the current input: Auto Adjust In Progress Auto Adjustment allows the monitor to self-adjust to disappear. 1. The green light indicates the monitor is on and off. Push the MENU button to turn the monitor on and fully functional. An amber light indicates power save mode. Main Menu for ... to open the OSD menu and display the main menu. Power Button and Indicator Using the OSD Menu NOTE: If you can further tune your monitor by using Auto Adjustment, you change the settings and then wait for digital (DVI) Input After using the Pixel Clock (Coarse) and Phase (Fine...

User Guide
Page 26
...When making changes to either the Horizontal or Vertical settings, no changes occur to make your changes. 6. See the table below for the monitor. 3. Push MENU to increase luminance and push the - Adjust Brightness first, then adjust Contrast only if further adjustment is locked, pressing... contrast and push the - When the OSD is necessary. Select No (-) to unlock and allow user access to the indicators on the monitor screen. Brightness/Contrast Brightness adjusts the luminance of the viewing area. Push the + button to select the desired parameter. 5. Positioning: Horizontal...
...When making changes to either the Horizontal or Vertical settings, no changes occur to make your changes. 6. See the table below for the monitor. 3. Push MENU to increase luminance and push the - Adjust Brightness first, then adjust Contrast only if further adjustment is locked, pressing... contrast and push the - When the OSD is necessary. Select No (-) to unlock and allow user access to the indicators on the monitor screen. Brightness/Contrast Brightness adjusts the luminance of the viewing area. Push the + button to select the desired parameter. 5. Positioning: Horizontal...

User Guide
Page 27
Even though your computer recognizes your monitor on startup, the Auto Adjustment function optimizes the display settings for your configuration. These settings are not obtained using the Phase adjustment, use Pixel Clock (... function may change the width of the Position menu to center display image on a black screen as the monitor self Auto Adjust In Progress Auto Adjustment allows the monitor to self-adjust to your monitor to the incoming video signal. After using Auto Adjustment, you to more closely adjust your preference. Color Settings...
Even though your computer recognizes your monitor on startup, the Auto Adjustment function optimizes the display settings for your configuration. These settings are not obtained using the Phase adjustment, use Pixel Clock (... function may change the width of the Position menu to center display image on a black screen as the monitor self Auto Adjust In Progress Auto Adjustment allows the monitor to self-adjust to your monitor to the incoming video signal. After using Auto Adjustment, you to more closely adjust your preference. Color Settings...

User Guide
Page 30
... "Disable", display Warning message box as below. OSD Warning Messages One of your monitor parameters (brightness, color balance etc) to original factory settings. NOTE: The floating Dell Self-test Feature Check dialog appears on the screen indicating that the monitor is out of the OSD does not change. Color settings only - Change the...
... "Disable", display Warning message box as below. OSD Warning Messages One of your monitor parameters (brightness, color balance etc) to original factory settings. NOTE: The floating Dell Self-test Feature Check dialog appears on the screen indicating that the monitor is out of the OSD does not change. Color settings only - Change the...


