
Dell Monitor Quick Start Guide
Page 1
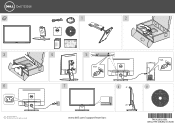
.... .AAll 746.A1201.0001 (DELL P/N:CWJ8G rev.A00) rlligrihgtshtrserseesrevrevde.d. All 4 5 1 VGA 2 7 Printed in China. © 2015 Dell Inc. E2016 3 6 1 Drivers and Documentation Dell™ E2016 Monitor Drivers and Documentation Contents: • Device drivers • Quick Setup Guide • User's Guide • Dell Display Manager Software Contents: • Device drivers • Quick Setup Guide • User's Guide • Dell Display Manager Software PPPP////NNNNMMJ7XX7aauJ9M9Mddun006e6ele..JyJAAiHiHn1n122220RCR0C331e1ehh9955vvii.n.n..00aaA0A000001001 ©...
.... .AAll 746.A1201.0001 (DELL P/N:CWJ8G rev.A00) rlligrihgtshtrserseesrevrevde.d. All 4 5 1 VGA 2 7 Printed in China. © 2015 Dell Inc. E2016 3 6 1 Drivers and Documentation Dell™ E2016 Monitor Drivers and Documentation Contents: • Device drivers • Quick Setup Guide • User's Guide • Dell Display Manager Software Contents: • Device drivers • Quick Setup Guide • User's Guide • Dell Display Manager Software PPPP////NNNNMMJ7XX7aauJ9M9Mddun006e6ele..JyJAAiHiHn1n122220RCR0C331e1ehh9955vvii.n.n..00aaA0A000001001 ©...

Dell Monitor Users Guide
Page 3
Contents About Your Monitor 5 Package Contents 5 Product Features 6 Identifying Parts and Controls 7 Monitor Specifications 8 Plug-and-Play 14 LCD Monitor Quality and Pixel Policy 14 Setting Up the Monitor 15 Attaching the Stand 15 Attaching the Vesa Cover 17 Connecting Your Monitor 17 Organizing Your Cables 18 Removing the Vesa Cover 18 Removing the Monitor Stand 19 Wall Mounting (Optional 20 Operating the Monitor 21 Turning on the Monitor 21 Using the Front Panel Controls 21 Using the On-Screen Display (OSD) Menu 23 Using Tilt 34 Contents | 3
Contents About Your Monitor 5 Package Contents 5 Product Features 6 Identifying Parts and Controls 7 Monitor Specifications 8 Plug-and-Play 14 LCD Monitor Quality and Pixel Policy 14 Setting Up the Monitor 15 Attaching the Stand 15 Attaching the Vesa Cover 17 Connecting Your Monitor 17 Organizing Your Cables 18 Removing the Vesa Cover 18 Removing the Monitor Stand 19 Wall Mounting (Optional 20 Operating the Monitor 21 Turning on the Monitor 21 Using the Front Panel Controls 21 Using the On-Screen Display (OSD) Menu 23 Using Tilt 34 Contents | 3
Dell Monitor Users Guide
Page 6
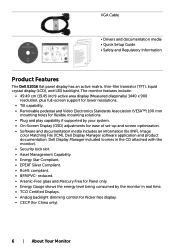
...; On-Screen Display (OSD) adjustments for China only). 6 | About Your Monitor VGA Cable • Drivers and documentation media • Quick Setup Guide • Safety and Regulatory Information Product Features The Dell E2016 flat panel display has an active matrix, thin-film transistor (TFT), liquid crystal display (LCD), and LED backlight. Dell Display Manager included (comes in real time. • TCO Certified Displays. • Analog backlight dimming control for flicker free display. • CECP (for ease of set-up and screen optimization. • Software and...
...; On-Screen Display (OSD) adjustments for China only). 6 | About Your Monitor VGA Cable • Drivers and documentation media • Quick Setup Guide • Safety and Regulatory Information Product Features The Dell E2016 flat panel display has an active matrix, thin-film transistor (TFT), liquid crystal display (LCD), and LED backlight. Dell Display Manager included (comes in real time. • TCO Certified Displays. • Analog backlight dimming control for flicker free display. • CECP (for ease of set-up and screen optimization. • Software and...
Dell Monitor Users Guide
Page 7
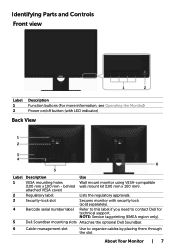
... VESA cover) Regulatory label Security-lock slot Barcode serial number label Dell Soundbar mounting slots Use Wall mount monitor using VESA‑compatible wall mount kit (100 mm x 100 mm). NOTE: Service tag printing (EMEA region only). Refer to this label if you need to organize cables by placing them through the slot. Identifying Parts and Controls Front view Label 1 2 Description Function buttons (For more information, see Operating the Monitor) Power on/off button (with security lock...
... VESA cover) Regulatory label Security-lock slot Barcode serial number label Dell Soundbar mounting slots Use Wall mount monitor using VESA‑compatible wall mount kit (100 mm x 100 mm). NOTE: Service tag printing (EMEA region only). Refer to this label if you need to organize cables by placing them through the slot. Identifying Parts and Controls Front view Label 1 2 Description Function buttons (For more information, see Operating the Monitor) Power on/off button (with security lock...

Dell Monitor Users Guide
Page 8
Monitor Specifications Flat Panel Specifications Screen type Panel type Viewable image: Diagonal Active Area: Horizontal Vertical Area Pixel pitch Viewing angle: Horizontal Vertical Luminance output Contrast ratio Active matrix - Bottom View Label Description 1 AC power connector 2 VGA port Use To connect the monitor power cable. TFT LCD In-plane switching type 49.40 cm (19.45 inches) 418.61 mm (16.48 inches) 262.35 mm (10.33 inches) 109821.81 mm2 (170.22 inch2) 0.2915 mm x 0.2915 mm 178° (typical...
Monitor Specifications Flat Panel Specifications Screen type Panel type Viewable image: Diagonal Active Area: Horizontal Vertical Area Pixel pitch Viewing angle: Horizontal Vertical Luminance output Contrast ratio Active matrix - Bottom View Label Description 1 AC power connector 2 VGA port Use To connect the monitor power cable. TFT LCD In-plane switching type 49.40 cm (19.45 inches) 418.61 mm (16.48 inches) 262.35 mm (10.33 inches) 109821.81 mm2 (170.22 inch2) 0.2915 mm x 0.2915 mm 178° (typical...

Dell Monitor Users Guide
Page 11
... (typical) Power Management Modes If you have VESA's DPM-compliant video card or software installed in your PC, the monitor can automatically reduce its power consumption when not in use. Off Less than 0.3 W (blinking slowly) - - If the computer detects input from the keyboard, mouse, or other input devices, the monitor automatically resumes functioning. The following table shows the power consumption and signaling of this automatic power saving feature...
... (typical) Power Management Modes If you have VESA's DPM-compliant video card or software installed in your PC, the monitor can automatically reduce its power consumption when not in use. Off Less than 0.3 W (blinking slowly) - - If the computer detects input from the keyboard, mouse, or other input devices, the monitor automatically resumes functioning. The following table shows the power consumption and signaling of this automatic power saving feature...

Dell Monitor Users Guide
Page 22
...;Panel Button 1 Description Use this button to directly access the "Brightness/ Contrast" menu. Front‑Panel Button Use the buttons on and off. Exit 5 Use the Power button to turn the monitor on the front of preset color modes. Use the Back button to go back to adjust the image settings. Shortcut key : Brightness/Contrast 3 Use this button to go back to launch the on and fully (with power light indicator) functional. A blinking white LED indicates DPMS power save mode. Power The White LED indicates the monitor is on -screen display (OSD...
...;Panel Button 1 Description Use this button to directly access the "Brightness/ Contrast" menu. Front‑Panel Button Use the buttons on and off. Exit 5 Use the Power button to turn the monitor on the front of preset color modes. Use the Back button to go back to adjust the image settings. Shortcut key : Brightness/Contrast 3 Use this button to go back to launch the on and fully (with power light indicator) functional. A blinking white LED indicates DPMS power save mode. Power The White LED indicates the monitor is on -screen display (OSD...

Dell Monitor Users Guide
Page 26
Input Color Format Allows you to set the video input mode to: RGB: Select this option if your monitor is connected to adjust the color setting mode. YPbPr: Select this option if your DVD player supports only YPbPr output. 26 | Operating the Monitor Icon Menu and Submenus Color Description Use the Color menu to a computer (or DVD player) using the VGA cable.
Input Color Format Allows you to set the video input mode to: RGB: Select this option if your monitor is connected to adjust the color setting mode. YPbPr: Select this option if your DVD player supports only YPbPr output. 26 | Operating the Monitor Icon Menu and Submenus Color Description Use the Color menu to a computer (or DVD player) using the VGA cable.
Dell Monitor Users Guide
Page 27
... the Monitor | 27 Icon Menu and Submenus Preset Mode Description When you select Preset Modes, you to manually adjust the color settings. Blend the text background to the factory defaults. The screen appears cooler with a red/yellow tint. • Cool: Decreases the color temperature. Reset Color Resets your own preset color mode. Press the and buttons to adjust the Red, Green, and Blue values and create your monitor's color settings to simulate paper media without affecting color images...
... the Monitor | 27 Icon Menu and Submenus Preset Mode Description When you select Preset Modes, you to manually adjust the color settings. Blend the text background to the factory defaults. The screen appears cooler with a red/yellow tint. • Cool: Decreases the color temperature. Reset Color Resets your own preset color mode. Press the and buttons to adjust the Red, Green, and Blue values and create your monitor's color settings to simulate paper media without affecting color images...

Dell Monitor Users Guide
Page 30
... Set the OSD display to change the menu transparency by using and (min. 0 / max. 100). When Lock is selected, no user adjustments are locked. Timer Lock OSD Hold Time: Sets the length of time the OSD remains active after you press a button. NOTE: Lock function - All buttons are allowed. Select this option to adjustments. Either soft lock (through OSD menu) or hard lock (Press and hold the button left power button for 6 sec) Reset Menu Restore the menu settings...
... Set the OSD display to change the menu transparency by using and (min. 0 / max. 100). When Lock is selected, no user adjustments are locked. Timer Lock OSD Hold Time: Sets the length of time the OSD remains active after you press a button. NOTE: Lock function - All buttons are allowed. Select this option to adjustments. Either soft lock (through OSD menu) or hard lock (Press and hold the button left power button for 6 sec) Reset Menu Restore the menu settings...

Dell Monitor Users Guide
Page 31
Operating the Monitor | 31 Reset Restores shortcut keys to adjust the OSD settings, such as shortcut key. Personalization Other Select this option to factory defaults. Icon Menu and Submenus Personalize Description Select from Preset Modes, Brightness/Contrast, Auto Adjust and Aspect Ratio set as the DDC/CI, LCD conditioning, and so on.
Operating the Monitor | 31 Reset Restores shortcut keys to adjust the OSD settings, such as shortcut key. Personalization Other Select this option to factory defaults. Icon Menu and Submenus Personalize Description Select from Preset Modes, Brightness/Contrast, Auto Adjust and Aspect Ratio set as the DDC/CI, LCD conditioning, and so on.

Dell Monitor Users Guide
Page 32
... you to adjust the monitor settings using software on Conditioning the degree of image retention. Select Disable to turn off this feature for best user experience and optimum performance of your computer. Enable this feature. Select Enable to factory defaults. Depending on your monitor. LCD Helps reduce minor cases of image retention, the program may take some time to the factory defaults. 32 | Operating the Monitor Factory Reset Restores all OSD settings to...
... you to adjust the monitor settings using software on Conditioning the degree of image retention. Select Disable to turn off this feature for best user experience and optimum performance of your computer. Enable this feature. Select Enable to factory defaults. Depending on your monitor. LCD Helps reduce minor cases of image retention, the program may take some time to the factory defaults. 32 | Operating the Monitor Factory Reset Restores all OSD settings to...

Dell Monitor Users Guide
Page 35
... monitor is working correctly. Troubleshooting WARNING: Before you use the previous procedure, check your video controller and computer, because your monitor is functioning properly. Troubleshooting | 35 While in this section, follow the Safety Instructions. If your monitor and computer are properly connected but the monitor screen remains dark, run the monitor self-test by performing the following steps: 1 Turn off your monitor and reconnect the video cable; If your monitor screen...
... monitor is working correctly. Troubleshooting WARNING: Before you use the previous procedure, check your video controller and computer, because your monitor is functioning properly. Troubleshooting | 35 While in this section, follow the Safety Instructions. If your monitor and computer are properly connected but the monitor screen remains dark, run the monitor self-test by performing the following steps: 1 Turn off your monitor and reconnect the video cable; If your monitor screen...

Dell Monitor Users Guide
Page 36
... monitor is functioning properly. The color of the computer or monitor. A gray screen appears. 4 Carefully inspect the screen for 2 seconds. The monitor then goes into the self-test mode. 3 Press and hold Button 1 and Button 4 on the front panel simultaneously for abnormalities. 5 Press Button 4 on the surface of the screen). 2 Unplug the video cable(s) from the back of the screen changes to inspect the display in green, blue, black, white, and text screens...
... monitor is functioning properly. The color of the computer or monitor. A gray screen appears. 4 Carefully inspect the screen for 2 seconds. The monitor then goes into the self-test mode. 3 Press and hold Button 1 and Button 4 on the front panel simultaneously for abnormalities. 5 Press Button 4 on the surface of the screen). 2 Unplug the video cable(s) from the back of the screen changes to inspect the display in green, blue, black, white, and text screens...
Dell Monitor Users Guide
Page 37
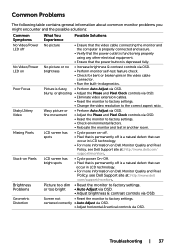
... OSD. • Perform monitor self-test feature check. • Check for bent or broken pins in the video cable connector. • Run the built-in diagnostics. com/support/monitors. No Video/Power LED on No picture or no brightness • Increase brightness & contrast controls via OSD. • Reset the monitor to the correct aspect ratio. or too bright • Auto Adjust via OSD. • Adjust brightness & contrast controls via OSD. • Eliminate video extension cables. • Reset the monitor to factory settings. • Change the video resolution to factory settings...
... OSD. • Perform monitor self-test feature check. • Check for bent or broken pins in the video cable connector. • Run the built-in diagnostics. com/support/monitors. No Video/Power LED on No picture or no brightness • Increase brightness & contrast controls via OSD. • Reset the monitor to the correct aspect ratio. or too bright • Auto Adjust via OSD. • Adjust brightness & contrast controls via OSD. • Eliminate video extension cables. • Reset the monitor to factory settings. • Change the video resolution to factory settings...
Dell Monitor Users Guide
Page 38
... Dell immediately. Wrong Color Picture color not good • Change the settings of smoke or sparks • Reset the monitor to determine if the scrambled screen appears in self-test mode. • Check for bent or broken pins in the video cable connector. • Run the built-in the video cable connector. on & off the static image the monitor at all times when not in use a dynamically changing screensaver. 38 | Troubleshooting Intermittent Problems Monitor...
... Dell immediately. Wrong Color Picture color not good • Change the settings of smoke or sparks • Reset the monitor to determine if the scrambled screen appears in self-test mode. • Check for bent or broken pins in the video cable connector. • Run the built-in the video cable connector. on & off the static image the monitor at all times when not in use a dynamically changing screensaver. 38 | Troubleshooting Intermittent Problems Monitor...

Dell Monitor Users Guide
Page 39
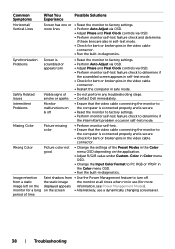
... in the power saving mode by moving the mouse or pressing any key on the monitor. • Check whether the OSD menu is plugged in the Display menu OSD. • Reset the monitor to unlock (for 6 seconds to factory settings. • Turn off the monitor, unplug the monitor power cable, plug it back, and then turn on the keyboard. • Check whether the signal cable is locked. If yes, press and hold the button beside the power button for more...
... in the power saving mode by moving the mouse or pressing any key on the monitor. • Check whether the OSD menu is plugged in the Display menu OSD. • Reset the monitor to unlock (for 6 seconds to factory settings. • Turn off the monitor, unplug the monitor power cable, plug it back, and then turn on the keyboard. • Check whether the signal cable is locked. If yes, press and hold the button beside the power button for more...
Dell Monitor Users Guide
Page 41
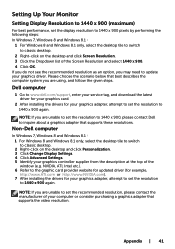
....NVIDIA.com). 7 After installing the drivers for your graphics adapter, attempt to set the recommended resolution, please contact the manufacturer of your graphics adapter, attempt to set the resolution to 1440 x 900 again. Appendix | 41 Setting Up Your Monitor Setting Display Resolution to 1440 x 900 (maximum) For best performance, set the resolution to 1440 x 900, please contact Dell to inquire about a graphics adapter that supports the video resolution. NOTE: If you...
....NVIDIA.com). 7 After installing the drivers for your graphics adapter, attempt to set the recommended resolution, please contact the manufacturer of your graphics adapter, attempt to set the resolution to 1440 x 900 again. Appendix | 41 Setting Up Your Monitor Setting Display Resolution to 1440 x 900 (maximum) For best performance, set the resolution to 1440 x 900, please contact Dell to inquire about a graphics adapter that supports the video resolution. NOTE: If you...
Dell Display Manager Users Guide
Page 4
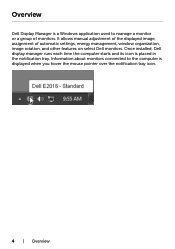
Overview Dell Display Manager is a Windows application used to the computer is placed in the notification tray. Information about monitors connected to manage a monitor or a group of automatic settings, energy management, window organization, image rotation, and other features on select Dell monitors. It allows manual adjustment of the displayed image, assignment of monitors. Once installed, Dell display manager runs each time the computer starts and its icon is displayed when you hover the mouse pointer over the notification tray icon. 4 | Overview
Overview Dell Display Manager is a Windows application used to the computer is placed in the notification tray. Information about monitors connected to manage a monitor or a group of automatic settings, energy management, window organization, image rotation, and other features on select Dell monitors. It allows manual adjustment of the displayed image, assignment of monitors. Once installed, Dell display manager runs each time the computer starts and its icon is displayed when you hover the mouse pointer over the notification tray icon. 4 | Overview

Dell Display Manager Users Guide
Page 7
... vary from one monitor to the assignment list, simply drag the application from the desktop, Windows Start Menu, or elsewhere, and drop it automatically. The preset mode assigned to a particular application may be ineffective. Assigning Preset Modes to associate a specific preset mode with a specific application, and apply it onto the current list. When Auto Mode is enabled, Dell Display Manager automatically switches to the...
... vary from one monitor to the assignment list, simply drag the application from the desktop, Windows Start Menu, or elsewhere, and drop it automatically. The preset mode assigned to a particular application may be ineffective. Assigning Preset Modes to associate a specific preset mode with a specific application, and apply it onto the current list. When Auto Mode is enabled, Dell Display Manager automatically switches to the...


