User's Guide
Page 1
... names may be used in this text: Dell and the DELL logo are trademarks of Dell Inc.; Microsoft a n d Windows are not followed. Model E1912Hf/E1912Hc April 2011 Rev. ENERGY STAR is strictly forbidden. disclaims any proprietary interest in any manner whatsoever without notice. © 2011 Dell Inc. Dell™ E1912H Monitor User's Guide About Your Monitor Setting Up the Monitor Operating the Monitor Troubleshooting Appendix Notes...
... names may be used in this text: Dell and the DELL logo are trademarks of Dell Inc.; Microsoft a n d Windows are not followed. Model E1912Hf/E1912Hc April 2011 Rev. ENERGY STAR is strictly forbidden. disclaims any proprietary interest in any manner whatsoever without notice. © 2011 Dell Inc. Dell™ E1912H Monitor User's Guide About Your Monitor Setting Up the Monitor Operating the Monitor Troubleshooting Appendix Notes...

User's Guide
Page 2
... may not ship with all the components and Contact Dell™ if anything is missing. l Monitor l Stand Riser l Stand Base l Power Cable l VGA Cable (attached to Contents Page About Your Monitor Dell™ E1912H Monitor User's Guide Package Contents Product Features Identifying Parts and Controls Monitor Specifications Plug and Play Capability LCD Monitor Quality & Pixel Policy Maintenance Guidelines Package Contents Your monitor ships with your monitor. NOTE: Some items may be optional and may not...
... may not ship with all the components and Contact Dell™ if anything is missing. l Monitor l Stand Riser l Stand Base l Power Cable l VGA Cable (attached to Contents Page About Your Monitor Dell™ E1912H Monitor User's Guide Package Contents Product Features Identifying Parts and Controls Monitor Specifications Plug and Play Capability LCD Monitor Quality & Pixel Policy Maintenance Guidelines Package Contents Your monitor ships with your monitor. NOTE: Some items may be optional and may not...
User's Guide
Page 3
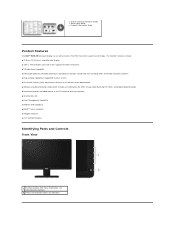
... screen optimization. ■ Software and documentation media which includes an information file (INF), Image Color Matching File (ICM), and product documentation. ■ PowerNap Software included (comes in the CD attached with LED indicator) l Drivers and Documentation media l Quick Setup Guide l Product Information Guide Product Features The Dell™ E1912H flat panel display has an active matrix, Thin-Film Transistor, Liquid Crystal Display. Power On/Off button (with the monitor). ■ Security lock...
... screen optimization. ■ Software and documentation media which includes an information file (INF), Image Color Matching File (ICM), and product documentation. ■ PowerNap Software included (comes in the CD attached with LED indicator) l Drivers and Documentation media l Quick Setup Guide l Product Information Guide Product Features The Dell™ E1912H flat panel display has an active matrix, Thin-Film Transistor, Liquid Crystal Display. Power On/Off button (with the monitor). ■ Security lock...
User's Guide
Page 5
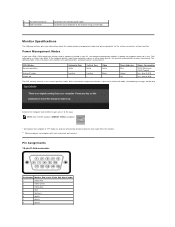
... OSD. If the computer detects input from the monitor. ** Maximum power consumption with max luminance and contrast. NOTE: Dell E1912H monitor is ENERGY STAR®-compliant. * Zero power consumption in the normal operation mode. Monitor Specifications The following messages will only function in OFF mode can only be displayed: Activate the computer and monitor to gain access to the monitor using a VGA cable. Vertical Sync Active Inactive - 1 AC power connector 2 VGA connector To connect the monitor power cable. Power Indicator Blue...
... OSD. If the computer detects input from the monitor. ** Maximum power consumption with max luminance and contrast. NOTE: Dell E1912H monitor is ENERGY STAR®-compliant. * Zero power consumption in the normal operation mode. Monitor Specifications The following messages will only function in OFF mode can only be displayed: Activate the computer and monitor to gain access to the monitor using a VGA cable. Vertical Sync Active Inactive - 1 AC power connector 2 VGA connector To connect the monitor power cable. Power Indicator Blue...

User's Guide
Page 6
...Electrical Specifications Model number Dell E1912H monitor Video input signals Analog RGB: 0.7 Volts +/- 5 %, 75 ohm input impedance Synchronization input signals Separate horizontal and vertical synchronizations, polarity-free TTL level, SOG (Composite SYNC on green) 100 VAC to white) 16.7 mil colors 82 % (typical) * * [E1912H] color gamut (typical) is based on CIE1976 (82 %) and CIE1931 (72 %) test standards. TFT LCD TN 47.0 cm (18.5 inches) (18.5-inch wide viewable image size) 409.8 mm (16.14 inches) 230.4 mm (9.07 inches) Pixel pitch Viewing angle: l Horizontal l Vertical 0.300...
...Electrical Specifications Model number Dell E1912H monitor Video input signals Analog RGB: 0.7 Volts +/- 5 %, 75 ohm input impedance Synchronization input signals Separate horizontal and vertical synchronizations, polarity-free TTL level, SOG (Composite SYNC on green) 100 VAC to white) 16.7 mil colors 82 % (typical) * * [E1912H] color gamut (typical) is based on CIE1976 (82 %) and CIE1931 (72 %) test standards. TFT LCD TN 47.0 cm (18.5 inches) (18.5-inch wide viewable image size) 409.8 mm (16.14 inches) 230.4 mm (9.07 inches) Pixel pitch Viewing angle: l Horizontal l Vertical 0.300...

User's Guide
Page 7
....0 85.5 Sync Polarity (Horizontal/Vertical) Physical Characteristics The following table lists the environmental conditions for your monitor: Model Number Temperature Dell E1912H monitor no cables) Weight of stand assembly 3.94 kg (8.69 lb) 3.26 kg (7.19 lb) 2.64 kg (5.82 lb) 0.33 kg (0.73 lb) Environmental Characteristics The following table lists the monitor's physical characteristics: Model Number Connector type Signal cable type Dimensions: (with stand) l Height l Width l Depth Dell E1912H monitor D-subminiature, blue connector Analog: Detachable...
....0 85.5 Sync Polarity (Horizontal/Vertical) Physical Characteristics The following table lists the environmental conditions for your monitor: Model Number Temperature Dell E1912H monitor no cables) Weight of stand assembly 3.94 kg (8.69 lb) 3.26 kg (7.19 lb) 2.64 kg (5.82 lb) 0.33 kg (0.73 lb) Environmental Characteristics The following table lists the monitor's physical characteristics: Model Number Connector type Signal cable type Dimensions: (with stand) l Height l Width l Depth Dell E1912H monitor D-subminiature, blue connector Analog: Detachable...

User's Guide
Page 8
... a "bright dot." The visible result is a fixed pixel that the system can select different settings if required. When the pixel remains black, it off your monitor with a cloth. CAUTION: Before cleaning the monitor, unplug the monitor power cable from display quality or usability. For best practices, follow the safety instructions before cleaning the monitor. l Use a slightly dampened, warm cloth to Contents Page l To help maintain the best image quality on your monitor, use...
... a "bright dot." The visible result is a fixed pixel that the system can select different settings if required. When the pixel remains black, it off your monitor with a cloth. CAUTION: Before cleaning the monitor, unplug the monitor power cable from display quality or usability. For best practices, follow the safety instructions before cleaning the monitor. l Use a slightly dampened, warm cloth to Contents Page l To help maintain the best image quality on your monitor, use...

User's Guide
Page 9
...-down menu at www.dell.com\regulatory_compliance. This device complies with Part 15 of controls, adjustments, or procedures other regulatory information, see the Product Information Guide. Verify your purchase invoice, packing slip, bill, or Dell product ...Dell™ E1912H Monitor User's Guide Safety Instructions FCC Notice (U.S. Availability varies by country and product, and some services may cause undesired operation Contacting Dell For customers in your need. 5. Back to Contents Page Visit support.dell.com. 2. NOTE: If you do not have an active Internet connection...
...-down menu at www.dell.com\regulatory_compliance. This device complies with Part 15 of controls, adjustments, or procedures other regulatory information, see the Product Information Guide. Verify your purchase invoice, packing slip, bill, or Dell product ...Dell™ E1912H Monitor User's Guide Safety Instructions FCC Notice (U.S. Availability varies by country and product, and some services may cause undesired operation Contacting Dell For customers in your need. 5. Back to Contents Page Visit support.dell.com. 2. NOTE: If you do not have an active Internet connection...
User's Guide
Page 12
... Change Display Settings. 3. Identify your graphics controller supplier from the description at the top of the window (e.g. Identify your Graphics Adapter, attempt to set the resolution to 1366 x 768 again. NVIDIA, ATI, Intel etc.). 5. Please refer to the graphics card provider website for updated driver (for your computer or consider purchasing a graphics adapter that will support the video resolution of 1366 x 768. After installing the drivers for...
... Change Display Settings. 3. Identify your graphics controller supplier from the description at the top of the window (e.g. Identify your Graphics Adapter, attempt to set the resolution to 1366 x 768 again. NVIDIA, ATI, Intel etc.). 5. Please refer to the graphics card provider website for updated driver (for your computer or consider purchasing a graphics adapter that will support the video resolution of 1366 x 768. After installing the drivers for...
User's Guide
Page 13
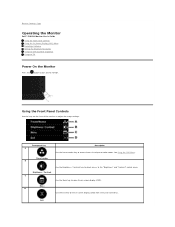
...Use the Brightness / Contrast key to direct access to open the on the monitor. Front panel Key A Preset modes B Description Use the Preset modes key to turn on -screen display (OSD). See Using the OSD Menu. Brightness / Contrast C Use the Menu key to the "Brightness" and "Contrast" control menu. Back to Contents Page Operating the Monitor Dell™ E1912H Monitor User's Guide Using the Front Panel Controls Using the On-Screen Display (OSD) Menu PowerNap Software Setting the Maximum Resolution Using the Dell Soundbar (Optional) Using the Tilt Power On the Monitor Press the button...
...Use the Brightness / Contrast key to direct access to open the on the monitor. Front panel Key A Preset modes B Description Use the Preset modes key to turn on -screen display (OSD). See Using the OSD Menu. Brightness / Contrast C Use the Menu key to the "Brightness" and "Contrast" control menu. Back to Contents Page Operating the Monitor Dell™ E1912H Monitor User's Guide Using the Front Panel Controls Using the On-Screen Display (OSD) Menu PowerNap Software Setting the Maximum Resolution Using the Dell Soundbar (Optional) Using the Tilt Power On the Monitor Press the button...

User's Guide
Page 16
...) controls under Image Settings. NOTE: Auto Adjust does not occur if you to set the video input mode to choose from a list of preset color modes. Input Color Format Preset Modes Allows you press the button while there are no active video input signals or attached cables. l YPbPr: Select this option if your monitor is connected to the incoming video signal. The following dialog appears on a black screen as the monitor self current input: COLOR SETTINGS Auto Adjustment allows the monitor to...
...) controls under Image Settings. NOTE: Auto Adjust does not occur if you to set the video input mode to choose from a list of preset color modes. Input Color Format Preset Modes Allows you press the button while there are no active video input signals or attached cables. l YPbPr: Select this option if your monitor is connected to the incoming video signal. The following dialog appears on a black screen as the monitor self current input: COLOR SETTINGS Auto Adjustment allows the monitor to...

User's Guide
Page 17
... the color temperature. DISPLAY SETTINGS Use the Displays Settings menu to adjust image left and right. Minimum is '100' (+). Pixel Clock The Phase and Pixel Clock adjustments allow you to the factory defaults. Use or buttons to adjust image up and down. Aspect Ratio Horizontal Position Adjusts the image ratio as Wide 16:9, 4:3, or 5:4. Vertical Position Use the or buttons to adjust for best image quality. Reset Color Settings Resets your own preset color mode. NOTE: Wide 16:9 adjustment is '0' (-). Minimum is not required at maximum preset resolution 1366...
... the color temperature. DISPLAY SETTINGS Use the Displays Settings menu to adjust image left and right. Minimum is '100' (+). Pixel Clock The Phase and Pixel Clock adjustments allow you to the factory defaults. Use or buttons to adjust image up and down. Aspect Ratio Horizontal Position Adjusts the image ratio as Wide 16:9, 4:3, or 5:4. Vertical Position Use the or buttons to adjust for best image quality. Reset Color Settings Resets your own preset color mode. NOTE: Wide 16:9 adjustment is '0' (-). Minimum is not required at maximum preset resolution 1366...

User's Guide
Page 18
... eight languages: English, Spanish, French, German, Japanese, Brazilian Portuguese, Simplified Chinese or Russian. Enable (Default): Optimizes the performance of image retention. If an image appears to all applicable settings. NOTE: Use LCD Conditioning only when you to set the OSD display to help reduce minor cases of your computer to the OSD settings menu, with image retention. Allows you directly to adjust the monitor display settings like the brightness, color balance etc. Controls user access...
... eight languages: English, Spanish, French, German, Japanese, Brazilian Portuguese, Simplified Chinese or Russian. Enable (Default): Optimizes the performance of image retention. If an image appears to all applicable settings. NOTE: Use LCD Conditioning only when you to set the OSD display to help reduce minor cases of your computer to the OSD settings menu, with image retention. Allows you directly to adjust the monitor display settings like the brightness, color balance etc. Controls user access...

User's Guide
Page 21
... selected input: If VGA cable is not connected, a floating dialog box as shown below appears. The Power Saving mode allows user to select either "Screen dim" or " Sleep" when your PC goes to the OSD. monitor goes into the sleep mode when the PC is a new update. OS support: Windows XP (32 and 64 bits), Vista (32 and 64 bits), Windows 7 (32 and 64 bits) Video interface support: VGA and DVI only. See Solving Problems...
... selected input: If VGA cable is not connected, a floating dialog box as shown below appears. The Power Saving mode allows user to select either "Screen dim" or " Sleep" when your PC goes to the OSD. monitor goes into the sleep mode when the PC is a new update. OS support: Windows XP (32 and 64 bits), Vista (32 and 64 bits), Windows 7 (32 and 64 bits) Video interface support: VGA and DVI only. See Solving Problems...

User's Guide
Page 22
... adjust the screen resolution to http://www.support.dell.com 2. Headphone connectors 3. Go to 1366 x 768. 4. Click OK. PowerNap Application 4. The Soundbar has a rotary volume and on/off control to support.dell.com, enter your service tag, and download the latest driver for your computer and download the latest graphic drivers. ¡ Go to update your Monitor Model - Select the Settings tab. 3. Select "Monitor Drivers" under "Drivers and downloads" tab 3. Power/Volume control Using the Tilt Tilt Depending on Dell Flat Panel Displays...
... adjust the screen resolution to http://www.support.dell.com 2. Headphone connectors 3. Go to 1366 x 768. 4. Click OK. PowerNap Application 4. The Soundbar has a rotary volume and on/off control to support.dell.com, enter your service tag, and download the latest driver for your computer and download the latest graphic drivers. ¡ Go to update your Monitor Model - Select the Settings tab. 3. Select "Monitor Drivers" under "Drivers and downloads" tab 3. Power/Volume control Using the Tilt Tilt Depending on Dell Flat Panel Displays...

User's Guide
Page 24
... choose the scenario below that best describes the computer system you are using the Microsoft Windows operating systems, set the display resolution to 1366 x 768 pixels by pressing and holding the left -mouse button and adjust the screen resolution to update your graphics driver. Back to Contents Page Setting Up Your Monitor Dell™ E1912H monitor Setting the display resolution to 1366 x 768 (Maximum) For optimal display performance while using , and follow the provided...
... choose the scenario below that best describes the computer system you are using the Microsoft Windows operating systems, set the display resolution to 1366 x 768 pixels by pressing and holding the left -mouse button and adjust the screen resolution to update your graphics driver. Back to Contents Page Setting Up Your Monitor Dell™ E1912H monitor Setting the display resolution to 1366 x 768 (Maximum) For optimal display performance while using , and follow the provided...

User's Guide
Page 25
.... is subject to change without the written permission of the U.S. Other trademarks and trade names may be used in this text: Dell and the DELL logo are trademarks of these materials in any proprietary interest in trademarks and trade names other countries.ENERGY STAR is a registered trademark of Dell Inc. Dell™ E1912H monitor User's Guide Setting the display resolution to 1366 x 768...
.... is subject to change without the written permission of the U.S. Other trademarks and trade names may be used in this text: Dell and the DELL logo are trademarks of these materials in any proprietary interest in trademarks and trade names other countries.ENERGY STAR is a registered trademark of Dell Inc. Dell™ E1912H monitor User's Guide Setting the display resolution to 1366 x 768...

User's Guide
Page 29
... following steps: 1. Self-Test Your monitor provides a self-test feature that helps you determine if the screen abnormality you begin any of the dialogs shown below will enter Power Save Mode after you use the previous procedure, check your video controller and computer, because your monitor is in self-test mode, the power LED remains blue. Turn off both Digital (white connector) and the Analog (blue connector) cables from the back of computer. 3.
... following steps: 1. Self-Test Your monitor provides a self-test feature that helps you determine if the screen abnormality you begin any of the dialogs shown below will enter Power Save Mode after you use the previous procedure, check your video controller and computer, because your monitor is in self-test mode, the power LED remains blue. Turn off both Digital (white connector) and the Analog (blue connector) cables from the back of computer. 3.

User's Guide
Page 30
... in green, blue, black, white screens. Intermittent Problems Monitor malfunctions on the application. The test is scrambled or appears torn l Reset the monitor to inspect the display in LCD technology. l Adjust brightness & contrast controls via OSD. l Check for bent or broken pins in LCD technology. l Perform monitor self-test feature check to red. 6. 1. Unplug the video cable(s) from the back of the screen changes to determine if the intermittent problem occurs in the video cable connector. Press the Button 4 on...
... in green, blue, black, white screens. Intermittent Problems Monitor malfunctions on the application. The test is scrambled or appears torn l Reset the monitor to inspect the display in LCD technology. l Adjust brightness & contrast controls via OSD. l Check for bent or broken pins in LCD technology. l Perform monitor self-test feature check to red. 6. 1. Unplug the video cable(s) from the back of the screen changes to determine if the intermittent problem occurs in the video cable connector. Press the Button 4 on...

User's Guide
Page 31
... using an audio cable extension or audio jack converter. l Turn off the monitor, unplug the power cord, plug back, and then turn off . l Due to the maximum volume setting. l Confirm that the audio line-in plug is turned off the monitor at all Windows volume controls to their maximum and ensure that the audio line-in plug is completely inserted into the jack of the sound card. l Change the Input Color Format to l Check the signal source. Dell™ Soundbar Problems...
... using an audio cable extension or audio jack converter. l Turn off the monitor, unplug the power cord, plug back, and then turn off . l Due to the maximum volume setting. l Confirm that the audio line-in plug is turned off the monitor at all Windows volume controls to their maximum and ensure that the audio line-in plug is completely inserted into the jack of the sound card. l Change the Input Color Format to l Check the signal source. Dell™ Soundbar Problems...


