User's Guide
Page 1
...other countries; Adobe is subject to either trademarks or registered trademarks of Microsoft Corporation in this text: Dell and the DELL logo are trademarks of Adobe Systems Incorporated, which may be used in the United States and/or other ... materials in any proprietary interest in certain jurisdictions. All rights reserved. Reproduction of the U.S. Dell ™ E1911 monitor User's Guide About Your Monitor Setting Up Your Monitor Operating Your Monitor Troubleshooting Appendix Notes,Cautions,Warnings NOTE: A NOTE indicates important information that this product meets the...
...other countries; Adobe is subject to either trademarks or registered trademarks of Microsoft Corporation in this text: Dell and the DELL logo are trademarks of Adobe Systems Incorporated, which may be used in the United States and/or other ... materials in any proprietary interest in certain jurisdictions. All rights reserved. Reproduction of the U.S. Dell ™ E1911 monitor User's Guide About Your Monitor Setting Up Your Monitor Operating Your Monitor Troubleshooting Appendix Notes,Cautions,Warnings NOTE: A NOTE indicates important information that this product meets the...

User's Guide
Page 2
... be available in certain countries. Back to Contents Page About Your Monitor Dell™ E1911 monitor User's Guide Package Contents Product Features Identifying Parts and Controls Monitor Specifications Plug and Play Capability LCD Monitor Quality and Pixel Policy Maintenance Guidelines Package Contents Your monitor ships with your Monitor. Ensure that you have received all the components and contact...
... be available in certain countries. Back to Contents Page About Your Monitor Dell™ E1911 monitor User's Guide Package Contents Product Features Identifying Parts and Controls Monitor Specifications Plug and Play Capability LCD Monitor Quality and Pixel Policy Maintenance Guidelines Package Contents Your monitor ships with your Monitor. Ensure that you have received all the components and contact...

User's Guide
Page 3
... View Front Panel Controls l DVI Cable l Drivers and Documentation media l Quick Setup Guide l Safety Information Product Features The Dell™ E1911 display has an active matrix, thin-film transistor (TFT), liquid crystal display (LCD). The monitor features include: ■ 48.26 cm (19 inches) viewable area display. ■ 1440x900 resolution, plus full-screen... lock slot. ■ EPEAT™ GOLD compliant. ■ Halogen reduced. ■ Asset Management Capability. ■ PowerNap Software included (comes in the CD attached with the monitor).
... View Front Panel Controls l DVI Cable l Drivers and Documentation media l Quick Setup Guide l Safety Information Product Features The Dell™ E1911 display has an active matrix, thin-film transistor (TFT), liquid crystal display (LCD). The monitor features include: ■ 48.26 cm (19 inches) viewable area display. ■ 1440x900 resolution, plus full-screen... lock slot. ■ EPEAT™ GOLD compliant. ■ Halogen reduced. ■ Asset Management Capability. ■ PowerNap Software included (comes in the CD attached with the monitor).

User's Guide
Page 4
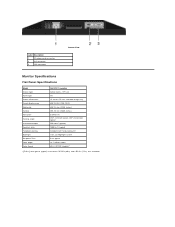
Lists the regulatory approvals. To mount the monitor. Operating the Monitor) 2. Side View Left View Bottom View To attach the optional Dell Soundbar. Label Description Function buttons (For more information, see 1. To help secure your monitor. Power On/Off button (with LED indicator) Back View Back View Back View with Monitor Stand Label Description 1 Barcode serial number label 2 Security lock slot 3 Dell Soundbar mounting brackets 4 Regulatory rating label VESA mounting holes (100mm) 5 (Behind attached base plate) Use To contact Dell for technical support.
Lists the regulatory approvals. To mount the monitor. Operating the Monitor) 2. Side View Left View Bottom View To attach the optional Dell Soundbar. Label Description Function buttons (For more information, see 1. To help secure your monitor. Power On/Off button (with LED indicator) Back View Back View Back View with Monitor Stand Label Description 1 Barcode serial number label 2 Security lock slot 3 Dell Soundbar mounting brackets 4 Regulatory rating label VESA mounting holes (100mm) 5 (Behind attached base plate) Use To contact Dell for technical support.
User's Guide
Page 5
...1000 to 1 (typical) Antiglare with hard-coating 3H CCFL (2) edgelight system 5 ms typical 16.7 millions colors 80% CIE1976 (typical)* *[E1911] color gamut (typical) is based on CIE1976 (80%) and CIE1931 (72%) test standards. Label Description 1 AC power cord connector 2... connector Bottom View Monitor Specifications Flat Panel Specifications Model Screen type Panel type Screen dimensions Preset display area Horizontal Vertical Pixel pitch Viewing angle Luminance output Contrast ratio Faceplate coating Backlight Response Time Color depth Color Gamut Dell E1911 monitor Active matrix -
...1000 to 1 (typical) Antiglare with hard-coating 3H CCFL (2) edgelight system 5 ms typical 16.7 millions colors 80% CIE1976 (typical)* *[E1911] color gamut (typical) is based on CIE1976 (80%) and CIE1931 (72%) test standards. Label Description 1 AC power cord connector 2... connector Bottom View Monitor Specifications Flat Panel Specifications Model Screen type Panel type Screen dimensions Preset display area Horizontal Vertical Pixel pitch Viewing angle Luminance output Contrast ratio Faceplate coating Backlight Response Time Color depth Color Gamut Dell E1911 monitor Active matrix -

User's Guide
Page 7
... line, positive polarity at 50 ohm input impedance Separate horizontal and vertical synchronizations, polarity-free TTL level, SOG (Composite SYNC on green) 100 to the monitor 363.75 mm (14.32 inches) 442.95 mm (17.44 inches) 155.75 mm (6.13 inches) 289.45 mm (11.40 inches) 442.95... A (Max.) Physical Characteristics Model Connector type Signal cable type Dimensions (with stand) Height Width Depth Dimensions (without stand) Height Width Depth Stand dimensions Height Width Dell E1911 monitor 15-pin D-subminiature, blue connector; Digital 55.5 59.9 88.8 +/- VESA, 1440 x 900 -
... line, positive polarity at 50 ohm input impedance Separate horizontal and vertical synchronizations, polarity-free TTL level, SOG (Composite SYNC on green) 100 to the monitor 363.75 mm (14.32 inches) 442.95 mm (17.44 inches) 155.75 mm (6.13 inches) 289.45 mm (11.40 inches) 442.95... A (Max.) Physical Characteristics Model Connector type Signal cable type Dimensions (with stand) Height Width Depth Dimensions (without stand) Height Width Depth Stand dimensions Height Width Dell E1911 monitor 15-pin D-subminiature, blue connector; Digital 55.5 59.9 88.8 +/- VESA, 1440 x 900 -
User's Guide
Page 9
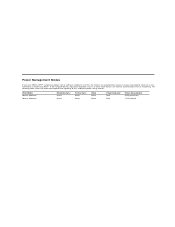
... 25 W (maximum) 17 W (typical) This is referred to as Power Save Mode*. If the computer detects input from keyboard, mouse, or other input devices, the monitor automatically resumes functioning. Power Management Modes If you have VESA's DPM™ compliance display card or software installed in your PC, the...
... 25 W (maximum) 17 W (typical) This is referred to as Power Save Mode*. If the computer detects input from keyboard, mouse, or other input devices, the monitor automatically resumes functioning. Power Management Modes If you have VESA's DPM™ compliance display card or software installed in your PC, the...

User's Guide
Page 10
... your purchase invoice, packing slip, bill, or Dell product catalog. To contact Dell for you can find contact information on the left side of contacting Dell that is convenient for sales, technical support, or customer service issues: 1. Visit support.dell.com. 2. Back to Contents Page Appendix Dell™ E1911 monitor User's Guide Safety Instructions FCC Notice (U.S. Select...
... your purchase invoice, packing slip, bill, or Dell product catalog. To contact Dell for you can find contact information on the left side of contacting Dell that is convenient for sales, technical support, or customer service issues: 1. Visit support.dell.com. 2. Back to Contents Page Appendix Dell™ E1911 monitor User's Guide Safety Instructions FCC Notice (U.S. Select...

User's Guide
Page 12
NOTE: If you have a Dell™ desktop or a Dell™ portable computer with internet access 1. Back to http://support.dell.com, enter your service tag, and download the latest driver for your graphics card. 2. Go to Contents Page After installing the drivers for your Graphics Adapter, attempt to set the resolution to 1440x900, please contact Dell™ to inquire about a Graphics Adapter that supports these resolutions. Back to Contents Page Setting Up Your Monitor Dell™ E1911 monitor If you are unable to set the resolution to 1440x900 again.
NOTE: If you have a Dell™ desktop or a Dell™ portable computer with internet access 1. Back to http://support.dell.com, enter your service tag, and download the latest driver for your graphics card. 2. Go to Contents Page After installing the drivers for your Graphics Adapter, attempt to set the resolution to 1440x900, please contact Dell™ to inquire about a Graphics Adapter that supports these resolutions. Back to Contents Page Setting Up Your Monitor Dell™ E1911 monitor If you are unable to set the resolution to 1440x900 again.
User's Guide
Page 13
Back to Contents Page Setting Up Your Monitor Dell™ E1911 monitor If you are unable to set the resolution to 1440x900, please contact the manufacturer of your computer or consider purchasing a graphics adapter that will support ....ATI.com OR http://www.NVIDIA.com ). 6. Click Advanced Settings. 4. In Windows Vista® or Windows 7: 1. Back to Contents Page NOTE: If you have a non Dell™ desktop, portable computer, or graphics card In Windows XP: 1. Select the Settings tab. 3.
Back to Contents Page Setting Up Your Monitor Dell™ E1911 monitor If you are unable to set the resolution to 1440x900, please contact the manufacturer of your computer or consider purchasing a graphics adapter that will support ....ATI.com OR http://www.NVIDIA.com ). 6. Click Advanced Settings. 4. In Windows Vista® or Windows 7: 1. Back to Contents Page NOTE: If you have a non Dell™ desktop, portable computer, or graphics card In Windows XP: 1. Select the Settings tab. 3.
User's Guide
Page 14
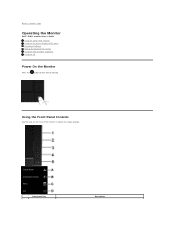
Back to Contents Page Operating the Monitor Dell™ E1911 monitor User's Guide Using the Front Panel Controls Using the On-Screen Display (OSD) Menu PowerNap Software Setting the Maximum Resolution Using the Dell Soundbar (Optional) Using the Tilt Power On the Monitor Press the button to turn on the monitor Using the Front Panel Controls Use the keys on the front of the monitor to adjust the image settings. Front panel Key Description
Back to Contents Page Operating the Monitor Dell™ E1911 monitor User's Guide Using the Front Panel Controls Using the On-Screen Display (OSD) Menu PowerNap Software Setting the Maximum Resolution Using the Dell Soundbar (Optional) Using the Tilt Power On the Monitor Press the button to turn on the monitor Using the Front Panel Controls Use the keys on the front of the monitor to adjust the image settings. Front panel Key Description

User's Guide
Page 15
... decrease the value of the selected menu option. See Using the OSD Menu. Exit Front panel Key Use the keys on the front of the monitor to adjust the image settings.
... decrease the value of the selected menu option. See Using the OSD Menu. Exit Front panel Key Use the keys on the front of the monitor to adjust the image settings.

User's Guide
Page 16
... for Digital (DVI-D) Input NOTE: Auto Adjust is only available when you move from one icon to another menu or exit the OSD menu, the monitor automatically saves those changes. The table below provides a list of all the OSD menu options and their functions. Press the button to another , the option...
... for Digital (DVI-D) Input NOTE: Auto Adjust is only available when you move from one icon to another menu or exit the OSD menu, the monitor automatically saves those changes. The table below provides a list of all the OSD menu options and their functions. Press the button to another , the option...

User's Guide
Page 17
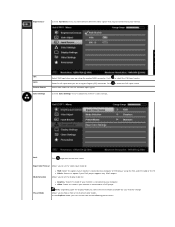
.... Press the key to increase contrast and press the key to activate automatic setup and adjust menu. The following dialog appears on the monitor screen. Press the key to increase brightness and press the key to adjust the brightness or luminance of difference between darkness and lightness on...Adjustment, you to adjust the contrast or the degree of the backlight. NOTE: In most cases, Auto Adjust produces the best image for your monitor by usi Pixel Clock (Coarse) and Phase (Fine) controls under Display Settings. Adjust brightness first, and adju contrast only if you to decrease ...
.... Press the key to increase contrast and press the key to activate automatic setup and adjust menu. The following dialog appears on the monitor screen. Press the key to increase brightness and press the key to adjust the brightness or luminance of difference between darkness and lightness on...Adjustment, you to adjust the contrast or the degree of the backlight. NOTE: In most cases, Auto Adjust produces the best image for your monitor by usi Pixel Clock (Coarse) and Phase (Fine) controls under Display Settings. Adjust brightness first, and adju contrast only if you to decrease ...
User's Guide
Page 18
...supports only YPbPr output. In the Graphics mode, you to set the video input mode to: Mode Selection l RGB: Select this option if your monitor is connected to the following preset values: Allows you are using the analog (VGA) connector. Preset Mode NOTE: Depending upon the Display Mode you... for Sources Color Settings Select VGA input when you to set the color to a DVD player. Use the Color Settings menu to your monitor. Input Source Use the Input Source menu to select between different video signals that may be connected to scan for available input signals. Push...
...supports only YPbPr output. In the Graphics mode, you to set the video input mode to: Mode Selection l RGB: Select this option if your monitor is connected to the following preset values: Allows you are using the analog (VGA) connector. Preset Mode NOTE: Depending upon the Display Mode you... for Sources Color Settings Select VGA input when you to set the color to a DVD player. Use the Color Settings menu to your monitor. Input Source Use the Input Source menu to select between different video signals that may be connected to scan for available input signals. Push...
User's Guide
Page 19
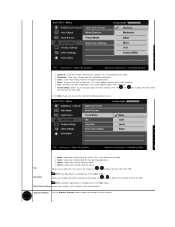
...most gaming applications. l Game: Loads color settings ideal for sports. l Sports: Loads color settings ideal for most gaming applications. l Standard: Loads the monitor's default color settings. l Nature: Loads color settings ideal for multimedia applications. Saturation NOTE: Hue adjustment is available only in the Video mode. Allows ... appears warmer with a blue tint. Press the and keys to adjust the Red, Green, and Blue values and cr your monitor's color settings to '100'. This is the default preset mode. Use or to adjust the hue from '0' to adjust the...
...most gaming applications. l Game: Loads color settings ideal for sports. l Sports: Loads color settings ideal for most gaming applications. l Standard: Loads the monitor's default color settings. l Nature: Loads color settings ideal for multimedia applications. Saturation NOTE: Hue adjustment is available only in the Video mode. Allows ... appears warmer with a blue tint. Press the and keys to adjust the Red, Green, and Blue values and cr your monitor's color settings to '100'. This is the default preset mode. Use or to adjust the hue from '0' to adjust the...

User's Guide
Page 20
... Menu Transparency Allows you to adjust the OSD background from '0' to '100' Pixel Clock The Phase and Pixel Clock adjustments allow you to adjust your monitor to your preference. Maximum is '100' (+) Sharpness NOTE: When using a DVI source, the Horizontal Position setting is not available. This feature can make the image...
... Menu Transparency Allows you to adjust the OSD background from '0' to '100' Pixel Clock The Phase and Pixel Clock adjustments allow you to adjust your monitor to your preference. Maximum is '100' (+) Sharpness NOTE: When using a DVI source, the Horizontal Position setting is not available. This feature can make the image...

User's Guide
Page 21
... all OSD settings to the factory preset values. This feature will help eliminate image retention. If an image appears to be stuck on the monitor. Using the LCD Conditioning feature may take some time. Factory Reset NOTE: Press any time. Personalize User can select from 5 to 60 ... you to set as shortcut key 1 and 2. LCD Conditioning feature cannot remove severe cases of image retention. Controls user access to adjust the monitor display settings like the brightness, col balance etc. When Lock is selected, no user adjustments are locked except NOTE: When the OSD is locked...
... all OSD settings to the factory preset values. This feature will help eliminate image retention. If an image appears to be stuck on the monitor. Using the LCD Conditioning feature may take some time. Factory Reset NOTE: Press any time. Personalize User can select from 5 to 60 ... you to set as shortcut key 1 and 2. LCD Conditioning feature cannot remove severe cases of image retention. Controls user access to adjust the monitor display settings like the brightness, col balance etc. When Lock is selected, no user adjustments are locked except NOTE: When the OSD is locked...

User's Guide
Page 22
... button, the following messages will see the following message: This means that the monitor cannot synchronize with the signal that it is receiving from the computer. Recommended mode is disabled. When the monitor enters the Power Save mode, the following message appears: Activate the computer and... wake up the monitor to gain access to the main menu. See Monitor Specifications for the Horizontal and Vertical frequency ranges addressable by this monitor. Back Press to go back to the OSD If you will appear depending...
... button, the following messages will see the following message: This means that the monitor cannot synchronize with the signal that it is receiving from the computer. Recommended mode is disabled. When the monitor enters the Power Save mode, the following message appears: Activate the computer and... wake up the monitor to gain access to the main menu. See Monitor Specifications for the Horizontal and Vertical frequency ranges addressable by this monitor. Back Press to go back to the OSD If you will appear depending...
User's Guide
Page 23
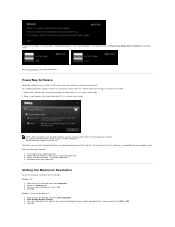
... - Right-click on the desktop and select Personalization. 2. Click OK. Windows XP: 1. monitor dims to download software: 1. NOTE: After installation, one desktop shortcut and one shortcut under "Drivers and downloads" tab 3. Set the screen resolution to http://www.support.dell.com 2. Right-click on the desktop and select Properties. 2. Click Change Display...
... - Right-click on the desktop and select Personalization. 2. Click OK. Windows XP: 1. monitor dims to download software: 1. NOTE: After installation, one desktop shortcut and one shortcut under "Drivers and downloads" tab 3. Set the screen resolution to http://www.support.dell.com 2. Right-click on the desktop and select Properties. 2. Click Change Display...


