User's Guide
Page 1
Dell ™ E1911 monitor User's Guide About Your Monitor Setting Up Your Monitor Operating Your Monitor Troubleshooting Appendix Notes,Cautions,Warnings NOTE: A NOTE indicates important information that this product meets the ENERGY STAR guidelines for property damage, personal injury, or death. has determined that helps you make better use of the U.S. is a trademark of Adobe Systems Incorporated, which may be registered in any proprietary...
Dell ™ E1911 monitor User's Guide About Your Monitor Setting Up Your Monitor Operating Your Monitor Troubleshooting Appendix Notes,Cautions,Warnings NOTE: A NOTE indicates important information that this product meets the ENERGY STAR guidelines for property damage, personal injury, or death. has determined that helps you make better use of the U.S. is a trademark of Adobe Systems Incorporated, which may be registered in any proprietary...

User's Guide
Page 2
... countries. NOTE: Some items may not ship with the components shown below. Ensure that you have received all the components and contact Dell if something is missing. Back to Contents Page About Your Monitor Dell™ E1911 monitor User's Guide Package Contents Product Features Identifying Parts and Controls Monitor Specifications Plug and Play Capability LCD Monitor Quality and Pixel Policy Maintenance Guidelines Package Contents Your...
... countries. NOTE: Some items may not ship with the components shown below. Ensure that you have received all the components and contact Dell if something is missing. Back to Contents Page About Your Monitor Dell™ E1911 monitor User's Guide Package Contents Product Features Identifying Parts and Controls Monitor Specifications Plug and Play Capability LCD Monitor Quality and Pixel Policy Maintenance Guidelines Package Contents Your...

User's Guide
Page 3
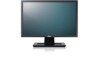
Identifying Parts and Controls Front View Front View Front Panel Controls l DVI Cable l Drivers and Documentation media l Quick Setup Guide l Safety Information Product Features The Dell™ E1911 display has an active matrix, thin-film transistor (TFT), liquid crystal display (LCD). The monitor features include: ■ 48.26 cm (19 inches) viewable area display. ■ 1440x900 resolution, plus full-screen support for lower resolutions. ■ Wide viewing angle to allow viewing from a sitting or standing position, or while moving from side...
Identifying Parts and Controls Front View Front View Front Panel Controls l DVI Cable l Drivers and Documentation media l Quick Setup Guide l Safety Information Product Features The Dell™ E1911 display has an active matrix, thin-film transistor (TFT), liquid crystal display (LCD). The monitor features include: ■ 48.26 cm (19 inches) viewable area display. ■ 1440x900 resolution, plus full-screen support for lower resolutions. ■ Wide viewing angle to allow viewing from a sitting or standing position, or while moving from side...

User's Guide
Page 7
... Model Connector type Signal cable type Dimensions (with stand) Height Width Depth Dimensions (without stand) Height Width Depth Stand dimensions Height Width Dell E1911 monitor 15-pin D-subminiature, blue connector; Analog 55.9 59.9 106.5 -/+ VESA, 1440 x 900 (CTV-R) - Electrical Specifications Video input signals Synchronization input signals AC input voltage/frequency/current Inrush current Analog RGB, 0.7 Volts +/- 5%, positive polarity at 75 ohm input impedance Digital DVI-D TMDS, 600mV for each differential line, positive polarity at 50 ohm input impedance Separate horizontal...
... Model Connector type Signal cable type Dimensions (with stand) Height Width Depth Dimensions (without stand) Height Width Depth Stand dimensions Height Width Dell E1911 monitor 15-pin D-subminiature, blue connector; Analog 55.9 59.9 106.5 -/+ VESA, 1440 x 900 (CTV-R) - Electrical Specifications Video input signals Synchronization input signals AC input voltage/frequency/current Inrush current Analog RGB, 0.7 Volts +/- 5%, positive polarity at 75 ohm input impedance Digital DVI-D TMDS, 600mV for each differential line, positive polarity at 50 ohm input impedance Separate horizontal...
User's Guide
Page 9
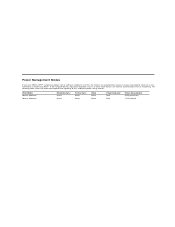
... other input devices, the monitor automatically resumes functioning. Power Management Modes If you have VESA's DPM™ compliance display card or software installed in your PC, the monitor can automatically reduce its power consumption when not in use. The following table shows the power consumption and signaling of this automatic power saving feature: VESA Modes Normal operation Normal operation Horizontal Sync Active Active Vertical Sync Active Active Video Active Active Power Indicator Blue Blue Power Consumption 25...
... other input devices, the monitor automatically resumes functioning. Power Management Modes If you have VESA's DPM™ compliance display card or software installed in your PC, the monitor can automatically reduce its power consumption when not in use. The following table shows the power consumption and signaling of this automatic power saving feature: VESA Modes Normal operation Normal operation Horizontal Sync Active Active Vertical Sync Active Active Video Active Active Power Indicator Blue Blue Power Consumption 25...
User's Guide
Page 13
... ). 6. Click Change Display Settings. 3. Identify your graphics controller supplier from the description at the top of the window (e.g. Back to Contents Page Setting Up Your Monitor Dell™ E1911 monitor If you are unable to set the resolution to 1440x900, please contact the manufacturer of your computer or consider purchasing a graphics adapter that will support the video resolution of 1440x900. Please refer to the graphics card provider...
... ). 6. Click Change Display Settings. 3. Identify your graphics controller supplier from the description at the top of the window (e.g. Back to Contents Page Setting Up Your Monitor Dell™ E1911 monitor If you are unable to set the resolution to 1440x900, please contact the manufacturer of your computer or consider purchasing a graphics adapter that will support the video resolution of 1440x900. Please refer to the graphics card provider...
User's Guide
Page 14
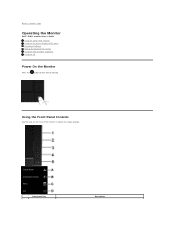
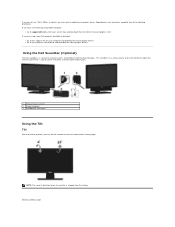
Back to Contents Page Operating the Monitor Dell™ E1911 monitor User's Guide Using the Front Panel Controls Using the On-Screen Display (OSD) Menu PowerNap Software Setting the Maximum Resolution Using the Dell Soundbar (Optional) Using the Tilt Power On the Monitor Press the button to turn on the monitor Using the Front Panel Controls Use the keys on the front of the monitor to adjust the image settings. Front panel Key Description
Back to Contents Page Operating the Monitor Dell™ E1911 monitor User's Guide Using the Front Panel Controls Using the On-Screen Display (OSD) Menu PowerNap Software Setting the Maximum Resolution Using the Dell Soundbar (Optional) Using the Tilt Power On the Monitor Press the button to turn on the monitor Using the Front Panel Controls Use the keys on the front of the monitor to adjust the image settings. Front panel Key Description

User's Guide
Page 15
... exit on-screen display(OSD) from menu and sub-menus. Menu D Use the Exit key to adjust (decrease ranges) items in the OSD menu. Brightness / Contrast C Use the Menu key to confirm your selection. Exit Front panel Key Use the keys on -screen display(OSD). Preset modes B Use this button to directly access the Shortcut Key 1 (Default: Preset Modes) menu or to increase the value of the monitor to adjust the image settings. Use the OK key to open the on...
... exit on-screen display(OSD) from menu and sub-menus. Menu D Use the Exit key to adjust (decrease ranges) items in the OSD menu. Brightness / Contrast C Use the Menu key to confirm your selection. Exit Front panel Key Use the keys on -screen display(OSD). Preset modes B Use this button to directly access the Shortcut Key 1 (Default: Preset Modes) menu or to increase the value of the monitor to adjust the image settings. Use the OK key to open the on...

User's Guide
Page 17
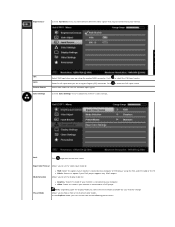
... configuration. Adjust brightness first, and adju contrast only if you to adjust the brightness or luminance of difference between darkness and lightness on a black screen as the monitor self-adjusts to the current input: Auto Adjustment allows the monitor to self-adjust to decrease contrast (min 0 ~ max 100). NOTE: In most cases, Auto Adjust produces the best image for your monitor by usi Pixel Clock (Coarse) and Phase (Fine) controls under Display Settings. NOTE: Brightness control will...
... configuration. Adjust brightness first, and adju contrast only if you to adjust the brightness or luminance of difference between darkness and lightness on a black screen as the monitor self-adjusts to the current input: Auto Adjustment allows the monitor to self-adjust to decrease contrast (min 0 ~ max 100). NOTE: In most cases, Auto Adjust produces the best image for your monitor by usi Pixel Clock (Coarse) and Phase (Fine) controls under Display Settings. NOTE: Brightness control will...
User's Guide
Page 18
... player using the VGA and DVI cable or the HDMI to DVI adapter l YPbPr: Select this option if your DVD player supports only YPbPr output. Back Press to go back to adjust the monitor's color settings. Input Color Format Allows you to set the color to the following preset values: Preset Mode NOTE: Depending upon the Display Mode you are using the Digital (DVI) connector. Input Source Use the Input Source menu to select between different video signals that may be connected...
... player using the VGA and DVI cable or the HDMI to DVI adapter l YPbPr: Select this option if your DVD player supports only YPbPr output. Back Press to go back to adjust the monitor's color settings. Input Color Format Allows you to set the color to the following preset values: Preset Mode NOTE: Depending upon the Display Mode you are using the Digital (DVI) connector. Input Source Use the Input Source menu to select between different video signals that may be connected...
User's Guide
Page 19
... adjust the Red, Green, and Blue values and cr your monitor's color settings to manually adjust the color settings. In the Video mode, you to the factory defaults. This is the default preset mode. l Game: Loads color settings ideal for multimedia applications. Use or to adjust the hue from '0' to '100'. Use or to adjust the saturation from '0' to '100'. Reset Color Settings Resets your own preset color mode. l Standard: Loads the monitor's default color settings. The screen appears cooler with a red/yellow tint. l Custom (RGB...
... adjust the Red, Green, and Blue values and cr your monitor's color settings to manually adjust the color settings. In the Video mode, you to the factory defaults. This is the default preset mode. l Game: Loads color settings ideal for multimedia applications. Use or to adjust the hue from '0' to '100'. Use or to adjust the saturation from '0' to '100'. Reset Color Settings Resets your own preset color mode. l Standard: Loads the monitor's default color settings. The screen appears cooler with a red/yellow tint. l Custom (RGB...

User's Guide
Page 20
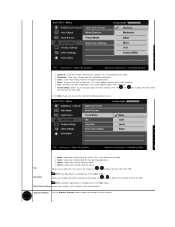
Vertical Position NOTE: When using a DVI source, the Vertical Position setting is not available. This feature can make the image look sharper or softer. Select this option to restore default display settings. Horizontal Position Use the or buttons to adjust image up and down. Minimum is '100' (+). NOTE: Pixel Clock and Phase Adjustments are only available for best image quality Phase Reset Display Settings Other Settings If satisfactory results are not obtained using the Phase adjustment, use the Pixel Clock (coarse) adjustment and...
Vertical Position NOTE: When using a DVI source, the Vertical Position setting is not available. This feature can make the image look sharper or softer. Select this option to restore default display settings. Horizontal Position Use the or buttons to adjust image up and down. Minimum is '100' (+). NOTE: Pixel Clock and Phase Adjustments are only available for best image quality Phase Reset Display Settings Other Settings If satisfactory results are not obtained using the Phase adjustment, use the Pixel Clock (coarse) adjustment and...

User's Guide
Page 21
... the monitor, select LCD Conditioning to help reduce minor cases of image retention o in 1 second increments, from "Preset Modes", "Brightness/Contrast", "Auto Adjust", "Input Source" and set the time for 10 seconds to unlock and allow user access to all OSD settings to the factory preset values. If an image appears to be stuck on the monitor. When Lock is selected, no user adjustments are locked except NOTE: When the OSD is locked, pressing the menu...
... the monitor, select LCD Conditioning to help reduce minor cases of image retention o in 1 second increments, from "Preset Modes", "Brightness/Contrast", "Auto Adjust", "Input Source" and set the time for 10 seconds to unlock and allow user access to all OSD settings to the factory preset values. If an image appears to be stuck on the monitor. When Lock is selected, no user adjustments are locked except NOTE: When the OSD is locked, pressing the menu...
User's Guide
Page 23
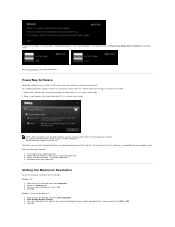
... "Monitor Drivers" under "Start" for more information. Download and install application Setting the Maximum Resolution To set the maximum resolution for the monitor. Windows XP: 1. Click Change Display Settings. 3. monitor dims to http://www.support.dell.com 2. PowerNap Application 4. Click OK. This software provides 2 options where user can be downloaded from Dell's website. Select the Settings tab. 3. If VGA or DVI cable is in screen saver mode. 2. Windows Vista® or Windows® 7: 1. Set the screen resolution to download software: 1. Go to minimum brightness level...
... "Monitor Drivers" under "Start" for more information. Download and install application Setting the Maximum Resolution To set the maximum resolution for the monitor. Windows XP: 1. Click Change Display Settings. 3. monitor dims to http://www.support.dell.com 2. PowerNap Application 4. Click OK. This software provides 2 options where user can be downloaded from Dell's website. Select the Settings tab. 3. If VGA or DVI cable is in screen saver mode. 2. Windows Vista® or Windows® 7: 1. Set the screen resolution to download software: 1. Go to minimum brightness level...
User's Guide
Page 24
... a rotary volume and on/off control to Contents Page Headphone connectors Using the Tilt Tilt With the built-in pedestal, you may need to update your computer, complete one of the following procedures. NOTE: The stand is detached when the monitor is a stereo two channel system, mountable on your graphics driver. Depending on Dell Flat Panel Displays. Back to adjust the overall system level, a LED for power indication...
... a rotary volume and on/off control to Contents Page Headphone connectors Using the Tilt Tilt With the built-in pedestal, you may need to update your computer, complete one of the following procedures. NOTE: The stand is detached when the monitor is a stereo two channel system, mountable on your graphics driver. Depending on Dell Flat Panel Displays. Back to adjust the overall system level, a LED for power indication...

User's Guide
Page 25
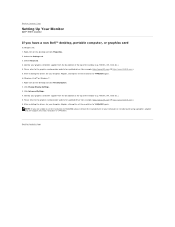
... right by performing the following steps: In Windows XP: 1. Back to Contents Page Setting Up Your Monitor Dell™ E1911 monitor Setting the display resolution to 1440x900 (Maximum) For optimal display performance while using , and follow the provided directions: 1: If you have a Dell™ desktop or a Dell™ portable computer with internet access. 2: If you have a non Dell™ desktop, portable computer, or graphics card. Click Change Display Settings. 3.
... right by performing the following steps: In Windows XP: 1. Back to Contents Page Setting Up Your Monitor Dell™ E1911 monitor Setting the display resolution to 1440x900 (Maximum) For optimal display performance while using , and follow the provided directions: 1: If you have a Dell™ desktop or a Dell™ portable computer with internet access. 2: If you have a non Dell™ desktop, portable computer, or graphics card. Click Change Display Settings. 3.

User's Guide
Page 27
... section, follow the Safety Instructions. Turn off your computer. Connect the blue (VGA) cable from your monitor to Contents Page Setting Up the Monitor Dell™ E1911 monitor User's Guide Attaching the Stand Connecting Your Monitor Removing the Stand Base Attaching the Dell Soundbar (Optional) Removing the Stand for VESA wall mount Attaching the Stand NOTE: The stand base is detached when the monitor is shipped from the factory. To attach the monitor stand body to the computer: 1. Connecting Your Monitor WARNING: Before you begin...
... section, follow the Safety Instructions. Turn off your computer. Connect the blue (VGA) cable from your monitor to Contents Page Setting Up the Monitor Dell™ E1911 monitor User's Guide Attaching the Stand Connecting Your Monitor Removing the Stand Base Attaching the Dell Soundbar (Optional) Removing the Stand for VESA wall mount Attaching the Stand NOTE: The stand base is detached when the monitor is shipped from the factory. To attach the monitor stand body to the computer: 1. Connecting Your Monitor WARNING: Before you begin...

User's Guide
Page 31
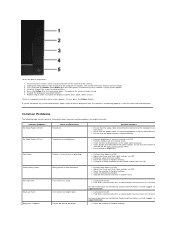
... Digital (white connector) and the Analog (blue connector) cables from the back of the computer. Turn off your monitor and reconnect the video cable; Turn on -screen (against a black background) if the monitor cannot sense a video signal and is functioning properly. Turn off both your computer and video card. Built-in Diagnostics Your monitor has a built-in diagnostic tool that allows you to Contents Page Troubleshooting Dell™ E1911 monitor Self-Test Common Problems Product Specific Problems Dell Soundbar Problems...
... Digital (white connector) and the Analog (blue connector) cables from the back of the computer. Turn off your monitor and reconnect the video cable; Turn on -screen (against a black background) if the monitor cannot sense a video signal and is functioning properly. Turn off both your computer and video card. Built-in Diagnostics Your monitor has a built-in diagnostic tool that allows you to Contents Page Troubleshooting Dell™ E1911 monitor Self-Test Common Problems Product Specific Problems Dell Soundbar Problems...
User's Guide
Page 32
... the display for bent or broken pins in diagnostics. l Verify that the screen is clean (no brightness l Increase brightness & contrast controls via the Input Source Select menu. l Check for any other electrical equipment. Poor Focus Picture is functioning properly using the built-in green, blue, black, white screens. l Eliminate video extension cables. l Adjust the Phase and Pixel Clock controls via OSD. Missing Pixels Stuck-on Pixels Brightness Problems LCD screen has spots LCD screen has bright spots Picture too dim or too bright l Cycle power on Dell Monitor...
... the display for bent or broken pins in diagnostics. l Verify that the screen is clean (no brightness l Increase brightness & contrast controls via the Input Source Select menu. l Check for any other electrical equipment. Poor Focus Picture is functioning properly using the built-in green, blue, black, white screens. l Eliminate video extension cables. l Adjust the Phase and Pixel Clock controls via OSD. Missing Pixels Stuck-on Pixels Brightness Problems LCD screen has spots LCD screen has bright spots Picture too dim or too bright l Cycle power on Dell Monitor...
User's Guide
Page 33
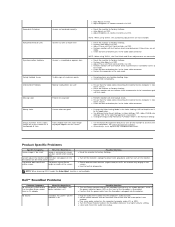
... missing color Picture color not good Image retention from an AC adapter What You Experience No power to determine if the intermittent problem occurs in Color Settings OSD. Geometric Distortion Screen not centered correctly Horizontal/Vertical Lines Screen has one or more information, see Power Management Modes). l Reset the monitor to Factory Settings. l Adjust brightness & contrast controls via OSD. NOTE: When using 'DVI-D', the positioning adjustments are not available. l Adjust Phase and Pixel Clock controls via OSD. l Reset the monitor to Factory Settings. Dell...
... missing color Picture color not good Image retention from an AC adapter What You Experience No power to determine if the intermittent problem occurs in Color Settings OSD. Geometric Distortion Screen not centered correctly Horizontal/Vertical Lines Screen has one or more information, see Power Management Modes). l Reset the monitor to Factory Settings. l Adjust brightness & contrast controls via OSD. NOTE: When using 'DVI-D', the positioning adjustments are not available. l Adjust Phase and Pixel Clock controls via OSD. l Reset the monitor to Factory Settings. Dell...


