User Guide
Page 1
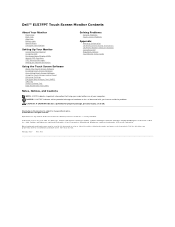
... Solving Problems General Problems Touch screen Problems Appendix Warranty Information CAUTION:General Safety Instructions CAUTION: Monitor Safety Instructions Contacting Dell Regulatory Notices Your Monitor Setup Guide Notes, Notices, and Cautions NOTE: A NOTE indicates important information that helps... how to change without the written permission of Dell Inc.; Dell Inc. Reproduction in any proprietary interest in this document is strictly forbidden. Dell™ E157FPT Touch Screen Monitor Contents About Your Monitor Front View Back View Side View Bottom view ...
... Solving Problems General Problems Touch screen Problems Appendix Warranty Information CAUTION:General Safety Instructions CAUTION: Monitor Safety Instructions Contacting Dell Regulatory Notices Your Monitor Setup Guide Notes, Notices, and Cautions NOTE: A NOTE indicates important information that helps... how to change without the written permission of Dell Inc.; Dell Inc. Reproduction in any proprietary interest in this document is strictly forbidden. Dell™ E157FPT Touch Screen Monitor Contents About Your Monitor Front View Back View Side View Bottom view ...
User Guide
Page 2
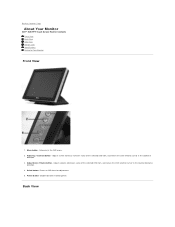
Enters an OSD item for Your Monitor Front View 1. Adjusts volume, decreases value of the selected OSD item, and moves the OSD selection cursor in the counter-clockwise direction. 4. Power button- Adjust ... contrast, increases value of the selected OSD item, and moves the OSD selection cursor in the clockwise direction. 3. Enables/disables monitor power. Back to Contents Page About Your Monitor Dell™ E157FPT Touch Screen Monitor Contents Front View Back View Side View Bottom view Specifications Caring for adjustment. 5. Select button- Menu button - Enters/exits the...
Enters an OSD item for Your Monitor Front View 1. Adjusts volume, decreases value of the selected OSD item, and moves the OSD selection cursor in the counter-clockwise direction. 4. Power button- Adjust ... contrast, increases value of the selected OSD item, and moves the OSD selection cursor in the clockwise direction. 3. Enables/disables monitor power. Back to Contents Page About Your Monitor Dell™ E157FPT Touch Screen Monitor Contents Front View Back View Side View Bottom view Specifications Caring for adjustment. 5. Select button- Menu button - Enters/exits the...
User Guide
Page 3
Mounting holes for optional Magnetic Stripe Reader (MSR) device 5. USB cable holder Cable cover 6. Cable holder 2. 1. Tilt-adjust knob 4. Optional MSR device 7. Monitor stand 3.
Mounting holes for optional Magnetic Stripe Reader (MSR) device 5. USB cable holder Cable cover 6. Cable holder 2. 1. Tilt-adjust knob 4. Optional MSR device 7. Monitor stand 3.
User Guide
Page 4
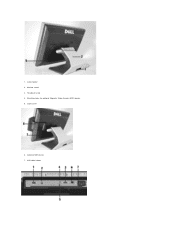
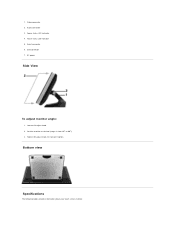
1. USB connector 7. Do not over tighten. Bottom view Specifications The following tables provide information about your touch screen monitor. Tighten tilt-adjust knob. Position monitor as desired (range is from 30o to 90o). 3. Video connector 2. Touch status LED indicator 5. Serial connector 6. AC power Side View To adjust monitor angle: 1. Audio connector 3. Loosen tilt-adjust knob. 2. Power status LED indicator 4.
1. USB connector 7. Do not over tighten. Bottom view Specifications The following tables provide information about your touch screen monitor. Tighten tilt-adjust knob. Position monitor as desired (range is from 30o to 90o). 3. Video connector 2. Touch status LED indicator 5. Serial connector 6. AC power Side View To adjust monitor angle: 1. Audio connector 3. Loosen tilt-adjust knob. 2. Power status LED indicator 4.
User Guide
Page 5
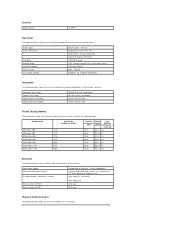
...frequency / current Inrush current at 110 V Inrush current at 75 Hz Preset Display Modes Dell guarantees image size and centering for all preset modes listed in the following table. TFT LCD Diagonal 15 inches (381 mm) Horizontal 11.9 inches (304 mm) Vertical 8.9 inches (228 mm... type Screen dimensions Pixel pitch Viewing angle Luminance output Contrast ratio LCD surface coating Active matrix - General Model number E157FPT Flat Panel The following table shows the physical attributes of the monitor. Horizontal scan range Vertical scan range Optimal preset resolution Highest preset...
...frequency / current Inrush current at 110 V Inrush current at 75 Hz Preset Display Modes Dell guarantees image size and centering for all preset modes listed in the following table. TFT LCD Diagonal 15 inches (381 mm) Horizontal 11.9 inches (304 mm) Vertical 8.9 inches (228 mm... type Screen dimensions Pixel pitch Viewing angle Luminance output Contrast ratio LCD surface coating Active matrix - General Model number E157FPT Flat Panel The following table shows the physical attributes of the monitor. Horizontal scan range Vertical scan range Optimal preset resolution Highest preset...
User Guide
Page 6
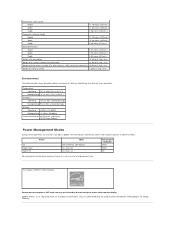
...89 BTU/hour (maximum) 75 BTU/hour (typical) Power Management Modes During normal operation, the monitor's LED light is ENERGY STAR-compliant. This display is green. As an ENERGY STAR Partner, DELL has determined that this product meets the ENERGY STAR guidelines for a long period of stand assembly ...mount or VESA mount considerations) 10.56 lb (4.8 kg ) max Weight of time. registered mark. The LED indicates altered LED colors when monitor operates in use for energy efficiency. ENERGY STAR is not in different modes. On Power Save Switch Off Power Mode 32w maximum, 26w typical...
...89 BTU/hour (maximum) 75 BTU/hour (typical) Power Management Modes During normal operation, the monitor's LED light is ENERGY STAR-compliant. This display is green. As an ENERGY STAR Partner, DELL has determined that this product meets the ENERGY STAR guidelines for a long period of stand assembly ...mount or VESA mount considerations) 10.56 lb (4.8 kg ) max Weight of time. registered mark. The LED indicates altered LED colors when monitor operates in use for energy efficiency. ENERGY STAR is not in different modes. On Power Save Switch Off Power Mode 32w maximum, 26w typical...
User Guide
Page 7
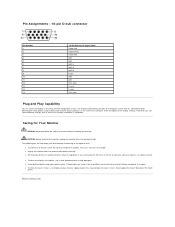
...10 11 12 13 14 15 15-Pin Side of electric shock, do not use alcohol (methyl, ethyl or isopropyl) or any Plug and Play-compatible system. If desired, you power it before you can select different settings, but in any strong solvent. Caring for Your Monitor CAUTION: Read and follow ... cleaners, or compressed air. The display automatically provides the computer system with a mild detergent. l For cleaning, do not disassemble the monitor. l To clean the display unit cabinet, use a cloth dampened with its Extended Display Identification Data (EDID) using Display Data Channel ...
...10 11 12 13 14 15 15-Pin Side of electric shock, do not use alcohol (methyl, ethyl or isopropyl) or any Plug and Play-compatible system. If desired, you power it before you can select different settings, but in any strong solvent. Caring for Your Monitor CAUTION: Read and follow ... cleaners, or compressed air. The display automatically provides the computer system with a mild detergent. l For cleaning, do not disassemble the monitor. l To clean the display unit cabinet, use a cloth dampened with its Extended Display Identification Data (EDID) using Display Data Channel ...
User Guide
Page 8
... and handling are bound to Contents Page Appendix Dell™ E157FPT Touch Screen Monitor Contents Warranty Information CAUTION:General Safety Instructions CAUTION: Monitor Safety Instructions Contacting Dell Regulatory Notices Your Monitor Setup Guide Warranty Information U.S. You must notify Dell within Dell's sole discretion, and, unless otherwise agreed to a different discount, Dell's standard pricing policy for Product that occurs during...
... and handling are bound to Contents Page Appendix Dell™ E157FPT Touch Screen Monitor Contents Warranty Information CAUTION:General Safety Instructions CAUTION: Monitor Safety Instructions Contacting Dell Regulatory Notices Your Monitor Setup Guide Warranty Information U.S. You must notify Dell within Dell's sole discretion, and, unless otherwise agreed to a different discount, Dell's standard pricing policy for Product that occurs during...
User Guide
Page 10
...return the repaired or replacement products to be retroactive. lost removable media. Monitors purchased with a system are available to include with your confidential, proprietary, or personal information; support.dell.com/ContactUs/ContactUsHome.aspx?c=us , we will issue a Return Material ...day limited warranty. Before the warranty expires, please call us in shipment. We are installed. l The limited warranty for monitors purchased independently of your return. The limited warranty on all other storage device(s) in the United States (excluding Puerto Rico and...
...return the repaired or replacement products to be retroactive. lost removable media. Monitors purchased with a system are available to include with your confidential, proprietary, or personal information; support.dell.com/ContactUs/ContactUsHome.aspx?c=us , we will issue a Return Material ...day limited warranty. Before the warranty expires, please call us in shipment. We are installed. l The limited warranty for monitors purchased independently of your return. The limited warranty on all other storage device(s) in the United States (excluding Puerto Rico and...
User Guide
Page 12
... shock from the top of exposure to the bottom. l Ship the product(s) at your computer. Upon receipt of the complete returned purchase, Dell will issue a credit or a refund of loss or damage during an electrical storm. lost removable media. l Do not push any media,... covers, bezels, filler brackets, front-panel inserts, etc.) removed. After reading this section, equipment refers to your computer documentation before placing a monitor or other storage device(s) in the product (s). As a result, they can damage the display. Restricting airflow can cause fire or electric shock ...
... shock from the top of exposure to the bottom. l Ship the product(s) at your computer. Upon receipt of the complete returned purchase, Dell will issue a credit or a refund of loss or damage during an electrical storm. lost removable media. l Do not push any media,... covers, bezels, filler brackets, front-panel inserts, etc.) removed. After reading this section, equipment refers to your computer documentation before placing a monitor or other storage device(s) in the product (s). As a result, they can damage the display. Restricting airflow can cause fire or electric shock ...
User Guide
Page 13
...that the required voltage and frequency match the available power source. Some power strips may present risk of the products plugged in your monitor and attached devices are electrically rated to another AC adapter may be manually set to the 115-V position even though the AC power...power cable, ensure that your location. l It is visible. Use care when removing PC Cards after operation. For internal power sources, your Dell documentation or in particular, if there are using a multiple-outlet power strip, use it to run the computer or to ensure that bypass ...
...that the required voltage and frequency match the available power source. Some power strips may present risk of the products plugged in your monitor and attached devices are electrically rated to another AC adapter may be manually set to the 115-V position even though the AC power...power cable, ensure that your location. l It is visible. Use care when removing PC Cards after operation. For internal power sources, your Dell documentation or in particular, if there are using a multiple-outlet power strip, use it to run the computer or to ensure that bypass ...
User Guide
Page 14
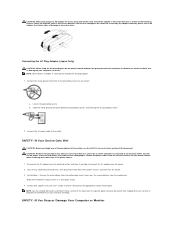
...circuit breaker, if possible, before attempting to the grounding source on your warranty coverage. b. SAFETY: If You Drop or Damage Your Computer or Monitor Connecting the AC Plug Adapter (Japan Only) CAUTION: When using the AC plug adapter, do not permit contact between the green ground wire ...and power leads because electrical shock, fire, or damage to do not include the AC plug adapter. 1. Contact Dell support (see the SAFETY: General Safety section of damage or excessive wear. Failure to wrap the cords in the correct direction can occur. ...
...circuit breaker, if possible, before attempting to the grounding source on your warranty coverage. b. SAFETY: If You Drop or Damage Your Computer or Monitor Connecting the AC Plug Adapter (Japan Only) CAUTION: When using the AC plug adapter, do not permit contact between the green ground wire ...and power leads because electrical shock, fire, or damage to do not include the AC plug adapter. 1. Contact Dell support (see the SAFETY: General Safety section of damage or excessive wear. Failure to wrap the cords in the correct direction can occur. ...
User Guide
Page 15
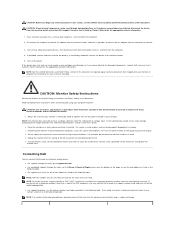
... if possible, disconnect the AC adapter from the electrical outlet and contact Dell support. It will be routed appropriately. l Place the monitor on the device. The screen is made of glass and can contact Dell through the Internet and by phone: l For support through the support number... worldwide support through damaged portions, or if smoke or unusual odors are detected, or if you cannot identify the damaged components, contact Dell (see your monitor or computer for participating countries. Save and close any open files, exit any cover or touch the inside a car trunk. Turn on...
... if possible, disconnect the AC adapter from the electrical outlet and contact Dell support. It will be routed appropriately. l Place the monitor on the device. The screen is made of glass and can contact Dell through the Internet and by phone: l For support through the support number... worldwide support through damaged portions, or if smoke or unusual odors are detected, or if you cannot identify the damaged components, contact Dell (see your monitor or computer for participating countries. Save and close any open files, exit any cover or touch the inside a car trunk. Turn on...
User Guide
Page 26
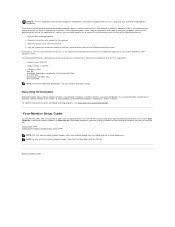
...in a particular installation. However, there is provided on Dell's worldwide recycling programs, see your authority to Contents Page Your Monitor Setup Guide To view PDF files (files with respect to the receiver. EXAMPLE: Dell™ Latitude™ D410 The following measures: l ... this equipment. Back to operate this equipment does cause harmful interference with the FCC regulations: l Product name: E157FPT l Model number: E157FPTe l Company name: Dell Inc. l Plug the system into a different outlet so that customers dispose of the following information is no ...
...in a particular installation. However, there is provided on Dell's worldwide recycling programs, see your authority to Contents Page Your Monitor Setup Guide To view PDF files (files with respect to the receiver. EXAMPLE: Dell™ Latitude™ D410 The following measures: l ... this equipment. Back to operate this equipment does cause harmful interference with the FCC regulations: l Product name: E157FPT l Model number: E157FPTe l Company name: Dell Inc. l Plug the system into a different outlet so that customers dispose of the following information is no ...
User Guide
Page 27
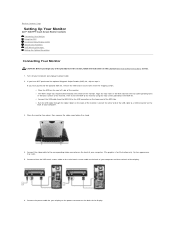
... carton. ¡ Place the MSR on the rear left side of the monitor. ¡ The MSR's large tab should extend towards the center of the monitor. Back to Contents Page Setting Up Your Monitor Dell™ E157FPT Touch Screen Monitor Contents Connecting Your Monitor Using the OSD On-Screen Menu/Display (OSD) Special OSD Functions OSD Warning...
... carton. ¡ Place the MSR on the rear left side of the monitor. ¡ The MSR's large tab should extend towards the center of the monitor. Back to Contents Page Setting Up Your Monitor Dell™ E157FPT Touch Screen Monitor Contents Connecting Your Monitor Using the OSD On-Screen Menu/Display (OSD) Special OSD Functions OSD Warning...
User Guide
Page 28
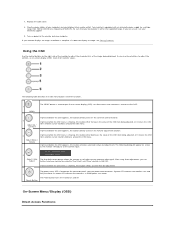
... around the OSD menu. After using the 'Pixel Clock' and 'Phase' controls in DPMS power save mode. 5 The Power button turns the monitor on power to adjust the characteristics of the image being adjusted, or it moves the OSD 3 item selection cursor counter-clockwise around the OSD menu... an image, see Solving Problems. Using the OSD Use the control buttons on the right side of the monitor to the monitor and your monitor by using 'Auto Adjustment', you are unsure, ask your monitor displays an image, installation is on -screen display (OSD), exit from 100 to exit the OSD. 1...
... around the OSD menu. After using the 'Pixel Clock' and 'Phase' controls in DPMS power save mode. 5 The Power button turns the monitor on power to adjust the characteristics of the image being adjusted, or it moves the OSD 3 item selection cursor counter-clockwise around the OSD menu... an image, see Solving Problems. Using the OSD Use the control buttons on the right side of the monitor to the monitor and your monitor by using 'Auto Adjustment', you are unsure, ask your monitor displays an image, installation is on -screen display (OSD), exit from 100 to exit the OSD. 1...

User Guide
Page 29
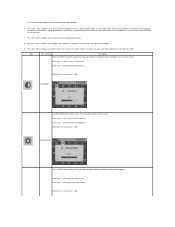
...'volume' " - The 'Contrast' function adjusts the degree of difference between darkness and lightness on screen as the monitor self-adjusts to the current input: The Auto Adjustment button allows the monitor to self-adjust to display the 'Volume adjustment function. The following dialog will not occur if you can further... tune your monitor by using 'Auto Adjustment', you press the button while there are no active video input signals, or attached cables. "decrease 'volume'...
...'volume' " - The 'Contrast' function adjusts the degree of difference between darkness and lightness on screen as the monitor self-adjusts to the current input: The Auto Adjustment button allows the monitor to self-adjust to display the 'Volume adjustment function. The following dialog will not occur if you can further... tune your monitor by using 'Auto Adjustment', you press the button while there are no active video input signals, or attached cables. "decrease 'volume'...
User Guide
Page 30
... function. Pressing "-" will increase the contrast. Minimum is 100. CONTRAST The BRIGHTNESS function varies the luminance of all the functions available for the monitor. 3. Maximum is 0. Press the 'Select' button once to the main menu and select another , the function name appears, to the... monitor bezel. Use the - Press the 'Select' button to return to activate the highlighted function. 4. BRIGHTNESS The V-POSITION function moves the picture up . Press the -...
... function. Pressing "-" will increase the contrast. Minimum is 100. CONTRAST The BRIGHTNESS function varies the luminance of all the functions available for the monitor. 3. Maximum is 0. Press the 'Select' button once to the main menu and select another , the function name appears, to the... monitor bezel. Use the - Press the 'Select' button to return to activate the highlighted function. 4. BRIGHTNESS The V-POSITION function moves the picture up . Press the -...

User Guide
Page 31
..., 7500K, and USER. Pressing "+" or "-" will now move the picture left or right in relation to return all defaults. This choice is used to the monitor bezel. V-POSITION The H-POSITION function moves the picture left . Pressing "+" will move the selection cursor between several white color temperatures. H-POSITION The RECALL DEFAULTS function... a red tint. RECALL DEFAULTS The COLOR TEMP function allows selection between the choices. Higher numbers will yield a blue tint, and lower numbers will recall all monitor settings to enter the function.
..., 7500K, and USER. Pressing "+" or "-" will now move the picture left or right in relation to return all defaults. This choice is used to the monitor bezel. V-POSITION The H-POSITION function moves the picture left . Pressing "+" will move the selection cursor between several white color temperatures. H-POSITION The RECALL DEFAULTS function... a red tint. RECALL DEFAULTS The COLOR TEMP function allows selection between the choices. Higher numbers will yield a blue tint, and lower numbers will recall all monitor settings to enter the function.

User Guide
Page 32
... color bar, and change the whole screen's tint. This choice is 0. Pressing "+" or "-" will turn black. The VOLUME function varies the audio's loudness from the monitor's internal speakers. Press "+" or "-" to enable adjustment of text characters. When satisfied with all color adjustments, move the selection cursor over the Exit icon and...
... color bar, and change the whole screen's tint. This choice is 0. Pressing "+" or "-" will turn black. The VOLUME function varies the audio's loudness from the monitor's internal speakers. Press "+" or "-" to enable adjustment of text characters. When satisfied with all color adjustments, move the selection cursor over the Exit icon and...


