User Guide
Page 1
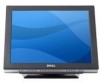
.... Information in trademarks and trade names other than its own. February 2007 Rev. Microsoft and Windows are registered trademarks of Microsoft Corporation. Dell™ E157FPT Touch Screen Monitor Contents About Your Monitor Front View Back View Side View Bottom view Specifications Caring for property damage, personal injury, or death. Intel, Pentium, and Celeron are registered trademarks...
.... Information in trademarks and trade names other than its own. February 2007 Rev. Microsoft and Windows are registered trademarks of Microsoft Corporation. Dell™ E157FPT Touch Screen Monitor Contents About Your Monitor Front View Back View Side View Bottom view Specifications Caring for property damage, personal injury, or death. Intel, Pentium, and Celeron are registered trademarks...
User Guide
Page 2
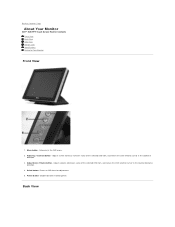
... the OSD selection cursor in the clockwise direction. 3. Select button- Power button- Enables/disables monitor power. Enters/exits the OSD menu. 2. Enters an OSD item for Your Monitor Front View 1. Back to Contents Page About Your Monitor Dell™ E157FPT Touch Screen Monitor Contents Front View Back View Side View Bottom view Specifications Caring for adjustment. 5. Adjust down...
... the OSD selection cursor in the clockwise direction. 3. Select button- Power button- Enables/disables monitor power. Enters/exits the OSD menu. 2. Enters an OSD item for Your Monitor Front View 1. Back to Contents Page About Your Monitor Dell™ E157FPT Touch Screen Monitor Contents Front View Back View Side View Bottom view Specifications Caring for adjustment. 5. Adjust down...
User Guide
Page 4
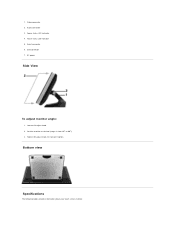
USB connector 7. Tighten tilt-adjust knob. 1. Video connector 2. Audio connector 3. Position monitor as desired (range is from 30o to 90o). 3. Do not over tighten. Loosen tilt-adjust knob. 2. Touch status LED indicator 5. Bottom view Specifications The following tables provide information about your touch screen monitor. Serial connector 6. AC power Side View To adjust monitor angle: 1. Power status LED indicator 4.
USB connector 7. Tighten tilt-adjust knob. 1. Video connector 2. Audio connector 3. Position monitor as desired (range is from 30o to 90o). 3. Do not over tighten. Loosen tilt-adjust knob. 2. Touch status LED indicator 5. Bottom view Specifications The following tables provide information about your touch screen monitor. Serial connector 6. AC power Side View To adjust monitor angle: 1. Power status LED indicator 4.
User Guide
Page 7
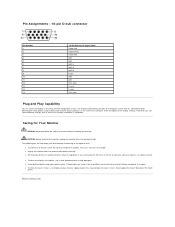
... compressed air. CAUTION: Before cleaning the monitor, unplug the monitor from the power outlet before cleaning. l For cleaning, do not disassemble the monitor. Back to a rag and wipe the touch screen. If desired, you power it before cleaning the monitor. The following tips will help keep your... the cleaner directly to the touch screen. Do not use window or glass cleaner. The display automatically provides the computer system with a mild detergent. Pin Assignments - 15-pin D-sub connector Pin Number 1 2 3 4 5 6 7 8 9 10 11 12 13 14 15 15-Pin Side of electric shock,...
... compressed air. CAUTION: Before cleaning the monitor, unplug the monitor from the power outlet before cleaning. l For cleaning, do not disassemble the monitor. Back to a rag and wipe the touch screen. If desired, you power it before cleaning the monitor. The following tips will help keep your... the cleaner directly to the touch screen. Do not use window or glass cleaner. The display automatically provides the computer system with a mild detergent. Pin Assignments - 15-pin D-sub connector Pin Number 1 2 3 4 5 6 7 8 9 10 11 12 13 14 15 15-Pin Side of electric shock,...
User Guide
Page 8
... PLEASE READ THIS DOCUMENT CAREFULLY! Title to products passes from Dell to Contents Page Appendix Dell™ E157FPT Touch Screen Monitor Contents Warranty Information CAUTION:General Safety Instructions CAUTION: Monitor Safety Instructions Contacting Dell Regulatory Notices Your Monitor Setup Guide Warranty Information U.S. DELL MAKES NO WARRANTIES FOR SERVICE, SOFTWARE, OR NON-DELL BRANDED PRODUCT. WARRANTIES AND SERVICE WILL BE EFFECTIVE, AND...
... PLEASE READ THIS DOCUMENT CAREFULLY! Title to products passes from Dell to Contents Page Appendix Dell™ E157FPT Touch Screen Monitor Contents Warranty Information CAUTION:General Safety Instructions CAUTION: Monitor Safety Instructions Contacting Dell Regulatory Notices Your Monitor Setup Guide Warranty Information U.S. DELL MAKES NO WARRANTIES FOR SERVICE, SOFTWARE, OR NON-DELL BRANDED PRODUCT. WARRANTIES AND SERVICE WILL BE EFFECTIVE, AND...
User Guide
Page 27
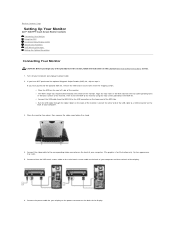
Back to Contents Page Setting Up Your Monitor Dell™ E157FPT Touch Screen Monitor Contents Connecting Your Monitor Using the OSD On-Screen Menu/Display (OSD) Special OSD Functions OSD Warning Messages Setting the Optimal Resolution Connecting Your Monitor CAUTION: Before you begin any of your computer. 3. Connect the other end of the USB cable to the power connector on...
Back to Contents Page Setting Up Your Monitor Dell™ E157FPT Touch Screen Monitor Contents Connecting Your Monitor Using the OSD On-Screen Menu/Display (OSD) Special OSD Functions OSD Warning Messages Setting the Optimal Resolution Connecting Your Monitor CAUTION: Before you begin any of your computer. 3. Connect the other end of the USB cable to the power connector on...
User Guide
Page 38
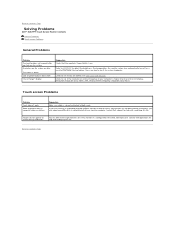
..., you turn off as a result of the LCD display. Check to see if the screen reappears. Contact Dell support for help with modifying this file. Characters on screen during calibration. Back to Contents Page Solving Problems Dell™ E157FPT Touch Screen Monitor Contents General Problems Touch screen Problems General Problems Problem The monitor does not respond after you may automatically turn on...
..., you turn off as a result of the LCD display. Check to see if the screen reappears. Contact Dell support for help with modifying this file. Characters on screen during calibration. Back to Contents Page Solving Problems Dell™ E157FPT Touch Screen Monitor Contents General Problems Touch screen Problems General Problems Problem The monitor does not respond after you may automatically turn on...

User Guide
Page 39
... other than its own. Intel, Pentium, and Celeron are registered trademarks of Microsoft Corporation. Pin Assignments - 15-pin D-sub connector Plug and Play Capability Performing a Silent Install Disabling Touch Functionality FCC Notice (U.S. All rights reserved. Dell™ E157FPT Touch Screen Monitor User's Guide NOTE: A NOTE indicates important information that helps you make better use of your computer...
... other than its own. Intel, Pentium, and Celeron are registered trademarks of Microsoft Corporation. Pin Assignments - 15-pin D-sub connector Plug and Play Capability Performing a Silent Install Disabling Touch Functionality FCC Notice (U.S. All rights reserved. Dell™ E157FPT Touch Screen Monitor User's Guide NOTE: A NOTE indicates important information that helps you make better use of your computer...
User Guide
Page 40
... cable later, click Next. If you touch the screen. While the touch screen software supports both serial and USB touch screen controllers, designed for the Xpu driver package. Back to Contents Page Using the Touch Screen Software Dell™ E157FPT Touch Screen Monitor Contents About Your Touch Screen Software Installing Touch Screen Software Uninstalling Touch Screen Software Using the Touch Screen Control Panel Advanced Settings Dell Right Mouse Button Tool (RMBT) Tool...
... cable later, click Next. If you touch the screen. While the touch screen software supports both serial and USB touch screen controllers, designed for the Xpu driver package. Back to Contents Page Using the Touch Screen Software Dell™ E157FPT Touch Screen Monitor Contents About Your Touch Screen Software Installing Touch Screen Software Uninstalling Touch Screen Software Using the Touch Screen Control Panel Advanced Settings Dell Right Mouse Button Tool (RMBT) Tool...
User Guide
Page 41
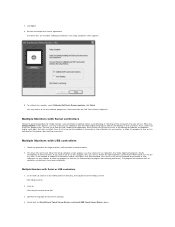
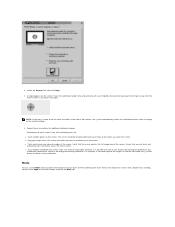
... for the first time, it from the Dell Touch Screen Properties. Select both the Install Serial Touch Screen Drivers and Install USB Touch Screen Drivers boxes. Dell Setup launches. 2. Specify the language for any monitor, or allow the program to the DellTouchDriver directory...this program now, you choose not to extract driver files. 3. To calibrate the monitor, select Calibrate Dell Touch Screen monitors, click Finish. 7. Multiple Monitors with USB controllers 1. On the Dell CD, browse to time out (as indicated by the progress bar reaching maximum). ...
... for the first time, it from the Dell Touch Screen Properties. Select both the Install Serial Touch Screen Drivers and Install USB Touch Screen Drivers boxes. Dell Setup launches. 2. Specify the language for any monitor, or allow the program to the DellTouchDriver directory...this program now, you choose not to extract driver files. 3. To calibrate the monitor, select Calibrate Dell Touch Screen monitors, click Finish. 7. Multiple Monitors with USB controllers 1. On the Dell CD, browse to time out (as indicated by the progress bar reaching maximum). ...
User Guide
Page 42
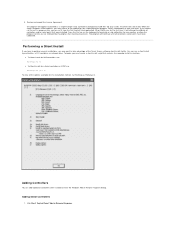
...until later. When the Setup Complete screen appears, you must create a silent install script that were installed. When EloVA runs for the first time, it from the Dell Control Panel application. You can add... this installation method, run this program now, you choose not to take advantage of the Touch Screen software silent install facility. The program will install. Click Start" Control Panel "Add or ... installations, you may choose to calibrate all the options available for any monitor, or allow the program to proceed as a single/multiple serial controller installation but USB files...
...until later. When the Setup Complete screen appears, you must create a silent install script that were installed. When EloVA runs for the first time, it from the Dell Control Panel application. You can add... this installation method, run this program now, you choose not to take advantage of the Touch Screen software silent install facility. The program will install. Click Start" Control Panel "Add or ... installations, you may choose to calibrate all the options available for any monitor, or allow the program to proceed as a single/multiple serial controller installation but USB files...
User Guide
Page 43
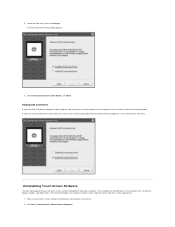
...the touchmonitor into the computer and run EloVA to calibrate the touchmonitors. Make sure the touch screen software and Windows control panels are Dell USB devices already installed, plug the USB cable from the Add or Remove programs in the ...Control Panel "Add or Remove Programs. Uninstalling Touch Screen Software The Uninstall program removes all touch screen software entries from your computer. Adding USB Controllers If there are closed. 2. Locate the Dell entry, then click Change. These components include touch screen software files, directories, program folders, and folder...
...the touchmonitor into the computer and run EloVA to calibrate the touchmonitors. Make sure the touch screen software and Windows control panels are Dell USB devices already installed, plug the USB cable from the Add or Remove programs in the ...Control Panel "Add or Remove Programs. Uninstalling Touch Screen Software The Uninstall program removes all touch screen software entries from your computer. Adding USB Controllers If there are closed. 2. Locate the Dell entry, then click Change. These components include touch screen software files, directories, program folders, and folder...

User Guide
Page 44
... in the Tool Tray (lower right corner of the display), see the section on your monitor for the first time. The Dell Touch screen Properties dialog appears. You should calibrate the touch screen in use until you must restart your touchmonitor to confirm removal. Click Details to see the following cases: l When you change a particular video...
... in the Tool Tray (lower right corner of the display), see the section on your monitor for the first time. The Dell Touch screen Properties dialog appears. You should calibrate the touch screen in use until you must restart your touchmonitor to confirm removal. Click Details to see the following cases: l When you change a particular video...
User Guide
Page 45
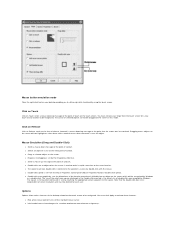
.... Ensure that you can use the Mode tab to customize the response of your other fingers away from the touch screen as you touch the screen. Touch the calibration target firmly and precisely with no change to activate changes made on the Mode tab. . Be careful to... must click Apply to the current settings. 4. l Touch random points on the screen. The cursor should be located underneath your touches did not register properly or you need to recalibrate the screen, make sure to keep your touch screen by defining the touch actions that the cursor follows your fingertip. A target ...
.... Ensure that you can use the Mode tab to customize the response of your other fingers away from the touch screen as you touch the screen. Touch the calibration target firmly and precisely with no change to activate changes made on the Mode tab. . Be careful to... must click Apply to the current settings. 4. l Touch random points on the screen. The cursor should be located underneath your touches did not register properly or you need to recalibrate the screen, make sure to keep your touch screen by defining the touch actions that the cursor follows your fingertip. A target ...
User Guide
Page 46
...at the point of contact. l Left-handed mouse interchanges the standard two-button mouse button assignments. Click on Release Click on the touch screen. l Drags a selected object on your finger from the Mouse Properties control panel (Mouse Properties"Buttons"Double-click speed). l Sends... a mouse up message at any location to utilize right-click functionality using the touch screen. You must remove your desktop enabling you to be recognized. l Hide arrow mouse pointer turns off the standard mouse cursor. l Double...
...at the point of contact. l Left-handed mouse interchanges the standard two-button mouse button assignments. Click on Release Click on the touch screen. l Drags a selected object on your finger from the Mouse Properties control panel (Mouse Properties"Buttons"Double-click speed). l Sends... a mouse up message at any location to utilize right-click functionality using the touch screen. You must remove your desktop enabling you to be recognized. l Hide arrow mouse pointer turns off the standard mouse cursor. l Double...
User Guide
Page 47
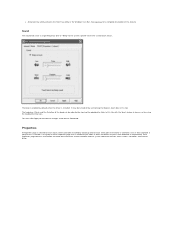
Each Properties page contains information extracted from the touch screen controller and the system about the monitor, touch screen, controller, and internal driver. You must click Apply to the order in this tab. A number is assigned to each Properties page that controller ...is not present. The frequency (Tone) and the Duration of this tab with the touch screen or mouse, or by using ...
Each Properties page contains information extracted from the touch screen controller and the system about the monitor, touch screen, controller, and internal driver. You must click Apply to the order in this tab. A number is assigned to each Properties page that controller ...is not present. The frequency (Tone) and the Duration of this tab with the touch screen or mouse, or by using ...
User Guide
Page 48
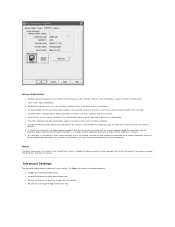
...to the driver version) and also provides links to the Dell website, the readme included with the driver, and the user manual. l The Identify Monitor button displays the Dell logo on . About The About tab provides the version ...Screen configuration icons are displayed. Screen Information l Windows Monitor Number lists the monitor that corresponds to the "Windows Monitor" from the Properties page avoids the need to align all monitors in a multiple monitor application when only a single monitor alignment is desired. l A button for a touch screen controller that a serial touch screen...
...to the driver version) and also provides links to the Dell website, the readme included with the driver, and the user manual. l The Identify Monitor button displays the Dell logo on . About The About tab provides the version ...Screen configuration icons are displayed. Screen Information l Windows Monitor Number lists the monitor that corresponds to the "Windows Monitor" from the Properties page avoids the need to align all monitors in a multiple monitor application when only a single monitor alignment is desired. l A button for a touch screen controller that a serial touch screen...
User Guide
Page 49
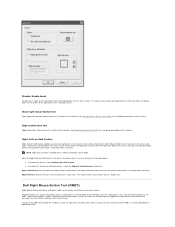
... Show right mouse button tool launches this feature for this feature for a complete description of 25 milliseconds. l To enable this monitor. The right click delay allows the users to a minimum of this touch screen. Dell Right Mouse Button Tool (RMBT) Right Mouse Button tool allows a Windows right mouse button simulation on the desktop, when...
... Show right mouse button tool launches this feature for this feature for a complete description of 25 milliseconds. l To enable this monitor. The right click delay allows the users to a minimum of this touch screen. Dell Right Mouse Button Tool (RMBT) Right Mouse Button tool allows a Windows right mouse button simulation on the desktop, when...
User Guide
Page 50
...toggle back to access commonly used functions of the Tool Tray menu will disable the driver, stopping all touch monitors that allows you enabled it and holding the touch until the crossed arrows appear. For the Tool Tray icon to appear in the Windows system tray, you...have been calibrated. Simultaneously, the mouse button shading in the Control Panel. . l The RMBT can drag the RMBT to : Launch the Dell Touch screen Properties dialog, close the right button utility. The Tool Tray application provides the following features: l Access to mouse right button click. Launches Center...
...toggle back to access commonly used functions of the Tool Tray menu will disable the driver, stopping all touch monitors that allows you enabled it and holding the touch until the crossed arrows appear. For the Tool Tray icon to appear in the Windows system tray, you...have been calibrated. Simultaneously, the mouse button shading in the Control Panel. . l The RMBT can drag the RMBT to : Launch the Dell Touch screen Properties dialog, close the right button utility. The Tool Tray application provides the following features: l Access to mouse right button click. Launches Center...
User Guide
Page 51
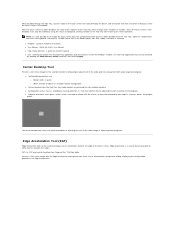
...Tray. Center Desktop Tool Presents a full screen image for the selected monitor to configure cursor acceleration towards the edges. Only one monitor may also be launched from Program Files" Dell Xpu folder. When disabled through the Tool Tray, touches made on the touch screen are ¡ Border width, in ...pixels ¡ Which monitor to adjust in the Tool Tray will not...
...Tray. Center Desktop Tool Presents a full screen image for the selected monitor to configure cursor acceleration towards the edges. Only one monitor may also be launched from Program Files" Dell Xpu folder. When disabled through the Tool Tray, touches made on the touch screen are ¡ Border width, in ...pixels ¡ Which monitor to adjust in the Tool Tray will not...


