User Guide
Page 1
... is strictly forbidden. disclaims any manner whatsoever without notice. © 2007 Dell Inc. Microsoft and Windows are registered trademarks of Dell Inc.; Information in trademarks and trade names other than its own. Dell Inc. A02 Dell™ E157FPT Touch Screen Monitor Contents About Your Monitor Front View Back View Side View Bottom view Specifications Caring for property...
... is strictly forbidden. disclaims any manner whatsoever without notice. © 2007 Dell Inc. Microsoft and Windows are registered trademarks of Dell Inc.; Information in trademarks and trade names other than its own. Dell Inc. A02 Dell™ E157FPT Touch Screen Monitor Contents About Your Monitor Front View Back View Side View Bottom view Specifications Caring for property...
User Guide
Page 2
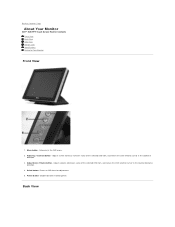
Adjust down /Volume button - Enables/disables monitor power. Back View Adjusts screen contrast, increases value of the selected OSD item, and moves the OSD selection cursor in the clockwise direction. 3. Menu button - ... the selected OSD item, and moves the OSD selection cursor in the counter-clockwise direction. 4. Enters an OSD item for Your Monitor Front View 1. Back to Contents Page About Your Monitor Dell™ E157FPT Touch Screen Monitor Contents Front View Back View Side View Bottom view Specifications Caring for adjustment. 5. Enters/exits the OSD menu. 2.
Adjust down /Volume button - Enables/disables monitor power. Back View Adjusts screen contrast, increases value of the selected OSD item, and moves the OSD selection cursor in the clockwise direction. 3. Menu button - ... the selected OSD item, and moves the OSD selection cursor in the counter-clockwise direction. 4. Enters an OSD item for Your Monitor Front View 1. Back to Contents Page About Your Monitor Dell™ E157FPT Touch Screen Monitor Contents Front View Back View Side View Bottom view Specifications Caring for adjustment. 5. Enters/exits the OSD menu. 2.
User Guide
Page 3
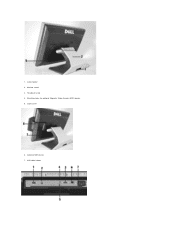
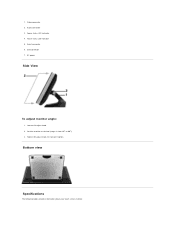
1. Monitor stand 3. Optional MSR device 7. Mounting holes for optional Magnetic Stripe Reader (MSR) device 5. Cable cover 6. Cable holder 2. Tilt-adjust knob 4. USB cable holder
1. Monitor stand 3. Optional MSR device 7. Mounting holes for optional Magnetic Stripe Reader (MSR) device 5. Cable cover 6. Cable holder 2. Tilt-adjust knob 4. USB cable holder
User Guide
Page 4
Audio connector 3. Serial connector 6. Loosen tilt-adjust knob. 2. 1. Video connector 2. Tighten tilt-adjust knob. Do not over tighten. Bottom view Specifications The following tables provide information about your touch screen monitor. Power status LED indicator 4. Touch status LED indicator 5. AC power Side View To adjust monitor angle: 1. Position monitor as desired (range is from 30o to 90o). 3. USB connector 7.
Audio connector 3. Serial connector 6. Loosen tilt-adjust knob. 2. 1. Video connector 2. Tighten tilt-adjust knob. Do not over tighten. Bottom view Specifications The following tables provide information about your touch screen monitor. Power status LED indicator 4. Touch status LED indicator 5. AC power Side View To adjust monitor angle: 1. Position monitor as desired (range is from 30o to 90o). 3. USB connector 7.
User Guide
Page 5
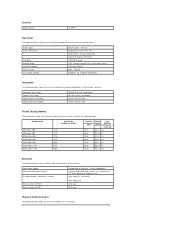
...LCD Diagonal 15 inches (381 mm) Horizontal 11.9 inches (304 mm) Vertical 8.9 inches (228 mm) 0.297x0.297mm 125° (vertical) typical, 140° (horizontal) typical 230 cd/m2 typical 500 : 1 typical Hardness 3H, antiglare treatment Resolution The following table. Screen type Screen dimensions Pixel pitch Viewing angle Luminance output Contrast ratio LCD... Display Modes Dell guarantees image size and centering for all preset modes listed in the following table shows the scan rate and pixel resolution capabilities of the monitor's display. General Model number E157FPT Flat Panel ...
...LCD Diagonal 15 inches (381 mm) Horizontal 11.9 inches (304 mm) Vertical 8.9 inches (228 mm) 0.297x0.297mm 125° (vertical) typical, 140° (horizontal) typical 230 cd/m2 typical 500 : 1 typical Hardness 3H, antiglare treatment Resolution The following table. Screen type Screen dimensions Pixel pitch Viewing angle Luminance output Contrast ratio LCD... Display Modes Dell guarantees image size and centering for all preset modes listed in the following table shows the scan rate and pixel resolution capabilities of the monitor's display. General Model number E157FPT Flat Panel ...
User Guide
Page 6
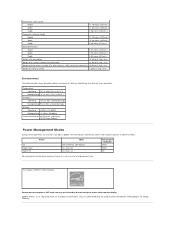
... (non-operating). The LED indicates altered LED colors when monitor operates in OFF mode can only be achieved by disconnecting the mains cable from the display. As an ENERGY STAR Partner, DELL has determined that this product meets the ENERGY STAR guidelines for a long period of stand ...m (40,000 ft) Thermal dissipation 89 BTU/hour (maximum) 75 BTU/hour (typical) Power Management Modes During normal operation, the monitor's LED light is not in use for energy efficiency. This display is a U.S. ENERGY STAR is ENERGY STAR-compliant. Zero power consumption in different ...
... (non-operating). The LED indicates altered LED colors when monitor operates in OFF mode can only be achieved by disconnecting the mains cable from the display. As an ENERGY STAR Partner, DELL has determined that this product meets the ENERGY STAR guidelines for a long period of stand ...m (40,000 ft) Thermal dissipation 89 BTU/hour (maximum) 75 BTU/hour (typical) Power Management Modes During normal operation, the monitor's LED light is not in use for energy efficiency. This display is a U.S. ENERGY STAR is ENERGY STAR-compliant. Zero power consumption in different ...
User Guide
Page 7
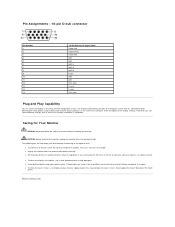
...liquid does get inside your touchmonitor functioning at the optimal level. Apply cleaner to a rag and wipe the touch screen. l Unplug the monitor from the electrical outlet. l Avoid getting liquids inside , have a qualified service technician check it on again. The display automatically provides the... a mild detergent. If desired, you power it before cleaning the monitor. The following tips will help keep your touchmonitor. Pin Assignments - 15-pin D-sub connector Pin Number 1 2 3 4 5 6 7 8 9 10 11 12 13 14 15 15-Pin Side of electric shock, do not use a cloth dampened with...
...liquid does get inside your touchmonitor functioning at the optimal level. Apply cleaner to a rag and wipe the touch screen. l Unplug the monitor from the electrical outlet. l Avoid getting liquids inside , have a qualified service technician check it on again. The display automatically provides the... a mild detergent. If desired, you power it before cleaning the monitor. The following tips will help keep your touchmonitor. Pin Assignments - 15-pin D-sub connector Pin Number 1 2 3 4 5 6 7 8 9 10 11 12 13 14 15 15-Pin Side of electric shock, do not use a cloth dampened with...
User Guide
Page 8
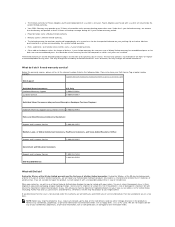
.... You are responsible for our contact information.) If returned, Product(s) must return Product to Contents Page Appendix Dell™ E157FPT Touch Screen Monitor Contents Warranty Information CAUTION:General Safety Instructions CAUTION: Monitor Safety Instructions Contacting Dell Regulatory Notices Your Monitor Setup Guide Warranty Information U.S. You may be bound by the use of this invoice, measured from...
.... You are responsible for our contact information.) If returned, Product(s) must return Product to Contents Page Appendix Dell™ E157FPT Touch Screen Monitor Contents Warranty Information CAUTION:General Safety Instructions CAUTION: Monitor Safety Instructions Contacting Dell Regulatory Notices Your Monitor Setup Guide Warranty Information U.S. You may be bound by the use of this invoice, measured from...
User Guide
Page 10
... (VARs): Support and Customer Service 1-800-822-8965 Government and Education Customers: Support and Customer Service Dell-Branded Memory 1-800-234-1490 1-888-363-5150 What will provide at the relevant number listed in shipment. Monitors purchased with a system are covered by the system limited warranty. We will issue a Return Material Authorization...
... (VARs): Support and Customer Service 1-800-822-8965 Government and Education Customers: Support and Customer Service Dell-Branded Memory 1-800-234-1490 1-888-363-5150 What will provide at the relevant number listed in shipment. Monitors purchased with a system are covered by the system limited warranty. We will issue a Return Material Authorization...
User Guide
Page 12
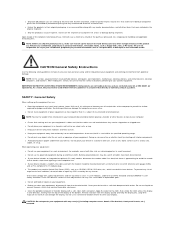
... range. Clean your equipment and working environment from lightning via the telephone line. Upon receipt of the complete returned purchase, Dell will issue a credit or a refund of electric shock from potential damage. CAUTION:General Safety Instructions Use the following safety ... safety and to all portable devices (computers, port replicators, media bases, docking stations, and similar devices), desktop computers, and monitors. Restricting airflow can be manufactured with any user serviceable or replaceable parts. l Ship back all products you are seeking to return...
... range. Clean your equipment and working environment from lightning via the telephone line. Upon receipt of the complete returned purchase, Dell will issue a credit or a refund of electric shock from potential damage. CAUTION:General Safety Instructions Use the following safety ... safety and to all portable devices (computers, port replicators, media bases, docking stations, and similar devices), desktop computers, and monitors. Restricting airflow can be manufactured with any user serviceable or replaceable parts. l Ship back all products you are seeking to return...
User Guide
Page 13
... plug the equipment power cables into an electrical outlet if the power cable is equipped with a manual voltage selection switch, set to your Dell documentation or in permanent damage to operate at the correct operating voltage. l Place the AC adapter in your system may become hot during or...your computer. Use of any reason the green light goes off due to the extension power cable does not exceed the ampere rating of your monitor and attached devices are electrically rated to a grounded electrical outlet only. Use care when removing PC Cards after operation. OR ¡ A...
... plug the equipment power cables into an electrical outlet if the power cable is equipped with a manual voltage selection switch, set to your Dell documentation or in permanent damage to operate at the correct operating voltage. l Place the AC adapter in your system may become hot during or...your computer. Use of any reason the green light goes off due to the extension power cable does not exceed the ampere rating of your monitor and attached devices are electrically rated to a grounded electrical outlet only. Use care when removing PC Cards after operation. OR ¡ A...
User Guide
Page 14
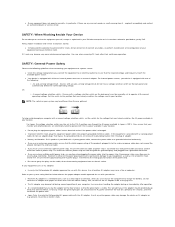
... Disconnect the AC adapter from the electrical outlet, and then, if possible, disconnect the AC adapter from a live power source. 1. Contact Dell support (see the SAFETY: General Safety section of this section, see your AC adapter for travel, wrap both of this procedure only after you... from the electrical outlet. NOTE: Some devices available in damage to dry. 4. SAFETY: If You Drop or Damage Your Computer or Monitor CAUTION: Perform this document or separate paper warranty document that shows signs of the procedures in the correct direction can occur. Slide the metal...
... Disconnect the AC adapter from the electrical outlet, and then, if possible, disconnect the AC adapter from a live power source. 1. Contact Dell support (see the SAFETY: General Safety section of this section, see your AC adapter for travel, wrap both of this procedure only after you... from the electrical outlet. NOTE: Some devices available in damage to dry. 4. SAFETY: If You Drop or Damage Your Computer or Monitor CAUTION: Perform this document or separate paper warranty document that shows signs of the procedures in the correct direction can occur. Slide the metal...
User Guide
Page 15
... "Electrical Specifications" section in the User's Guide. NOTE: In certain countries, support specific to Dell™ XPS™ computers is available at the time that your monitor is electrically rated to operate with your warranty coverage. If you need or have an adverse effect..., connect the device to severe vibration or high impact conditions. l Place the monitor on the device. l Always be left unused for information on the liquid crystal of the display. Contacting Dell You can have a voltage selection switch for the appropriate contact information). CAUTION: Before...
... "Electrical Specifications" section in the User's Guide. NOTE: In certain countries, support specific to Dell™ XPS™ computers is available at the time that your monitor is electrically rated to operate with your warranty coverage. If you need or have an adverse effect..., connect the device to severe vibration or high impact conditions. l Place the monitor on the device. l Always be left unused for information on the liquid crystal of the display. Contacting Dell You can have a voltage selection switch for the appropriate contact information). CAUTION: Before...
User Guide
Page 26
... l Relocate the system with the FCC regulations: l Product name: E157FPT l Model number: E157FPTe l Company name: Dell Inc. These limits are on Dell's worldwide recycling programs, see your Product Information Guide. NOTICE: The... FCC regulations provide that changes or modifications not expressly approved by one or more of the following information is no guarantee that customers dispose of their used computer hardware, monitors...
... l Relocate the system with the FCC regulations: l Product name: E157FPT l Model number: E157FPTe l Company name: Dell Inc. These limits are on Dell's worldwide recycling programs, see your Product Information Guide. NOTICE: The... FCC regulations provide that changes or modifications not expressly approved by one or more of the following information is no guarantee that customers dispose of their used computer hardware, monitors...
User Guide
Page 27
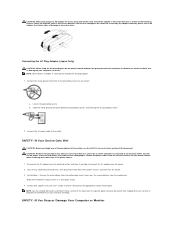
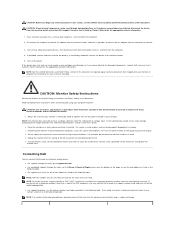
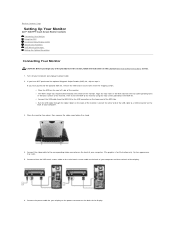
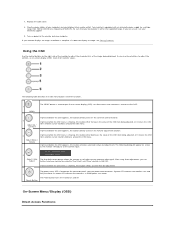
...the two corresponding holes in the back surface of the display. Back to Contents Page Setting Up Your Monitor Dell™ E157FPT Touch Screen Monitor Contents Connecting Your Monitor Using the OSD On-Screen Menu/Display (OSD) Special OSD Functions OSD Warning Messages Setting the Optimal ...Resolution Connecting Your Monitor CAUTION: Before you have NOT purchased the optional Magnetic Stripe Reader (MSR) kit, skip to step 3....
...the two corresponding holes in the back surface of the display. Back to Contents Page Setting Up Your Monitor Dell™ E157FPT Touch Screen Monitor Contents Connecting Your Monitor Using the OSD On-Screen Menu/Display (OSD) Special OSD Functions OSD Warning Messages Setting the Optimal ...Resolution Connecting Your Monitor CAUTION: Before you have NOT purchased the optional Magnetic Stripe Reader (MSR) kit, skip to step 3....
User Guide
Page 28
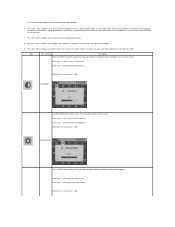
...menu is showing, this button activates automatic setup and adjustment. The following dialog will appear on the right side of the monitor to the monitor and your monitor by using 'Auto Adjustment', you are unsure, ask your display into a nearby outlet. Contrast If pressed before the OSD... is located on and off. Replace the cable cover. 8. If pressed while the OSD menu is complete. Be sure that your monitor displays an image, installation is showing, this button directly accesses the Volume adjustment function. The following table describes the OSD menu buttons and...
...menu is showing, this button activates automatic setup and adjustment. The following dialog will appear on the right side of the monitor to the monitor and your monitor by using 'Auto Adjustment', you are unsure, ask your display into a nearby outlet. Contrast If pressed before the OSD... is located on and off. Replace the cable cover. 8. If pressed while the OSD menu is complete. Be sure that your monitor displays an image, installation is showing, this button directly accesses the Volume adjustment function. The following table describes the OSD menu buttons and...

User Guide
Page 29
...The 'Contrast' function adjusts the degree of difference between darkness and lightness on screen as the monitor self-adjusts to the current input: The Auto Adjustment button allows the monitor to self-adjust to activate automatic setup and adjustment. Function Auto Adjustment Adjustment Method While the ...video signal. The "Volume" function adjusts the sound level from the internal speakers. The following dialog will not occur if you can further tune your monitor by using the 'Pixel Clock' and 'Phase' controls in the OSD. "+" increase 'volume' " - With the menu off , press the button...
...The 'Contrast' function adjusts the degree of difference between darkness and lightness on screen as the monitor self-adjusts to the current input: The Auto Adjustment button allows the monitor to self-adjust to activate automatic setup and adjustment. Function Auto Adjustment Adjustment Method While the ...video signal. The "Volume" function adjusts the sound level from the internal speakers. The following dialog will not occur if you can further tune your monitor by using the 'Pixel Clock' and 'Phase' controls in the OSD. "+" increase 'volume' " - With the menu off , press the button...
User Guide
Page 30
... to other function icons. Icon Menu Name Description The CONTRAST function varies the intensity difference between dark and light areas on the menu, to the monitor bezel. Pressing "+" will decrease the brightness. Pressing "-" will increase the contrast. Minimum is 0. Press the 'Select' button to return to activate the highlighted function. ... is 100. As you move the picture up or down . CONTRAST The BRIGHTNESS function varies the luminance of all the functions available for the monitor. 3. Maximum is 100. Pressing "+" will move from the OSD.
... to other function icons. Icon Menu Name Description The CONTRAST function varies the intensity difference between dark and light areas on the menu, to the monitor bezel. Pressing "+" will decrease the brightness. Pressing "-" will increase the contrast. Minimum is 0. Press the 'Select' button to return to activate the highlighted function. ... is 100. As you move the picture up or down . CONTRAST The BRIGHTNESS function varies the luminance of all the functions available for the monitor. 3. Maximum is 100. Pressing "+" will move from the OSD.

User Guide
Page 31
Pressing "Select" will recall all monitor settings to the monitor bezel. Pressing "+", "-", or "Menu" will yield a red tint. RECALL DEFAULTS The COLOR TEMP function allows selection between the choices. Pressing "+" or "-" will be replaced by ...
Pressing "Select" will recall all monitor settings to the monitor bezel. Pressing "+", "-", or "Menu" will yield a red tint. RECALL DEFAULTS The COLOR TEMP function allows selection between the choices. Pressing "+" or "-" will be replaced by ...

User Guide
Page 32
... of that color's intensity, lengthen or shorten its color bar, and change the whole screen's tint. The VOLUME function varies the audio's loudness from the monitor's internal speakers. Minimum is 0. With the selection cursor highlighting the desired R, B, or G icon, press "Select" to save the color's adjustment. Maximum is 0. A setting of the...
... of that color's intensity, lengthen or shorten its color bar, and change the whole screen's tint. The VOLUME function varies the audio's loudness from the monitor's internal speakers. Minimum is 0. With the selection cursor highlighting the desired R, B, or G icon, press "Select" to save the color's adjustment. Maximum is 0. A setting of the...


