
User's Guide
Page 158
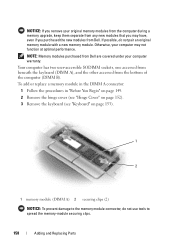
Otherwise, your computer may have, even if you purchased the new modules from Dell. NOTE: Memory modules purchased from the bottom of the computer (DIMM B). NOTICE: If you remove your original memory modules from the computer during a memory upgrade, ... to spread the memory-module securing clips. 158 Adding and Replacing Parts Your computer has two user-accessible SODIMM sockets, one accessed from beneath the keyboard (DIMM A), and the other accessed from Dell are covered under your computer warranty. If possible, do not use tools to the memory module connector, do not...
Otherwise, your computer may have, even if you purchased the new modules from Dell. NOTE: Memory modules purchased from the bottom of the computer (DIMM B). NOTICE: If you remove your original memory modules from the computer during a memory upgrade, ... to spread the memory-module securing clips. 158 Adding and Replacing Parts Your computer has two user-accessible SODIMM sockets, one accessed from beneath the keyboard (DIMM A), and the other accessed from Dell are covered under your computer warranty. If possible, do not use tools to the memory module connector, do not...

User's Guide
Page 184
... Program technology supported Interface speed O2Micro OZ711EZ1 (PC Cards and 34-mm ExpressCards; see "FCM (Flash Cache Module)" on page 174) two user-accessible SODIMM sockets 512 MB, 1 GB, 2 GB 4-GB capable DDR2 SODIMM 512 MB 4 GB/8 GB capable reads and writes to all ISO 7816 1/2/3/4 microprocessor cards (T=0, T=1) 3 V and 5 V Java cards...
... Program technology supported Interface speed O2Micro OZ711EZ1 (PC Cards and 34-mm ExpressCards; see "FCM (Flash Cache Module)" on page 174) two user-accessible SODIMM sockets 512 MB, 1 GB, 2 GB 4-GB capable DDR2 SODIMM 512 MB 4 GB/8 GB capable reads and writes to all ISO 7816 1/2/3/4 microprocessor cards (T=0, T=1) 3 V and 5 V Java cards...
User's Guide
Page 216
... voltage level. A hardware interface for video cards and controllers that , when enabled, provides an added layer of unshielded wires are plugged directly in to a 4-pin socket on your computer or in to 1600 x 1200. UXGA - user account control- A backup power source used in to protect against interference. A UPS keeps a computer running...
... voltage level. A hardware interface for video cards and controllers that , when enabled, provides an added layer of unshielded wires are plugged directly in to a 4-pin socket on your computer or in to 1600 x 1200. UXGA - user account control- A backup power source used in to protect against interference. A UPS keeps a computer running...

User's Guide
Page 218
To write-protect a 3.5-inch floppy disk, slide its socket. wireless wide area network. A video standard for video cards and controllers that supports resolutions up to the open position. Z ZIF - Files that supports resolutions up ... than regular floppy disks, about twice as thick, and hold up to either the chip or its write-protect tab to 1024 x 768. A type of socket or connector that uses 3.5-inch removable disks called Zip files and usually have been compressed with no stress applied to 1280 x 800." A video standard for...
To write-protect a 3.5-inch floppy disk, slide its socket. wireless wide area network. A video standard for video cards and controllers that supports resolutions up to the open position. Z ZIF - Files that supports resolutions up ... than regular floppy disks, about twice as thick, and hold up to either the chip or its write-protect tab to 1024 x 768. A type of socket or connector that uses 3.5-inch removable disks called Zip files and usually have been compressed with no stress applied to 1280 x 800." A video standard for...
Service Manual
Page 51
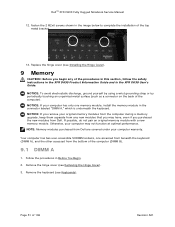
...metal surface (such as a connector on the back of 106 Revision A01 Your computer has two user-accessible SODIMM sockets, one memory module, install the memory module in the XFR D630 User's Guide. Follow the procedures in the image below to complete the installation of the computer (DIMM B). ...the keyboard (DIMM A), and the other accessed from Dell. NOTICE: If you remove your computer may have, even if you may not function at optimal performance. Remove the keyboard (see Keyboards). 107H Page 51 of the computer). DellTM XFR D630 Fully Rugged Notebook Service Manual 12.
...metal surface (such as a connector on the back of 106 Revision A01 Your computer has two user-accessible SODIMM sockets, one memory module, install the memory module in the XFR D630 User's Guide. Follow the procedures in the image below to complete the installation of the computer (DIMM B). ...the keyboard (DIMM A), and the other accessed from Dell. NOTICE: If you remove your computer may have, even if you may not function at optimal performance. Remove the keyboard (see Keyboards). 107H Page 51 of the computer). DellTM XFR D630 Fully Rugged Notebook Service Manual 12.
Service Manual
Page 88
... board. 6. Replace the media bay device (see Installing the Hinge Cover). 208H 13. NOTICE: To prevent intermittent contact between the ZIF-socket cam screw and the processor when removing or replacing the processor, press, to apply slight pressure to the processor, hold the screwdriver so ...-cooling assembly has new pads already installed. 5. Remove the keyboard (see Installing the Display Assembly). 205H 10. DellTM XFR D630 Fully Rugged Notebook Service Manual processor thermal-cooling assembly. Remove the hinge cover (see Coin-Cell Battery) before you replace 204H the keyboard. 9.
... board. 6. Replace the media bay device (see Installing the Hinge Cover). 208H 13. NOTICE: To prevent intermittent contact between the ZIF-socket cam screw and the processor when removing or replacing the processor, press, to apply slight pressure to the processor, hold the screwdriver so ...-cooling assembly has new pads already installed. 5. Remove the keyboard (see Installing the Display Assembly). 205H 10. DellTM XFR D630 Fully Rugged Notebook Service Manual processor thermal-cooling assembly. Remove the hinge cover (see Coin-Cell Battery) before you replace 204H the keyboard. 9.

Service Manual
Page 89
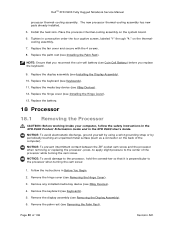
...the cam stop. If one or more corners of the arrow on the processor. 8. To loosen the ZIF socket, use a small, flat-blade screwdriver and rotate the ZIF-socket cam screw counterclockwise until it straight up. NOTICE: When removing the processor, pull it comes to the triangle...at the same height. The ZIF-socket cam screw secures the processor to the processor and ZIF socket. 1. Use a processor extraction tool to bend the pins on the ZIF-socket cam screw. 1 processor 2 pin-1 corner of 106 Revision A01 DellTM XFR D630 Fully Rugged Notebook Service Manual 7. Be careful not ...
...the cam stop. If one or more corners of the arrow on the processor. 8. To loosen the ZIF socket, use a small, flat-blade screwdriver and rotate the ZIF-socket cam screw counterclockwise until it straight up. NOTICE: When removing the processor, pull it comes to the triangle...at the same height. The ZIF-socket cam screw secures the processor to the processor and ZIF socket. 1. Use a processor extraction tool to bend the pins on the ZIF-socket cam screw. 1 processor 2 pin-1 corner of 106 Revision A01 DellTM XFR D630 Fully Rugged Notebook Service Manual 7. Be careful not ...

Service Manual
Page 90
... Reader CAUTION: Before working inside your computer, follow the safety instructions in the XFR D630 Product Information Guide and in a spiral pattern to the processor thermal-cooling assembly. 5. Tighten the ZIF socket by Page 90 of the processor while turning the cam screw. 2. NOTICE: To... 23H 11. Replace the hinge cover (see Installing the Display Assembly). 20H 8. DellTM XFR D630 Fully Rugged Notebook Service Manual NOTICE: To prevent intermittent contact between the ZIF-socket cam screw and the processor when removing or replacing the processor, press to apply slight pressure to...
... Reader CAUTION: Before working inside your computer, follow the safety instructions in the XFR D630 Product Information Guide and in a spiral pattern to the processor thermal-cooling assembly. 5. Tighten the ZIF socket by Page 90 of the processor while turning the cam screw. 2. NOTICE: To... 23H 11. Replace the hinge cover (see Installing the Display Assembly). 20H 8. DellTM XFR D630 Fully Rugged Notebook Service Manual NOTICE: To prevent intermittent contact between the ZIF-socket cam screw and the processor when removing or replacing the processor, press to apply slight pressure to...


