Quick Reference Guide
Page 13
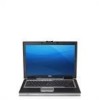
...Using wireless communications devices, PC Cards, ExpressCards, media memory cards, or USB devices • Using high-brightness display settings, 3D screen savers, or other computers with the AC adapter until the battery is used and the conditions under which it is fully charged.... local waste disposal or environmental agency for your computer, see "Configuring Power Management Settings" in your User's Guide). Replace the battery only with your Dell computer. To view battery charge status, click Start→ Settings→ Control Panel→ Power Options→ Power...
...Using wireless communications devices, PC Cards, ExpressCards, media memory cards, or USB devices • Using high-brightness display settings, 3D screen savers, or other computers with the AC adapter until the battery is used and the conditions under which it is fully charged.... local waste disposal or environmental agency for your computer, see "Configuring Power Management Settings" in your User's Guide). Replace the battery only with your Dell computer. To view battery charge status, click Start→ Settings→ Control Panel→ Power Options→ Power...
User's Guide
Page 42
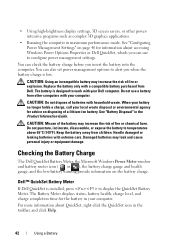
... QuickSet, right-click the QuickSet icon in maximum performance mode. Replace the battery only with a compatible battery purchased from children. Keep the battery away from Dell. • Using high-brightness display settings, 3D screen savers, or other computers with your computer. You can check... the battery to display the QuickSet Battery Meter. CAUTION: Do not dispose of a lithium-ion battery. Checking the Battery Charge The Dell QuickSet Battery Meter, the Microsoft Windows Power Meter window and battery meter icon ( or ), the battery charge gauge and health gauge,...
... QuickSet, right-click the QuickSet icon in maximum performance mode. Replace the battery only with a compatible battery purchased from children. Keep the battery away from Dell. • Using high-brightness display settings, 3D screen savers, or other computers with your computer. You can check... the battery to display the QuickSet Battery Meter. CAUTION: Do not dispose of a lithium-ion battery. Checking the Battery Charge The Dell QuickSet Battery Meter, the Microsoft Windows Power Meter window and battery meter icon ( or ), the battery charge gauge and health gauge,...
User's Guide
Page 96
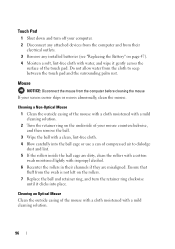
Ensure that fluff from the swab is not left on the rollers. 7 Replace the ball and retainer ring, and turn off your computer. 2 Disconnect any attached devices from the computer and from their channels if they are misaligned. ... of the mouse with a cloth moistened with isopropyl alcohol. 6 Recenter the rollers in their electrical outlets. 3 Remove any installed batteries (see "Replacing the Battery" on the underside of your screen cursor skips or moves abnormally, clean the mouse. Cleaning an Optical Mouse Clean the outside casing of the mouse with a cloth moistened...
Ensure that fluff from the swab is not left on the rollers. 7 Replace the ball and retainer ring, and turn off your computer. 2 Disconnect any attached devices from the computer and from their channels if they are misaligned. ... of the mouse with a cloth moistened with isopropyl alcohol. 6 Recenter the rollers in their electrical outlets. 3 Remove any installed batteries (see "Replacing the Battery" on the underside of your screen cursor skips or moves abnormally, clean the mouse. Cleaning an Optical Mouse Clean the outside casing of the mouse with a cloth moistened...
User's Guide
Page 114
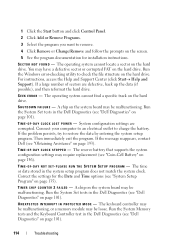
.... A chip on the hard drive. The reserve battery that supports the system configuration settings may require replacement (see "Obtaining Assistance" on the hard drive. Correct the settings for installation instructions. If the message reappears, contact Dell (see "Coin-Cell Battery" on page 135). U N E X P E C T E D I N T ... try to charge the battery. D A Y N O T S E T - A chip on the screen. 5 See the program documentation for the Date and Time options (see "Dell Diagnostics" on page 101). 1 Click the Start button and click Control Panel. 2 Click Add or Remove ...
.... A chip on the hard drive. The reserve battery that supports the system configuration settings may require replacement (see "Obtaining Assistance" on the hard drive. Correct the settings for installation instructions. If the message reappears, contact Dell (see "Coin-Cell Battery" on page 135). U N E X P E C T E D I N T ... try to charge the battery. D A Y N O T S E T - A chip on the screen. 5 See the program documentation for the Date and Time options (see "Dell Diagnostics" on page 101). 1 Click the Start button and click Control Panel. 2 Click Add or Remove ...

Service Manual
Page 3
DellTM XFR D630 Fully Rugged Notebook Service Manual Table of Contents 1 BEFORE YOU BEGIN ...6 1.1 RECOMMENDED TOOLS ...6 1.2 TURNING OFF YOUR COMPUTER 6 1.3 BEFORE WORKING INSIDE YOUR COMPUTER 6 1.4 SCREW CHART ...8 2 XBAY DEVICES ...13 3 HARD DRIVE...14 4 STYLUS, TETHER AND CLIP (DIRECTVUE TOUCH SCREEN DISPLAY OPTION) ... 17 4.1 REPLACING THE STYLUS CLIP 17 4.2 REPLACING THE STYLUS 19 5 HANDLE...19 5.1 REMOVING THE...
DellTM XFR D630 Fully Rugged Notebook Service Manual Table of Contents 1 BEFORE YOU BEGIN ...6 1.1 RECOMMENDED TOOLS ...6 1.2 TURNING OFF YOUR COMPUTER 6 1.3 BEFORE WORKING INSIDE YOUR COMPUTER 6 1.4 SCREW CHART ...8 2 XBAY DEVICES ...13 3 HARD DRIVE...14 4 STYLUS, TETHER AND CLIP (DIRECTVUE TOUCH SCREEN DISPLAY OPTION) ... 17 4.1 REPLACING THE STYLUS CLIP 17 4.2 REPLACING THE STYLUS 19 5 HANDLE...19 5.1 REMOVING THE...
Service Manual
Page 17
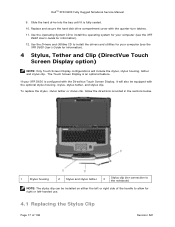
... CD to install the drivers and utilities for your computer (see the XFR D630 User's Guide for information). 4 Stylus, Tether and Clip (DirectVue Touch Screen Display option) NOTE: Only Touch Screen Display configurations will also be installed on either the left or right side of...D630 User's Guide for right or left-handed use. 4.1 Replacing the Stylus Clip Page 17 of 106 Revision A01 Replace and secure the hard disk drive compartment cover with the DirectVue Touch Screen Display, it is fully seated. 10. If your XFR D630 is an optional feature. DellTM XFR D630 Fully Rugged Notebook...
... CD to install the drivers and utilities for your computer (see the XFR D630 User's Guide for information). 4 Stylus, Tether and Clip (DirectVue Touch Screen Display option) NOTE: Only Touch Screen Display configurations will also be installed on either the left or right side of...D630 User's Guide for right or left-handed use. 4.1 Replacing the Stylus Clip Page 17 of 106 Revision A01 Replace and secure the hard disk drive compartment cover with the DirectVue Touch Screen Display, it is fully seated. 10. If your XFR D630 is an optional feature. DellTM XFR D630 Fully Rugged Notebook...

Service Manual
Page 21
...main handle assembly ends as shown. 5. Remove the Comms Door from the notebook. Remove the 2 screws that secure the Comms Door. 2. Align each side). 6 Port Covers The XFR D630 utilizes port covers to Replacing the 97H Stylus Clip for instructions regarding installing the stylus clip onto one side.... 6. If your XFR D630 is located on each of the handle covers over the main handle assembly and to the XFR D630 with the optional Touch Screen, please refer to secure and protect the connectors and devices of 106 Revision A01 DellTM XFR D630 Fully Rugged Notebook Service Manual 4.
...main handle assembly ends as shown. 5. Remove the Comms Door from the notebook. Remove the 2 screws that secure the Comms Door. 2. Align each side). 6 Port Covers The XFR D630 utilizes port covers to Replacing the 97H Stylus Clip for instructions regarding installing the stylus clip onto one side.... 6. If your XFR D630 is located on each of the handle covers over the main handle assembly and to the XFR D630 with the optional Touch Screen, please refer to secure and protect the connectors and devices of 106 Revision A01 DellTM XFR D630 Fully Rugged Notebook Service Manual 4.
Service Manual
Page 56
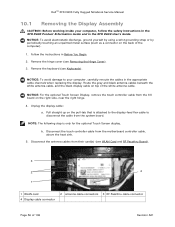
...that is only for the optional Touch Screen display. DellTM XFR D630 Fully Rugged Notebook Service Manual 10.1 Removing the Display Assembly CAUTION: Before working inside your computer, carefully reroute the cables in the appropriate cable channels when replacing the display. Route the gray and... To avoid damage to disconnect the cable from their card(s) (see Removing the Hinge Cover). 12H 3. NOTICE: For the optional Touch Screen Display, remove the touch controller cable from the motherboard controller cable, above the heat sink. 5. Unplug the display cable: a. Disconnect the...
...that is only for the optional Touch Screen display. DellTM XFR D630 Fully Rugged Notebook Service Manual 10.1 Removing the Display Assembly CAUTION: Before working inside your computer, carefully reroute the cables in the appropriate cable channels when replacing the display. Route the gray and... To avoid damage to disconnect the cable from their card(s) (see Removing the Hinge Cover). 12H 3. NOTICE: For the optional Touch Screen Display, remove the touch controller cable from the motherboard controller cable, above the heat sink. 5. Unplug the display cable: a. Disconnect the...

Service Manual
Page 65
...release the ribbon cable, and lift the display panel fully from the display back cover. 10.6 Installing the Display Panel NOTE: Remove the replacement display panel assembly from the display back cover. 8. Page 65 of the inverter. Connect the LED cable. 2. Lift the display panel a...where cables exit the Display Assembly. The LVDS cable will have packing material covering the LVDS connector. DellTM XFR D630 Fully Rugged Notebook Service Manual 6. For the optional Touch Screen displays, pull the touch controller cable through the rubber grommet in the top cover. 3. These antenna cables ...
...release the ribbon cable, and lift the display panel fully from the display back cover. 10.6 Installing the Display Panel NOTE: Remove the replacement display panel assembly from the display back cover. 8. Page 65 of the inverter. Connect the LED cable. 2. Lift the display panel a...where cables exit the Display Assembly. The LVDS cable will have packing material covering the LVDS connector. DellTM XFR D630 Fully Rugged Notebook Service Manual 6. For the optional Touch Screen displays, pull the touch controller cable through the rubber grommet in the top cover. 3. These antenna cables ...
Service Manual
Page 101
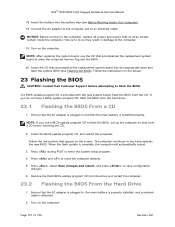
... is complete, the computer will automatically reboot. 3. Press and to an electrical outlet. DellTM XFR D630 Fully Rugged Notebook Service Manual 18. Insert the CD that accompanied the replacement system board into the BIOS. 20. Ensure that the main battery is attached. 2. Page 101 ... the instructions that appear on the computer, replace all screws and ensure that accompanied the replacement system board to boot and updates the new BIOS. Follow the instructions on the screen. 29H 23 Flashing the BIOS CAUTION: Contact Dell Customer Support before inserting the CD. 2....
... is complete, the computer will automatically reboot. 3. Press and to an electrical outlet. DellTM XFR D630 Fully Rugged Notebook Service Manual 18. Insert the CD that accompanied the replacement system board into the BIOS. 20. Ensure that the main battery is attached. 2. Page 101 ... the instructions that appear on the computer, replace all screws and ensure that accompanied the replacement system board to boot and updates the new BIOS. Follow the instructions on the screen. 29H 23 Flashing the BIOS CAUTION: Contact Dell Customer Support before inserting the CD. 2....

Service Manual
Page 105
...302H 3. Follow the instructions in the XFR D630 User's Guide. Replace the modem cable (see Installing the System Board). 305H 25.3 Removing the Modem Cable CAUTION: Before working inside your XFR D630 is equipped with the optional Touch Screen, remove the stylus, tether and clip (see...stylus, tether and clip if previously removed. Install the new modem cable. DellTM XFR D630 Fully Rugged Notebook Service Manual 6. If your computer, follow the safety instructions in the XFR D630 Product Information Guide and in Before You Begin. 306H 2. NOTICE: To avoid electrostatic ...
...302H 3. Follow the instructions in the XFR D630 User's Guide. Replace the modem cable (see Installing the System Board). 305H 25.3 Removing the Modem Cable CAUTION: Before working inside your XFR D630 is equipped with the optional Touch Screen, remove the stylus, tether and clip (see...stylus, tether and clip if previously removed. Install the new modem cable. DellTM XFR D630 Fully Rugged Notebook Service Manual 6. If your computer, follow the safety instructions in the XFR D630 Product Information Guide and in Before You Begin. 306H 2. NOTICE: To avoid electrostatic ...


