
Dell Users Guide
Page 10
... 247 Scanning Using the Windows Image Acquisition (WIA) Driver 248 Scanning to a PC or Server via SMB/FTP 249 Overview 249 Confirming a Login name and Password 251 Specifying a Destination to Store the Document 252 Configuring the Printer Settings 259 Sending the Scanned File on the Network 263 Scanning to Application 246...
... 247 Scanning Using the Windows Image Acquisition (WIA) Driver 248 Scanning to a PC or Server via SMB/FTP 249 Overview 249 Confirming a Login name and Password 251 Specifying a Destination to Store the Document 252 Configuring the Printer Settings 259 Sending the Scanned File on the Network 263 Scanning to Application 246...
Dell Users Guide
Page 57
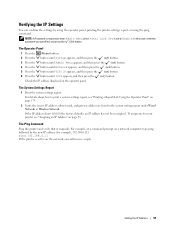
... that it responds. The System Settings Report 1 Print the system settings report. If the IP address shows 0.0.0.0 (the factory default), an IP address has not been assigned. NOTE: A Password is required to Enable. The Operator Panel 1 Press the (Menu) button. 2 Press the button until System appears, and... the operator panel, printing the printer settings report, or using the ping command. Setting the IP Address 55 In this case, enter the password you will receive a reply. Verifying the IP Settings You can confirm the settings by the new IP address (for your printer, see "...
... that it responds. The System Settings Report 1 Print the system settings report. If the IP address shows 0.0.0.0 (the factory default), an IP address has not been assigned. NOTE: A Password is required to Enable. The Operator Panel 1 Press the (Menu) button. 2 Press the button until System appears, and... the operator panel, printing the printer settings report, or using the ping command. Setting the IP Address 55 In this case, enter the password you will receive a reply. Verifying the IP Settings You can confirm the settings by the new IP address (for your printer, see "...

Dell Users Guide
Page 87
...& Fax (Print & Scan for Mac OS X 10.7). 4 Click the Plus (+) sign, and click Default. 5 Select the printer connected via Bonjour from Nearby Printers. Name and Print Using are no printers in ...Other Printer or Scanner for Mac OS X 10.7). 4 Click the Plus (+) sign, and click Default (Click the Plus (+) sign, and select the printer from the Printer Name list. If you...Drivers and Software 1 Run the Software and Documentation disc on the Macintosh computer. 2 Double-click the Dell C1765 Installer icon. 3 Click Continue on the Introduction screen. 4 Confirm the installation location, and then...
...& Fax (Print & Scan for Mac OS X 10.7). 4 Click the Plus (+) sign, and click Default. 5 Select the printer connected via Bonjour from Nearby Printers. Name and Print Using are no printers in ...Other Printer or Scanner for Mac OS X 10.7). 4 Click the Plus (+) sign, and click Default (Click the Plus (+) sign, and select the printer from the Printer Name list. If you...Drivers and Software 1 Run the Software and Documentation disc on the Macintosh computer. 2 Double-click the Dell C1765 Installer icon. 3 Click Continue on the Introduction screen. 4 Confirm the installation location, and then...
Dell Users Guide
Page 97
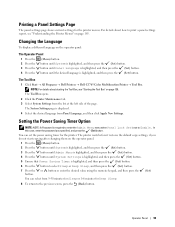
...then press the (Set) button. Setting the Power Saving Timer Option NOTE: NOTE: A Password is required to the previous screen, press the (Back) button. The printer waits before it restores the default copy settings, if you specified, and press the (Set) button. The Tool Box ...1 Click Start → All Programs → Dell Printers → Dell C1765 Color Multifunction Printer → Tool Box. Operator Panel 95 Printing...
...then press the (Set) button. Setting the Power Saving Timer Option NOTE: NOTE: A Password is required to the previous screen, press the (Back) button. The printer waits before it restores the default copy settings, if you specified, and press the (Set) button. The Tool Box ...1 Click Start → All Programs → Dell Printers → Dell C1765 Color Multifunction Printer → Tool Box. Operator Panel 95 Printing...
Dell Users Guide
Page 106
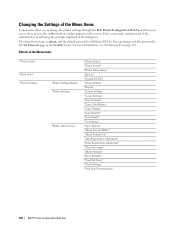
... name is admin, and the default password is left blank (NULL). You can change the printer settings through the Dell Printer Configuration Web Tool. Details of the Menu Items "Printer Status" "Printer Jobs" "Printer Settings" "Printer Settings Report" "Printer Settings..."Clean Developer" "Adjust Altitude" "Reset Defaults" "Non-Dell Toner" "Clock Settings" "Web Link Customization" 104 Dell™ Printer Configuration Web Tool When you to change only the password in the Set Password page in the dialog box. Enter a user name and password of the administrator by following the prompts ...
... name is admin, and the default password is left blank (NULL). You can change the printer settings through the Dell Printer Configuration Web Tool. Details of the Menu Items "Printer Status" "Printer Jobs" "Printer Settings" "Printer Settings Report" "Printer Settings..."Clean Developer" "Adjust Altitude" "Reset Defaults" "Non-Dell Toner" "Clock Settings" "Web Link Customization" 104 Dell™ Printer Configuration Web Tool When you to change only the password in the Set Password page in the dialog box. Enter a user name and password of the administrator by following the prompts ...

Dell Users Guide
Page 107
...to PC" "Reset Print Server" "Security" "Set Password" "IP Filter (IPv4)" "Print Volume" "Print Volume" "Address Book" "Fax/E-Mail" "Address Book - Top Page" "E-Mail Group (Confirm/Change, Create)" "E-Mail Group (Delete)" "E-Mail Default Setup" "Server Address" "Server Address - Top Page..." "FAX Group (Confirm/Change, Create)" "FAX Group (Delete)" "E-Mail Group - Dell™ Printer Configuration Web Tool 105 Top Page" "Server Address (Confirm...
...to PC" "Reset Print Server" "Security" "Set Password" "IP Filter (IPv4)" "Print Volume" "Print Volume" "Address Book" "Fax/E-Mail" "Address Book - Top Page" "E-Mail Group (Confirm/Change, Create)" "E-Mail Group (Delete)" "E-Mail Default Setup" "Server Address" "Server Address - Top Page..." "FAX Group (Confirm/Change, Create)" "FAX Group (Delete)" "E-Mail Group - Dell™ Printer Configuration Web Tool 105 Top Page" "Server Address (Confirm...
Dell Users Guide
Page 111
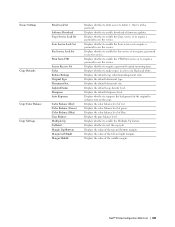
... to use the service. Displays whether to enable the Copy service or to require a password to Admin Menu with a password. Displays the default copy reduction/enlargement ratio. Displays the default copy density level. Displays the color balance level of green. Dell™ Printer Configuration Web Tool 109 Displays whether to enable the Scan service or...
... to use the service. Displays whether to enable the Copy service or to require a password to Admin Menu with a password. Displays the default copy reduction/enlargement ratio. Displays the default copy density level. Displays the color balance level of green. Dell™ Printer Configuration Web Tool 109 Displays whether to enable the Scan service or...

Dell Users Guide
Page 134
...also be displayed by clicking Set Password in the field when it is required to the factory default settings and memory and restart printer. Restart Printer Click Start to confirm. 132 Dell™ Printer Configuration Web Tool NOTE: If you change the password that is entered. See "Reset... Print Server" on page 132. Scan to the default (NULL). Values: Initialize NIC NVRAM Click Start to enable the...
...also be displayed by clicking Set Password in the field when it is required to the factory default settings and memory and restart printer. Restart Printer Click Start to confirm. 132 Dell™ Printer Configuration Web Tool NOTE: If you change the password that is entered. See "Reset... Print Server" on page 132. Scan to the default (NULL). Values: Initialize NIC NVRAM Click Start to enable the...
Dell Users Guide
Page 140
Server Port Number Login Name Login Password Re-enter Password Apply New Settings Restore Settings Back Allows you leave the text box blank, the default port number (FTP: 21, SMB: 139) will be used. If you to view or edit ... that is loaded in the dialog box that prompts the user to access the selected protocol, or enter a new password. Click this button to the top page. Click this button to apply the new settings. Displays the server address registered... paper loaded in the MPF. Click this button to restore the previous settings. 138 Dell™ Printer Configuration Web Tool
Server Port Number Login Name Login Password Re-enter Password Apply New Settings Restore Settings Back Allows you leave the text box blank, the default port number (FTP: 21, SMB: 139) will be used. If you to view or edit ... that is loaded in the dialog box that prompts the user to access the selected protocol, or enter a new password. Click this button to the top page. Click this button to apply the new settings. Displays the server address registered... paper loaded in the MPF. Click this button to restore the previous settings. 138 Dell™ Printer Configuration Web Tool

Dell Users Guide
Page 141
...Tool Box. Starting the Tool Box Click Start → All Programs → Dell Printers → Dell C1765 Color Multifunction Printer → Tool Box. Using the Tool Box to change the Tool Box defaults. Driver settings may have precedence over changes previously made and may require you ... is set on the printer. The Tool Box opens. In this case, click Dell C1765nf Color Multifunction Printer or Dell C1765nfw Color Multifunction Printer listed in Printer Name, and then click OK. NOTE: The Password dialog box appears the first time you to describe a setting • A numerical...
...Tool Box. Starting the Tool Box Click Start → All Programs → Dell Printers → Dell C1765 Color Multifunction Printer → Tool Box. Using the Tool Box to change the Tool Box defaults. Driver settings may have precedence over changes previously made and may require you ... is set on the printer. The Tool Box opens. In this case, click Dell C1765nf Color Multifunction Printer or Dell C1765nfw Color Multifunction Printer listed in Printer Name, and then click OK. NOTE: The Password dialog box appears the first time you to describe a setting • A numerical...

Dell Users Guide
Page 176
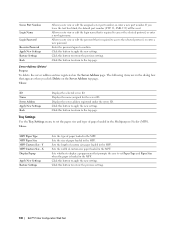
Report / List Use the Report / List menu to Enable. NOTE: A Password is required to enter the Report / List menu when Panel Lock Set is loaded in the MPF. *1 The default for Paper Size varies depending on country-specific factory default. On* Displays a popup menu that prompts the user to set Paper Size and Paper... the custom size paper. Specifies the width of all the settings on page 208. DL Env. (110x220 mm) DL Env. In this case, enter the password you specified, and press the (Set) button.
Report / List Use the Report / List menu to Enable. NOTE: A Password is required to enter the Report / List menu when Panel Lock Set is loaded in the MPF. *1 The default for Paper Size varies depending on country-specific factory default. On* Displays a popup menu that prompts the user to set Paper Size and Paper... the custom size paper. Specifies the width of all the settings on page 208. DL Env. (110x220 mm) DL Env. In this case, enter the password you specified, and press the (Set) button.

Dell Users Guide
Page 178
...communication speed and the duplex settings of fax destinations and register it under a two-digit dial code. NOTE: For Dell C1765nfw Color Multifunction Printer, this case, enter the password you specified, and press the (Set) button. Group Dial Purpose: To create a group of Ethernet. Uses ...10base-T half-duplex. Phone Book Use the Phone Book menu to configure a variety of printer features. NOTE: Values marked by an asterisk (*) are the factory default menu ...
...communication speed and the duplex settings of fax destinations and register it under a two-digit dial code. NOTE: For Dell C1765nfw Color Multifunction Printer, this case, enter the password you specified, and press the (Set) button. Group Dial Purpose: To create a group of Ethernet. Uses ...10base-T half-duplex. Phone Book Use the Phone Book menu to configure a variety of printer features. NOTE: Values marked by an asterisk (*) are the factory default menu ...
Dell Users Guide
Page 199
... changed accidentally. NOTE: You can access to the items under Function Enabled are the factory default menu settings. Restricts access to Admin Menu and Report / List with a color mode, but requires a password to send faxes (does not require a password to Disable. Disables the Copy service. Enables the USB-Print service. Enables the Fax...
... changed accidentally. NOTE: You can access to the items under Function Enabled are the factory default menu settings. Restricts access to Admin Menu and Report / List with a color mode, but requires a password to send faxes (does not require a password to Disable. Disables the Copy service. Enables the USB-Print service. Enables the Fax...

Dell Users Guide
Page 200
... Download Purpose: To enable or disable download of the transmission source. Enables firmware updates. Sets or changes the password required to print incoming faxes. NOTE: Values marked by an asterisk (*) are the factory default menu settings. Values: Disable Enable* Disables editing of firmware updates. Values: Disable Enable* Disables firmware updates. Edit From...
... Download Purpose: To enable or disable download of the transmission source. Enables firmware updates. Sets or changes the password required to print incoming faxes. NOTE: Values marked by an asterisk (*) are the factory default menu settings. Values: Disable Enable* Disables editing of firmware updates. Values: Disable Enable* Disables firmware updates. Edit From...
Dell Users Guide
Page 202
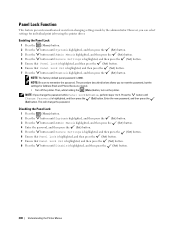
...then press the (Set) button. Enter the new password, and then press the (Set) button. The procedure described below allows you change the password. Then, while holding the (Menu) button, turn on the printer. NOTE: The factory-default panel password is highlighted, and then press the (Set) ...button. 200 Understanding the Printer Menus This will change the password while Panel Lock is highlighted, and then press the (Set) button. Panel Lock...
...then press the (Set) button. Enter the new password, and then press the (Set) button. The procedure described below allows you change the password. Then, while holding the (Menu) button, turn on the printer. NOTE: The factory-default panel password is highlighted, and then press the (Set) ...button. 200 Understanding the Printer Menus This will change the password while Panel Lock is highlighted, and then press the (Set) button. Panel Lock...
Dell Users Guide
Page 203
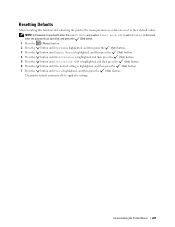
... required to enter the Admin Menu menu when Panel Lock Set is highlighted, and then press the (Set) button. Resetting Defaults After executing this case, enter the password you specified, and press the (Set) button. 1 Press the (Menu) button. 2 Press the button until System is highlighted, and then press the (Set) button...
... required to enter the Admin Menu menu when Panel Lock Set is highlighted, and then press the (Set) button. Resetting Defaults After executing this case, enter the password you specified, and press the (Set) button. 1 Press the (Menu) button. 2 Press the button until System is highlighted, and then press the (Set) button...

Dell Users Guide
Page 238
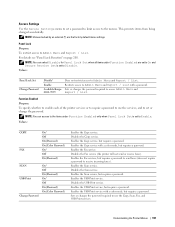
...the ADF" on page 235. 6 Press the (Start) button to On(Color Password), you make two copies of three page documents, one complete three page document will print followed by an asterisk (*) are the factory default menu settings. Uncollated* Collated Auto Does not sort the copy job Sorts the copy... including the number of copies, contrast, and image quality. Collated To sort the copy output: For example, if you need to enter the four digit password to begin copying. 236 Copying See "Setting Copy Options" on page 272. 2 Press the (Copy) button. 3 Press the 4 Press the (Color Mode) ...
...the ADF" on page 235. 6 Press the (Start) button to On(Color Password), you make two copies of three page documents, one complete three page document will print followed by an asterisk (*) are the factory default menu settings. Uncollated* Collated Auto Does not sort the copy job Sorts the copy... including the number of copies, contrast, and image quality. Collated To sort the copy output: For example, if you need to enter the four digit password to begin copying. 236 Copying See "Setting Copy Options" on page 272. 2 Press the (Copy) button. 3 Press the 4 Press the (Color Mode) ...

Dell Users Guide
Page 261
... the Dell Printer Configuration Web Tool or Address Book Editor. Configuring the Printer Settings You can configure the printer settings to use the Scan to check the IP address of the printer in the correct user name and password. The Server Address page appears. NOTE: The default user name is admin, and the default password...
... the Dell Printer Configuration Web Tool or Address Book Editor. Configuring the Printer Settings You can configure the printer settings to use the Scan to check the IP address of the printer in the correct user name and password. The Server Address page appears. NOTE: The default user name is admin, and the default password...

Dell Users Guide
Page 263
... Enter the Server Port Number. NOTE: Empty password is not valid in the folder you have a valid password for the user login account. (See "Confirming a Login name and Password" on page 251 for FTP. After you can enter the default value of 139 for SMB and 21 for details...your user login account.) Re-enter your computer or FTP server. Enter the password corresponding to store the scanned document. From the Address Book Editor 1 Click Start → All Programs → Dell Printers → Dell C1765 Color Multifunction Printer → Address Book Editor. To store the scanned ...
... Enter the Server Port Number. NOTE: Empty password is not valid in the folder you have a valid password for the user login account. (See "Confirming a Login name and Password" on page 251 for FTP. After you can enter the default value of 139 for SMB and 21 for details...your user login account.) Re-enter your computer or FTP server. Enter the password corresponding to store the scanned document. From the Address Book Editor 1 Click Start → All Programs → Dell Printers → Dell C1765 Color Multifunction Printer → Address Book Editor. To store the scanned ...
Dell Users Guide
Page 287
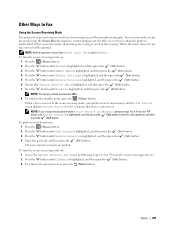
NOTE: Before operation, ensure that there is a fax stored. NOTE: The factory-default password is highlighted, and then press the (Set) button. Enter the new password, and then press the (Set) button. To turn the secure receiving mode on: 1 Press the (Menu) button. 2 Press the button ...Press the (Menu) button. 2 Press the button until Job Status is highlighted, and then press the (Set) button. 3 Press the button until Change Password is unattended. The faxes stored in "To turn on :". 2 Press the button until Enable is 0000. 8 To return to the standby mode, press the...
NOTE: Before operation, ensure that there is a fax stored. NOTE: The factory-default password is highlighted, and then press the (Set) button. Enter the new password, and then press the (Set) button. To turn the secure receiving mode on: 1 Press the (Menu) button. 2 Press the button ...Press the (Menu) button. 2 Press the button until Job Status is highlighted, and then press the (Set) button. 3 Press the button until Change Password is unattended. The faxes stored in "To turn on :". 2 Press the button until Enable is 0000. 8 To return to the standby mode, press the...


