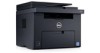
User Guide
Page 9
... a Print Job 230 Canceling From the Operator Panel 230 Canceling a Job From the Computer Running Windows 230 Direct Print Using the USB Storage Device 231 Supported File Formats 231 Printing a File in a USB Memory 231 Printing a Report Page 231 19 Copying 233 Loading Paper for Copying 233 Preparing a Document 233 Making Copies From the Document Glass 233 Making Copies From the ADF 235 Setting Copy Options 235 Number of Copies 235 Color 236 Collated 236 Reduce/Enlarge 237 Document Size 238 Original Type 238 Lighter/Darker 239 Sharpness 239 Auto Exposure 240 Multiple...
... a Print Job 230 Canceling From the Operator Panel 230 Canceling a Job From the Computer Running Windows 230 Direct Print Using the USB Storage Device 231 Supported File Formats 231 Printing a File in a USB Memory 231 Printing a Report Page 231 19 Copying 233 Loading Paper for Copying 233 Preparing a Document 233 Making Copies From the Document Glass 233 Making Copies From the ADF 235 Setting Copy Options 235 Number of Copies 235 Color 236 Collated 236 Reduce/Enlarge 237 Document Size 238 Original Type 238 Lighter/Darker 239 Sharpness 239 Auto Exposure 240 Multiple...
User Guide
Page 56
... opens. 2 Click the Printer Maintenance tab. 3 Select TCP/IP Settings from 0.0.0.0 to assign an IP address. 1 Click Start → All Programs → Dell Printers → Dell C1765 Color Multifunction Printer → Tool Box. If the IP address is located at the left side of Dell C1765nf Color Multifunction Printer or Dell C1765nfw Color Multifunction Printer listed in your printer. When you use the Network Installation feature, and the Get IP Address is assigned to the network and enter the IP address...
... opens. 2 Click the Printer Maintenance tab. 3 Select TCP/IP Settings from 0.0.0.0 to assign an IP address. 1 Click Start → All Programs → Dell Printers → Dell C1765 Color Multifunction Printer → Tool Box. If the IP address is located at the left side of Dell C1765nf Color Multifunction Printer or Dell C1765nfw Color Multifunction Printer listed in your printer. When you use the Network Installation feature, and the Get IP Address is assigned to the network and enter the IP address...
User Guide
Page 67
...-install Status Before installing the printer driver on your computer, check the IP address of your printer by performing one of the following procedure uses Windows 7 as an example. 1 Insert the Software and Documentation disc into your computer. 2 Click Start → Control Panel. 3 Select System and Security. 4 Click Allow a program through Windows Firewall. 5 Click Change settings → Allow another program. 6 Check Browse. 7 D:\setup.exe (where D is the drive letter of the Dell™ C1765nfw Color...
...-install Status Before installing the printer driver on your computer, check the IP address of your printer by performing one of the following procedure uses Windows 7 as an example. 1 Insert the Software and Documentation disc into your computer. 2 Click Start → Control Panel. 3 Select System and Security. 4 Click Allow a program through Windows Firewall. 5 Click Change settings → Allow another program. 6 Check Browse. 7 D:\setup.exe (where D is the drive letter of the Dell™ C1765nfw Color...
User Guide
Page 70
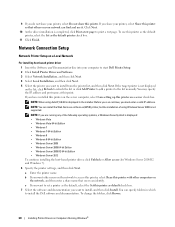
... on Devices (WSD) printer, but the installation of the following operating systems, a Windows Security Alert is not supported. a Enter the printer name. You can continue, you share your printer, select Share this printer on Computers Running Windows® To change the folders, click Browse. 68 Installing Printer Drivers on a server check box. Network Connection Setup Network Printer Setup on a Local Network For installing host-based printer driver 1 Insert the Software and Documentation disc into your computer to start Dell Printer Setup. 2 Click Install Printer Driver...
... on Devices (WSD) printer, but the installation of the following operating systems, a Windows Security Alert is not supported. a Enter the printer name. You can continue, you share your printer, select Share this printer on Computers Running Windows® To change the folders, click Browse. 68 Installing Printer Drivers on a server check box. Network Connection Setup Network Printer Setup on a Local Network For installing host-based printer driver 1 Insert the Software and Documentation disc into your computer to start Dell Printer Setup. 2 Click Install Printer Driver...
User Guide
Page 78
... update the information. • Click Add Printer, and then enter a port name (any of print services to be installed is not listed in Select Printer, and then click Next. NOTE: If you need to add the roles of the following steps: • Click Refresh to exit this tool. Setting Up for Windows Vista, Windows 7, Windows 8, Windows Server 2008, Windows Server 2008 R2, and Windows Server 2012. The Dell Printer Setup file launches automatically. 2 Click Install Printer Driver and Software...
... update the information. • Click Add Printer, and then enter a port name (any of print services to be installed is not listed in Select Printer, and then click Next. NOTE: If you need to add the roles of the following steps: • Click Refresh to exit this tool. Setting Up for Windows Vista, Windows 7, Windows 8, Windows Server 2008, Windows Server 2008 R2, and Windows Server 2012. The Dell Printer Setup file launches automatically. 2 Click Install Printer Driver and Software...
User Guide
Page 80
... printed successfully, installation is displayed in the list, enter the printer's IP address manually to use either of Administrators group. 1. a For Windows Vista, Windows 7, Windows Server 2008, and Windows Server 2008 R2: Click Start → Devices and Printers (Start → Control Panel → Hardware and Sound → Printers for an administrator password or confirmation, type the password or provide confirmation. 6 Complete the additional steps in the Hostname or IP address text box and click Next. To enter the printer's IP address manually, follow the instructions...
... printed successfully, installation is displayed in the list, enter the printer's IP address manually to use either of Administrators group. 1. a For Windows Vista, Windows 7, Windows Server 2008, and Windows Server 2008 R2: Click Start → Devices and Printers (Start → Control Panel → Hardware and Sound → Printers for an administrator password or confirmation, type the password or provide confirmation. 6 Complete the additional steps in the Hostname or IP address text box and click Next. To enter the printer's IP address manually, follow the instructions...
User Guide
Page 102
... address, phone number, server address, and fax number entries in the Multipurpose Feeder (MPF). Set E-Mail Alert also when using the Scan to register new entries. NOTE: You must log in the e-mail list box to be notified. Print Server Settings Use the Print Server Settings menu to change the printer settings you selected. Order Supplies at: www.dell.com/supplies Contact Dell Support at: support.dell.com 100 Dell™ Printer Configuration Web Tool Print Volume Use the Print Volume option to check the number of paper loaded in the Address Book...
... address, phone number, server address, and fax number entries in the Multipurpose Feeder (MPF). Set E-Mail Alert also when using the Scan to register new entries. NOTE: You must log in the e-mail list box to be notified. Print Server Settings Use the Print Server Settings menu to change the printer settings you selected. Order Supplies at: www.dell.com/supplies Contact Dell Support at: support.dell.com 100 Dell™ Printer Configuration Web Tool Print Volume Use the Print Volume option to check the number of paper loaded in the Address Book...
User Guide
Page 108
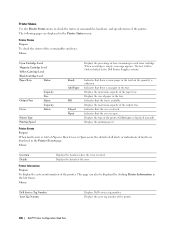
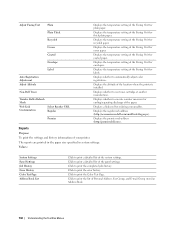
... Printer Status Purpose: To check the status of the error. Displays the maximum capacity of the printer. 106 Dell™ Printer Configuration Web Tool Color Laser is open. Displays the asset tag number of the output tray. The following pages are displayed in the tray. Displays the size of faults are displayed in each toner cartridge. Values: Location Details Displays the location where the error occurred. Displays the type of the printer. This page can also be displayed by clicking Printer Information in the tray. Printer Status Use the Printer Status menu...
... Printer Status Purpose: To check the status of the error. Displays the maximum capacity of the printer. 106 Dell™ Printer Configuration Web Tool Color Laser is open. Displays the asset tag number of the output tray. The following pages are displayed in the tray. Displays the size of faults are displayed in each toner cartridge. Values: Location Details Displays the location where the error occurred. Displays the type of the printer. This page can also be displayed by clicking Printer Information in the tray. Printer Status Use the Printer Status menu...
User Guide
Page 110
... it enters the power saver timer - All Tones Displays the volume of the printer does not match (the paper set in the tray of all the tones are disabled. Disable printing with larger Displays whether to disable printing if the paper size set in the paper size printer driver and the paper size set in the tray is emitted when a problem occurs. Auto Log Print Displays whether to configure the printer settings. Auto Reset Displays the time taken by the printer before it finishes a job. Panel Alert Tone Displays...
... it enters the power saver timer - All Tones Displays the volume of the printer does not match (the paper set in the tray of all the tones are disabled. Disable printing with larger Displays whether to disable printing if the paper size set in the paper size printer driver and the paper size set in the tray is emitted when a problem occurs. Auto Log Print Displays whether to configure the printer settings. Auto Reset Displays the time taken by the printer before it finishes a job. Panel Alert Tone Displays...
User Guide
Page 115
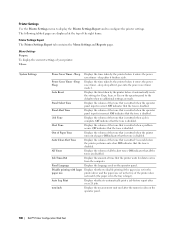
... printed after it finishes a job. In most circumstances, this keeps the printer ready to operate with larger Specifies whether to arrive from the power saver timer mode when it times out. Printer Settings The Printer Settings tab contains the System Settings, Secure Settings, Copy Defaults, Copy Color Balance, Copy Settings, Scan Defaults, Fax Defaults, and Fax Settings pages. Out of Paper Tone Sets the volume of the tone that is emitted when the operator panel input is in Power Saver Timer - Auto Clear...
... printed after it finishes a job. In most circumstances, this keeps the printer ready to operate with larger Specifies whether to arrive from the power saver timer mode when it times out. Printer Settings The Printer Settings tab contains the System Settings, Secure Settings, Copy Defaults, Copy Color Balance, Copy Settings, Scan Defaults, Fax Defaults, and Fax Settings pages. Out of Paper Tone Sets the volume of the tone that is emitted when the operator panel input is in Power Saver Timer - Auto Clear...
User Guide
Page 123
... server address entries in the Address Book. Clock Settings Purpose: To set the date and time, and regional time zone of another manufacturer. Section Reset Defaults of your printer. NOTE: Using non-Dell-brand toner cartridges may make some printer features unusable, reduce print quality and decrease the reliability of User (Scan) Section Click Start to initialize the fax number entries in the Address Book. Dell does not provide warranty coverage for e-mail. Dell™ Printer Configuration Web Tool 121 Values: Reset Defaults...
... server address entries in the Address Book. Clock Settings Purpose: To set the date and time, and regional time zone of another manufacturer. Section Reset Defaults of your printer. NOTE: Using non-Dell-brand toner cartridges may make some printer features unusable, reduce print quality and decrease the reliability of User (Scan) Section Click Start to initialize the fax number entries in the Address Book. Dell does not provide warranty coverage for e-mail. Dell™ Printer Configuration Web Tool 121 Values: Reset Defaults...
User Guide
Page 144
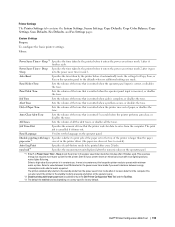
... web address (http://premier.dell.com). Displays the temperature setting of the Fusing Unit for ordering consumables. Displays the altitude of the system settings. Displays a link used for coated paper. Values: System Settings Panel Settings Job History Error History Color Test Page Address Book List Click to print a detailed list of the location where the printer is installed. Click to print the completed jobs history. Displays the temperature setting of the Fusing Unit for curling/separating discharge of the paper. Displays whether to execute counter...
... web address (http://premier.dell.com). Displays the temperature setting of the Fusing Unit for ordering consumables. Displays the altitude of the system settings. Displays a link used for coated paper. Values: System Settings Panel Settings Job History Error History Color Test Page Address Book List Click to print a detailed list of the location where the printer is installed. Click to print the completed jobs history. Displays the temperature setting of the Fusing Unit for curling/separating discharge of the paper. Displays whether to execute counter...
User Guide
Page 153
... fax number entries in the Address Book. Click to apply the changes. NOTE: Using non-Dell™-brand toner cartridges may make some printer features unusable, reduce print quality and decrease the reliability of your printer. Values: Non-Dell Toner Off On Apply New Settings Does not use toner cartridge of the location where the printer is being used. After you use toner cartridge of another manufacturer. After executing this function and rebooting the printer, the menu parameters or data...
... fax number entries in the Address Book. Click to apply the changes. NOTE: Using non-Dell™-brand toner cartridges may make some printer features unusable, reduce print quality and decrease the reliability of your printer. Values: Non-Dell Toner Off On Apply New Settings Does not use toner cartridge of the location where the printer is being used. After you use toner cartridge of another manufacturer. After executing this function and rebooting the printer, the menu parameters or data...
User Guide
Page 165
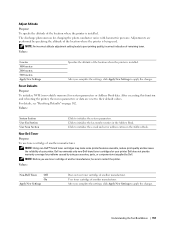
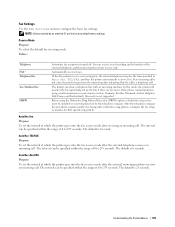
...from using the printer driver. Color Purpose: To set by an asterisk (*) are the factory default menu settings. Sorts the copy job. Automatically determines which output mode for individual print jobs using the operator panel to inadvertently change the default menu settings that has been set whether to make copies in color or in color mode. Prints in black and white. Collated Purpose: To sort the copy job. Values: Uncollated* Collated Auto Does not sort the copy job. Defaults Settings Use the Defaults Settings menu to configure the default copy, scan, and fax settings of copy...
...from using the printer driver. Color Purpose: To set by an asterisk (*) are the factory default menu settings. Sorts the copy job. Automatically determines which output mode for individual print jobs using the operator panel to inadvertently change the default menu settings that has been set whether to make copies in color or in color mode. Prints in black and white. Collated Purpose: To sort the copy job. Values: Uncollated* Collated Auto Does not sort the copy job. Defaults Settings Use the Defaults Settings menu to configure the default copy, scan, and fax settings of copy...
User Guide
Page 177
.... Protocol Monitor Purpose: To print a detailed list of the print, copy, fax, or scan jobs that have been processed. The report or list is highlighted, and then press the (Set) button. Job History Purpose: To print a detailed list of monitored protocols. In this case, click Dell C1765nf Color Multifunction Printer or Dell C1765nfw Color Multifunction Printer listed in this step, when multiple printer drivers are installed on your computer. The selected report or list is displayed. 4 Click the button for testing colors.
.... Protocol Monitor Purpose: To print a detailed list of the print, copy, fax, or scan jobs that have been processed. The report or list is highlighted, and then press the (Set) button. Job History Purpose: To print a detailed list of monitored protocols. In this case, click Dell C1765nf Color Multifunction Printer or Dell C1765nfw Color Multifunction Printer listed in this step, when multiple printer drivers are installed on your computer. The selected report or list is displayed. 4 Click the button for testing colors.
User Guide
Page 183
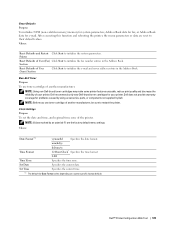
..., configure the fax setup to configure the basic fax settings. If the phone communication is using the Distinctive Ring Pattern Detection (DRPD) option, a distinctive ring service must be specified within the range of 0 to 255 seconds. After the telephone company has provided a separate number for the time specified in your telephone line by an asterisk (*) are fax tones. Receive Mode Purpose: To select the default fax receiving mode. The default is...
..., configure the fax setup to configure the basic fax settings. If the phone communication is using the Distinctive Ring Pattern Detection (DRPD) option, a distinctive ring service must be specified within the range of 0 to 255 seconds. After the telephone company has provided a separate number for the time specified in your telephone line by an asterisk (*) are fax tones. Receive Mode Purpose: To select the default fax receiving mode. The default is...

User Guide
Page 243
... paper in the size specified in increments of copies, contrast, and image quality. OR Place a single document face down on page 272. 2 Press the (Copy) button. 3 Press the button until Multiple-Up is set to Auto, ID Copy, or Manual, the display prompts you select Yes, press the button to select Continue or Cancel, and then press the (Set) button. Automatically reduces the original pages to begin copying. For details about loading a document...
... paper in the size specified in increments of copies, contrast, and image quality. OR Place a single document face down on page 272. 2 Press the (Copy) button. 3 Press the button until Multiple-Up is set to Auto, ID Copy, or Manual, the display prompts you select Yes, press the button to select Continue or Cancel, and then press the (Set) button. Automatically reduces the original pages to begin copying. For details about loading a document...
User Guide
Page 278
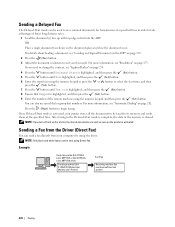
... Delayed Start mode is activated, your fax needs. NOTE: Only black and white faxes can be faxed to its memory and sends them at a specified time in order to take advantage of the remote machine using the driver. You can also use speed dial or group dial numbers. Example Send data via the Dell C1765nf Color MFP FAX or Dell C1765nfw Color MFP FAX driver Sending machine (Dell C1765nf/C1765nfw Color Multifunction Printer) Send fax Receiving machine (fax machine/multifunction printer) 276 Faxing Sending a Delayed Fax The Delayed Start mode can be used to save scanned documents for...
... Delayed Start mode is activated, your fax needs. NOTE: Only black and white faxes can be faxed to its memory and sends them at a specified time in order to take advantage of the remote machine using the driver. You can also use speed dial or group dial numbers. Example Send data via the Dell C1765nf Color MFP FAX or Dell C1765nfw Color MFP FAX driver Sending machine (Dell C1765nf/C1765nfw Color Multifunction Printer) Send fax Receiving machine (fax machine/multifunction printer) 276 Faxing Sending a Delayed Fax The Delayed Start mode can be used to save scanned documents for...
User Guide
Page 355
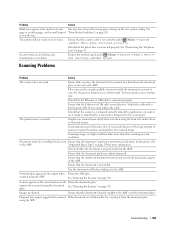
... correct port. See "Cleaning the Scanner" on page 43. Images are adjusted properly. The printer will not send or receive faxes. See "Connecting the Telephone Line" on page 320. Try the preview function to analyze and reproduce the scanned image. Document misfeeds or multiple feeds occur Ensure that the phone line is set correctly under (Menu) → System → Admin Menu → Fax Settings → Modem Speed. See in the ADF. Fan the document well before loading it from the document glass...
... correct port. See "Cleaning the Scanner" on page 43. Images are adjusted properly. The printer will not send or receive faxes. See "Connecting the Telephone Line" on page 320. Try the preview function to analyze and reproduce the scanned image. Document misfeeds or multiple feeds occur Ensure that the phone line is set correctly under (Menu) → System → Admin Menu → Fax Settings → Modem Speed. See in the ADF. Fan the document well before loading it from the document glass...
User Guide
Page 373
... Reset Print Server, 132 Reset Wireless, 179 Resetting Defaults, 162, 201 Resolution, 110, 116, 169, 172, 273 Restore Settings, 103 Return Policy, 360 Right Frame, 103 Ring Tone Volume, 110, 117, 182, 270 Ringer Volume, 269 S Safety information, 21 Scan button, 92 Scan Defaults, 110, 116, 154 Scan Service Lock Set, 109, 114 Scan To Network, 110, 116, 168 Scan to PC, 132 ScanButton Manager, 293 Scanner Driver/Printer Utility Problems, 355 Scanner Unit...
... Reset Print Server, 132 Reset Wireless, 179 Resetting Defaults, 162, 201 Resolution, 110, 116, 169, 172, 273 Restore Settings, 103 Return Policy, 360 Right Frame, 103 Ring Tone Volume, 110, 117, 182, 270 Ringer Volume, 269 S Safety information, 21 Scan button, 92 Scan Defaults, 110, 116, 154 Scan Service Lock Set, 109, 114 Scan To Network, 110, 116, 168 Scan to PC, 132 ScanButton Manager, 293 Scanner Driver/Printer Utility Problems, 355 Scanner Unit...


