
Monitor Teardown Instructions
Page 1
... out the mainboard from the upper cover of electric screwdriver: 1.1±0.1kgf.cm, Screwdriver head: star 3. Remove the base screws 5.Remove the pwer button and menu button a:ke the electric screwdriver and remove the base a:Remove the pwer button and menu button screws at positions "1~9" S5 b:que of the base b:Remove the cable hook, pull out the cable; 2. DELL C1422H Teardown Instruction Chapter 8-TEARDOWN INSTRUCTION 1.Tear the rubber a:Tear off...
... out the mainboard from the upper cover of electric screwdriver: 1.1±0.1kgf.cm, Screwdriver head: star 3. Remove the base screws 5.Remove the pwer button and menu button a:ke the electric screwdriver and remove the base a:Remove the pwer button and menu button screws at positions "1~9" S5 b:que of the base b:Remove the cable hook, pull out the cable; 2. DELL C1422H Teardown Instruction Chapter 8-TEARDOWN INSTRUCTION 1.Tear the rubber a:Tear off...

Monitor Teardown Instructions
Page 2
... panel a:Remove the cable hook, pull out the cable; DELL C1422H Teardown Instruction 7.Tear pull adhesive a:Tear off the pull adhesive at positions"1~3" S7 (Clamp the pull glue with pliers and pull it out) b:Tack out the panel from the back cover S11 9. S8 11.Take out the cable a:Tack out the cable from the back cover 10.Remove the Hinge screws...
... panel a:Remove the cable hook, pull out the cable; DELL C1422H Teardown Instruction 7.Tear pull adhesive a:Tear off the pull adhesive at positions"1~3" S7 (Clamp the pull glue with pliers and pull it out) b:Tack out the panel from the back cover S11 9. S8 11.Take out the cable a:Tack out the cable from the back cover 10.Remove the Hinge screws...

Monitor Teardown Instructions
Page 3
... asbestos CRT Component contain CFC, HCFC, HGC and HC Gas discharge lamps LCD display > 100 cm2 External electric cable Component contain refractory ceramic fibers Component contains radio-active substances Electrolyte capacitors (height > 25mm, diameter >25mm) Not used Not used Not used Not used Not use Product LCD greater than 100cm2 Product has external cables Not used Not used to disassemble the product to remove VGA connectivity) - DELL C1422H Teardown Instruction 1. Screwdriver...
... asbestos CRT Component contain CFC, HCFC, HGC and HC Gas discharge lamps LCD display > 100 cm2 External electric cable Component contain refractory ceramic fibers Component contains radio-active substances Electrolyte capacitors (height > 25mm, diameter >25mm) Not used Not used Not used Not used Not use Product LCD greater than 100cm2 Product has external cables Not used Not used to disassemble the product to remove VGA connectivity) - DELL C1422H Teardown Instruction 1. Screwdriver...
Monitor Simplified Service Manual
Page 8
Service Manual 6. Trouble shooting instructions 8
Service Manual 6. Trouble shooting instructions 8

Users Guide
Page 3
Contents About your monitor 5 Package contents 5 Product features 6 Identifying features and controls 7 Monitor specifications 9 Pin assignments 14 Plug and play capability 15 LCD monitor quality and pixel policy 15 Maintenance guidelines 15 Setting up the monitor 16 Sleeve 16 Tilt adjustment 16 Connecting your monitor 17 Connecting with Docking device 20 Operating your monitor 21 Turning on the monitor 21 Using the front panel control 21 Using the On-Screen Display (OSD) menu 23 Setting up display resolution on your monitor 26 Contents │ 3
Contents About your monitor 5 Package contents 5 Product features 6 Identifying features and controls 7 Monitor specifications 9 Pin assignments 14 Plug and play capability 15 LCD monitor quality and pixel policy 15 Maintenance guidelines 15 Setting up the monitor 16 Sleeve 16 Tilt adjustment 16 Connecting your monitor 17 Connecting with Docking device 20 Operating your monitor 21 Turning on the monitor 21 Using the front panel control 21 Using the On-Screen Display (OSD) menu 23 Setting up display resolution on your monitor 26 Contents │ 3
Users Guide
Page 6
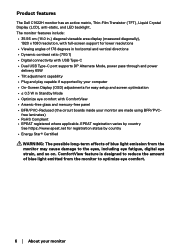
... Dell C1422H monitor has an active matrix, Thin-Film Transistor (TFT), Liquid Crystal Display (LCD), anti-static, and LED backlight. The monitor features include: • 35.56 cm (14.0 in.) diagonal viewable area display (measured diagonally), 1920 x 1080 resolution, with full-screen support for easy setup and screen optimization • ≤ 0.3 W in horizontal and vertical directions • Dynamic contrast ratio (700:1) • Digital connectivity with ComfortView • Arsenic-free glass and mercury-free panel...
... Dell C1422H monitor has an active matrix, Thin-Film Transistor (TFT), Liquid Crystal Display (LCD), anti-static, and LED backlight. The monitor features include: • 35.56 cm (14.0 in.) diagonal viewable area display (measured diagonally), 1920 x 1080 resolution, with full-screen support for easy setup and screen optimization • ≤ 0.3 W in horizontal and vertical directions • Dynamic contrast ratio (700:1) • Digital connectivity with ComfortView • Arsenic-free glass and mercury-free panel...

Users Guide
Page 7
... panel control. About your portable computer/phone using the USB Type-C cable (C to your monitor │ 7 To access the OSD menu and change the settings if required. Note: USB data not supported. Identifying features and controls 12 34 Label Description 1 Power On/Off button (with LED indicator) 2 USB Type-C (support Alt mode DP 3 1.2 and PD function) 4 Function buttons Use To turn the monitor On or Off. Connect to C). Solid white light indicates the monitor is in Standby Mode. Blinking white light...
... panel control. About your portable computer/phone using the USB Type-C cable (C to your monitor │ 7 To access the OSD menu and change the settings if required. Note: USB data not supported. Identifying features and controls 12 34 Label Description 1 Power On/Off button (with LED indicator) 2 USB Type-C (support Alt mode DP 3 1.2 and PD function) 4 Function buttons Use To turn the monitor On or Off. Connect to C). Solid white light indicates the monitor is in Standby Mode. Blinking white light...
Users Guide
Page 9
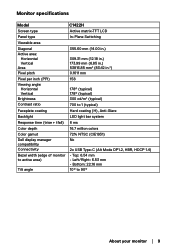
Monitor specifications Model Screen type Panel type Viewable area Diagonal Active area: Horizontal Vertical Area Pixel pitch Pixel per inch (PPI) Viewing angle: Horizontal Vertical Brightness Contrast ratio Faceplate coating Backlight Response time (trise + tfall) Color depth Color gamut Dell display manager compatibility Connectivity Bezel width (edge of monitor to active area) Tilt angle C1422H Active matrix-TFT LCD In-Plane Switching 355.60 mm (14.00 in.) 309.31 mm (12.18 in.) 173.99 mm (6.85 in...
Monitor specifications Model Screen type Panel type Viewable area Diagonal Active area: Horizontal Vertical Area Pixel pitch Pixel per inch (PPI) Viewing angle: Horizontal Vertical Brightness Contrast ratio Faceplate coating Backlight Response time (trise + tfall) Color depth Color gamut Dell display manager compatibility Connectivity Bezel width (edge of monitor to active area) Tilt angle C1422H Active matrix-TFT LCD In-Plane Switching 355.60 mm (14.00 in.) 309.31 mm (12.18 in.) 173.99 mm (6.85 in...
Users Guide
Page 11
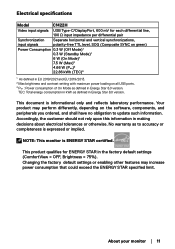
... differential line, 100 Ω input impedance per differential pair Synchronization input signals Separate horizontal and vertical synchronizations, polarity-free TTL level, SOG (Composite SYNC on green) Power Consumption 0.3 W (Off Mode)1 0.3 W (Standby Mode)1 6 W (On Mode)1 7.5 W (Max)2 4.66 W (Pon)3 22.86 kWh (TEC)3 1 As defined in EU 2019/2021 and EU 2019/2013. 2 Max brightness and contrast setting with maximum power loading on the software, components, and peripherals you...
... differential line, 100 Ω input impedance per differential pair Synchronization input signals Separate horizontal and vertical synchronizations, polarity-free TTL level, SOG (Composite SYNC on green) Power Consumption 0.3 W (Off Mode)1 0.3 W (Standby Mode)1 6 W (On Mode)1 7.5 W (Max)2 4.66 W (Pon)3 22.86 kWh (TEC)3 1 As defined in EU 2019/2021 and EU 2019/2013. 2 Max brightness and contrast setting with maximum power loading on the software, components, and peripherals you...
Users Guide
Page 15
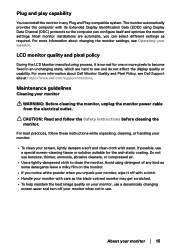
... settings as the black-colored monitor may get scratched. • To help maintain the best image quality on your monitor, use a dynamically changing screen saver and turn off with a cloth. • Handle your monitor when not in use. For best practices, follow the Safety instructions before cleaning the monitor. LCD monitor quality and pixel policy During the LCD Monitor manufacturing process, it off your monitor with care as required. Plug and play capability You can install...
... settings as the black-colored monitor may get scratched. • To help maintain the best image quality on your monitor, use a dynamically changing screen saver and turn off with a cloth. • Handle your monitor when not in use. For best practices, follow the Safety instructions before cleaning the monitor. LCD monitor quality and pixel policy During the LCD Monitor manufacturing process, it off your monitor with care as required. Plug and play capability You can install...
Users Guide
Page 17
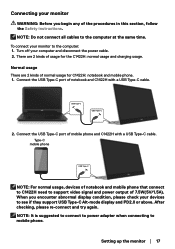
... notebook and mobile phone that connect to C1422H need to support video signal and power output of the procedures in this section, follow the Safety instructions. Normal usage There are 2 kinds of mobile phone and C1422H with a USB Type-C cable. NOTE: It is suggested to connect to power adapter when connecting to the computer: 1. Turn off your monitor to mobile phone. To connect your computer and disconnect the...
... notebook and mobile phone that connect to C1422H need to support video signal and power output of the procedures in this section, follow the Safety instructions. Normal usage There are 2 kinds of mobile phone and C1422H with a USB Type-C cable. NOTE: It is suggested to connect to power adapter when connecting to the computer: 1. Turn off your monitor to mobile phone. To connect your computer and disconnect the...

Users Guide
Page 18
..., please check your power capacity of plug in usage for C1422H and other devices. In order to use the monitor smoothly, please refer to the notebook with power adapter. 1. NOTE: When disconnecting the power adapter from the C1422H, a blank screen will appear. 18 │ Setting up the monitor Plug in usage There are 2 kinds of power adapter connected with a USB Type-C cable. Connect Type-C power adapter to C1422H and connect C1422H to the Preset display modes and Power management.
..., please check your power capacity of plug in usage for C1422H and other devices. In order to use the monitor smoothly, please refer to the notebook with power adapter. 1. NOTE: When disconnecting the power adapter from the C1422H, a blank screen will appear. 18 │ Setting up the monitor Plug in usage There are 2 kinds of power adapter connected with a USB Type-C cable. Connect Type-C power adapter to C1422H and connect C1422H to the Preset display modes and Power management.

Users Guide
Page 21
Solid white light indicates that the monitor is turned on the edge of the monitor to turn the monitor On or Off. Operating your monitor Turning on the monitor Press the button to adjust the image being displayed. 1 The following table describes the control button: Control button 1 Power button (with power-status light) Description To turn on the monitor. Using the front panel control Use the control button on and functioning normally. Operating your monitor │ 21 Blinking white light indicates that the monitor is in Standby Mode.
Solid white light indicates that the monitor is turned on the edge of the monitor to turn the monitor On or Off. Operating your monitor Turning on the monitor Press the button to adjust the image being displayed. 1 The following table describes the control button: Control button 1 Power button (with power-status light) Description To turn on the monitor. Using the front panel control Use the control button on and functioning normally. Operating your monitor │ 21 Blinking white light indicates that the monitor is in Standby Mode.

Users Guide
Page 22
... increase values or move down in a menu. Brightness/ Down/[-] Use the Down button to switch ComfortView ON/OFF. OSD controls Use the buttons on the edge of the monitor to adjust the image settings. 32+ 1 Control buttons 1 ComfortView 2 + Description To launch the On-Screen Display (OSD) menu, or to increase current value of bar. 3 - Brightness/ Up/[+] • Press key to call out ComfortView OSD menu. • Press key to decrease values or...
... increase values or move down in a menu. Brightness/ Down/[-] Use the Down button to switch ComfortView ON/OFF. OSD controls Use the buttons on the edge of the monitor to adjust the image settings. 32+ 1 Control buttons 1 ComfortView 2 + Description To launch the On-Screen Display (OSD) menu, or to increase current value of bar. 3 - Brightness/ Up/[+] • Press key to call out ComfortView OSD menu. • Press key to decrease values or...

Users Guide
Page 24
Press key to call out Brightness OSD menu. • Press the button to switch ComfortView ON/OFF. Press key to call out ComfortView OSD menu. • Press key to increase the brightness and press the brightness (min. 0; button decrease 75% Note: No Contrast adjustment. 24 │ Operating your monitor max. 100). Accessing the OSD menu NOTE: Any changes you make are automatically saved when you move to another menu, exit the OSD menu, or wait for the OSD menu to close automatically. 1. ComfortView = ON ComfortView = OFF 2.
Press key to call out Brightness OSD menu. • Press the button to switch ComfortView ON/OFF. Press key to call out ComfortView OSD menu. • Press key to increase the brightness and press the brightness (min. 0; button decrease 75% Note: No Contrast adjustment. 24 │ Operating your monitor max. 100). Accessing the OSD menu NOTE: Any changes you make are automatically saved when you move to another menu, exit the OSD menu, or wait for the OSD menu to close automatically. 1. ComfortView = ON ComfortView = OFF 2.
Users Guide
Page 26
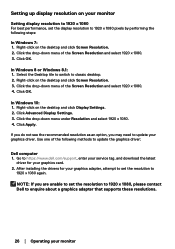
... Screen Resolution. 3. In Windows 8 or Windows 8.1: 1. In Windows 10: 1. After installing the drivers for your graphics card. 2. Click the drop-down menu under Resolution and select 1920 x 1080. 4. Right-click on the desktop and click Screen Resolution. 2. Right-click on the desktop and click Display Settings. 2. Select the Desktop tile to switch to https://www.dell.com/support, enter your service tag, and download the latest driver for your graphics adapter...
... Screen Resolution. 3. In Windows 8 or Windows 8.1: 1. In Windows 10: 1. After installing the drivers for your graphics card. 2. Click the drop-down menu under Resolution and select 1920 x 1080. 4. Right-click on the desktop and click Screen Resolution. 2. Right-click on the desktop and click Display Settings. 2. Select the Desktop tile to switch to https://www.dell.com/support, enter your service tag, and download the latest driver for your graphics adapter...
Users Guide
Page 27
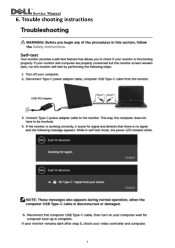
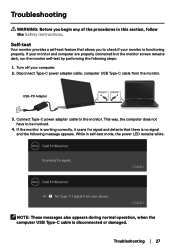
If the monitor is working correctly, it scans for signal... C1422H Dell 14 Monitor ? Self-test Your monitor provides a self-test feature that there is no signal and the following steps: 1. No Type-C 1 signal from the monitor. USB-PD Adapter USB Type-C USB Type-C 3. Dell 14 Monitor Scanning for signal and detects that allows you begin any of the procedures in self-test mode, the power LED remains white. Troubleshooting │ 27 If...
If the monitor is working correctly, it scans for signal... C1422H Dell 14 Monitor ? Self-test Your monitor provides a self-test feature that there is no signal and the following steps: 1. No Type-C 1 signal from the monitor. USB-PD Adapter USB Type-C USB Type-C 3. Dell 14 Monitor Scanning for signal and detects that allows you begin any of the procedures in self-test mode, the power LED remains white. Troubleshooting │ 27 If...

Users Guide
Page 28
If your monitor remains dark after step 5, check your computer wait for computer boot up is complete. 5. Reconnect the computer USB Type-C cable, then turn on your video controller and computer. 28 │ Troubleshooting
If your monitor remains dark after step 5, check your computer wait for computer boot up is complete. 5. Reconnect the computer USB Type-C cable, then turn on your video controller and computer. 28 │ Troubleshooting
Users Guide
Page 30
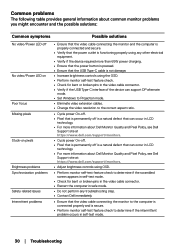
... that the power button is pressed. • Ensure that the USB Type-C cable is not damage. • Increase brightness controls using the OSD. • Perform monitor self-test feature check. • Check for bent or broken pins in the video cable connector. • Verify if the USB Type-C interface of the device can support DP alternate mode. • Set Windows to Projection mode. • Eliminate video extension cables. • Change the video resolution to the...
... that the power button is pressed. • Ensure that the USB Type-C cable is not damage. • Increase brightness controls using the OSD. • Perform monitor self-test feature check. • Check for bent or broken pins in the video cable connector. • Verify if the USB Type-C interface of the device can support DP alternate mode. • Set Windows to Projection mode. • Eliminate video extension cables. • Change the video resolution to the...

Users Guide
Page 32
.../or mechanical hazards. https://www.dell.com/support/monitors • Contacting Dell - Dell provides several online and telephone-based support and service options. Appendix Safety instructions WARNING: Use of controls, adjustments, or procedures other regulatory information, see Safety, Environmental, and Regulatory Information (SERI). For information on your area.... the United States, call 800-WWW-DELL (800-999-3355). NOTE: If you do not have an active Internet connection, you can find contact information on safety instructions, see the regulatory compliance website located...
.../or mechanical hazards. https://www.dell.com/support/monitors • Contacting Dell - Dell provides several online and telephone-based support and service options. Appendix Safety instructions WARNING: Use of controls, adjustments, or procedures other regulatory information, see Safety, Environmental, and Regulatory Information (SERI). For information on your area.... the United States, call 800-WWW-DELL (800-999-3355). NOTE: If you do not have an active Internet connection, you can find contact information on safety instructions, see the regulatory compliance website located...


