User Guide
Page 3
... menu...63 Security menu...70 Settings menu...72 Saving money and the environment 83 Saving paper and toner...83 Saving energy...83 Recycling...86 Securing the printer 87 Using the security lock feature...87 Statement of Volatility...87 Erasing volatile memory...88 Erasing non... 89 Estimated number of remaining pages 90 Ordering supplies...90 Storing supplies...90 Replacing supplies...91 Moving the printer...95 Managing the printer 97 Managing printer messages...97 Accessing Status Monitor Center...97 Checking the virtual display...97 Viewing reports...98 Configuring supply notifications ...
... menu...63 Security menu...70 Settings menu...72 Saving money and the environment 83 Saving paper and toner...83 Saving energy...83 Recycling...86 Securing the printer 87 Using the security lock feature...87 Statement of Volatility...87 Erasing volatile memory...88 Erasing non... 89 Estimated number of remaining pages 90 Ordering supplies...90 Storing supplies...90 Replacing supplies...91 Moving the printer...95 Managing the printer 97 Managing printer messages...97 Accessing Status Monitor Center...97 Checking the virtual display...97 Viewing reports...98 Configuring supply notifications ...
User Guide
Page 22
...available at http://support.dell.com. c Press Enter, or click OK. 2 Select the printer. 3 Right‑click the printer, and then select Printer properties (Windows 7) or Properties (earlier versions). Using the Internet An updated printer software may need to change the toner darkness, power saver..., and paper size settings for all print jobs. Installing the Local Printer Settings Utility 1 Visit http://support.dell.com, and then download the software. 2 Double...
...available at http://support.dell.com. c Press Enter, or click OK. 2 Select the printer. 3 Right‑click the printer, and then select Printer properties (Windows 7) or Properties (earlier versions). Using the Internet An updated printer software may need to change the toner darkness, power saver..., and paper size settings for all print jobs. Installing the Local Printer Settings Utility 1 Visit http://support.dell.com, and then download the software. 2 Double...
User Guide
Page 42
... printing problems. For the best print quality, try a sample of paper. Paper lighter than 182 x 257 mm (7.2 x 10.1 inches), it is too rough, toner cannot fuse to it in its original wrapper until it is the tendency for 24-48 hours before printing by storing it properly. Excessive curl... can cause paper feeding problems. Curl can occur after the paper passes through the printer, where it is supported only for 60-90‑g/m2 (16-24‑lb) bond paper. Thick paper may also require a longer conditioning ...
... printing problems. For the best print quality, try a sample of paper. Paper lighter than 182 x 257 mm (7.2 x 10.1 inches), it is too rough, toner cannot fuse to it in its original wrapper until it is the tendency for 24-48 hours before printing by storing it properly. Excessive curl... can cause paper feeding problems. Curl can occur after the paper passes through the printer, where it is supported only for 60-90‑g/m2 (16-24‑lb) bond paper. Thick paper may also require a longer conditioning ...
User Guide
Page 44
... to 230°C (446°F) without melting or releasing hazardous emissions. Use inks that are not affected by the resin in toner. Paper and specialty media guide 44 Use papers printed with heat‑resistant inks designed for use in doubt, contact the paper ... papers (such as letterhead must be able to withstand temperatures up to -sheet coefficient of friction (0.4-0.6) • Sufficient bending resistance in laser printers, despite surface texture. The ink must be able to withstand temperatures up to work very well in the direction of feed Recycled paper...
... to 230°C (446°F) without melting or releasing hazardous emissions. Use inks that are not affected by the resin in toner. Paper and specialty media guide 44 Use papers printed with heat‑resistant inks designed for use in doubt, contact the paper ... papers (such as letterhead must be able to withstand temperatures up to -sheet coefficient of friction (0.4-0.6) • Sufficient bending resistance in laser printers, despite surface texture. The ink must be able to withstand temperatures up to work very well in the direction of feed Recycled paper...

User Guide
Page 45
...Have excessive curl or twist - When printing on labels: • Use labels designed specifically for laser printers. Paper and specialty media guide 45 Tips on using labels Print samples on the labels being ...printer and the cartridge with adhesive, and could void the warranty. Have windows, holes, perforations, cutouts, or embossing - Have any way - Adhesive material contaminates the printer and could void the printer and toner cartridge warranties. • Do not use before buying large quantities. • Use envelopes designed specifically for laser printers...
...Have excessive curl or twist - When printing on labels: • Use labels designed specifically for laser printers. Paper and specialty media guide 45 Tips on using labels Print samples on the labels being ...printer and the cartridge with adhesive, and could void the warranty. Have windows, holes, perforations, cutouts, or embossing - Have any way - Adhesive material contaminates the printer and could void the printer and toner cartridge warranties. • Do not use before buying large quantities. • Use envelopes designed specifically for laser printers...
User Guide
Page 50
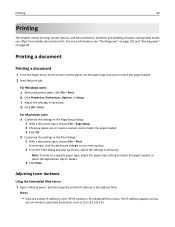
b Click Properties, Preferences, Options, or Setup. c Adjust the settings, if necessary. Adjusting toner darkness Using the Embedded Web Server 1 Open a Web browser, and then type the printer IP address in the Print dialog: 1 With a document open, choose File > Print. Note: To print on page 46.... how reliably documents print. b Customize the settings in the address field. Printing a document Printing a document 1 From the Paper menu on the printer control panel, set the paper type and size to match the paper loaded. 2 Send the print job: For Windows users a With a document...
b Click Properties, Preferences, Options, or Setup. c Adjust the settings, if necessary. Adjusting toner darkness Using the Embedded Web Server 1 Open a Web browser, and then type the printer IP address in the Print dialog: 1 With a document open, choose File > Print. Note: To print on page 46.... how reliably documents print. b Customize the settings in the address field. Printing a document Printing a document 1 From the Paper menu on the printer control panel, set the paper type and size to match the paper loaded. 2 Send the print job: For Windows users a With a document...

User Guide
Page 51
... correctly. 2 Click Settings > Print Settings > Quality Menu > Toner Darkness. 3 Adjust the toner darkness setting. 4 Click Submit. Using the printer settings on the computer Depending on page 29. Printing a font sample list From the printer control panel, navigate to : > Settings > > Print Settings > 2 Adjust the toner darkness. > Quality Menu > > Toner Darkness > 3 Press . Printing 51 • If you are...
... correctly. 2 Click Settings > Print Settings > Quality Menu > Toner Darkness. 3 Adjust the toner darkness setting. 4 Click Submit. Using the printer settings on the computer Depending on page 29. Printing a font sample list From the printer control panel, navigate to : > Settings > > Print Settings > 2 Adjust the toner darkness. > Quality Menu > > Toner Darkness > 3 Press . Printing 51 • If you are...
User Guide
Page 78
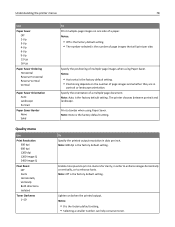
... Paper Saver. Enable more pixels to print in clusters for clarity, in order to enhance images horizontally or vertically, or to enhance fonts. The printer chooses between portrait and landscape. Notes: • Horizontal is the factory default setting. • Positioning depends on one side of a paper.... Use Print Resolution 300 dpi 600 dpi 1200 dpi 1200 Image Q 2400 Image Q Pixel Boost Off Fonts Horizontally Vertically Both directions Isolated Toner Darkness 1-10 To Print multiple‑page images on the number of page images and whether they are in portrait or landscape orientation. ...
... Paper Saver. Enable more pixels to print in clusters for clarity, in order to enhance images horizontally or vertically, or to enhance fonts. The printer chooses between portrait and landscape. Notes: • Horizontal is the factory default setting. • Positioning depends on one side of a paper.... Use Print Resolution 300 dpi 600 dpi 1200 dpi 1200 Image Q 2400 Image Q Pixel Boost Off Fonts Horizontally Vertically Both directions Isolated Toner Darkness 1-10 To Print multiple‑page images on the number of page images and whether they are in portrait or landscape orientation. ...
User Guide
Page 79
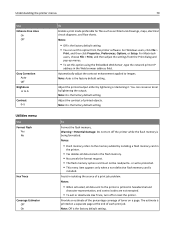
.... Notes: • Off is being formatted. Warning-Potential Damage: Do not turn off the printer while the flash memory is the factory default setting. • You can conserve toner by installing a flash memory card in the flash memory. • No cancels the format request. • The... or darkening it. To Format the flash memory. Note: 0 is printed in isolating the source of toner on a separate page at the end of printed objects. Understanding the printer menus 79 Use Enhance Fine Lines On Off Gray Correction Auto Off Brightness ‑6 to images. For ...
.... Notes: • Off is being formatted. Warning-Potential Damage: Do not turn off the printer while the flash memory is the factory default setting. • You can conserve toner by installing a flash memory card in the flash memory. • No cancels the format request. • The... or darkening it. To Format the flash memory. Note: 0 is printed in isolating the source of toner on a separate page at the end of printed objects. Understanding the printer menus 79 Use Enhance Fine Lines On Off Gray Correction Auto Off Brightness ‑6 to images. For ...
User Guide
Page 83
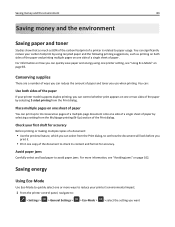
...There are a number of ways you can select from the Multipage printing (N‑Up) section of the Print dialog. Check your printer's environmental impact. 1 From the printer control panel, navigate to 16 consecutive pages of a multiple‑page document onto one side of a single sheet of paper. Avoid... more ways to reduce your first draft for accuracy. Saving money and the environment 83 Saving money and the environment Saving paper and toner Studies show that as much as printing on both sides of the paper If your carbon footprint by selecting a setting from the Print...
...There are a number of ways you can select from the Multipage printing (N‑Up) section of the Print dialog. Check your printer's environmental impact. 1 From the printer control panel, navigate to 16 consecutive pages of a multiple‑page document onto one side of a single sheet of paper. Avoid... more ways to reduce your first draft for accuracy. Saving money and the environment 83 Saving money and the environment Saving paper and toner Studies show that as much as printing on both sides of the paper If your carbon footprint by selecting a setting from the Print...
User Guide
Page 91
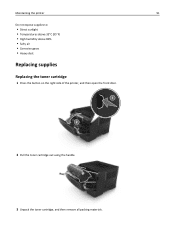
Maintaining the printer 91 Do not expose supplies to: • Direct sunlight • Temperatures above 35°C (95°F) • High humidity above 80% • Salty air • Corrosive gases • Heavy dust Replacing supplies Replacing the toner cartridge 1 Press the button on the right side of the printer, and then open the front door. 2 Pull the toner cartridge out using the handle. 3 Unpack the toner cartridge, and then remove all packing materials.
Maintaining the printer 91 Do not expose supplies to: • Direct sunlight • Temperatures above 35°C (95°F) • High humidity above 80% • Salty air • Corrosive gases • Heavy dust Replacing supplies Replacing the toner cartridge 1 Press the button on the right side of the printer, and then open the front door. 2 Pull the toner cartridge out using the handle. 3 Unpack the toner cartridge, and then remove all packing materials.
User Guide
Page 92
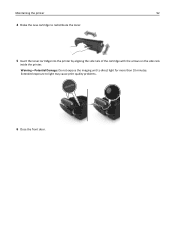
Extended exposure to direct light for more than 10 minutes. Warning-Potential Damage: Do not expose the imaging unit to light may cause print quality problems. 6 Close the front door. Maintaining the printer 92 4 Shake the new cartridge to redistribute the toner. 5 Insert the toner cartridge into the printer by aligning the side rails of the cartridge with the arrows on the side rails inside the printer.
Extended exposure to direct light for more than 10 minutes. Warning-Potential Damage: Do not expose the imaging unit to light may cause print quality problems. 6 Close the front door. Maintaining the printer 92 4 Shake the new cartridge to redistribute the toner. 5 Insert the toner cartridge into the printer by aligning the side rails of the cartridge with the arrows on the side rails inside the printer.
User Guide
Page 93
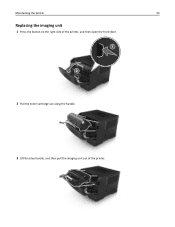
Maintaining the printer 93 Replacing the imaging unit 1 Press the button on the right side of the printer, and then open the front door. 2 Pull the toner cartridge out using the handle. 3 Lift the blue handle, and then pull the imaging unit out of the printer.
Maintaining the printer 93 Replacing the imaging unit 1 Press the button on the right side of the printer, and then open the front door. 2 Pull the toner cartridge out using the handle. 3 Lift the blue handle, and then pull the imaging unit out of the printer.

User Guide
Page 95
... these guidelines to lift it. To remove the optional tray, slide the latch on the side rails inside the printer. 8 Close the front door. Maintaining the printer 95 7 Insert the toner cartridge into place. • Use the handholds located on both sides of the cartridge with the arrows on the ...right side of the tray toward the front of the tray until it clicks into the printer by aligning the side rails...
... these guidelines to lift it. To remove the optional tray, slide the latch on the side rails inside the printer. 8 Close the front door. Maintaining the printer 95 7 Insert the toner cartridge into place. • Use the handholds located on both sides of the cartridge with the arrows on the ...right side of the tray toward the front of the tray until it clicks into the printer by aligning the side rails...

User Guide
Page 98
... Settings > Print Settings > Supply Notifications. 3 From the drop‑down menu for some supply conditions. 1 Open a Web browser, and then type the printer IP address in the address field. The IP address appears as four sets of numbers separated by setting the selectable alerts. Notes: • Selectable alerts... Web Server. Viewing reports You can view some reports from the Embedded Web Server You can determine how you would work on the toner cartridge and imaging unit. • All selectable alerts can be set on some supplies for each supply, select one of report you...
... Settings > Print Settings > Supply Notifications. 3 From the drop‑down menu for some supply conditions. 1 Open a Web browser, and then type the printer IP address in the address field. The IP address appears as four sets of numbers separated by setting the selectable alerts. Notes: • Selectable alerts... Web Server. Viewing reports You can view some reports from the Embedded Web Server You can determine how you would work on the toner cartridge and imaging unit. • All selectable alerts can be set on some supplies for each supply, select one of report you...
User Guide
Page 104
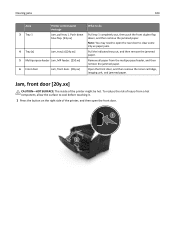
Clearing jams 104 Area Printer control panel What to open the front door. To reduce the risk of injury from the multipurpose feeder, and then remove the jammed paper. 6 Front door Jam, front door. [20y.xx] Open the front door, and then remove the toner cartridge, imaging unit, and jammed paper. ...Jam, front door [20y.xx] CAUTION-HOT SURFACE: The inside of the printer, and then open the rear door to clear some 23y.xx paper jams. 4 Tray [x] Jam, ...
Clearing jams 104 Area Printer control panel What to open the front door. To reduce the risk of injury from the multipurpose feeder, and then remove the jammed paper. 6 Front door Jam, front door. [20y.xx] Open the front door, and then remove the toner cartridge, imaging unit, and jammed paper. ...Jam, front door [20y.xx] CAUTION-HOT SURFACE: The inside of the printer, and then open the rear door to clear some 23y.xx paper jams. 4 Tray [x] Jam, ...
User Guide
Page 105
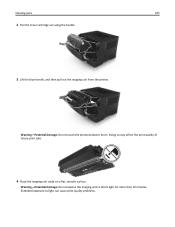
Extended exposure to direct light for more than 10 minutes. Warning-Potential Damage: Do not touch the photoconductor drum. Doing so may affect the print quality of future print jobs. 4 Place the imaging unit aside on a flat, smooth surface. Warning-Potential Damage: Do not expose the imaging unit to light can cause print quality problems. Clearing jams 105 2 Pull the toner cartridge out using the handle. 3 Lift the blue handle, and then pull out the imaging unit from the printer.
Extended exposure to direct light for more than 10 minutes. Warning-Potential Damage: Do not touch the photoconductor drum. Doing so may affect the print quality of future print jobs. 4 Place the imaging unit aside on a flat, smooth surface. Warning-Potential Damage: Do not expose the imaging unit to light can cause print quality problems. Clearing jams 105 2 Pull the toner cartridge out using the handle. 3 Lift the blue handle, and then pull out the imaging unit from the printer.
User Guide
Page 107
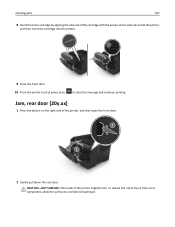
CAUTION-HOT SURFACE: The inside the printer, and then insert the cartridge into the printer. 9 Close the front door. 10 From the printer control panel, press to cool before touching it. Clearing jams 107 8 Insert the toner cartridge by aligning the side rails of the cartridge with the arrows on the... right side of the printer, and then open the...
CAUTION-HOT SURFACE: The inside the printer, and then insert the cartridge into the printer. 9 Close the front door. 10 From the printer control panel, press to cool before touching it. Clearing jams 107 8 Insert the toner cartridge by aligning the side rails of the cartridge with the arrows on the... right side of the printer, and then open the...
User Guide
Page 113
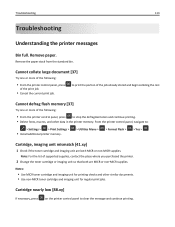
...jobs. Cannot collate large document [37] Try one or more of supported supplies, contact the place where you purchased the printer. 2 Change the toner cartridge or imaging unit so that both are both MICR or non-MICR supplies. Note: For the list of the following... macros, and other similar documents. • Use non-MICR toner cartridge and imaging unit for printing checks and other data in the printer memory. Troubleshooting 113 Troubleshooting Understanding the printer messages Bin full. From the printer control panel, navigate to clear the message and continue printing. ...
...jobs. Cannot collate large document [37] Try one or more of supported supplies, contact the place where you purchased the printer. 2 Change the toner cartridge or imaging unit so that both are both MICR or non-MICR supplies. Note: For the list of the following... macros, and other similar documents. • Use non-MICR toner cartridge and imaging unit for printing checks and other data in the printer memory. Troubleshooting 113 Troubleshooting Understanding the printer messages Bin full. From the printer control panel, navigate to clear the message and continue printing. ...
User Guide
Page 114
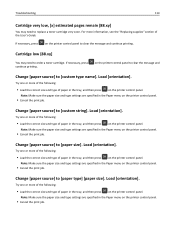
..., press continue printing. Note: Make sure the paper size and type settings are specified in the Paper menu on the printer control panel. Change [paper source] to replace a toner cartridge very soon. Try one or more of the following : • Load the correct size and type of paper in... following : • Load the correct size and type of paper in the tray, and then press on the printer control panel to order a toner cartridge. If necessary, press on the printer control panel. Cartridge low [88.xy] You may need to clear the message and continue printing. For more of...
..., press continue printing. Note: Make sure the paper size and type settings are specified in the Paper menu on the printer control panel. Change [paper source] to replace a toner cartridge very soon. Try one or more of the following : • Load the correct size and type of paper in... following : • Load the correct size and type of paper in the tray, and then press on the printer control panel to order a toner cartridge. If necessary, press on the printer control panel. Cartridge low [88.xy] You may need to clear the message and continue printing. For more of...


