
User Guide
Page 11
... previous screen. 9 Indicator light Determine the status of the printer. For menus with numeric values, press and hold an arrow button to the top‑level menu screen. Learning about the printer 11 Using the printer control panel Use the To 1 Menus button Open the menus. Release the button when the...
... previous screen. 9 Indicator light Determine the status of the printer. For menus with numeric values, press and hold an arrow button to the top‑level menu screen. Learning about the printer 11 Using the printer control panel Use the To 1 Menus button Open the menus. Release the button when the...
User Guide
Page 34
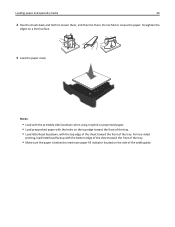
... top edge of the sheet toward the front of the tray. • Make sure the paper is below the maximum paper fill indicator located on a level surface. 5 Load the paper stack. Do not fold or crease the paper. Straighten the edges on the side of the tray. Notes: • Load with...
... top edge of the sheet toward the front of the tray. • Make sure the paper is below the maximum paper fill indicator located on a level surface. 5 Load the paper stack. Do not fold or crease the paper. Straighten the edges on the side of the tray. Notes: • Load with...
User Guide
Page 37
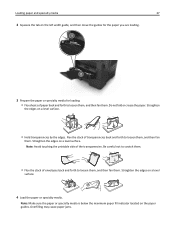
...or specialty media for loading. • Flex sheets of paper back and forth to loosen them, and then fan them. Straighten the edges on a level surface. 4 Load the paper or specialty media. Note: Make sure the paper or specialty media is below the maximum paper fill indicator located on... a level surface. • Hold transparencies by the edges. Straighten the edges on the paper guides. Overfilling may cause paper jams. Be careful not to scratch them...
...or specialty media for loading. • Flex sheets of paper back and forth to loosen them, and then fan them. Straighten the edges on a level surface. 4 Load the paper or specialty media. Note: Make sure the paper or specialty media is below the maximum paper fill indicator located on... a level surface. • Hold transparencies by the edges. Straighten the edges on the paper guides. Overfilling may cause paper jams. Be careful not to scratch them...

User Guide
Page 90
...Click Order Online to order supplies on the Web. • Click Order by Phone to order supplies by phone. Consider the variable level of accuracy before purchasing or replacing supplies based on the estimate. Its accuracy may decrease when the actual printing consumption is based on the... Estimated number of remaining pages The estimated number of remaining pages is different from the list. 3 Select your printer, and then navigate to: Dell Printer Home > Maintenance > Order supplies 4 From the Order Printer Supplies dialog, do any of the following : • Click Order Online...
...Click Order Online to order supplies on the Web. • Click Order by Phone to order supplies by phone. Consider the variable level of accuracy before purchasing or replacing supplies based on the estimate. Its accuracy may decrease when the actual printing consumption is based on the... Estimated number of remaining pages The estimated number of remaining pages is different from the list. 3 Select your printer, and then navigate to: Dell Printer Home > Maintenance > Order supplies 4 From the Order Printer Supplies dialog, do any of the following : • Click Order Online...
User Guide
Page 112
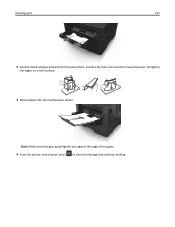
Straighten the edges on a level surface. 3 Reload paper into the multipurpose feeder. Do not fold or crease the paper. Note: Make sure the paper guide lightly rests against the edge of paper back and forth to clear the message and continue printing. Clearing jams 112 2 Flex the sheets of the paper. 4 From the printer control panel, press to loosen them, and then fan them.
Straighten the edges on a level surface. 3 Reload paper into the multipurpose feeder. Do not fold or crease the paper. Note: Make sure the paper guide lightly rests against the edge of paper back and forth to clear the message and continue printing. Clearing jams 112 2 Flex the sheets of the paper. 4 From the printer control panel, press to loosen them, and then fan them.


