
User Manual
Page 11
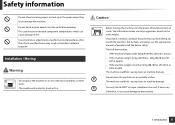
... prevents you from lifting, do not lift the machine. The machine could fall , causing injury or machine damage. This could result in the paper output tray. The information below are only suggestions based on an unstable surface. Use only No.26 AWGa or larger, telephone line cord, if necessary. It can....09 lbs) - 40kg (88.18 lbs), lift with 2 people. • If the machine weighs more people. Do not block or push objects into the ventilation opening. Do not place the machine on the units weight.
... prevents you from lifting, do not lift the machine. The machine could fall , causing injury or machine damage. This could result in the paper output tray. The information below are only suggestions based on an unstable surface. Use only No.26 AWGa or larger, telephone line cord, if necessary. It can....09 lbs) - 40kg (88.18 lbs), lift with 2 people. • If the machine weighs more people. Do not block or push objects into the ventilation opening. Do not place the machine on the units weight.
User Manual
Page 24
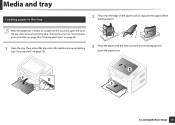
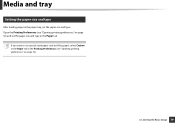
... close the top cover to print facing up and open the output tray. 1 2 2 1 2. Learning the Basic Usage 24 Then, adjust the tray size to the media size you are loading (see "Tray overview" on page 23). 3 Place the paper with the side you want to resume printing after clearing the error (see "Out-of... the paper stack to separate the pages before loading papers. Media and tray 2 Loading paper in the tray 2 Flex or fan the edge of -paper error resolution" on page 49 or "Clearing paper jams" on page 50...
... close the top cover to print facing up and open the output tray. 1 2 2 1 2. Learning the Basic Usage 24 Then, adjust the tray size to the media size you are loading (see "Tray overview" on page 23). 3 Place the paper with the side you want to resume printing after clearing the error (see "Out-of... the paper stack to separate the pages before loading papers. Media and tray 2 Loading paper in the tray 2 Flex or fan the edge of -paper error resolution" on page 49 or "Clearing paper jams" on page 50...
User Manual
Page 25
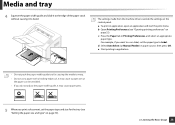
...control panel. e Start printing in Printing Preferences, and select an appropriate paper type. d Select Auto Select (or Manual Feeder) in application, open an application and start the print menu. b Open Printing Preferences (see "Setting the paper size and type" on page 30). 2. c Press the Paper tab in application. • Do ...cause a paper jam or the paper can be wrinkled. • If you do not adjust the paper width guide, it to bend. Media and tray 4 Squeeze the paper width guide and slide it to the edge of the paper stack without causing it may cause paper jams. 5 When you ...
...control panel. e Start printing in Printing Preferences, and select an appropriate paper type. d Select Auto Select (or Manual Feeder) in application, open an application and start the print menu. b Open Printing Preferences (see "Setting the paper size and type" on page 30). 2. c Press the Paper tab in application. • Do ...cause a paper jam or the paper can be wrinkled. • If you do not adjust the paper width guide, it to bend. Media and tray 4 Squeeze the paper width guide and slide it to the edge of the paper stack without causing it may cause paper jams. 5 When you ...
User Manual
Page 26
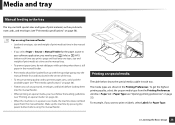
...on postcards, envelopes, and labels before using the manual feeder. 4 Printing on special media The table below shows the special media usable in each tray. Tips on using the manual feeder • Load only one type, size and weight of print media at time in the manual feeder. &#... the center of print material, such as postcards, note cards, and envelopes (see "Opening printing preferences" on page 32). Media and tray 3 Manual feeding in the tray The tray can hold special sizes and types of the tray. • To ensure printing quality and to prevent paper jams, only load the available...
...on postcards, envelopes, and labels before using the manual feeder. 4 Printing on special media The table below shows the special media usable in each tray. Tips on using the manual feeder • Load only one type, size and weight of print media at time in the manual feeder. &#... the center of print material, such as postcards, note cards, and envelopes (see "Opening printing preferences" on page 32). Media and tray 3 Manual feeding in the tray The tray can hold special sizes and types of the tray. • To ensure printing quality and to prevent paper jams, only load the available...
User Manual
Page 30
Learning the Basic Usage 30 Media and tray 5 Setting the paper size and type After loading paper in the Printing Preferences (see "Opening printing preferences" on page 32). 2. If you want to use special-sized paper such as billing paper, select Custom in the Paper tab in the paper tray, set the paper size and type in the Paper tab. Open the Printing Preferences (see "Opening printing preferences" on page 32) and set the paper size and type.
Learning the Basic Usage 30 Media and tray 5 Setting the paper size and type After loading paper in the Printing Preferences (see "Opening printing preferences" on page 32). 2. If you want to use special-sized paper such as billing paper, select Custom in the Paper tab in the paper tray, set the paper size and type in the Paper tab. Open the Printing Preferences (see "Opening printing preferences" on page 32) and set the paper size and type.
User Manual
Page 49
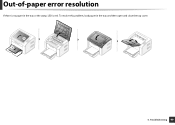
Out-of-paper error resolution If there is no paper in the tray and then open and close the top cover. 2 1 4. To resolve this problem, load paper in the tray or the status LED is red. Troubleshooting 49
Out-of-paper error resolution If there is no paper in the tray and then open and close the top cover. 2 1 4. To resolve this problem, load paper in the tray or the status LED is red. Troubleshooting 49
User Manual
Page 50
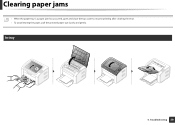
Clearing paper jams • When the paper tray is a paper jam has occurred, open and close the top cover to resume printing after clearing the error. • To avoid tearing the paper, pull the jammed paper out slowly and gently. 1 In tray 2 1 4. Troubleshooting 50
Clearing paper jams • When the paper tray is a paper jam has occurred, open and close the top cover to resume printing after clearing the error. • To avoid tearing the paper, pull the jammed paper out slowly and gently. 1 In tray 2 1 4. Troubleshooting 50
User Manual
Page 53
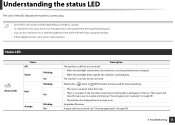
..., open and close the top cover to be used. Troubleshooting 53 The machine is on-line and can also resolve the error with the guidelines from the Dell Printer Status program window. • If the problem persists, call a service representative. 3 Status LED (Status LED) Status Off Green Red... the machine is receiving data from the troubleshooting part. • You can be pressed for manual printing. • The cover is no paper in the tray. Upgrading firmware. Waiting for a (Info) or (WPS) button to resume printing (see "Clearing paper jams" on model or country. • To ...
..., open and close the top cover to be used. Troubleshooting 53 The machine is on-line and can also resolve the error with the guidelines from the Dell Printer Status program window. • If the problem persists, call a service representative. 3 Status LED (Status LED) Status Off Green Red... the machine is receiving data from the troubleshooting part. • You can be pressed for manual printing. • The cover is no paper in the tray. Upgrading firmware. Waiting for a (Info) or (WPS) button to resume printing (see "Clearing paper jams" on model or country. • To ...
User Manual
Page 134
...are against both sides of paper. • Remove paper from the tray and flex or fan the paper. • Humid conditions may be stacked in the tray. Open the top cover and remove any obstructions from the tray. Troubleshooting 134 Suggested solutions Clear the paper jam. • Check ...the maximum paper capacity of the tray . • Make sure that the paper guides are printing ...
...are against both sides of paper. • Remove paper from the tray and flex or fan the paper. • Humid conditions may be stacked in the tray. Open the top cover and remove any obstructions from the tray. Troubleshooting 134 Suggested solutions Clear the paper jam. • Check ...the maximum paper capacity of the tray . • Make sure that the paper guides are printing ...

User Manual
Page 137
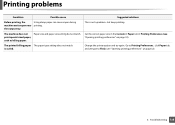
... the Printing Preferences (see if the machine is so big that was selected in the tray. The output tray is removed from the wrong Printing Preferences may be incorrectly installed. See the printer driver help... " on page 32). Troubleshooting 137 The printer driver may be incorrect. Contact a service representative. Change the page orientation in the software application settings you use (see "Using help screen (see "Opening...
... the Printing Preferences (see if the machine is so big that was selected in the tray. The output tray is removed from the wrong Printing Preferences may be incorrectly installed. See the printer driver help... " on page 32). Troubleshooting 137 The printer driver may be incorrect. Contact a service representative. Change the page orientation in the software application settings you use (see "Using help screen (see "Opening...
User Manual
Page 139
the output tray. The printed billing paper The paper type setting does not match. Suggested solutions This is curled. Go to Printing Preferences , click Paper tab, and set type to Thick (see "Opening printing preferences" on page 32). 5. Troubleshooting 139 is not a problem. Change the ...and paper size setting do not match. Set the correct paper size in the Custom in Paper tab in Printing Preferences (see "Opening printing preferences" on page 32). Just keep printing. print special-sized paper, such as billing paper. Printing problems Condition Possible cause...
the output tray. The printed billing paper The paper type setting does not match. Suggested solutions This is curled. Go to Printing Preferences , click Paper tab, and set type to Thick (see "Opening printing preferences" on page 32). 5. Troubleshooting 139 is not a problem. Change the ...and paper size setting do not match. Set the correct paper size in the Custom in Paper tab in Printing Preferences (see "Opening printing preferences" on page 32). Just keep printing. print special-sized paper, such as billing paper. Printing problems Condition Possible cause...
User Manual
Page 147
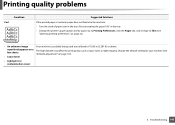
...the print quality, such as loose toner or light imaging. Go to Printing Preferences, click the Paper tab, and set type to Thin (see "Opening printing preferences" on page 32). • An unknown image Your machine is curled or paper does not feed into the machine: • Turn ... Suggested Solutions If the printed paper is probably being used at an altitude of paper over in the tray. • Change the printer's paper option and try rotating the paper 180° in the tray. repetitively appears on page 107). • Loose toner • Light print or contamination occurs 5.
...the print quality, such as loose toner or light imaging. Go to Printing Preferences, click the Paper tab, and set type to Thin (see "Opening printing preferences" on page 32). • An unknown image Your machine is curled or paper does not feed into the machine: • Turn ... Suggested Solutions If the printed paper is probably being used at an altitude of paper over in the tray. • Change the printer's paper option and try rotating the paper 180° in the tray. repetitively appears on page 107). • Loose toner • Light print or contamination occurs 5.


