
User's Guide
Page 2
...36 Storing the toner cartridge 37 Redistributing toner 39 Replacing the toner cartridge 40 Cleaning the machine 42 Tips for avoiding paper jams 48 Out-of-paper error resolution 49 Clearing paper jams 50 Understanding the status LED 53 5. BASIC 1. Troubleshooting Tips for moving & storing your machine 46 4. ... panel overview 16 Turning on the machine 17 Installing the driver locally 18 Reinstalling the driver 20 2. Appendix Specifications 56 Dell technical support policy 64 Contacting Dell 65 Warranty and return policy 66 Copyright 67 2
...36 Storing the toner cartridge 37 Redistributing toner 39 Replacing the toner cartridge 40 Cleaning the machine 42 Tips for avoiding paper jams 48 Out-of-paper error resolution 49 Clearing paper jams 50 Understanding the status LED 53 5. BASIC 1. Troubleshooting Tips for moving & storing your machine 46 4. ... panel overview 16 Turning on the machine 17 Installing the driver locally 18 Reinstalling the driver 20 2. Appendix Specifications 56 Dell technical support policy 64 Contacting Dell 65 Warranty and return policy 66 Copyright 67 2
User's Guide
Page 4
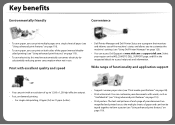
... when not in the requested details to access help tools and information. Print with excellent quality and speed • Dell Printer Manager and Dell Printer Status are magnified and printed across the multiple sheets of paper and can then be taped together to form a poster (see "Using advanced print features" on page 110). Wide range...
... when not in the requested details to access help tools and information. Print with excellent quality and speed • Dell Printer Manager and Dell Printer Status are magnified and printed across the multiple sheets of paper and can then be taped together to form a poster (see "Using advanced print features" on page 110). Wide range...
User's Guide
Page 7
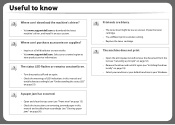
... page 15). • Check the instructions on removing jammed paper in this manual and troubleshoot accordingly (see "Understanding the status LED" on page 50). Useful to know Where can I download the machine's driver? • Visit www.support.dell.com to view product service information. Where can I purchase ...toner cartridge. The status LED flashes or remains constantly on. • Turn the product off and on your retailer. • Visit www.support.dell.com. Printouts are blurry. • The toner level might be low or uneven. The machine does not print. • Open the print ...
... page 15). • Check the instructions on removing jammed paper in this manual and troubleshoot accordingly (see "Understanding the status LED" on page 50). Useful to know Where can I download the machine's driver? • Visit www.support.dell.com to view product service information. Where can I purchase ...toner cartridge. The status LED flashes or remains constantly on. • Turn the product off and on your retailer. • Visit www.support.dell.com. Printouts are blurry. • The toner level might be low or uneven. The machine does not print. • Open the print ...
User's Guide
Page 8
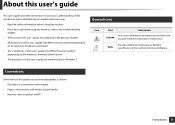
... guide This user's guide provides information for your machine depending on Windows 7. 2 General icons Icon Text Description Gives users information to printer or MFP. 1. Note Provides additional information or detailed specification of the machine as well as detailed steps to explain machine usage. &#... Some terms in this user's guide are used interchangeably, as below: • Document is synonymous with original. • Paper is synonymous with media, or print media. • Machine refers to protect the machine from Caution possible mechanical damage or malfunction. Introduction 8...
... guide This user's guide provides information for your machine depending on Windows 7. 2 General icons Icon Text Description Gives users information to printer or MFP. 1. Note Provides additional information or detailed specification of the machine as well as detailed steps to explain machine usage. &#... Some terms in this user's guide are used interchangeably, as below: • Document is synonymous with original. • Paper is synonymous with media, or print media. • Machine refers to protect the machine from Caution possible mechanical damage or malfunction. Introduction 8...

User's Guide
Page 10
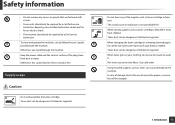
... electric shock or fire and/or injury to force it in electric shock. This could result in . Be care when replacing paper or removing jammed paper. New paper has sharp edges and can occur. When printing large quantities, the bottom part of non-operation, remove the power plug from... qualified service personnel. Introduction 10 Safety information Caution 5 Operating method During an electrical storm or for a period of the paper output area may get hot. If the plug does not easily enter the electrical outlet, do not use tweezers or sharp metal objects. Caution...
... electric shock or fire and/or injury to force it in electric shock. This could result in . Be care when replacing paper or removing jammed paper. New paper has sharp edges and can occur. When printing large quantities, the bottom part of non-operation, remove the power plug from... qualified service personnel. Introduction 10 Safety information Caution 5 Operating method During an electrical storm or for a period of the paper output area may get hot. If the plug does not easily enter the electrical outlet, do not use tweezers or sharp metal objects. Caution...

User's Guide
Page 11
Safety information Do not allow too many papers to the machine. 1. This could fall , causing injury or machine damage. The machine could result in elevated component temperatures which can cause damage or fire. ... an area with 4 or more than those specified herein may result in hazardous radiation exposure. 6 Installation / Moving Warning Do not place the machine in the paper output tray. Caution Before moving the machine, turn the power off and disconnect all cords. Then lift the machine: • If the machine weighs under...
Safety information Do not allow too many papers to the machine. 1. This could fall , causing injury or machine damage. The machine could result in elevated component temperatures which can cause damage or fire. ... an area with 4 or more than those specified herein may result in hazardous radiation exposure. 6 Installation / Moving Warning Do not place the machine in the paper output tray. Caution Before moving the machine, turn the power off and disconnect all cords. Then lift the machine: • If the machine weighs under...
User's Guide
Page 13
Safety information • Do not remove any of recycled supplies, a service fee will be repaired by a Dell service technician. Do not burn any covers or guards that are fastened with the machine. When toner gets on your body or clothes. In case... in fire or electric shock. • The machine should only be charged. 1. This could damage the machine. When changing the toner cartridge or removing jammed paper, be dangerous if inhaled or ingested. Use cold water. Otherwise, you could cause an explosion or uncontrollable fire. To clean and operate the machine, strictly...
Safety information • Do not remove any of recycled supplies, a service fee will be repaired by a Dell service technician. Do not burn any covers or guards that are fastened with the machine. When toner gets on your body or clothes. In case... in fire or electric shock. • The machine should only be charged. 1. This could damage the machine. When changing the toner cartridge or removing jammed paper, be dangerous if inhaled or ingested. Use cold water. Otherwise, you could cause an explosion or uncontrollable fire. To clean and operate the machine, strictly...
User's Guide
Page 16
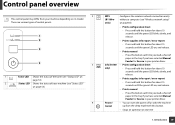
...You can turn the power off or wake the machine up from your machine (see "Status LED" on page 53). 4 WPS (B1160w only) Info (B1160 only) Power/ Cancel Configures the wireless network connection easily without a computer (see "Status LED" on page 53). 2 Status LED Shows the status of...release. • Prints manual - Press and hold this button for Source in your printer driver. • Prints configuration sheet - There are various types of control panels. 3 1 Toner LED Shows the status of paper in the tray if you have selected Manual Feeder for about 15 seconds until the ...
...You can turn the power off or wake the machine up from your machine (see "Status LED" on page 53). 4 WPS (B1160w only) Info (B1160 only) Power/ Cancel Configures the wireless network connection easily without a computer (see "Status LED" on page 53). 2 Status LED Shows the status of...release. • Prints manual - Press and hold this button for Source in your printer driver. • Prints configuration sheet - There are various types of control panels. 3 1 Toner LED Shows the status of paper in the tray if you have selected Manual Feeder for about 15 seconds until the ...
User's Guide
Page 23
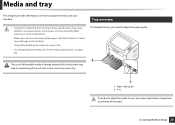
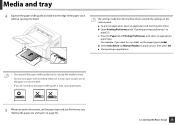
Such repairs are not covered by Dell's warranty or service agreements. • Make sure not to use of inflammable media or foreign materials left in the printer may lead to adjust the paper guide. 2 The use the inkjet photo paper with this machine. To change the size, you do not adjust ...; Using print media that does not meet these specifications may cause paper registration, image skew, or jamming of the unit and, in rare cases may cause a fire. 1 1 Paper width guide 2 Tray If you need to overheating of the paper. 2. Learning the Basic Usage 23 Media and tray This chapter ...
Such repairs are not covered by Dell's warranty or service agreements. • Make sure not to use of inflammable media or foreign materials left in the printer may lead to adjust the paper guide. 2 The use the inkjet photo paper with this machine. To change the size, you do not adjust ...; Using print media that does not meet these specifications may cause paper registration, image skew, or jamming of the unit and, in rare cases may cause a fire. 1 1 Paper width guide 2 Tray If you need to overheating of the paper. 2. Learning the Basic Usage 23 Media and tray This chapter ...
User's Guide
Page 24
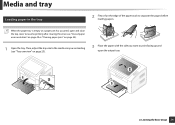
... or fan the edge of -paper error resolution" on page 49 or "Clearing paper jams" on page 23). 3 Place the paper with the side you want to print facing up and open and close the top cover to resume printing after clearing the error (see "Out-of the paper stack to the media size... you are loading (see "Tray overview" on page 50). 1 Open the tray. When the paper tray is empty or a paper jam has occurred, open the output tray. 1 2 2 1 2. Then, adjust the tray size to...
... or fan the edge of -paper error resolution" on page 49 or "Clearing paper jams" on page 23). 3 Place the paper with the side you want to print facing up and open and close the top cover to resume printing after clearing the error (see "Out-of the paper stack to the media size... you are loading (see "Tray overview" on page 50). 1 Open the tray. When the paper tray is empty or a paper jam has occurred, open the output tray. 1 2 2 1 2. Then, adjust the tray size to...
User's Guide
Page 25
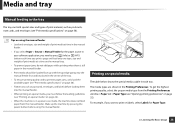
...2. e Start printing in Printing Preferences, and select an appropriate paper type. c Press the Paper tab in application. • Do not push the paper width guide too far causing the media to warp. • Do not use a label, set the paper type and size for the tray (see "Opening printing preferences" ... and type" on the control panel. Media and tray 4 Squeeze the paper width guide and slide it to the edge of the paper stack without causing it may cause paper jams. 5 When you print a document, set the paper type to bend. d Select Auto Select (or Manual Feeder) in application, ...
...2. e Start printing in Printing Preferences, and select an appropriate paper type. c Press the Paper tab in application. • Do not push the paper width guide too far causing the media to warp. • Do not use a label, set the paper type and size for the tray (see "Opening printing preferences" ... and type" on the control panel. Media and tray 4 Squeeze the paper width guide and slide it to the edge of the paper stack without causing it may cause paper jams. 5 When you print a document, set the paper type to bend. d Select Auto Select (or Manual Feeder) in application, ...
User's Guide
Page 26
...placed in the center of print material, such as postcards, note cards, and envelopes (see "Print media specifications" on labels, select Labels for the paper source in each time you want to press (Info) or (WPS) button each tray. The media types are shown in the manual feeder. •...; If you select Paper > Source > Manual Feeder for Paper Type. 2. Tips on using the manual feeder. 4 Printing on special media The table below shows the special media usable in your software...
...placed in the center of print material, such as postcards, note cards, and envelopes (see "Print media specifications" on labels, select Labels for the paper source in each time you want to press (Info) or (WPS) button each tray. The media types are shown in the manual feeder. •...; If you select Paper > Source > Manual Feeder for Paper Type. 2. Tips on using the manual feeder. 4 Printing on special media The table below shows the special media usable in your software...
User's Guide
Page 27
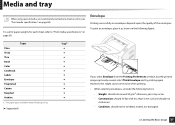
To print an envelope, place it as shown in tray. (●: Supported) Traya If you feed one sheet at a time (see for paper weights for each sheet, refer to "Print media specifications" on envelopes depends upon the quality of the envelopes. Types Plain Thick Thin Bond Color CardStock .... Construction: should lie flat with less than 6 mm curl and should not be wrinkled, nicked, nor damaged. 2. Weight: should not exceed 90 g/m2 otherwise; The paper types available manual feeding in the following factors: -
To print an envelope, place it as shown in tray. (●: Supported) Traya If you feed one sheet at a time (see for paper weights for each sheet, refer to "Print media specifications" on envelopes depends upon the quality of the envelopes. Types Plain Thick Thin Bond Color CardStock .... Construction: should lie flat with less than 6 mm curl and should not be wrinkled, nicked, nor damaged. 2. Weight: should not exceed 90 g/m2 otherwise; The paper types available manual feeding in the following factors: -
User's Guide
Page 29
... or release hazardous emissions when subjected to peel off during printing, which can cause paper jams. Exposed adhesive can come off preprinted paper, reducing print quality. 2. Preprinted paper When loading preprinted paper, the printed side should be non-flammable and should not adversely affect machine rollers. ... labels through the machine. • Do not use labels that are wrinkled, bubbled, or otherwise damaged. Card stock/ Custom-sized paper • In the software application, set margins at the front. Media and tray • Make sure that there is not guaranteed...
... or release hazardous emissions when subjected to peel off during printing, which can cause paper jams. Exposed adhesive can come off preprinted paper, reducing print quality. 2. Preprinted paper When loading preprinted paper, the printed side should be non-flammable and should not adversely affect machine rollers. ... labels through the machine. • Do not use labels that are wrinkled, bubbled, or otherwise damaged. Card stock/ Custom-sized paper • In the software application, set margins at the front. Media and tray • Make sure that there is not guaranteed...

User's Guide
Page 30
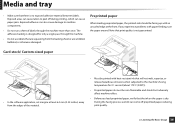
If you want to use special-sized paper such as billing paper, select Custom in the Paper tab in the Paper tab. Media and tray 5 Setting the paper size and type After loading paper in the paper tray, set the paper size and type in the Printing Preferences (see "Opening printing preferences" on page 32). 2. Learning the Basic Usage 30 Open the Printing Preferences (see "Opening printing preferences" on page 32) and set the paper size and type.
If you want to use special-sized paper such as billing paper, select Custom in the Paper tab in the Paper tab. Media and tray 5 Setting the paper size and type After loading paper in the paper tray, set the paper size and type in the Printing Preferences (see "Opening printing preferences" on page 32). 2. Learning the Basic Usage 30 Open the Printing Preferences (see "Opening printing preferences" on page 32) and set the paper size and type.
User's Guide
Page 37
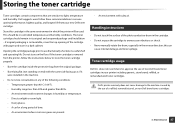
...to store the toner cartridge properly. • Store the cartridge inside the protective bag from your printer including generic, store brand, refilled, or remanufactured toner cartridges. An environment with paper and store in a dark cabinet. An environment where corrosive gases are sensitive to the machine ...with the same side facing up as if it were installed in the machine. • Do not store consumables in any of non-Dell brand toner cartridges in its useful shelf and operating life. Direct sunlight or room light. - Opening the cartridge package prior to unnecessary...
...to store the toner cartridge properly. • Store the cartridge inside the protective bag from your printer including generic, store brand, refilled, or remanufactured toner cartridges. An environment with paper and store in a dark cabinet. An environment where corrosive gases are sensitive to the machine ...with the same side facing up as if it were installed in the machine. • Do not store consumables in any of non-Dell brand toner cartridges in its useful shelf and operating life. Direct sunlight or room light. - Opening the cartridge package prior to unnecessary...

User's Guide
Page 42
... air and might be careful not to you use a cloth or tissue dampened with water to clean it. If you . • During the printing process, paper, toner, and dust particles can accumulate inside of alcohol, solvents, or other strong substances can cause print quality problems, such as toner specks or smearing.
... air and might be careful not to you use a cloth or tissue dampened with water to clean it. If you . • During the printing process, paper, toner, and dust particles can accumulate inside of alcohol, solvents, or other strong substances can cause print quality problems, such as toner specks or smearing.

User's Guide
Page 43
This buildup can accumulate inside the machine. Maintenance 43 Cleaning the machine 5 Cleaning the inside During the printing process, paper, toner, and dust particles can cause print quality problems, such as toner specks or smearing. Cleaning the inside of the machine clears and reduces these problems. • Use a dry lint-free cloth to clean the machine. • If your machine has a power switch, turn the power switch off before cleaning the machine. • Before opening the top cover, close the output support first. 1 2 3.
This buildup can accumulate inside the machine. Maintenance 43 Cleaning the machine 5 Cleaning the inside During the printing process, paper, toner, and dust particles can cause print quality problems, such as toner specks or smearing. Cleaning the inside of the machine clears and reduces these problems. • Use a dry lint-free cloth to clean the machine. • If your machine has a power switch, turn the power switch off before cleaning the machine. • Before opening the top cover, close the output support first. 1 2 3.
User's Guide
Page 47
... error. 4. Troubleshooting This chapter gives helpful information for what to do if you encounter an error. • Tips for avoiding paper jams 48 • Out-of-paper error resolution 49 • Clearing paper jams 50 • Understanding the status LED 53 This chapter gives helpful information for what to do if you cannot...
... error. 4. Troubleshooting This chapter gives helpful information for what to do if you encounter an error. • Tips for avoiding paper jams 48 • Out-of-paper error resolution 49 • Clearing paper jams 50 • Understanding the status LED 53 This chapter gives helpful information for what to do if you cannot...
User's Guide
Page 48
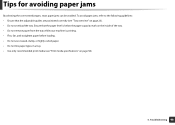
... • Do not overload the tray. Tips for avoiding paper jams By selecting the correct media types, most paper jams can be avoided. To avoid paper jams, refer to the following guidelines: • Ensure that the paper level is below the paper capacity mark on the inside of the tray. • Do... not remove paper from the tray while your machine is printing. • Flex, fan, and straighten paper before loading. • Do not use creased, damp, or highly curled paper. • Do not mix paper types in a tray. • Use only recommended print media ...
... • Do not overload the tray. Tips for avoiding paper jams By selecting the correct media types, most paper jams can be avoided. To avoid paper jams, refer to the following guidelines: • Ensure that the paper level is below the paper capacity mark on the inside of the tray. • Do... not remove paper from the tray while your machine is printing. • Flex, fan, and straighten paper before loading. • Do not use creased, damp, or highly curled paper. • Do not mix paper types in a tray. • Use only recommended print media ...


