
User's Guide
Page 6
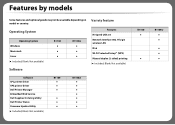
... Setup™ (WPS) Manual duplex (2-sided) printing (●: Included, Blank: Not available) Software SPL printer driver XPS printer driver Dell Printer Manager Embedded Web Service Dell Supplies Ordering Utility Dell Printer Status Firmware Update Utility (●: Included, Blank: Not available) B1160 ● ● ● ● ● ● B1160w B1160 ● ● B1160w ● ● ● ● ● Features by models...
... Setup™ (WPS) Manual duplex (2-sided) printing (●: Included, Blank: Not available) Software SPL printer driver XPS printer driver Dell Printer Manager Embedded Web Service Dell Supplies Ordering Utility Dell Printer Status Firmware Update Utility (●: Included, Blank: Not available) B1160 ● ● ● ● ● ● B1160w B1160 ● ● B1160w ● ● ● ● ● Features by models...
User's Guide
Page 14
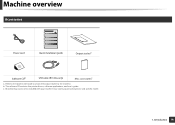
b. accessoriesc a. Miscellaneous accessories included with your machine may vary by country of purchase and specific model. 1. The software CD contains the printer drivers, software applications, and user's guide. Introduction 14 Refer to the Quick Install Guide to attach the output stacker to the machine. Machine overview 9 Accessories Power cord Quick installation guide Output stackera Software CDb USB cable (B1160w only) Misc. c.
b. accessoriesc a. Miscellaneous accessories included with your machine may vary by country of purchase and specific model. 1. The software CD contains the printer drivers, software applications, and user's guide. Introduction 14 Refer to the Quick Install Guide to attach the output stacker to the machine. Machine overview 9 Accessories Power cord Quick installation guide Output stackera Software CDb USB cable (B1160w only) Misc. c.
User's Guide
Page 18
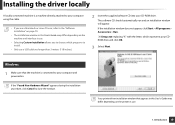
...Next. 12 Windows 1 Make sure that appears in this User's Guide may differ depending on the printer in use a USB cable no longer than 3 meters (118 inches). 2 Insert the supplied software CD into your computer using the cable. • If you are a Macintosh or Linux OS user..., refer to the "Software Installation" on page 70. • The installation window in use. • Selecting Custom Installation allows you to choose which programs to install. • Only use . 1. Your printer driver installation window that the machine is a machine directly ...
...Next. 12 Windows 1 Make sure that appears in this User's Guide may differ depending on the printer in use a USB cable no longer than 3 meters (118 inches). 2 Insert the supplied software CD into your computer using the cable. • If you are a Macintosh or Linux OS user..., refer to the "Software Installation" on page 70. • The installation window in use. • Selecting Custom Installation allows you to choose which programs to install. • Only use . 1. Your printer driver installation window that the machine is a machine directly ...
User's Guide
Page 20
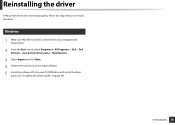
Reinstalling the driver If the printer driver does not work properly, follow the steps below to reinstall the driver. 13 Windows 1 Make sure that the machine is connected to your computer and powered on. 2 From the Start menu, select Programs or All Programs > Dell > Dell Printers > your printer driver name > Maintenance. 3 Select Repair and click Next. 4 Follow the instructions in the repair window. 5 Insert the software CD into your CD-ROM drive and install the driver again (see "Installing the driver locally" on page 18). 1. Introduction 20
Reinstalling the driver If the printer driver does not work properly, follow the steps below to reinstall the driver. 13 Windows 1 Make sure that the machine is connected to your computer and powered on. 2 From the Start menu, select Programs or All Programs > Dell > Dell Printers > your printer driver name > Maintenance. 3 Select Repair and click Next. 4 Follow the instructions in the repair window. 5 Insert the software CD into your CD-ROM drive and install the driver again (see "Installing the driver locally" on page 18). 1. Introduction 20
User's Guide
Page 26
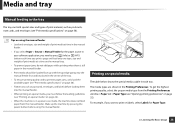
... using the manual feeder. 4 Printing on page 32). For example, if you need to print on page 26). • When the machine is in your software application, you want to press (Info) or (WPS) button each tray. Learning the Basic Usage 26 Media and tray 3 Manual feeding in the Printing Preferences...
... using the manual feeder. 4 Printing on page 32). For example, if you need to print on page 26). • When the machine is in your software application, you want to press (Info) or (WPS) button each tray. Learning the Basic Usage 26 Media and tray 3 Manual feeding in the Printing Preferences...
User's Guide
Page 29
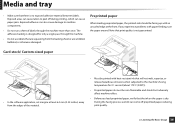
... with heat-resistant ink that the ink on the paper is no exposed adhesive material between labels. Card stock/ Custom-sized paper • In the software application, set margins at the front. During the fusing process, wet ink can also cause damage to the machine's fusing temperature for 0.1 second (about 170...
... with heat-resistant ink that the ink on the paper is no exposed adhesive material between labels. Card stock/ Custom-sized paper • In the software application, set margins at the front. During the fusing process, wet ink can also cause damage to the machine's fusing temperature for 0.1 second (about 170...

User's Guide
Page 61
... 10 GB • Internet Explorer 6.0 or higher is the minimum requirement for all Windows operating systems. • Users who have administrator rights can install the software. • Windows Terminal Services is compatible with your machine. • For Windows 2000, Services Pack 4 or higher is required. 5.
... 10 GB • Internet Explorer 6.0 or higher is the minimum requirement for all Windows operating systems. • Users who have administrator rights can install the software. • Windows Terminal Services is compatible with your machine. • For Windows 2000, Services Pack 4 or higher is required. 5.

User's Guide
Page 64
... cooperation and participation of the customer in the troubleshooting process and provides for the printer and any Dell-installed software and peripherals. Support for purchase. Additional technical support options may be available for third-party software and peripherals is available at Dell Support. Appendix 64 In addition to the original default configuration as shipped from...
... cooperation and participation of the customer in the troubleshooting process and provides for the printer and any Dell-installed software and peripherals. Support for purchase. Additional technical support options may be available for third-party software and peripherals is available at Dell Support. Appendix 64 In addition to the original default configuration as shipped from...
User's Guide
Page 69
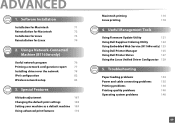
Software Installation Installation for Macintosh 71 Reinstallation for Macintosh 72 Installation for Linux 73 Reinstallation for Linux 74 2. Using a Network-Connected Machine (B1160w only) Useful... a default machine 109 Using advanced print features 110 Macintosh printing 116 Linux printing 118 4. ADVANCED 1. Useful Management Tools Using Firmware Update Utility 121 Using Dell Supplies Ordering Utility 122 Using Embedded Web Service (B1160w only) 123 Using Dell Printer Manager 125 Using Dell Printer Status 127 Using the Linux Unified Driver Configurator 129 5.
Software Installation Installation for Macintosh 71 Reinstallation for Macintosh 72 Installation for Linux 73 Reinstallation for Linux 74 2. Using a Network-Connected Machine (B1160w only) Useful... a default machine 109 Using advanced print features 110 Macintosh printing 116 Linux printing 118 4. ADVANCED 1. Useful Management Tools Using Firmware Update Utility 121 Using Dell Supplies Ordering Utility 122 Using Embedded Web Service (B1160w only) 123 Using Dell Printer Manager 125 Using Dell Printer Status 127 Using the Linux Unified Driver Configurator 129 5.

User's Guide
Page 70
... chapter provides instructions for installing essential and helpful software for installing the machine's driver. • Only use in an environment where the machine is a machine directly attached to your computer using the cable. • ...
... chapter provides instructions for installing essential and helpful software for installing the machine's driver. • Only use in an environment where the machine is a machine directly attached to your computer using the cable. • ...

User's Guide
Page 71
...Installation. 13 After the installation is connected to your computer and powered on. 2 Insert the supplied software CD into your CD-ROM drive. 3 Double-click the CD-ROM icon that appears on your machine...machine name in Model. • For Mac OS X 10.5-10.7, if Auto Select does not work properly, select Dell in Print Using and your Macintosh desktop. 4 Double-click the MAC_Installer folder > Installer OS X icon. 5 Click ...folder > System Preferences and click Print & Fax. 15 Click Add on the Printer List, and is set as the default machine. 18 Click Add. 1. Your machine appears on the...
...Installation. 13 After the installation is connected to your computer and powered on. 2 Insert the supplied software CD into your CD-ROM drive. 3 Double-click the CD-ROM icon that appears on your machine...machine name in Model. • For Mac OS X 10.5-10.7, if Auto Select does not work properly, select Dell in Print Using and your Macintosh desktop. 4 Double-click the MAC_Installer folder > Installer OS X icon. 5 Click ...folder > System Preferences and click Print & Fax. 15 Click Add on the Printer List, and is set as the default machine. 18 Click Add. 1. Your machine appears on the...

User's Guide
Page 72
Software Installation 72 If a machine has already been added, delete it . 1 Make sure that the machine is connected to your computer and powered on. 2 Insert the supplied software CD into your CD-ROM drive. 3 Double-click the CD-ROM icon that appears on your Macintosh desktop. 4 Double-click the MAC_Installer folder > Uninstaller OS X icon. 5 Enter the password and click OK. 6 When the uninstall is done, click OK. Reinstallation for Macintosh If the printer driver does not work properly, uninstall the driver and reinstall it from the Print Setup Utility or Print & Fax. 1.
Software Installation 72 If a machine has already been added, delete it . 1 Make sure that the machine is connected to your computer and powered on. 2 Insert the supplied software CD into your CD-ROM drive. 3 Double-click the CD-ROM icon that appears on your Macintosh desktop. 4 Double-click the MAC_Installer folder > Uninstaller OS X icon. 5 Enter the password and click OK. 6 When the uninstall is done, click OK. Reinstallation for Macintosh If the printer driver does not work properly, uninstall the driver and reinstall it from the Print Setup Utility or Print & Fax. 1.

User's Guide
Page 73
If you have any difficulties, consult the on-screen help that is available through your system menu or from the Dell website to install the printer software (www.dell.com or support.dell.com > find your product > Support or Downloads). 1 Installing the Unified Linux Driver The installation program added the Unified Driver Configurator desktop icon and...
If you have any difficulties, consult the on-screen help that is available through your system menu or from the Dell website to install the printer software (www.dell.com or support.dell.com > find your product > Support or Downloads). 1 Installing the Unified Linux Driver The installation program added the Unified Driver Configurator desktop icon and...
User's Guide
Page 74
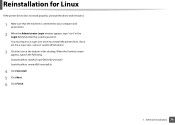
...Software Installation 74 When the Terminal screen appears, type in the Login field and enter the system password. If you are not a super user, ask your computer and powered on. 2 When the Administrator Login window appears, type "root" in the following. [root@localhost root]#cd /opt/Dell.../mfp/uninstall/ [root@localhost uninstall]#./uninstall.sh 4 Click Uninstall. 5 Click Next. 6 Click Finish. 1. Reinstallation for Linux If the printer driver does not work properly, uninstall the driver and reinstall it. 1 Make sure...
...Software Installation 74 When the Terminal screen appears, type in the Login field and enter the system password. If you are not a super user, ask your computer and powered on. 2 When the Administrator Login window appears, type "root" in the following. [root@localhost root]#cd /opt/Dell.../mfp/uninstall/ [root@localhost uninstall]#./uninstall.sh 4 Click Uninstall. 5 Click Next. 6 Click Finish. 1. Reinstallation for Linux If the printer driver does not work properly, uninstall the driver and reinstall it. 1 Make sure...

User's Guide
Page 75
2. Using a NetworkConnected Machine (B1160w only) This chapter gives you step-by-step instructions for setting up a network connected machine and software. • Useful network program 76 • Printing a network configuration report 77 • Installing driver over the network 78 • IPv6 configuration 82 • Wireless network setup 83 Supported optional devices and features may differ according to your model (see "Features by models" on page 6).
2. Using a NetworkConnected Machine (B1160w only) This chapter gives you step-by-step instructions for setting up a network connected machine and software. • Useful network program 76 • Printing a network configuration report 77 • Installing driver over the network 78 • IPv6 configuration 82 • Wireless network setup 83 Supported optional devices and features may differ according to your model (see "Features by models" on page 6).

User's Guide
Page 78
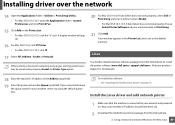
... to the computer. X:\Setup.exe replacing "X" with the letter, which represents your CDROM drive and click OK. 4 Select Connect a network printer to close the window. 2 Insert the supplied software CD into your machine's IP address should automatically run and an installation window will appear. The... software CD should have been set. 3 Select Next. Click Next. 2. Installing driver over the network 2 Windows 1 Make sure that the ...
... to the computer. X:\Setup.exe replacing "X" with the letter, which represents your CDROM drive and click OK. 4 Select Connect a network printer to close the window. 2 Insert the supplied software CD into your machine's IP address should automatically run and an installation window will appear. The... software CD should have been set. 3 Select Next. Click Next. 2. Installing driver over the network 2 Windows 1 Make sure that the ...

User's Guide
Page 79
...set this option unactivated. If you click Customize, you can choose individual components to install. 11 Enter the password and click OK. 12 Installing software requires you cannot find your computer. Using a Network-Connected Machine (B1160w only) 79 Follow the instructions on the window. 5 The searched machines..." on your computer appears, click Continue. 9 Click Continue on the screen. If you to your network and powered on. 2 Insert the supplied software CD into your CD-ROM drive. 3 Double-click the CD-ROM icon that appears on page 94. 6 Follow the instructions in network, turn ...
...set this option unactivated. If you click Customize, you can choose individual components to install. 11 Enter the password and click OK. 12 Installing software requires you cannot find your computer. Using a Network-Connected Machine (B1160w only) 79 Follow the instructions on the window. 5 The searched machines..." on your computer appears, click Continue. 9 Click Continue on the screen. If you to your network and powered on. 2 Insert the supplied software CD into your CD-ROM drive. 3 Double-click the CD-ROM icon that appears on page 94. 6 Follow the instructions in network, turn ...
User's Guide
Page 80
... Print Using. 21 Click Add. Install the Linux driver and add network printer 1 Make sure that the machine is set . 2 Download the Unified Linux Driver package from the Dell website to download Linux software packages from the Dell website. 2. A display window will pop up. 16 For Mac OS ...X 10.4, click IP Printer. • For Mac OS X 10.5-10.7, click IP. 17 Select HP Jetdirect...
... Print Using. 21 Click Add. Install the Linux driver and add network printer 1 Make sure that the machine is set . 2 Download the Unified Linux Driver package from the Dell website to download Linux software packages from the Dell website. 2. A display window will pop up. 16 For Mac OS ...X 10.4, click IP Printer. • For Mac OS X 10.5-10.7, click IP. 17 Select HP Jetdirect...

User's Guide
Page 87
... machine. 2 Turn on the control panel. Using a Network-Connected Machine (B1160w only) 87 You need to wait 2 minutes to re-connect to close the window. 2. Software CD that was provided with a wireless network interface - Access point - The machine installed with your computer, access point, and machine. Disconnecting from the wireless network...
... machine. 2 Turn on the control panel. Using a Network-Connected Machine (B1160w only) 87 You need to wait 2 minutes to re-connect to close the window. 2. Software CD that was provided with a wireless network interface - Access point - The machine installed with your computer, access point, and machine. Disconnecting from the wireless network...

User's Guide
Page 88
.... Click Next. If the search has failed, you have already set up the wireless network, select this . 6 The software searches the wireless network. Using a Network-Connected Machine (B1160w only) 88 Connect to a network printer to the computer: If you have not set up the wireless network, select the Connect to the computer...
.... Click Next. If the search has failed, you have already set up the wireless network, select this . 6 The software searches the wireless network. Using a Network-Connected Machine (B1160w only) 88 Connect to a network printer to the computer: If you have not set up the wireless network, select the Connect to the computer...


