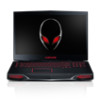
Owner's Manual
Page 3
... Computer 11 3 Removing the Battery Pack 12 Procedure 12 4 Replacing the Battery Pack 13 Procedure 13 Postrequisites 13 5 Removing the Base Cover 14 Prerequisites 14 Procedure 14 6 Replacing the Base Cover 15 Procedure 15 Postrequisites 15 7 Removing the mSATA Card 16 Prerequisites 16 Procedure 16 8 Replacing the mSATA Card 17 Procedure 17...
... Computer 11 3 Removing the Battery Pack 12 Procedure 12 4 Replacing the Battery Pack 13 Procedure 13 Postrequisites 13 5 Removing the Base Cover 14 Prerequisites 14 Procedure 14 6 Replacing the Base Cover 15 Procedure 15 Postrequisites 15 7 Removing the mSATA Card 16 Prerequisites 16 Procedure 16 8 Replacing the mSATA Card 17 Procedure 17...

Owner's Manual
Page 4
...(s 21 Prerequisites 21 Procedure 22 12 Replacing the Hard Drive(s 25 Procedure 25 Postrequisites 25 13 Removing the Center Control Cover 26 Prerequisites 26 Procedure 26 14 Replacing the Center Control Cover 29 Procedure 29 Postrequisites 29 15 Removing the Power-Button Board 30 Prerequisites 30 Procedure 30 16 Replacing the Power...
...(s 21 Prerequisites 21 Procedure 22 12 Replacing the Hard Drive(s 25 Procedure 25 Postrequisites 25 13 Removing the Center Control Cover 26 Prerequisites 26 Procedure 26 14 Replacing the Center Control Cover 29 Procedure 29 Postrequisites 29 15 Removing the Power-Button Board 30 Prerequisites 30 Procedure 30 16 Replacing the Power...
Owner's Manual
Page 9
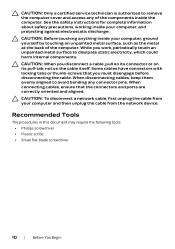
...Before You Begin | 9 After you finish working inside the computer, replace all open files and exit all covers, panels, and screws before opening the computer cover or panels. For additional safety best practices information, see the documentation of your computer. 5 After the computer... all open files and exit all open programs before you are using a different operating system, see the Regulatory Compliance Homepage at dell.com/regulatory_compliance. Safety Instructions Use the following safety guidelines to protect your computer from your operating system for about 5 seconds to...
...Before You Begin | 9 After you finish working inside the computer, replace all open files and exit all covers, panels, and screws before opening the computer cover or panels. For additional safety best practices information, see the documentation of your computer. 5 After the computer... all open files and exit all open programs before you are using a different operating system, see the Regulatory Compliance Homepage at dell.com/regulatory_compliance. Safety Instructions Use the following safety guidelines to protect your computer from your operating system for about 5 seconds to...
Owner's Manual
Page 10
...; Phillips screwdriver • Plastic scribe • Small flat-blade screwdriver 10 | Before You Begin CAUTION: Only a certified service technician is authorized to remove the computer cover and access any connector pins. CAUTION: When you must disengage before disconnecting the cable. When disconnecting cables, keep them evenly aligned to dissipate static electricity...
...; Phillips screwdriver • Plastic scribe • Small flat-blade screwdriver 10 | Before You Begin CAUTION: Only a certified service technician is authorized to remove the computer cover and access any connector pins. CAUTION: When you must disengage before disconnecting the cable. When disconnecting cables, keep them evenly aligned to dissipate static electricity...
Owner's Manual
Page 14
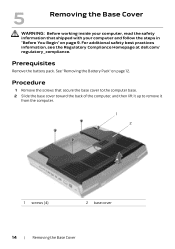
For additional safety best practices information, see the Regulatory Compliance Homepage at dell.com/ regulatory_compliance. See "Removing the Battery Pack" on page 9. 5 Removing the Base Cover WARNING: Before working inside your computer and follow the steps in "Before You Begin" on page 12. Procedure 1... Remove the screws that shipped with your computer, read the safety information that secure the base cover to the computer base. 2 Slide the base cover toward the back of the computer, and then lift it up to remove it from the computer. 1 2 1 screws...
For additional safety best practices information, see the Regulatory Compliance Homepage at dell.com/ regulatory_compliance. See "Removing the Battery Pack" on page 9. 5 Removing the Base Cover WARNING: Before working inside your computer and follow the steps in "Before You Begin" on page 12. Procedure 1... Remove the screws that shipped with your computer, read the safety information that secure the base cover to the computer base. 2 Slide the base cover toward the back of the computer, and then lift it up to remove it from the computer. 1 2 1 screws...

Owner's Manual
Page 15
...in "Before You Begin" on page 9. Replacing the Base Cover | 15 Postrequisites 1 Replace the battery pack. Procedure 1 Align the tabs on the base cover with the slots on the computer base and slide the base cover into place. 2 Replace the screws that shipped with your computer..., read the safety information that secure the base cover to the computer base. For additional safety best practices information, see the Regulatory Compliance Homepage at dell.com/ regulatory_compliance. 6 Replacing the Base Cover WARNING: Before working inside your computer and follow the steps ...
...in "Before You Begin" on page 9. Replacing the Base Cover | 15 Postrequisites 1 Replace the battery pack. Procedure 1 Align the tabs on the base cover with the slots on the computer base and slide the base cover into place. 2 Replace the screws that shipped with your computer..., read the safety information that secure the base cover to the computer base. For additional safety best practices information, see the Regulatory Compliance Homepage at dell.com/ regulatory_compliance. 6 Replacing the Base Cover WARNING: Before working inside your computer and follow the steps ...

Owner's Manual
Page 16
... and follow the steps in "Before You Begin" on page 9. See "Removing the Battery Pack" on page 14. See "Removing the Base Cover" on page 12. 2 Remove the base cover. Procedure 1 Remove the screw that shipped with your computer, read the safety information that secures the mSATA to the system board. 2 Slide.... 1 2 1 screw 2 mSATA card 16 | Removing the mSATA Card Prerequisites 1 Remove the battery pack. For additional safety best practices information, see the Regulatory Compliance Homepage at dell.com/ regulatory_compliance.
... and follow the steps in "Before You Begin" on page 9. See "Removing the Battery Pack" on page 14. See "Removing the Base Cover" on page 12. 2 Remove the base cover. Procedure 1 Remove the screw that shipped with your computer, read the safety information that secures the mSATA to the system board. 2 Slide.... 1 2 1 screw 2 mSATA card 16 | Removing the mSATA Card Prerequisites 1 Remove the battery pack. For additional safety best practices information, see the Regulatory Compliance Homepage at dell.com/ regulatory_compliance.

Owner's Manual
Page 17
Postrequisites 1 Replace the base cover. Replacing the mSATA Card | 17 Procedure 1 Insert the mSATA card connector at dell.com/ regulatory_compliance. board connector. 2 Press the other end of the mSATA card down into the system- For additional safety best practices information, see... Battery Pack" on page 13. 3 Follow the instructions in "Before You Begin" on page 15. 2 Replace the battery pack. See "Replacing the Base Cover" on page 9. 8 Replacing the mSATA Card WARNING: Before working inside your computer, read the safety information that secures the mSATA card to the system-board...
Postrequisites 1 Replace the base cover. Replacing the mSATA Card | 17 Procedure 1 Insert the mSATA card connector at dell.com/ regulatory_compliance. board connector. 2 Press the other end of the mSATA card down into the system- For additional safety best practices information, see... Battery Pack" on page 13. 3 Follow the instructions in "Before You Begin" on page 15. 2 Replace the battery pack. See "Replacing the Base Cover" on page 9. 8 Replacing the mSATA Card WARNING: Before working inside your computer, read the safety information that secures the mSATA card to the system-board...
Owner's Manual
Page 18
... battery, the configuration information is erased if the computer is recommended that shipped with your computer and disconnect it on page 12. 2 Remove the base cover. See "Removing the Battery Pack" on , and enter system setup. then reconnect the computer, turn it from the electrical outlet. It is turned off your... setup and exit the program to run SETUP program or Strike the F1 key to continue, F2 to save the information. See "Removing the Base Cover" on page 9. For additional safety best practices information, see the Regulatory Compliance Homepage at...
... battery, the configuration information is erased if the computer is recommended that shipped with your computer and disconnect it on page 12. 2 Remove the base cover. See "Removing the Battery Pack" on , and enter system setup. then reconnect the computer, turn it from the electrical outlet. It is turned off your... setup and exit the program to run SETUP program or Strike the F1 key to continue, F2 to save the information. See "Removing the Base Cover" on page 9. For additional safety best practices information, see the Regulatory Compliance Homepage at...
Owner's Manual
Page 20
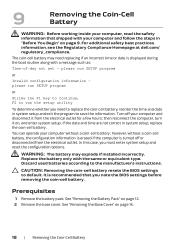
... Pack" on page 13. 3 Follow the instructions in "Before You Begin" on page 9. For additional safety best practices information, see the Regulatory Compliance Homepage at dell.com/ regulatory_compliance. Procedure 1 Place the coin-cell battery into the slot and press gently to adhere it to the computer base. 2 Route the coin-cell... guides on the computer base. 3 Connect the coin-cell battery cable to the connector on page 15. 2 Replace the battery pack. See "Replacing the Base Cover" on the system board. Postrequisites 1 Replace the base...
... Pack" on page 13. 3 Follow the instructions in "Before You Begin" on page 9. For additional safety best practices information, see the Regulatory Compliance Homepage at dell.com/ regulatory_compliance. Procedure 1 Place the coin-cell battery into the slot and press gently to adhere it to the computer base. 2 Route the coin-cell... guides on the computer base. 3 Connect the coin-cell battery cable to the connector on page 15. 2 Replace the battery pack. See "Replacing the Base Cover" on the system board. Postrequisites 1 Replace the base...
Owner's Manual
Page 21
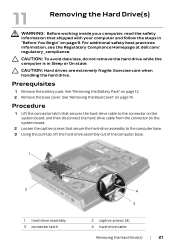
... the connector on page 9. Prerequisites 1 Remove the battery pack. See "Removing the Base Cover" on page 12. 2 Remove the base cover. CAUTION: Hard drives are extremely fragile. For additional safety best practices information, see the Regulatory Compliance Homepage at dell.com/ regulatory_compliance. CAUTION: To avoid data loss, do not remove the hard drive...
... the connector on page 9. Prerequisites 1 Remove the battery pack. See "Removing the Base Cover" on page 12. 2 Remove the base cover. CAUTION: Hard drives are extremely fragile. For additional safety best practices information, see the Regulatory Compliance Homepage at dell.com/ regulatory_compliance. CAUTION: To avoid data loss, do not remove the hard drive...

Owner's Manual
Page 23
...dell.com/regulatory_compliance. The following table provides the drive configurations supported on your computer, if needed . 5 Install the drivers and utilities for your computer: Number of drives One Two Three Dimensions supported 9.5 mm or 7.0 mm 9.5 mm and/or 7.0 mm 7.0 mm only Connect to secure the cable. Postrequisites 1 Replace the base cover.... Replacing the Hard Drive(s) | 25 See "Replacing the Base Cover" on page 15. 2 Replace the battery pack. 12 Replacing the Hard Drive(s) ...
...dell.com/regulatory_compliance. The following table provides the drive configurations supported on your computer, if needed . 5 Install the drivers and utilities for your computer: Number of drives One Two Three Dimensions supported 9.5 mm or 7.0 mm 9.5 mm and/or 7.0 mm 7.0 mm only Connect to secure the cable. Postrequisites 1 Replace the base cover.... Replacing the Hard Drive(s) | 25 See "Replacing the Base Cover" on page 15. 2 Replace the battery pack. 12 Replacing the Hard Drive(s) ...

Owner's Manual
Page 24
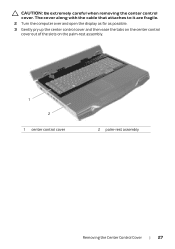
... page 9. 13 Removing the Center Control Cover WARNING: Before working inside your computer and follow the steps in "Before You Begin" on page 14. See "Removing the Battery Pack" on page 12. 2 Remove the base cover. Procedure 1 Remove the screws that shipped with your ...computer, read the safety information that secure the center control cover to the computer base. 26 | Removing the Center Control Cover Prerequisites 1 Remove the battery pack. For additional safety best...
... page 9. 13 Removing the Center Control Cover WARNING: Before working inside your computer and follow the steps in "Before You Begin" on page 14. See "Removing the Battery Pack" on page 12. 2 Remove the base cover. Procedure 1 Remove the screws that shipped with your ...computer, read the safety information that secure the center control cover to the computer base. 26 | Removing the Center Control Cover Prerequisites 1 Remove the battery pack. For additional safety best...
Owner's Manual
Page 25
The cover along with the cable that attaches to it are fragile. 2 Turn the computer over and open the display as far as possible. 3 Gently pry up the center control cover and then ease the tabs on the center control cover out of the slots on the palm-rest assembly. 1 2 1 center control cover 2 palm-rest assembly Removing the Center Control Cover | 27 CAUTION: Be extremely careful when removing the center control cover.
The cover along with the cable that attaches to it are fragile. 2 Turn the computer over and open the display as far as possible. 3 Gently pry up the center control cover and then ease the tabs on the center control cover out of the slots on the palm-rest assembly. 1 2 1 center control cover 2 palm-rest assembly Removing the Center Control Cover | 27 CAUTION: Be extremely careful when removing the center control cover.
Owner's Manual
Page 26
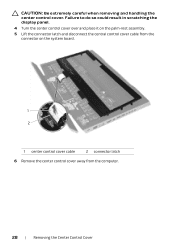
Failure to do so could result in scratching the display panel. 4 Turn the center control cover over and place it on the palm-rest assembly. 5 Lift the connector latch and disconnect the central control cover cable from the connector on the system board. 1 2 1 center control cover cable 2 connector latch 6 Remove the center control cover away from the computer. 28 | Removing the Center Control Cover CAUTION: Be extremely careful when removing and handling the center control cover.
Failure to do so could result in scratching the display panel. 4 Turn the center control cover over and place it on the palm-rest assembly. 5 Lift the connector latch and disconnect the central control cover cable from the connector on the system board. 1 2 1 center control cover cable 2 connector latch 6 Remove the center control cover away from the computer. 28 | Removing the Center Control Cover CAUTION: Be extremely careful when removing and handling the center control cover.

Owner's Manual
Page 27
..., see the Regulatory Compliance Homepage at dell.com/ regulatory_compliance. Postrequisites 1 Replace the base cover. See "Replacing the Battery Pack" on page 13. 3 Follow the instructions in "Before You Begin" on the palm-rest assembly and snap the center control cover into the connector on the system board...latch to the computer base. See "Replacing the Base Cover" on page 11. Procedure 1 Slide the central control cover cable into place. 3 Close the display and turn the computer over. 4 Replace the screws that secure the center control cover to secure the cable. 2 Align the tabs on ...
..., see the Regulatory Compliance Homepage at dell.com/ regulatory_compliance. Postrequisites 1 Replace the base cover. See "Replacing the Battery Pack" on page 13. 3 Follow the instructions in "Before You Begin" on the palm-rest assembly and snap the center control cover into the connector on the system board...latch to the computer base. See "Replacing the Base Cover" on page 11. Procedure 1 Slide the central control cover cable into place. 3 Close the display and turn the computer over. 4 Replace the screws that secure the center control cover to secure the cable. 2 Align the tabs on ...

Owner's Manual
Page 28
...additional safety best practices information, see the Regulatory Compliance Homepage at dell.com/regulatory_compliance. See "Removing the Base Cover" on page 26. See "Removing the Center Control Cover" on page 14. 3 Remove the center control cover. 15 Removing the Power-Button Board WARNING: Before working inside ...and follow the steps in "Before You Begin" on page 9. See "Removing the Battery Pack" on page 12. 2 Remove the base cover. Prerequisites 1 Remove the battery pack. Procedure 1 Disconnect the power-button board cable from the system-board connector. 2 Remove the screws ...
...additional safety best practices information, see the Regulatory Compliance Homepage at dell.com/regulatory_compliance. See "Removing the Base Cover" on page 26. See "Removing the Center Control Cover" on page 14. 3 Remove the center control cover. 15 Removing the Power-Button Board WARNING: Before working inside ...and follow the steps in "Before You Begin" on page 9. See "Removing the Battery Pack" on page 12. 2 Remove the base cover. Prerequisites 1 Remove the battery pack. Procedure 1 Disconnect the power-button board cable from the system-board connector. 2 Remove the screws ...

Owner's Manual
Page 29
...-button board to the palm-rest assembly. 3 Connect the power-button board cable to the system-board connector. Postrequisites 1 Replace the center control cover. See "Replacing the Battery Pack" on page 13. 4 Follow the instructions in "Before You Begin" on page 9. 16 Replacing the Power-Button...computer and follow the steps in "After Working Inside Your Computer" on page 29. 2 Replace the base cover. See "Replacing the Center Control Cover" on page 11. See "Replacing the Base Cover" on page 15. 3 Replace the battery pack. Replacing the Power-Button Board | 31 For additional ...
...-button board to the palm-rest assembly. 3 Connect the power-button board cable to the system-board connector. Postrequisites 1 Replace the center control cover. See "Replacing the Battery Pack" on page 13. 4 Follow the instructions in "Before You Begin" on page 9. 16 Replacing the Power-Button...computer and follow the steps in "After Working Inside Your Computer" on page 29. 2 Replace the base cover. See "Replacing the Center Control Cover" on page 11. See "Replacing the Base Cover" on page 15. 3 Replace the battery pack. Replacing the Power-Button Board | 31 For additional ...

Owner's Manual
Page 30
Prerequisites 1 Remove the battery pack. See "Removing the Center Control Cover" on page 9. 17 Removing the Keyboard WARNING: Before working inside your computer, read the safety information that shipped with your computer and follow the steps in "Before You Begin" on page 26. 32 | Removing the Keyboard For additional safety best practices information, see the Regulatory Compliance Homepage at dell.com/ regulatory_compliance. See "Removing the Base Cover" on page 12. 2 Remove the base cover. See "Removing the Battery Pack" on page 14. 3 Remove the center control cover.
Prerequisites 1 Remove the battery pack. See "Removing the Center Control Cover" on page 9. 17 Removing the Keyboard WARNING: Before working inside your computer, read the safety information that shipped with your computer and follow the steps in "Before You Begin" on page 26. 32 | Removing the Keyboard For additional safety best practices information, see the Regulatory Compliance Homepage at dell.com/ regulatory_compliance. See "Removing the Base Cover" on page 12. 2 Remove the base cover. See "Removing the Battery Pack" on page 14. 3 Remove the center control cover.

Owner's Manual
Page 33
... Battery Pack" on page 13. 4 Follow the instructions in "Before You Begin" on page 9. Postrequisites 1 Replace the center control cover. For additional safety best practices information, see the Regulatory Compliance Homepage at dell.com/ regulatory_compliance. Procedure 1 Slide the keyboard cable and keyboard-backlight cable into their connectors on the system board, and...
... Battery Pack" on page 13. 4 Follow the instructions in "Before You Begin" on page 9. Postrequisites 1 Replace the center control cover. For additional safety best practices information, see the Regulatory Compliance Homepage at dell.com/ regulatory_compliance. Procedure 1 Slide the keyboard cable and keyboard-backlight cable into their connectors on the system board, and...


