
Owner's Manual
Page 2
... trade names other countries. All rights reserved. disclaims any manner whatsoever without notice. © 2012 Dell Inc. Alienware® is a registered trademark of your computer. Trademarks used in this document is used in this text: Dell™ and the DELL logo are either the entities claiming the marks and names or their products. and is subject...
... trade names other countries. All rights reserved. disclaims any manner whatsoever without notice. © 2012 Dell Inc. Alienware® is a registered trademark of your computer. Trademarks used in this document is used in this text: Dell™ and the DELL logo are either the entities claiming the marks and names or their products. and is subject...

Owner's Manual
Page 9
... covers, panels, and screws before connecting to protect your computer from their edges and avoid touching pins and contacts. Safety Instructions Use the following safety guidelines to the power source. WARNING: Before working inside your computer, read the safety information that the work...with your computer. 1 Save and close all open files and exit all open programs before you are using a different operating system, see the Regulatory Compliance Homepage at dell.com/regulatory_compliance. 1 Before You Begin Turn Off Your Computer and Connected Devices CAUTION: To avoid losing ...
... covers, panels, and screws before connecting to protect your computer from their edges and avoid touching pins and contacts. Safety Instructions Use the following safety guidelines to the power source. WARNING: Before working inside your computer, read the safety information that the work...with your computer. 1 Save and close all open files and exit all open programs before you are using a different operating system, see the Regulatory Compliance Homepage at dell.com/regulatory_compliance. 1 Before You Begin Turn Off Your Computer and Connected Devices CAUTION: To avoid losing ...

Owner's Manual
Page 13
... Inside Your Computer" on page 9. For additional safety best practices information, see the Regulatory Compliance Homepage at dell.com/ regulatory_compliance. Procedure CAUTION: To avoid damage to the computer, use only the battery designed for this particular Alienware computer. Postrequsites Follow the instructions in "Before You Begin" on page 11. Align the tabs on...
... Inside Your Computer" on page 9. For additional safety best practices information, see the Regulatory Compliance Homepage at dell.com/ regulatory_compliance. Procedure CAUTION: To avoid damage to the computer, use only the battery designed for this particular Alienware computer. Postrequsites Follow the instructions in "Before You Begin" on page 11. Align the tabs on...
Owner's Manual
Page 16
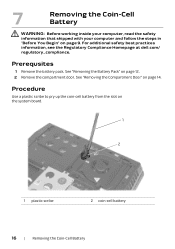
.... 1 2 1 plastic scribe 2 coin-cell battery 16 | Removing the Coin-Cell Battery For additional safety best practices information, see the Regulatory Compliance Homepage at dell.com/ regulatory_compliance. Procedure Use a plastic scribe to pry up the coin-cell battery from the slot on page 12. 2 Remove the compartment door. Prerequsites 1 Remove the battery pack.
.... 1 2 1 plastic scribe 2 coin-cell battery 16 | Removing the Coin-Cell Battery For additional safety best practices information, see the Regulatory Compliance Homepage at dell.com/ regulatory_compliance. Procedure Use a plastic scribe to pry up the coin-cell battery from the slot on page 12. 2 Remove the compartment door. Prerequsites 1 Remove the battery pack.
Owner's Manual
Page 18
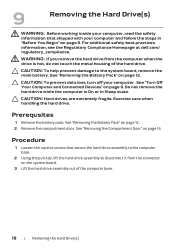
...Hard Drive(s) WARNING: Before working inside your computer, read the safety information that secure the hard-drive assembly to the computer base. 2 Using the pull-tab, lift the hard-drive assembly to the system board, remove the main battery. CAUTION: To help prevent damage to disconnect ... the battery pack. See "Removing the Battery Pack" on page 12. For additional safety best practices information, see the Regulatory Compliance Homepage at dell.com/ regulatory_compliance. See "Removing the Battery Pack" on page 12. 2 Remove the compartment door. Do not remove the hard drive while the...
...Hard Drive(s) WARNING: Before working inside your computer, read the safety information that secure the hard-drive assembly to the computer base. 2 Using the pull-tab, lift the hard-drive assembly to the system board, remove the main battery. CAUTION: To help prevent damage to disconnect ... the battery pack. See "Removing the Battery Pack" on page 12. For additional safety best practices information, see the Regulatory Compliance Homepage at dell.com/ regulatory_compliance. See "Removing the Battery Pack" on page 12. 2 Remove the compartment door. Do not remove the hard drive while the...

Owner's Manual
Page 23
Removing the Memory Module(s) | 23 CAUTION: To prevent damage to the memory-module connector, do not use tools to spread the memory module securing clips. 3 Use your fingertips to carefully spread apart the securing clips on each end of the memory-module connector until the memory module pops up. 1 3 2 1 memory-module connector 3 memory module 2 securing clips (2) 4 Remove the memory module from the memory-module connector.
Removing the Memory Module(s) | 23 CAUTION: To prevent damage to the memory-module connector, do not use tools to spread the memory module securing clips. 3 Use your fingertips to carefully spread apart the securing clips on each end of the memory-module connector until the memory module pops up. 1 3 2 1 memory-module connector 3 memory module 2 securing clips (2) 4 Remove the memory module from the memory-module connector.
Owner's Manual
Page 37
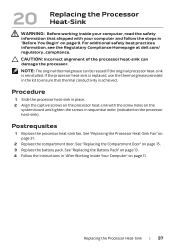
For additional safety best practices information, see the Regulatory Compliance Homepage at dell.com/ regulatory_compliance. If the processor heat-sink is replaced, use the thermal grease provided in "After Working Inside Your Computer" on page 11. Postrequsites 1 Replace the processor heat-sink fan. Replacing the Processor Heat-Sink | ...
For additional safety best practices information, see the Regulatory Compliance Homepage at dell.com/ regulatory_compliance. If the processor heat-sink is replaced, use the thermal grease provided in "After Working Inside Your Computer" on page 11. Postrequsites 1 Replace the processor heat-sink fan. Replacing the Processor Heat-Sink | ...
Owner's Manual
Page 38
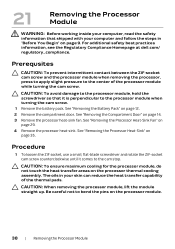
... bend the pins on page 29. 4 Remove the processor heat-sink. For additional safety best practices information, see the Regulatory Compliance Homepage at dell.com/ regulatory_compliance. See "Removing the Processor Heat-Sink Fan" on the processor module. 38 | Removing the Processor Module Be careful not to..." on the processor thermal cooling assembly. The oils in "Before You Begin" on page 9. Procedure 1 To loosen the ZIF socket, use a small, flat-blade screwdriver and rotate the ZIF-socket cam screw counterclockwise until it is perpendicular to the center of the thermal pads.
... bend the pins on page 29. 4 Remove the processor heat-sink. For additional safety best practices information, see the Regulatory Compliance Homepage at dell.com/ regulatory_compliance. See "Removing the Processor Heat-Sink Fan" on the processor module. 38 | Removing the Processor Module Be careful not to..." on the processor thermal cooling assembly. The oils in "Before You Begin" on page 9. Procedure 1 To loosen the ZIF socket, use a small, flat-blade screwdriver and rotate the ZIF-socket cam screw counterclockwise until it is perpendicular to the center of the thermal pads.
Owner's Manual
Page 51
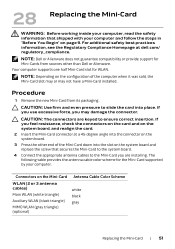
..., see the Regulatory Compliance Homepage at a 45-degree angle into the slot on the system board. 3 Press the other than Dell or Alienware. Procedure 1 Remove the new Mini-Card from sources other end of the computer when it was sold, the Mini-Card slot ...Mini-Card installed. The following table provides the antenna cable color scheme for WLAN. NOTE: Dell or Alienware does not guarantee compatibility or provide support for Mini-Cards from its packaging. CAUTION: Use firm and even pressure to ensure correct insertion. Connectors on page 9. 28 Replacing the Mini...
..., see the Regulatory Compliance Homepage at a 45-degree angle into the slot on the system board. 3 Press the other than Dell or Alienware. Procedure 1 Remove the new Mini-Card from sources other end of the computer when it was sold, the Mini-Card slot ...Mini-Card installed. The following table provides the antenna cable color scheme for WLAN. NOTE: Dell or Alienware does not guarantee compatibility or provide support for Mini-Cards from its packaging. CAUTION: Use firm and even pressure to ensure correct insertion. Connectors on page 9. 28 Replacing the Mini...

Owner's Manual
Page 54
... page 9. Postrequsites 1 Replace the keyboard. See "Replacing the Compartment Door" on page 48. 2 Replace the center control cover. If you use excessive force, you ordered a wirelessHD card with your computer, the card is already installed. CAUTION: The connectors are keyed to slide the card... check the connectors on the card and on the system board, and realign the card. 2 Insert the wirelessHD card connector at dell.com/ regulatory_compliance. 30 Replacing the WirelessHD Card WARNING: Before working inside your computer, read the safety information that secures the wirelessHD ...
... page 9. Postrequsites 1 Replace the keyboard. See "Replacing the Compartment Door" on page 48. 2 Replace the center control cover. If you use excessive force, you ordered a wirelessHD card with your computer, the card is already installed. CAUTION: The connectors are keyed to slide the card... check the connectors on the card and on the system board, and realign the card. 2 Insert the wirelessHD card connector at dell.com/ regulatory_compliance. 30 Replacing the WirelessHD Card WARNING: Before working inside your computer, read the safety information that secures the wirelessHD ...

Owner's Manual
Page 57
... keyboard. 33 Removing the Display Assembly WARNING: Before working inside your computer, read the safety information that secure the display cable to the system board. 2 Using the pull-tab, pull the display cable to disconnect the display cable from the connector on the system board. 3 Disconnect the camera cable and infrared... and remove the cables from the routing guides on the palm rest assembly. For additional safety best practices information, see the Regulatory Compliance Homepage at dell.com/ regulatory_compliance. Removing the Display Assembly | 57
... keyboard. 33 Removing the Display Assembly WARNING: Before working inside your computer, read the safety information that secure the display cable to the system board. 2 Using the pull-tab, pull the display cable to disconnect the display cable from the connector on the system board. 3 Disconnect the camera cable and infrared... and remove the cables from the routing guides on the palm rest assembly. For additional safety best practices information, see the Regulatory Compliance Homepage at dell.com/ regulatory_compliance. Removing the Display Assembly | 57
Owner's Manual
Page 81
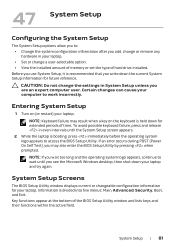
... of hard drive installed. 47 System Setup Configuring the System Setup The System Setup options allow you to access the BIOS Setup Utility. Before you use System Setup, it is held down for extended periods of time. NOTE: If you wait too long and the operating system logo appears, continue to...
... of hard drive installed. 47 System Setup Configuring the System Setup The System Setup options allow you to access the BIOS Setup Utility. Before you use System Setup, it is held down for extended periods of time. NOTE: If you wait too long and the operating system logo appears, continue to...
Owner's Manual
Page 84
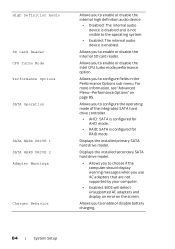
... you to choose if the computer should display warning messages when you to enable or disable the Intel CPU turbo mode performance option. Allows you use AC adapters that are not supported by your computer. • Enabled: BIOS will detect unsupported AC adapters and display an error on page 85. For...
... you to choose if the computer should display warning messages when you to enable or disable the Intel CPU turbo mode performance option. Allows you use AC adapters that are not supported by your computer. • Enabled: BIOS will detect unsupported AC adapters and display an error on page 85. For...
Owner's Manual
Page 87
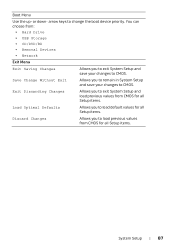
... Setup and save your changes to CMOS. Save Change Without Exit Allows you to exit System Setup and save your changes to CMOS. Boot Menu Use the up- arrow keys to load default values for all Setup items. Load Optimal Defaults Allows you to change the boot device priority. Exit Discarding...
... Setup and save your changes to CMOS. Save Change Without Exit Allows you to exit System Setup and save your changes to CMOS. Boot Menu Use the up- arrow keys to load default values for all Setup items. Load Optimal Defaults Allows you to change the boot device priority. Exit Discarding...


