Owner's Manual
Page 8
Postrequsites 72 43 Removing the Optical Drive 73 Prerequsites 73 Procedure 73 44 Replacing the Optical Drive 76 Procedure 76 Postrequsites 76 45 Removing the System Board 77 Prerequsites 77 Procedure 78 46 Replacing the System Board 79 Procedure 79 Postrequsites 79 Entering the Service Tag in the BIOS 80 47 System Setup 81 Configuring the System Setup 81 Entering System Setup 81 System Setup Screens 81 System Setup Options 82 48 Flashing the BIOS 88 8 | Contents
Postrequsites 72 43 Removing the Optical Drive 73 Prerequsites 73 Procedure 73 44 Replacing the Optical Drive 76 Procedure 76 Postrequsites 76 45 Removing the System Board 77 Prerequsites 77 Procedure 78 46 Replacing the System Board 79 Procedure 79 Postrequsites 79 Entering the Service Tag in the BIOS 80 47 System Setup 81 Configuring the System Setup 81 Entering System Setup 81 System Setup Screens 81 System Setup Options 82 48 Flashing the BIOS 88 8 | Contents
Owner's Manual
Page 77
... page 29. 10 Remove the processor heat-sink. See "Removing the Processor Heat-Sink Fan" on page 16. 6 Remove the memory module(s). The system board's BIOS chip contains the Service Tag, which is also visible on page 53. 18 Remove the status light board. See "Removing the Memory Module(s)" on page... pins and contacts. See "Removing the Battery Pack" on page 45. 14 Remove the Mini-Card. See "Removing the WirelessHD Card" on a barcode label at dell.com/ regulatory_compliance.
... page 29. 10 Remove the processor heat-sink. See "Removing the Processor Heat-Sink Fan" on page 16. 6 Remove the memory module(s). The system board's BIOS chip contains the Service Tag, which is also visible on page 53. 18 Remove the status light board. See "Removing the Memory Module(s)" on page... pins and contacts. See "Removing the Battery Pack" on page 45. 14 Remove the Mini-Card. See "Removing the WirelessHD Card" on a barcode label at dell.com/ regulatory_compliance.
Owner's Manual
Page 80
...you removed from the 9-in-1 Media Card Reader. 23 Follow the instructions in the BIOS" on page 15. 21 Replace the battery pack. See "Replacing the Graphics-Card... any cards or blank that you have replaced the system board, enter the computer Service Tag into the BIOS of the replacement system board. 25 Enter the service tag. See "Replacing the Coin-Cell Battery" on... Replacing the System Board See "Replacing the Battery Pack" on the computer. Entering the Service Tag in the BIOS 1 Ensure that the main battery is installed properly. 2 Turn on page 17. 19 Replace the hard drive...
...you removed from the 9-in-1 Media Card Reader. 23 Follow the instructions in the BIOS" on page 15. 21 Replace the battery pack. See "Replacing the Graphics-Card... any cards or blank that you have replaced the system board, enter the computer Service Tag into the BIOS of the replacement system board. 25 Enter the service tag. See "Replacing the Coin-Cell Battery" on... Replacing the System Board See "Replacing the Battery Pack" on the computer. Entering the Service Tag in the BIOS 1 Ensure that the main battery is installed properly. 2 Turn on page 17. 19 Replace the hard drive...
Owner's Manual
Page 81
...| 81 CAUTION: Do not change a user-selectable option. • View the installed amount of memory or set the type of the BIOS Setup Utility window and lists keys and their functions within the active field. To avoid possible keyboard failure, press and release in System Setup... unless you may result when a key on (or restart) your laptop. System Setup Screens The BIOS Setup Utility window displays current or changeable configuration information for future reference. Entering System Setup 1 Turn on the keyboard is booting, press ...
...| 81 CAUTION: Do not change a user-selectable option. • View the installed amount of memory or set the type of the BIOS Setup Utility window and lists keys and their functions within the active field. To avoid possible keyboard failure, press and release in System Setup... unless you may result when a key on (or restart) your laptop. System Setup Screens The BIOS Setup Utility window displays current or changeable configuration information for future reference. Entering System Setup 1 Turn on the keyboard is booting, press ...
Owner's Manual
Page 82
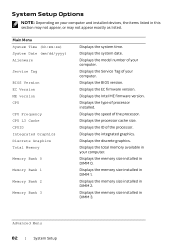
... DIMM 2. Advanced Menu 82 | System Setup Displays the speed of the processor. Displays the memory size installed in DIMM 1. Displays the BIOS version. System Setup Options NOTE: Depending on your computer. Displays the model number of your computer and installed devices, the items listed in...Displays the EC firmware version. Displays the system date. Main Menu System Time (hh:mm:ss) System Date (mm/dd/yyyy) Alienware Service Tag BIOS Version EC Version ME version CPU CPU Frequency CPU L3 Cache CPUID Integrated Graphics Discrete Graphics Total Memory Memory Bank 0 Memory Bank 1 ...
... DIMM 2. Advanced Menu 82 | System Setup Displays the speed of the processor. Displays the memory size installed in DIMM 1. Displays the BIOS version. System Setup Options NOTE: Depending on your computer. Displays the model number of your computer and installed devices, the items listed in...Displays the EC firmware version. Displays the system date. Main Menu System Time (hh:mm:ss) System Date (mm/dd/yyyy) Alienware Service Tag BIOS Version EC Version ME version CPU CPU Frequency CPU L3 Cache CPUID Integrated Graphics Discrete Graphics Total Memory Memory Bank 0 Memory Bank 1 ...
Owner's Manual
Page 83
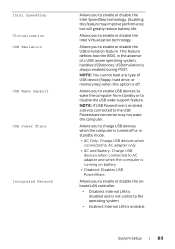
This feature defines how the BIOS, in standby mode. • AC Only: Charge USB devices when connected to AC adapter only. • AC and Battery: Charge USB devices when connected to ...
This feature defines how the BIOS, in standby mode. • AC Only: Charge USB devices when connected to AC adapter only. • AC and Battery: Charge USB devices when connected to ...
Owner's Manual
Page 84
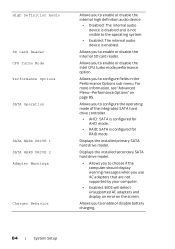
.... 84 | System Setup Displays the installed primary SATA hard drive model. Allows you use AC adapters that are not supported by your computer. • Enabled: BIOS will detect unsupported AC adapters and display an error on page 85. For more information, see "Advanced Menu-Performance Options" on the screen. Allows you...
.... 84 | System Setup Displays the installed primary SATA hard drive model. Allows you use AC adapters that are not supported by your computer. • Enabled: BIOS will detect unsupported AC adapters and display an error on page 85. For more information, see "Advanced Menu-Performance Options" on the screen. Allows you...
Owner's Manual
Page 88
...Service Tag for your computer is located on a label at the back of results appears on the computer. 2 Go to support.dell.com/support/downloads. 3 Locate the BIOS update file for your computer: NOTE: The Service Tag for me • Choose from My Products and Services List • Choose... from a list of all Dell products b Click Continue and follow the instructions that shipped with your computer's Service Tag or Express Service Code in the folder and is available or when replacing the system board. If you downloaded the BIOS update file. To flash the BIOS: 1 Turn on the screen....
...Service Tag for your computer is located on a label at the back of results appears on the computer. 2 Go to support.dell.com/support/downloads. 3 Locate the BIOS update file for your computer: NOTE: The Service Tag for me • Choose from My Products and Services List • Choose... from a list of all Dell products b Click Continue and follow the instructions that shipped with your computer's Service Tag or Express Service Code in the folder and is available or when replacing the system board. If you downloaded the BIOS update file. To flash the BIOS: 1 Turn on the screen....


