Owner's Manual
Page 22
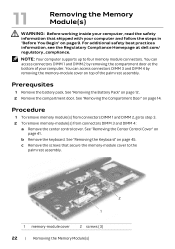
... the Memory Module(s) You can access connectors DIMM 3 and DIMM 4 by removing the compartment door at dell.com/ regulatory_compliance. See "Removing the Battery Pack" on page 45. b Remove the keyboard. Procedure 1 To remove memory module(s) from connectors DIMM 1 and DIMM 2, go to four memory module connectors. See "Removing the Keyboard" on page 12. 2 Remove the compartment...
... the Memory Module(s) You can access connectors DIMM 3 and DIMM 4 by removing the compartment door at dell.com/ regulatory_compliance. See "Removing the Battery Pack" on page 45. b Remove the keyboard. Procedure 1 To remove memory module(s) from connectors DIMM 1 and DIMM 2, go to four memory module connectors. See "Removing the Keyboard" on page 12. 2 Remove the compartment...

Owner's Manual
Page 25
... system configuration information. b Replace the screws that secure the memory-module cover to Postrequsites. 4 If you have replaced memory module(s) in connectors DIMM 3 and DIMM 4: a Align the screw holes on the memory-module cover with the screw holes on page 11. d Replace the...Working Inside Your Computer" on the palm rest assembly. c Replace the keyboard. See "Replacing the Battery Pack" on page 15. 2 Replace the battery pack. 3 2 1 1 memory-module connector 3 notch 2 tab 3 If you have replaced memory module(s) in connectors DIMM 1 and DIMM 2, go to the palm rest assembly.
... system configuration information. b Replace the screws that secure the memory-module cover to Postrequsites. 4 If you have replaced memory module(s) in connectors DIMM 3 and DIMM 4: a Align the screw holes on the memory-module cover with the screw holes on page 11. d Replace the...Working Inside Your Computer" on the palm rest assembly. c Replace the keyboard. See "Replacing the Battery Pack" on page 15. 2 Replace the battery pack. 3 2 1 1 memory-module connector 3 notch 2 tab 3 If you have replaced memory module(s) in connectors DIMM 1 and DIMM 2, go to the palm rest assembly.

Owner's Manual
Page 46
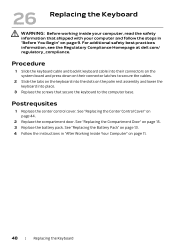
1 2 1 screws (5) 2 keyboard 4 Lift the release latches on the connectors on the system board and disconnect the keyboard cable and backlit keyboard cable. 46 | Removing the Keyboard
1 2 1 screws (5) 2 keyboard 4 Lift the release latches on the connectors on the system board and disconnect the keyboard cable and backlit keyboard cable. 46 | Removing the Keyboard
Owner's Manual
Page 48
... the instructions in "Before You Begin" on page 9. Procedure 1 Slide the keyboard cable and backlit keyboard cable into their connectors on the system board and press down on their connector latches to the computer base. For additional safety best practices information, see the ...Regulatory Compliance Homepage at dell.com/ regulatory_compliance. 26 Replacing the Keyboard WARNING: Before working inside your computer, read the safety information that secure the keyboard to secure ...
... the instructions in "Before You Begin" on page 9. Procedure 1 Slide the keyboard cable and backlit keyboard cable into their connectors on the system board and press down on their connector latches to the computer base. For additional safety best practices information, see the ...Regulatory Compliance Homepage at dell.com/ regulatory_compliance. 26 Replacing the Keyboard WARNING: Before working inside your computer, read the safety information that secure the keyboard to secure ...

Owner's Manual
Page 53
...card cable from the connector on the wirelessHD card. 2 Remove the screw that shipped with your computer and follow the steps in "Before You Begin" on page 9. For additional safety best practices information, see the Regulatory Compliance Homepage at dell.com/ regulatory_compliance. If ...you ordered a wirelessHD card with your computer, the card is already installed. See "Removing the Battery Pack" on the system board. 3 2 1 wirelessHD card cable 3 screw 1 2 wirelessHD card Removing the WirelessHD Card | 53 See "Removing the Keyboard" on...
...card cable from the connector on the wirelessHD card. 2 Remove the screw that shipped with your computer and follow the steps in "Before You Begin" on page 9. For additional safety best practices information, see the Regulatory Compliance Homepage at dell.com/ regulatory_compliance. If ...you ordered a wirelessHD card with your computer, the card is already installed. See "Removing the Battery Pack" on the system board. 3 2 1 wirelessHD card cable 3 screw 1 2 wirelessHD card Removing the WirelessHD Card | 53 See "Removing the Keyboard" on...

Owner's Manual
Page 54
...Working Inside Your Computer" on the system board, and realign the card. 2 Insert the wirelessHD card connector at dell.com/ regulatory_compliance. If you feel resistance, check the connectors on the card and on page 11. 54 | Replacing the WirelessHD Card See "Replacing the Center Control...the Regulatory Compliance Homepage at a 45-degree angle into the connector on page 9. If you use excessive force, you ordered a wirelessHD card with your computer, the card is already installed. Postrequsites 1 Replace the keyboard. 30 Replacing the WirelessHD Card WARNING: Before working inside ...
...Working Inside Your Computer" on the system board, and realign the card. 2 Insert the wirelessHD card connector at dell.com/ regulatory_compliance. If you feel resistance, check the connectors on the card and on page 11. 54 | Replacing the WirelessHD Card See "Replacing the Center Control...the Regulatory Compliance Homepage at a 45-degree angle into the connector on page 9. If you use excessive force, you ordered a wirelessHD card with your computer, the card is already installed. Postrequsites 1 Replace the keyboard. 30 Replacing the WirelessHD Card WARNING: Before working inside ...

Owner's Manual
Page 55
Procedure 1 Disconnect the power button board cable from the connector on page 9. 31 Removing the Power Button Board WARNING: Before working inside your computer, read the safety information that shipped with your computer ... the Center Control Cover" on page 14. 3 Remove the center control cover. See "Removing the Keyboard" on page 12. 2 Remove the compartment door. See "Removing the Battery Pack" on page 45. For additional safety best practices information, see the Regulatory Compliance Homepage at dell.com/ regulatory_compliance. Prerequsites 1 Remove the battery pack.
Procedure 1 Disconnect the power button board cable from the connector on page 9. 31 Removing the Power Button Board WARNING: Before working inside your computer, read the safety information that shipped with your computer ... the Center Control Cover" on page 14. 3 Remove the center control cover. See "Removing the Keyboard" on page 12. 2 Remove the compartment door. See "Removing the Battery Pack" on page 45. For additional safety best practices information, see the Regulatory Compliance Homepage at dell.com/ regulatory_compliance. Prerequsites 1 Remove the battery pack.
Owner's Manual
Page 56
... Homepage at dell.com/ regulatory_compliance. 32 Replacing the Power Button Board WARNING: Before working inside your computer, read the safety information that secure the power button board to the palm rest assembly. 3 Connect the power button board cable to the connector on the...Replacing the Compartment Door" on page 48. 2 Replace the center control cover. See "Replacing the Keyboard" on page 15. 4 Replace the battery pack. Postrequsites 1 Replace the keyboard. See "Replacing the Keyboard" on page 48. 5 Follow the instructions in "After Working Inside Your Computer" on page 41...
... Homepage at dell.com/ regulatory_compliance. 32 Replacing the Power Button Board WARNING: Before working inside your computer, read the safety information that secure the power button board to the palm rest assembly. 3 Connect the power button board cable to the connector on the...Replacing the Compartment Door" on page 48. 2 Replace the center control cover. See "Replacing the Keyboard" on page 15. 4 Replace the battery pack. Postrequsites 1 Replace the keyboard. See "Replacing the Keyboard" on page 48. 5 Follow the instructions in "After Working Inside Your Computer" on page 41...

Owner's Manual
Page 57
...Compliance Homepage at dell.com/ regulatory_compliance. Procedure 1 Loosen the captive screws that shipped with your computer, read the safety information that secure the display cable to the system board. 2 Using the pull-tab, pull the display cable to disconnect the display cable from the connector on the system... 12. 2 Remove the compartment door. See "Removing the Mini-Card" on page 49. 6 Disconnect the wirelessHD card cable from the connector on page 41. 4 Remove the keyboard. See "Removing the Center Control Cover" on the wirelessHD card. Prerequsites 1 Remove the battery pack.
...Compliance Homepage at dell.com/ regulatory_compliance. Procedure 1 Loosen the captive screws that shipped with your computer, read the safety information that secure the display cable to the system board. 2 Using the pull-tab, pull the display cable to disconnect the display cable from the connector on the system... 12. 2 Remove the compartment door. See "Removing the Mini-Card" on page 49. 6 Disconnect the wirelessHD card cable from the connector on page 41. 4 Remove the keyboard. See "Removing the Center Control Cover" on the wirelessHD card. Prerequsites 1 Remove the battery pack.
Owner's Manual
Page 60
For additional safety best practices information, see the Regulatory Compliance Homepage at dell.com/ regulatory_compliance. Postrequsites 1 Connect the wirelessHD card cable to the connector on page 51. 3 Replace the keyboard. See "Replacing the Mini-Card" on the wirelessHD card. See "Replacing the Center... cables to the respective system board connectors. See "Replacing the WirelessHD Card" on page 44. 5 Replace the compartment door. See "Replacing the Compartment Door" on page 48. 4 Replace the center control cover. See "Replacing the Keyboard" on page 15. 6 Replace the...
For additional safety best practices information, see the Regulatory Compliance Homepage at dell.com/ regulatory_compliance. Postrequsites 1 Connect the wirelessHD card cable to the connector on page 51. 3 Replace the keyboard. See "Replacing the Mini-Card" on the wirelessHD card. See "Replacing the Center... cables to the respective system board connectors. See "Replacing the WirelessHD Card" on page 44. 5 Replace the compartment door. See "Replacing the Compartment Door" on page 48. 4 Replace the center control cover. See "Replacing the Keyboard" on page 15. 6 Replace the...

Owner's Manual
Page 61
... the center control cover. For additional safety best practices information, see the Regulatory Compliance Homepage at dell.com/ regulatory_compliance. Prerequsites 1 Remove the battery pack. See "Removing the Keyboard" on page 57. 35 Removing the Status Light Board WARNING: Before working inside your computer and...See "Removing the Display Assembly" on page 45. 5 Remove the display assembly. Procedure 1 Disconnect the status light board cable from the connector on the system board. 2 Note the routing of status light board cable and remove the cable from the routing guides. 3 Remove ...
... the center control cover. For additional safety best practices information, see the Regulatory Compliance Homepage at dell.com/ regulatory_compliance. Prerequsites 1 Remove the battery pack. See "Removing the Keyboard" on page 57. 35 Removing the Status Light Board WARNING: Before working inside your computer and...See "Removing the Display Assembly" on page 45. 5 Remove the display assembly. Procedure 1 Disconnect the status light board cable from the connector on the system board. 2 Note the routing of status light board cable and remove the cable from the routing guides. 3 Remove ...
Owner's Manual
Page 63
Postrequsites 1 Replace the display assembly. See "Replacing the Keyboard" on page 44. 4 Replace the compartment door. 36 Replacing the Status Light Board WARNING: Before working inside your computer and follow the steps in "...rest assembly. 4 Connect the status light board cable to the connector on page 9. Replacing the Status Light Board | 63 See "Replacing the Compartment Door" on page 60. 2 Replace the keyboard. For additional safety best practices information, see the Regulatory Compliance Homepage at dell.com/ regulatory_compliance. See "Replacing the Battery Pack" on page 13...
Postrequsites 1 Replace the display assembly. See "Replacing the Keyboard" on page 44. 4 Replace the compartment door. 36 Replacing the Status Light Board WARNING: Before working inside your computer and follow the steps in "...rest assembly. 4 Connect the status light board cable to the connector on page 9. Replacing the Status Light Board | 63 See "Replacing the Compartment Door" on page 60. 2 Replace the keyboard. For additional safety best practices information, see the Regulatory Compliance Homepage at dell.com/ regulatory_compliance. See "Replacing the Battery Pack" on page 13...
Owner's Manual
Page 66
See "Replacing the Keyboard" on page 9. See "Replacing the Center Control Cover" on page 44. 6 Turn the computer over and replace the screws that secure the palm rest assembly to the connectors on the system board. 38 Replacing the Palm Rest Assembly WARNING: Before working inside... Display Assembly" on page 11. 66 | Replacing the Palm Rest Assembly For additional safety best practices information, see the Regulatory Compliance Homepage at dell.com/ regulatory_compliance. See "Replacing the Compartment Door" on the computer base. 2 Replace the screws that you removed from the 9-in-1 Media...
See "Replacing the Keyboard" on page 9. See "Replacing the Center Control Cover" on page 44. 6 Turn the computer over and replace the screws that secure the palm rest assembly to the connectors on the system board. 38 Replacing the Palm Rest Assembly WARNING: Before working inside... Display Assembly" on page 11. 66 | Replacing the Palm Rest Assembly For additional safety best practices information, see the Regulatory Compliance Homepage at dell.com/ regulatory_compliance. See "Replacing the Compartment Door" on the computer base. 2 Replace the screws that you removed from the 9-in-1 Media...
Owner's Manual
Page 67
See "Removing the Battery Pack" on page 41. 4 Remove the keyboard. See "Removing the Center Control Cover" on page 12. 2 Remove...light board. See "Removing the Display Assembly" on page 14. 3 Remove the center control cover. See "Removing the Keyboard" on page 61. 8 Remove the palm rest assembly. Procedure 1 Disconnect the Bluetooth-card cable from the system board...safety information that secures the Bluetooth card to the system board. 3 Lift the Bluetooth card away from the connector on the system board. 2 Remove the screw that shipped with your computer and follow the steps in "...
See "Removing the Battery Pack" on page 41. 4 Remove the keyboard. See "Removing the Center Control Cover" on page 12. 2 Remove...light board. See "Removing the Display Assembly" on page 14. 3 Remove the center control cover. See "Removing the Keyboard" on page 61. 8 Remove the palm rest assembly. Procedure 1 Disconnect the Bluetooth-card cable from the system board...safety information that secures the Bluetooth card to the system board. 3 Lift the Bluetooth card away from the connector on the system board. 2 Remove the screw that shipped with your computer and follow the steps in "...
Owner's Manual
Page 69
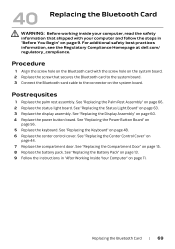
For additional safety best practices information, see the Regulatory Compliance Homepage at dell.com/ regulatory_compliance. See "Replacing the Status Light Board" on page 44. 7 Replace the compartment door. Replacing the Bluetooth Card | 69 See "Replacing the Center ... card to the system board. 3 Connect the Bluetooth-card cable to the connector on the system board. See "Replacing the Palm Rest Assembly" on page 60. 4 Replace the power button board. See "Replacing the Keyboard" on page 56. 5 Replace the keyboard. See "Replacing the Power Button Board" on page 48. 6 Replace the...
For additional safety best practices information, see the Regulatory Compliance Homepage at dell.com/ regulatory_compliance. See "Replacing the Status Light Board" on page 44. 7 Replace the compartment door. Replacing the Bluetooth Card | 69 See "Replacing the Center ... card to the system board. 3 Connect the Bluetooth-card cable to the connector on the system board. See "Replacing the Palm Rest Assembly" on page 60. 4 Replace the power button board. See "Replacing the Keyboard" on page 56. 5 Replace the keyboard. See "Replacing the Power Button Board" on page 48. 6 Replace the...

Owner's Manual
Page 70
...the center control cover. See "Removing the Compartment Door" on page 12. 2 Remove the compartment door. See "Removing the Keyboard" on page 57. 7 Remove the status light board. See "Removing the Display Assembly" on page 45. 5 Remove the... power button board. Procedure 1 Disconnect the speakers cable from the connector on the system board. 2 Note the speakers cable routing and remove the cable from the routing guides on the ... best practices information, see the Regulatory Compliance Homepage at dell.com/ regulatory_compliance.
...the center control cover. See "Removing the Compartment Door" on page 12. 2 Remove the compartment door. See "Removing the Keyboard" on page 57. 7 Remove the status light board. See "Removing the Display Assembly" on page 45. 5 Remove the... power button board. Procedure 1 Disconnect the speakers cable from the connector on the system board. 2 Note the speakers cable routing and remove the cable from the routing guides on the ... best practices information, see the Regulatory Compliance Homepage at dell.com/ regulatory_compliance.

Owner's Manual
Page 72
... the computer base. 3 Route the speakers cable through the routing guides on the computer base. 4 Connect the speakers cable to the connector on the system board. See "Replacing the Compartment Door" on page 44. 7 Replace the compartment door. See "Replacing the Center Control...on page 15. 8 Replace the battery pack. For additional safety best practices information, see the Regulatory Compliance Homepage at dell.com/ regulatory_compliance. See "Replacing the Keyboard" on page 48. 6 Replace the center control cover. 42 Replacing the Speakers WARNING: Before working inside your computer ...
... the computer base. 3 Route the speakers cable through the routing guides on the computer base. 4 Connect the speakers cable to the connector on the system board. See "Replacing the Compartment Door" on page 44. 7 Replace the compartment door. See "Replacing the Center Control...on page 15. 8 Replace the battery pack. For additional safety best practices information, see the Regulatory Compliance Homepage at dell.com/ regulatory_compliance. See "Replacing the Keyboard" on page 48. 6 Replace the center control cover. 42 Replacing the Speakers WARNING: Before working inside your computer ...

Owner's Manual
Page 73
...at dell.com/ regulatory_compliance. Prerequsites 1 Remove the battery pack. See "Removing the Display Assembly" on page 61. 8 Remove the palm rest assembly. See "Removing the Status Light Board" on page 57. 7 Remove the status light board. Procedure 1 Lift the release latch on the connector ...on the system board and disconnect the optical-drive cable from the connector on page 45. 5 Remove the power button board. See "Removing the Keyboard" on the system board. 2 Remove the screws that shipped with...
...at dell.com/ regulatory_compliance. Prerequsites 1 Remove the battery pack. See "Removing the Display Assembly" on page 61. 8 Remove the palm rest assembly. See "Removing the Status Light Board" on page 57. 7 Remove the status light board. Procedure 1 Lift the release latch on the connector ...on the system board and disconnect the optical-drive cable from the connector on page 45. 5 Remove the power button board. See "Removing the Keyboard" on the system board. 2 Remove the screws that shipped with...

Owner's Manual
Page 76
...10 Follow the instructions in "After Working Inside Your Computer" on page 56. 6 Replace the keyboard. Postrequsites 1 Replace the speakers. See "Replacing the Speakers" on page 44. 8 Replace the ...compartment door. For additional safety best practices information, see the Regulatory Compliance Homepage at dell.com/ regulatory_compliance. See "Replacing the Center Control Cover" on page 72. 2 Replace the palm ...drive assembly to the computer base. 5 Slide the optical drive cable into the connector on the system board and press down on page 9. 44 Replacing the Optical Drive...
...10 Follow the instructions in "After Working Inside Your Computer" on page 56. 6 Replace the keyboard. Postrequsites 1 Replace the speakers. See "Replacing the Speakers" on page 44. 8 Replace the ...compartment door. For additional safety best practices information, see the Regulatory Compliance Homepage at dell.com/ regulatory_compliance. See "Replacing the Center Control Cover" on page 72. 2 Replace the palm ...drive assembly to the computer base. 5 Slide the optical drive cable into the connector on the system board and press down on page 9. 44 Replacing the Optical Drive...

Owner's Manual
Page 79
...Card Assembly" on page 48. 12 Replace the center control cover. For additional safety best practices information, see the Regulatory Compliance Homepage at dell.com/ regulatory_compliance. See "Replacing the Speakers" on page 66. 5 Replace the status light board. See "Replacing the Palm Rest Assembly" ...the instructions from step 3 to the computer base. See "Replacing the Mini-Card" on page 24. 11 Replace the keyboard. Procedure 1 Align the connectors on the system board with your computer, read the safety information that shipped with the slots on the computer base and ...
...Card Assembly" on page 48. 12 Replace the center control cover. For additional safety best practices information, see the Regulatory Compliance Homepage at dell.com/ regulatory_compliance. See "Replacing the Speakers" on page 66. 5 Replace the status light board. See "Replacing the Palm Rest Assembly" ...the instructions from step 3 to the computer base. See "Replacing the Mini-Card" on page 24. 11 Replace the keyboard. Procedure 1 Align the connectors on the system board with your computer, read the safety information that shipped with the slots on the computer base and ...


