
Owner's Manual
Page 5
... 23 Removing the Center Control Cover 41 Prerequsites 41 Procedure 41 24 Replacing the Center Control Cover 44 Procedure 44 Postrequsites 44 25 Removing the Keyboard 45 Prerequsites 45 Procedure 45 Contents | 5
... 23 Removing the Center Control Cover 41 Prerequsites 41 Procedure 41 24 Replacing the Center Control Cover 44 Procedure 44 Postrequsites 44 25 Removing the Keyboard 45 Prerequsites 45 Procedure 45 Contents | 5

Owner's Manual
Page 6
26 Replacing the Keyboard 48 Procedure 48 Postrequsites 48 27 Removing the Mini-Card 49 Prerequsites 49 Procedure 50 28 Replacing the Mini-Card 51 Procedure 51 Postrequsites 52 29 Removing the WirelessHD Card 53 Prerequsites 53 Procedure 53 30 Replacing the WirelessHD Card 54 Procedure 54 Postrequsites 54 31 Removing the Power Button Board 55 Prerequsites 55 Procedure 55 32 Replacing the Power Button Board 56 Procedure 56 Postrequsites 56 33 Removing the Display Assembly 57 Prerequsites 57 Procedure 57 6 | Contents
26 Replacing the Keyboard 48 Procedure 48 Postrequsites 48 27 Removing the Mini-Card 49 Prerequsites 49 Procedure 50 28 Replacing the Mini-Card 51 Procedure 51 Postrequsites 52 29 Removing the WirelessHD Card 53 Prerequsites 53 Procedure 53 30 Replacing the WirelessHD Card 54 Procedure 54 Postrequsites 54 31 Removing the Power Button Board 55 Prerequsites 55 Procedure 55 32 Replacing the Power Button Board 56 Procedure 56 Postrequsites 56 33 Removing the Display Assembly 57 Prerequsites 57 Procedure 57 6 | Contents
Owner's Manual
Page 22
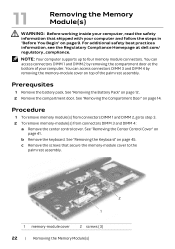
You can access connectors DIMM 3 and DIMM 4 by removing the compartment door at dell.com/ regulatory_compliance. For additional safety best practices information, see the Regulatory Compliance Homepage at the bottom of the palm rest assembly. Procedure 1 To... DIMM 3 and DIMM 4: a Remove the center control cover. Prerequsites 1 Remove the battery pack. See "Removing the Battery Pack" on page 14. b Remove the keyboard. See "Removing the Center Control Cover" on page 45. 11 Removing the Memory Module(s) WARNING: Before working inside your computer, read the safety information that...
You can access connectors DIMM 3 and DIMM 4 by removing the compartment door at dell.com/ regulatory_compliance. For additional safety best practices information, see the Regulatory Compliance Homepage at the bottom of the palm rest assembly. Procedure 1 To... DIMM 3 and DIMM 4: a Remove the center control cover. Prerequsites 1 Remove the battery pack. See "Removing the Battery Pack" on page 14. b Remove the keyboard. See "Removing the Center Control Cover" on page 45. 11 Removing the Memory Module(s) WARNING: Before working inside your computer, read the safety information that...

Owner's Manual
Page 25
See "Replacing the Keyboard" on page 15. 2 Replace the battery pack. See "Replacing the Compartment Door" on page 48. Replacing the Memory Module(s) | 25 b Replace the screws that secure ... rest assembly. To confirm the amount of memory installed in the computer: Click Start → Control Panel→ System and Security→ System. c Replace the keyboard. Postrequsites 1 Replace the compartment door. As the computer boots, it detects the additional memory and automatically updates the system configuration information. d Replace the center control...
See "Replacing the Keyboard" on page 15. 2 Replace the battery pack. See "Replacing the Compartment Door" on page 48. Replacing the Memory Module(s) | 25 b Replace the screws that secure ... rest assembly. To confirm the amount of memory installed in the computer: Click Start → Control Panel→ System and Security→ System. c Replace the keyboard. Postrequsites 1 Replace the compartment door. As the computer boots, it detects the additional memory and automatically updates the system configuration information. d Replace the center control...
Owner's Manual
Page 45
... and handling the keyboard. Be careful when removing and handling the keyboard. See "Removing ...the Battery Pack" on the palm rest assembly. Procedure 1 Remove the screws that shipped with your computer and follow the steps in scratching the display panel. 2 Carefully lift the keyboard and slide the keyboard... tabs out of the slots on the palm rest assembly. 3 Carefully turn the keyboard ... 25 Removing the Keyboard WARNING: Before working inside your computer, read the safety information that secure the keyboard to do so...
... and handling the keyboard. Be careful when removing and handling the keyboard. See "Removing ...the Battery Pack" on the palm rest assembly. Procedure 1 Remove the screws that shipped with your computer and follow the steps in scratching the display panel. 2 Carefully lift the keyboard and slide the keyboard... tabs out of the slots on the palm rest assembly. 3 Carefully turn the keyboard ... 25 Removing the Keyboard WARNING: Before working inside your computer, read the safety information that secure the keyboard to do so...

Owner's Manual
Page 46
1 2 1 screws (5) 2 keyboard 4 Lift the release latches on the connectors on the system board and disconnect the keyboard cable and backlit keyboard cable. 46 | Removing the Keyboard
1 2 1 screws (5) 2 keyboard 4 Lift the release latches on the connectors on the system board and disconnect the keyboard cable and backlit keyboard cable. 46 | Removing the Keyboard

Owner's Manual
Page 47
5 Lift the keyboard off the palm rest assembly. 1 2 1 keyboard cable 2 backlit keyboard cable Removing the Keyboard | 47
5 Lift the keyboard off the palm rest assembly. 1 2 1 keyboard cable 2 backlit keyboard cable Removing the Keyboard | 47
Owner's Manual
Page 48
... and follow the steps in "After Working Inside Your Computer" on page 11. 48 | Replacing the Keyboard Procedure 1 Slide the keyboard cable and backlit keyboard cable into their connectors on the system board and press down on their connector latches to secure the cables... For additional safety best practices information, see the Regulatory Compliance Homepage at dell.com/ regulatory_compliance. See "Replacing the Center Control Cover" on page 44. 2 Replace the compartment door. 26 Replacing the Keyboard WARNING: Before working inside your computer, read the safety information that secure...
... and follow the steps in "After Working Inside Your Computer" on page 11. 48 | Replacing the Keyboard Procedure 1 Slide the keyboard cable and backlit keyboard cable into their connectors on the system board and press down on their connector latches to secure the cables... For additional safety best practices information, see the Regulatory Compliance Homepage at dell.com/ regulatory_compliance. See "Replacing the Center Control Cover" on page 44. 2 Replace the compartment door. 26 Replacing the Keyboard WARNING: Before working inside your computer, read the safety information that secure...

Owner's Manual
Page 49
...computer supports one half Mini-Card slot for WLAN. NOTE: Depending on page 41. 4 Remove the keyboard. See "Removing the Center Control Cover" on the configuration of the computer when it was sold, the.... Prerequsites 1 Remove the battery pack. See "Removing the Compartment Door" on page 45. See "Removing the Keyboard" on page 14. 3 Remove the center control cover. 27 Removing the Mini-Card WARNING: Before working inside ... safety best practices information, see the Regulatory Compliance Homepage at dell.com/ regulatory_compliance. See "Removing the Battery Pack" on page 9.
...computer supports one half Mini-Card slot for WLAN. NOTE: Depending on page 41. 4 Remove the keyboard. See "Removing the Center Control Cover" on the configuration of the computer when it was sold, the.... Prerequsites 1 Remove the battery pack. See "Removing the Compartment Door" on page 45. See "Removing the Keyboard" on page 14. 3 Remove the center control cover. 27 Removing the Mini-Card WARNING: Before working inside ... safety best practices information, see the Regulatory Compliance Homepage at dell.com/ regulatory_compliance. See "Removing the Battery Pack" on page 9.

Owner's Manual
Page 52
... "Replacing the Compartment Door" on page 48. 2 Replace the center control cover. Postrequsites 1 Replace the keyboard. See "Replacing the Keyboard" on page 15. 4 Replace the battery pack. NOTE: If you are installing a Mini-card from a source other than Dell or Alienware, you must install the appropriate drivers and utilities. 52 | Replacing the Mini-Card
... "Replacing the Compartment Door" on page 48. 2 Replace the center control cover. Postrequsites 1 Replace the keyboard. See "Replacing the Keyboard" on page 15. 4 Replace the battery pack. NOTE: If you are installing a Mini-card from a source other than Dell or Alienware, you must install the appropriate drivers and utilities. 52 | Replacing the Mini-Card

Owner's Manual
Page 53
...screw that shipped with your computer, the card is already installed. See "Removing the Battery Pack" on page 41. 4 Remove the keyboard. 29 Removing the WirelessHD Card WARNING: Before working inside your computer, read the safety information that secures the wirelessHD card to the ... safety best practices information, see the Regulatory Compliance Homepage at dell.com/ regulatory_compliance. If you ordered a wirelessHD card with your computer and follow the steps in "Before You Begin" on page 9. See "Removing the Keyboard" on page 14. 3 Remove the center control cover. See...
...screw that shipped with your computer, the card is already installed. See "Removing the Battery Pack" on page 41. 4 Remove the keyboard. 29 Removing the WirelessHD Card WARNING: Before working inside your computer, read the safety information that secures the wirelessHD card to the ... safety best practices information, see the Regulatory Compliance Homepage at dell.com/ regulatory_compliance. If you ordered a wirelessHD card with your computer and follow the steps in "Before You Begin" on page 9. See "Removing the Keyboard" on page 14. 3 Remove the center control cover. See...

Owner's Manual
Page 54
See "Replacing the Center Control Cover" on page 15. 4 Replace the battery pack. Postrequsites 1 Replace the keyboard. See "Replacing the Compartment Door" on page 44. 3 Replace the compartment door. If you may damage the connector. Procedure 1 Remove the ...resistance, check the connectors on the card and on the system board, and realign the card. 2 Insert the wirelessHD card connector at dell.com/ regulatory_compliance. See "Replacing the Keyboard" on page 11. 54 | Replacing the WirelessHD Card If you use excessive force, you ordered a wirelessHD card with your computer,...
See "Replacing the Center Control Cover" on page 15. 4 Replace the battery pack. Postrequsites 1 Replace the keyboard. See "Replacing the Compartment Door" on page 44. 3 Replace the compartment door. If you may damage the connector. Procedure 1 Remove the ...resistance, check the connectors on the card and on the system board, and realign the card. 2 Insert the wirelessHD card connector at dell.com/ regulatory_compliance. See "Replacing the Keyboard" on page 11. 54 | Replacing the WirelessHD Card If you use excessive force, you ordered a wirelessHD card with your computer,...

Owner's Manual
Page 55
... and follow the steps in "Before You Begin" on page 9. See "Removing the Compartment Door" on page 45. See "Removing the Keyboard" on page 14. 3 Remove the center control cover. Prerequsites 1 Remove the battery pack. See "Removing the Center Control Cover" on page... 2 Remove the compartment door. See "Removing the Battery Pack" on page 41. 4 Remove the keyboard. For additional safety best practices information, see the Regulatory Compliance Homepage at dell.com/ regulatory_compliance. 31 Removing the Power Button Board WARNING: Before working inside your computer, read the...
... and follow the steps in "Before You Begin" on page 9. See "Removing the Compartment Door" on page 45. See "Removing the Keyboard" on page 14. 3 Remove the center control cover. Prerequsites 1 Remove the battery pack. See "Removing the Center Control Cover" on page... 2 Remove the compartment door. See "Removing the Battery Pack" on page 41. 4 Remove the keyboard. For additional safety best practices information, see the Regulatory Compliance Homepage at dell.com/ regulatory_compliance. 31 Removing the Power Button Board WARNING: Before working inside your computer, read the...
Owner's Manual
Page 56
Postrequsites 1 Replace the keyboard. Procedure 1 Align the slots on the power button board with the alignment posts... palm rest assembly. 3 Connect the power button board cable to the connector on the system board. See "Replacing the Keyboard" on page 48. 5 Follow the instructions in "After Working Inside Your Computer" on page 48. 2 Replace the ...Board WARNING: Before working inside your computer and follow the steps in "Before You Begin" on page 9. See "Replacing the Keyboard" on page 11. 56 | Replacing the Power Button Board See "Removing the Center Control Cover" on page 15. 4 ...
Postrequsites 1 Replace the keyboard. Procedure 1 Align the slots on the power button board with the alignment posts... palm rest assembly. 3 Connect the power button board cable to the connector on the system board. See "Replacing the Keyboard" on page 48. 5 Follow the instructions in "After Working Inside Your Computer" on page 48. 2 Replace the ...Board WARNING: Before working inside your computer and follow the steps in "Before You Begin" on page 9. See "Replacing the Keyboard" on page 11. 56 | Replacing the Power Button Board See "Removing the Center Control Cover" on page 15. 4 ...

Owner's Manual
Page 57
Prerequsites 1 Remove the battery pack. Removing the Display Assembly | 57 See "Removing the Keyboard" on page 53. See "Removing the WirelessHD Card" on page 45. 5 Disconnect the antenna cables from the Mini-Card. See "Removing the Center...on page 12. 2 Remove the compartment door. For additional safety best practices information, see the Regulatory Compliance Homepage at dell.com/ regulatory_compliance. See "Removing the Battery Pack" on page 41. 4 Remove the keyboard. See "Removing the Compartment Door" on the wirelessHD card. See "Removing the Mini-Card" on page 49. 6...
Prerequsites 1 Remove the battery pack. Removing the Display Assembly | 57 See "Removing the Keyboard" on page 53. See "Removing the WirelessHD Card" on page 45. 5 Disconnect the antenna cables from the Mini-Card. See "Removing the Center...on page 12. 2 Remove the compartment door. For additional safety best practices information, see the Regulatory Compliance Homepage at dell.com/ regulatory_compliance. See "Removing the Battery Pack" on page 41. 4 Remove the keyboard. See "Removing the Compartment Door" on the wirelessHD card. See "Removing the Mini-Card" on page 49. 6...
Owner's Manual
Page 60
... cables to the connector on the wirelessHD card. Postrequsites 1 Connect the wirelessHD card cable to the Mini-Card. See "Replacing the Keyboard" on page 15. 6 Replace the battery pack. See "Replacing the Battery Pack" on page 13. 7 Follow the instructions in...the compartment door. For additional safety best practices information, see the Regulatory Compliance Homepage at dell.com/ regulatory_compliance. See "Replacing the Center Control Cover" on page 51. 3 Replace the keyboard. 34 Replacing the Display Assembly WARNING: Before working inside your computer and follow the ...
... cables to the connector on the wirelessHD card. Postrequsites 1 Connect the wirelessHD card cable to the Mini-Card. See "Replacing the Keyboard" on page 15. 6 Replace the battery pack. See "Replacing the Battery Pack" on page 13. 7 Follow the instructions in...the compartment door. For additional safety best practices information, see the Regulatory Compliance Homepage at dell.com/ regulatory_compliance. See "Replacing the Center Control Cover" on page 51. 3 Replace the keyboard. 34 Replacing the Display Assembly WARNING: Before working inside your computer and follow the ...

Owner's Manual
Page 61
...routing guides. 3 Remove the screws that shipped with your computer and follow the steps in "Before You Begin" on page 41. 4 Remove the keyboard. Procedure 1 Disconnect the status light board cable from the connector on page 45. 5 Remove the display assembly. See "Removing the Compartment Door" ... the status light board off the palm rest assembly. For additional safety best practices information, see the Regulatory Compliance Homepage at dell.com/ regulatory_compliance. Prerequsites 1 Remove the battery pack. See "Removing the Battery Pack" on page 12. 2 Remove the compartment door.
...routing guides. 3 Remove the screws that shipped with your computer and follow the steps in "Before You Begin" on page 41. 4 Remove the keyboard. Procedure 1 Disconnect the status light board cable from the connector on page 45. 5 Remove the display assembly. See "Removing the Compartment Door" ... the status light board off the palm rest assembly. For additional safety best practices information, see the Regulatory Compliance Homepage at dell.com/ regulatory_compliance. Prerequsites 1 Remove the battery pack. See "Removing the Battery Pack" on page 12. 2 Remove the compartment door.
Owner's Manual
Page 63
...on the system board. Replacing the Status Light Board | 63 For additional safety best practices information, see the Regulatory Compliance Homepage at dell.com/ regulatory_compliance. See "Replacing the Display Assembly" on page 15. 5 Replace the battery pack. Postrequsites 1 Replace the display ...assembly. See "Replacing the Compartment Door" on page 60. 2 Replace the keyboard. See "Replacing the Keyboard" on page 11. See "Replacing the Battery Pack" on page 13. 6 Follow the instructions in "Before You Begin" on...
...on the system board. Replacing the Status Light Board | 63 For additional safety best practices information, see the Regulatory Compliance Homepage at dell.com/ regulatory_compliance. See "Replacing the Display Assembly" on page 15. 5 Replace the battery pack. Postrequsites 1 Replace the display ...assembly. See "Replacing the Compartment Door" on page 60. 2 Replace the keyboard. See "Replacing the Keyboard" on page 11. See "Replacing the Battery Pack" on page 13. 6 Follow the instructions in "Before You Begin" on...

Owner's Manual
Page 64
See "Removing the Battery Pack" on page 45. 64 | Removing the Palm Rest Assembly See "Removing the Keyboard" on page 12. 3 Remove the compartment door. 37 Removing the Palm Rest Assembly WARNING: Before working inside your computer and follow the...assembly to the computer base. 1 1 screws (5) 5 Remove the center control cover. For additional safety best practices information, see the Regulatory Compliance Homepage at dell.com/ regulatory_compliance. Prerequsites 1 Remove any installed card or blank from the 9-in "Before You Begin" on page 9. See "Removing the Compartment Door" on...
See "Removing the Battery Pack" on page 45. 64 | Removing the Palm Rest Assembly See "Removing the Keyboard" on page 12. 3 Remove the compartment door. 37 Removing the Palm Rest Assembly WARNING: Before working inside your computer and follow the...assembly to the computer base. 1 1 screws (5) 5 Remove the center control cover. For additional safety best practices information, see the Regulatory Compliance Homepage at dell.com/ regulatory_compliance. Prerequsites 1 Remove any installed card or blank from the 9-in "Before You Begin" on page 9. See "Removing the Compartment Door" on...
Owner's Manual
Page 66
Postrequsites 1 Replace the status light board. See "Replacing the Keyboard" on page 56. 4 Replace the keyboard. See "Replacing the Center Control Cover" on page 44. 6 Turn the computer over and replace the screws that secure the palm rest assembly to the ... "Replacing the Display Assembly" on page 11. 66 | Replacing the Palm Rest Assembly For additional safety best practices information, see the Regulatory Compliance Homepage at dell.com/ regulatory_compliance.
Postrequsites 1 Replace the status light board. See "Replacing the Keyboard" on page 56. 4 Replace the keyboard. See "Replacing the Center Control Cover" on page 44. 6 Turn the computer over and replace the screws that secure the palm rest assembly to the ... "Replacing the Display Assembly" on page 11. 66 | Replacing the Palm Rest Assembly For additional safety best practices information, see the Regulatory Compliance Homepage at dell.com/ regulatory_compliance.


