
Owner's Manual
Page 71
...safety best practices information, see the Regulatory Compliance Homepage at dell.com/regulatory_compliance. See "Removing the Left Side-Panel" on page 45. Removing the Processor Liquid-Cooling Assembly WARNING: Despite having a plastic shield, the processor liquid-cooling assembly may be very hot during normal operation. See "...the PCI Shroud" on page 25. 2 Open the PCI shroud. Ensure that secure the processor liquid-cooling assembly to the chassis. 5 Slide and lift the processor liquid-cooling assembly out of the thermal grease. 1 Press the tab on the CPU pump cable and disconnect...
...safety best practices information, see the Regulatory Compliance Homepage at dell.com/regulatory_compliance. See "Removing the Left Side-Panel" on page 45. Removing the Processor Liquid-Cooling Assembly WARNING: Despite having a plastic shield, the processor liquid-cooling assembly may be very hot during normal operation. See "...the PCI Shroud" on page 25. 2 Open the PCI shroud. Ensure that secure the processor liquid-cooling assembly to the chassis. 5 Slide and lift the processor liquid-cooling assembly out of the thermal grease. 1 Press the tab on the CPU pump cable and disconnect...

Owner's Manual
Page 72
1 2 6 5 3 4 1 screws (4) 3 top lighting-board 5 captive screws (4) 2 processor liquid-cooling assembly 4 CPU-pump cable 6 system-fan cable Replacing the Processor Liquid-Cooling Assembly CAUTION: Incorrect alignment of the processor liquid-cooling assembly can damage the system board and processor. 72 Processor Liquid-Cooling Assembly
1 2 6 5 3 4 1 screws (4) 3 top lighting-board 5 captive screws (4) 2 processor liquid-cooling assembly 4 CPU-pump cable 6 system-fan cable Replacing the Processor Liquid-Cooling Assembly CAUTION: Incorrect alignment of the processor liquid-cooling assembly can damage the system board and processor. 72 Processor Liquid-Cooling Assembly

Owner's Manual
Page 73
...Working Inside Your Computer" on page 46. 2 Replace the left side-panel. 1 Align the screw holes on the processor liquid-cooling assembly with the screw holes on the top lighting-board. NOTE: The original thermal grease can be reused if the original processor and... processor liquid-cooling assembly are reinstalled together. Postrequisites 1 Close the PCI shroud. Processor Liquid-Cooling Assembly 73 See "Closing the PCI Shroud" on page 15. See "Replacing the Left Side-Panel" ...
...Working Inside Your Computer" on page 46. 2 Replace the left side-panel. 1 Align the screw holes on the processor liquid-cooling assembly with the screw holes on the top lighting-board. NOTE: The original thermal grease can be reused if the original processor and... processor liquid-cooling assembly are reinstalled together. Postrequisites 1 Close the PCI shroud. Processor Liquid-Cooling Assembly 73 See "Closing the PCI Shroud" on page 15. See "Replacing the Left Side-Panel" ...

Owner's Manual
Page 74
74 Processor Liquid-Cooling Assembly
74 Processor Liquid-Cooling Assembly

Owner's Manual
Page 75
...dell.com/regulatory_compliance. Ensure that shipped with your computer and follow the steps in "Before You Begin" on page 13. Removing the Processor 1 Press down and push the release lever away from the processor to cool before you touch it from the securing tab. WARNING: Despite having a plastic shield, the processor liquid-cooling... assembly may be very hot during normal operation. See "Removing the Processor Liquid-Cooling Assembly" on page 25. Prerequisites 1 Remove the left side-panel. ...
...dell.com/regulatory_compliance. Ensure that shipped with your computer and follow the steps in "Before You Begin" on page 13. Removing the Processor 1 Press down and push the release lever away from the processor to cool before you touch it from the securing tab. WARNING: Despite having a plastic shield, the processor liquid-cooling... assembly may be very hot during normal operation. See "Removing the Processor Liquid-Cooling Assembly" on page 25. Prerequisites 1 Remove the left side-panel. ...

Owner's Manual
Page 80
See "Replacing the Processor Liquid-Cooling Assembly" on page 15. 80 Processor See "Replacing the Left Side-Panel" on page 27. 3 Follow the steps in "After Working Inside Your Computer" on page 72. 2 Replace the left side-panel. 1 2 4 3 1 securing tabs 3 release levers 2 processor cover 4 processor Postrequisites 1 Replace the processor liquid-cooling assembly.
See "Replacing the Processor Liquid-Cooling Assembly" on page 15. 80 Processor See "Replacing the Left Side-Panel" on page 27. 3 Follow the steps in "After Working Inside Your Computer" on page 72. 2 Replace the left side-panel. 1 2 4 3 1 securing tabs 3 release levers 2 processor cover 4 processor Postrequisites 1 Replace the processor liquid-cooling assembly.

Owner's Manual
Page 95
...board assembly. System-Board Assembly 95 For additional safety best practices information, see the Regulatory Compliance Homepage at dell.com/regulatory_compliance. See "Removing the Graphics Card" on page 63. 7 Remove the processor liquid-cooling assembly. See "Removing the PCI-Express x1 Card" on page 71. 8 Remove the processor. See ..."Removing the Processor Liquid-Cooling Assembly" on page 49. 5 Remove the coin-cell battery. You must enter the service tag in the system board. Prerequisites 1 Remove...
...board assembly. System-Board Assembly 95 For additional safety best practices information, see the Regulatory Compliance Homepage at dell.com/regulatory_compliance. See "Removing the Graphics Card" on page 63. 7 Remove the processor liquid-cooling assembly. See "Removing the PCI-Express x1 Card" on page 71. 8 Remove the processor. See ..."Removing the Processor Liquid-Cooling Assembly" on page 49. 5 Remove the coin-cell battery. You must enter the service tag in the system board. Prerequisites 1 Remove...

Owner's Manual
Page 97
See "Replacing the PCI-Express x1 Card" on page 72. 3 Replace the memory module(s). See "Replacing the Processor Liquid-Cooling Assembly" on page 50. 6 Replace the graphics card. System-Board Assembly 97 See "Replacing the Coin-Cell Battery" on page 68. 9 ...assembly. See "Replacing the Processor" on page 64. 4 Replace the coin-cell battery. See "Replacing Memory Module(s)" on page 78. 2 Replace the processor liquid-cooling assembly. See "Closing the PCI Shroud" on page 20. NOTE: For information on system board connectors, see "System-Board Components" on page 46. 8 Replace...
See "Replacing the PCI-Express x1 Card" on page 72. 3 Replace the memory module(s). See "Replacing the Processor Liquid-Cooling Assembly" on page 50. 6 Replace the graphics card. System-Board Assembly 97 See "Replacing the Coin-Cell Battery" on page 68. 9 ...assembly. See "Replacing the Processor" on page 64. 4 Replace the coin-cell battery. See "Replacing Memory Module(s)" on page 78. 2 Replace the processor liquid-cooling assembly. See "Closing the PCI Shroud" on page 20. NOTE: For information on system board connectors, see "System-Board Components" on page 46. 8 Replace...
Owner's Manual
Page 133
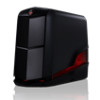
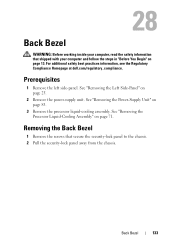
See "Removing the Processor Liquid-Cooling Assembly" on page 83. 3 Remove the processor liquid-cooling assembly. Back Bezel 133 For additional safety best practices information, see the Regulatory Compliance Homepage at dell.com/regulatory_compliance. See "Removing the Power-Supply Unit" on page 71. 28 Back Bezel WARNING: Before working inside your computer, read the safety information...
See "Removing the Processor Liquid-Cooling Assembly" on page 83. 3 Remove the processor liquid-cooling assembly. Back Bezel 133 For additional safety best practices information, see the Regulatory Compliance Homepage at dell.com/regulatory_compliance. See "Removing the Power-Supply Unit" on page 71. 28 Back Bezel WARNING: Before working inside your computer, read the safety information...
Owner's Manual
Page 136
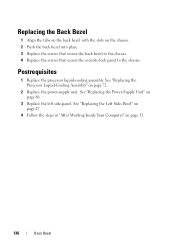
...Back Bezel 1 Align the tabs on the back bezel with the slots on page 86. 3 Replace the left side-panel. Postrequisites 1 Replace the processor liquid-cooling assembly. See "Replacing the Power-Supply Unit" on the chassis. 2 Push the back bezel into place. 3 Replace the screws that secure the back bezel... to the chassis. 4 Replace the screws that secure the security-lock panel to the chassis. See "Replacing the Processor Liquid-Cooling Assembly" on page 15. 136 Back Bezel See "Replacing the Left Side-Panel" on page 27. 4 Follow the steps in "After Working Inside...
...Back Bezel 1 Align the tabs on the back bezel with the slots on page 86. 3 Replace the left side-panel. Postrequisites 1 Replace the processor liquid-cooling assembly. See "Replacing the Power-Supply Unit" on the chassis. 2 Push the back bezel into place. 3 Replace the screws that secure the back bezel... to the chassis. 4 Replace the screws that secure the security-lock panel to the chassis. See "Replacing the Processor Liquid-Cooling Assembly" on page 15. 136 Back Bezel See "Replacing the Left Side-Panel" on page 27. 4 Follow the steps in "After Working Inside...


