

Handling swollen Lithium-ion batteries
Page 1
... from the system. One type of the laptop. We recommend contacting Dell product support for options to malfunction, discontinue the use lithium-ion batteries. To discharge the battery, unplug the AC adapter from Dell. 1 Handling swollen Lithium-ion batteries Current Release Version: A05 Release Date: 2020-06-11 Previous Release Version: A04 Like most laptops...
... from the system. One type of the laptop. We recommend contacting Dell product support for options to malfunction, discontinue the use lithium-ion batteries. To discharge the battery, unplug the AC adapter from Dell. 1 Handling swollen Lithium-ion batteries Current Release Version: A05 Release Date: 2020-06-11 Previous Release Version: A04 Like most laptops...

Handling swollen Lithium-ion batteries
Page 2
Lithium-ion batteries can swell for various reasons such as age, number of the issue, see Dell Laptop Battery - Frequently Asked Questions. 2 For more information on how to improve the performance and lifespan of the laptop battery and to minimize the possibility of occurrence of charge cycles, or exposure to high heat.
Lithium-ion batteries can swell for various reasons such as age, number of the issue, see Dell Laptop Battery - Frequently Asked Questions. 2 For more information on how to improve the performance and lifespan of the laptop battery and to minimize the possibility of occurrence of charge cycles, or exposure to high heat.
Service Manual
Page 4
... computer base...26 Prerequisites...26 Procedure...26 16 Replacing the computer base...28 Procedure...28 Post-requisites...28 17 Removing the coin-cell battery...29 Prerequisites...29 Procedure...29 18 Replacing the coin-cell battery...30 Procedure...30 Post-requisites...30 19 Removing the speakers...31 Prerequisites...31 Procedure...31 20 Replacing the...
... computer base...26 Prerequisites...26 Procedure...26 16 Replacing the computer base...28 Procedure...28 Post-requisites...28 17 Removing the coin-cell battery...29 Prerequisites...29 Procedure...29 18 Replacing the coin-cell battery...30 Procedure...30 Post-requisites...30 19 Removing the speakers...31 Prerequisites...31 Procedure...31 20 Replacing the...
Service Manual
Page 6
... Prerequisites...51 Procedure...51 36 Replacing the battery...52 Procedure...52 Post-requisites...52 37 Removing the touchpad...53 Prerequisites...53 Procedure...53 38 Replacing the touchpad...54 Procedure...54 Post-requisites...55 ...
... Prerequisites...51 Procedure...51 36 Replacing the battery...52 Procedure...52 Post-requisites...52 37 Removing the touchpad...53 Prerequisites...53 Procedure...53 38 Replacing the touchpad...54 Procedure...54 Post-requisites...55 ...

Service Manual
Page 10
Screw list Component Base cover Secured to Palm-rest assembly Screw type M2.5x13 Battery Computer base Palm-rest assembly Palm-rest assembly Display assembly Hard-drive assembly Hard-drive bracket Heat-sink assembly I/O board Keyboard bracket Power-adapter port ... M2.5x8 M2.5x5 M2.5x5 M3x3 M2x3 M2.5x5 M2x3 M2x3 M2x3 M2.5x7 M2x3 M2x2 M2.5x5 M2x3 M2.5x5 M2x3 Quantity 6 4 14 6 4 4 7 2 17 1 2 2 1 2 7 5 2 1 Screw image 10 Screw list Table 1.
Screw list Component Base cover Secured to Palm-rest assembly Screw type M2.5x13 Battery Computer base Palm-rest assembly Palm-rest assembly Display assembly Hard-drive assembly Hard-drive bracket Heat-sink assembly I/O board Keyboard bracket Power-adapter port ... M2.5x8 M2.5x5 M2.5x5 M3x3 M2x3 M2.5x5 M2x3 M2x3 M2x3 M2.5x7 M2x3 M2x2 M2.5x5 M2x3 M2.5x5 M2x3 Quantity 6 4 14 6 4 4 7 2 17 1 2 2 1 2 7 5 2 1 Screw image 10 Screw list Table 1.

Service Manual
Page 12
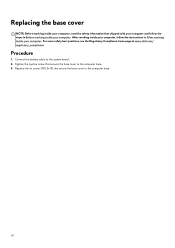
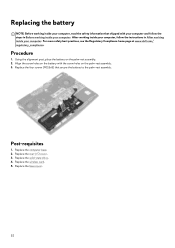
...base cover from the system board. 12 After working inside your computer, follow the steps in After working inside your computer. Procedure 1. Disconnect the battery cable from the gap around the captive screw to open a gap between the two parts. 3. For more safety best practices, see the Regulatory... Compliance home page at www.dell.com/ regulatory_compliance. Lift the base cover off the computer base. 5. Remove the six screws (M2.5x13) that secure the base cover to the...
...base cover from the system board. 12 After working inside your computer, follow the steps in After working inside your computer. Procedure 1. Disconnect the battery cable from the gap around the captive screw to open a gap between the two parts. 3. For more safety best practices, see the Regulatory... Compliance home page at www.dell.com/ regulatory_compliance. Lift the base cover off the computer base. 5. Remove the six screws (M2.5x13) that secure the base cover to the...
Service Manual
Page 14
... shipped with your computer and follow the instructions in Before working inside your computer. Connect the battery cable to the computer base. 14 For more safety best practices, see the Regulatory Compliance home page at www.dell.com/ regulatory_compliance. Replace the six screws (M2.5x13) that secure the base cover to the...
... shipped with your computer and follow the instructions in Before working inside your computer. Connect the battery cable to the computer base. 14 For more safety best practices, see the Regulatory Compliance home page at www.dell.com/ regulatory_compliance. Replace the six screws (M2.5x13) that secure the base cover to the...

Service Manual
Page 29
...For more safety best practices, see the Regulatory Compliance home page at www.dell.com/ regulatory_compliance. Peel off the tape that secures the coin-cell battery to default. Gently peel off the coin-cell battery along with your computer and follow the instructions in Before working inside your... computer. Remove the rear-I/O cover. 5. Remove the wireless card. 3. Removing the coin-cell battery NOTE: Before working inside your computer, read the safety information that shipped with its cable off the palm-rest assembly. 29 Note ...
...For more safety best practices, see the Regulatory Compliance home page at www.dell.com/ regulatory_compliance. Peel off the tape that secures the coin-cell battery to default. Gently peel off the coin-cell battery along with your computer and follow the instructions in Before working inside your... computer. Remove the rear-I/O cover. 5. Remove the wireless card. 3. Removing the coin-cell battery NOTE: Before working inside your computer, read the safety information that shipped with its cable off the palm-rest assembly. 29 Note ...

Service Manual
Page 30
...battery NOTE: Before working inside your computer, read the safety information that shipped with your computer and follow the instructions in Before working inside your computer. Procedure 1. Route the coin-cell battery... cable through the routing guide and adhere the tape that secures the coin-cell battery to the system board. Replace the solid...steps in After working inside your computer. Adhere the coin-cell battery to the system board. 4. Connect the coin-cell battery cable to the palm-rest assembly. 2. Replace the wireless card...
...battery NOTE: Before working inside your computer, read the safety information that shipped with your computer and follow the instructions in Before working inside your computer. Procedure 1. Route the coin-cell battery... cable through the routing guide and adhere the tape that secures the coin-cell battery to the system board. Replace the solid...steps in After working inside your computer. Adhere the coin-cell battery to the system board. 4. Connect the coin-cell battery cable to the palm-rest assembly. 2. Replace the wireless card...

Service Manual
Page 39
...disconnect the touch-pad cable from the system board. 18. Peel the tape that secure the system-board assembly to the I /O board. 17. Disconnect the coin-cell battery cable from the system board. 12. Disconnect the speaker cable from the system board. 9. Lift the system-board assembly off the system board... assembly. 21. Disconnect the power-adapter port cable from the system board. 13. Remove the screw (M2.5x5) that secures the coin-cell battery cable to the system board and lift the USB Type-C port bracket off the palm-rest assembly. 39 Peel off the tape that secures the...
...disconnect the touch-pad cable from the system board. 18. Peel the tape that secure the system-board assembly to the I /O board. 17. Disconnect the coin-cell battery cable from the system board. 12. Disconnect the speaker cable from the system board. 9. Lift the system-board assembly off the system board... assembly. 21. Disconnect the power-adapter port cable from the system board. 13. Remove the screw (M2.5x5) that secures the coin-cell battery cable to the system board and lift the USB Type-C port bracket off the palm-rest assembly. 39 Peel off the tape that secures the...
Service Manual
Page 41
... secures the USB Type-C port bracket to the system board. Connect the macro-keys cable, speaker cable, power-adapter port cable, and coin-cell battery cable to secure the cable. 12. Slide the display cable into the connector on the I /O board. 8. Post-requisites 1. Replace the memory ..., follow the steps in Before working inside your computer. For more safety best practices, see the Regulatory Compliance home page at www.dell.com/ regulatory_compliance. Slide the touch-pad cable into their connectors and press down the latches to the palm-rest assembly. 4. Replacing ...
... secures the USB Type-C port bracket to the system board. Connect the macro-keys cable, speaker cable, power-adapter port cable, and coin-cell battery cable to secure the cable. 12. Slide the display cable into the connector on the I /O board. 8. Post-requisites 1. Replace the memory ..., follow the steps in Before working inside your computer. For more safety best practices, see the Regulatory Compliance home page at www.dell.com/ regulatory_compliance. Slide the touch-pad cable into their connectors and press down the latches to the palm-rest assembly. 4. Replacing ...

Service Manual
Page 51
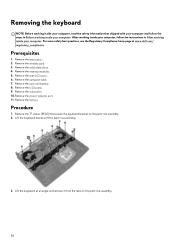
...M2.5x5) that shipped with its cable, off the palm-rest assembly. 51 Remove the solid-state drive. 4. Lift the battery, along with your computer and follow the instructions in Before working inside your computer. For more safety best practices, see the Regulatory... Compliance home page at www.dell.com/ regulatory_compliance. Remove the rear-I/O cover. 5. Prerequisites 1. Removing the battery NOTE: Before working inside your computer, read the safety information that secure the battery to the palm-rest assembly. 2. After working inside your ...
...M2.5x5) that shipped with its cable, off the palm-rest assembly. 51 Remove the solid-state drive. 4. Lift the battery, along with your computer and follow the instructions in Before working inside your computer. For more safety best practices, see the Regulatory... Compliance home page at www.dell.com/ regulatory_compliance. Remove the rear-I/O cover. 5. Prerequisites 1. Removing the battery NOTE: Before working inside your computer, read the safety information that secure the battery to the palm-rest assembly. 2. After working inside your ...
Service Manual
Page 52
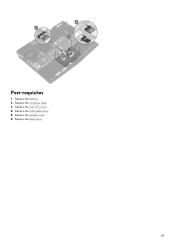
... in After working inside your computer. For more safety best practices, see the Regulatory Compliance home page at www.dell.com/ regulatory_compliance. Procedure 1. Using the alignment post, place the battery on the palm-rest assembly. 3. Post-requisites 1. Replace the base cover. 52 Replace the wireless card. 5.... with the screw holes on the palm-rest assembly. 2. Replace the solid-state drive. 4. Align the screw holes on the battery with your computer and follow the instructions in Before working inside your computer. Replace the computer base. 2. Replacing the...
... in After working inside your computer. For more safety best practices, see the Regulatory Compliance home page at www.dell.com/ regulatory_compliance. Procedure 1. Using the alignment post, place the battery on the palm-rest assembly. 3. Post-requisites 1. Replace the base cover. 52 Replace the wireless card. 5.... with the screw holes on the palm-rest assembly. 2. Replace the solid-state drive. 4. Align the screw holes on the battery with your computer and follow the instructions in Before working inside your computer. Replace the computer base. 2. Replacing the...

Service Manual
Page 53
... the touchpad bracket to the palm-rest assembly. 4. For more safety best practices, see the Regulatory Compliance home page at www.dell.com/ regulatory_compliance. Remove the computer base. 6. Prerequisites 1. Remove the base cover. 2. Procedure 1. Lift the touchpad bracket off the ...palm-rest assembly. 53 Remove the battery. Remove the five screws (M2x3) that shipped with your computer and follow the instructions in Before working inside your computer. After working...
... the touchpad bracket to the palm-rest assembly. 4. For more safety best practices, see the Regulatory Compliance home page at www.dell.com/ regulatory_compliance. Remove the computer base. 6. Prerequisites 1. Remove the base cover. 2. Procedure 1. Lift the touchpad bracket off the ...palm-rest assembly. 53 Remove the battery. Remove the five screws (M2x3) that shipped with your computer and follow the instructions in Before working inside your computer. After working...
Service Manual
Page 55
Post-requisites 1. Replace the solid-state drive. 5. Replace the base cover. 55 Replace the wireless card. 6. Replace the battery. 2. Replace the rear-I/O cover. 4. Replace the computer base. 3.
Post-requisites 1. Replace the solid-state drive. 5. Replace the base cover. 55 Replace the wireless card. 6. Replace the battery. 2. Replace the rear-I/O cover. 4. Replace the computer base. 3.
Service Manual
Page 56
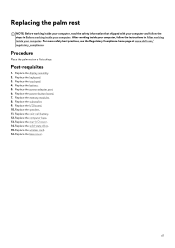
... 3. Remove the coin-cell battery. 8. Lift the keyboard bracket off the palm-rest assembly. 3. Remove the power-adapter port. 11. Lift the keyboard at www.dell.com/ regulatory_compliance. Remove the ...subwoofer. 10. Remove the memory modules. 5. Remove the rear-I /O board. 9. Removing the keyboard NOTE: Before working inside your computer, read the safety information that secure the keyboard bracket to the palm-rest assembly. 2. Prerequisites 1. Remove the I /O cover. 6. Remove the battery. Procedure 1. Remove the 17...
... 3. Remove the coin-cell battery. 8. Lift the keyboard bracket off the palm-rest assembly. 3. Remove the power-adapter port. 11. Lift the keyboard at www.dell.com/ regulatory_compliance. Remove the ...subwoofer. 10. Remove the memory modules. 5. Remove the rear-I /O board. 9. Removing the keyboard NOTE: Before working inside your computer, read the safety information that secure the keyboard bracket to the palm-rest assembly. 2. Prerequisites 1. Remove the I /O cover. 6. Remove the battery. Procedure 1. Remove the 17...

Service Manual
Page 59
Replace the I /O cover. 8. Replace the coin-cell battery. 6. Replace the power-adapter port. 3. Replace the memory modules. 9. Replace the subwoofer. 4. Replace the rear-I /O board. 5. Replace the computer base. 7. Replace the wireless card. 11. Post-requisites 1. Replace the battery. 2. Replace the solid-state drive. 10. Replace the base cover. 59
Replace the I /O cover. 8. Replace the coin-cell battery. 6. Replace the power-adapter port. 3. Replace the memory modules. 9. Replace the subwoofer. 4. Replace the rear-I /O board. 5. Replace the computer base. 7. Replace the wireless card. 11. Post-requisites 1. Replace the battery. 2. Replace the solid-state drive. 10. Replace the base cover. 59

Service Manual
Page 60
... computer, follow the steps in After working inside your computer. Remove the coin-cell battery. 7. Remove the subwoofer. 10. Remove the keyboard. 16. Remove the wireless card. 3. Remove the battery. 14. Remove the computer base. 6. For more safety best practices, see the ...Regulatory Compliance home page at www.dell.com/ regulatory_compliance. Remove the power-button board. 12. Procedure After performing all...
... computer, follow the steps in After working inside your computer. Remove the coin-cell battery. 7. Remove the subwoofer. 10. Remove the keyboard. 16. Remove the wireless card. 3. Remove the battery. 14. Remove the computer base. 6. For more safety best practices, see the ...Regulatory Compliance home page at www.dell.com/ regulatory_compliance. Remove the power-button board. 12. Procedure After performing all...
Service Manual
Page 61
.... 15. For more safety best practices, see the Regulatory Compliance home page at www.dell.com/ regulatory_compliance. Replace the power-adapter port. 6. Replace the memory modules. 8. Replace the coin-cell battery. 12. Replace the touchpad. 4. Replace the base cover. 61 Replace the keyboard....working inside your computer. Replace the I /O cover. 14. Replace the display assembly. 2. Replace the computer base. 13. Replace the battery. 5. Post-requisites 1. Replace the wireless card. 16. Replacing the palm rest NOTE: Before working inside your computer, read the safety ...
.... 15. For more safety best practices, see the Regulatory Compliance home page at www.dell.com/ regulatory_compliance. Replace the power-adapter port. 6. Replace the memory modules. 8. Replace the coin-cell battery. 12. Replace the touchpad. 4. Replace the base cover. 61 Replace the keyboard....working inside your computer. Replace the I /O cover. 14. Replace the display assembly. 2. Replace the computer base. 13. Replace the battery. 5. Post-requisites 1. Replace the wireless card. 16. Replacing the palm rest NOTE: Before working inside your computer, read the safety ...

Service Manual
Page 78
For more safety best practices, see the Regulatory Compliance home page at www.dell.com/ regulatory_compliance. Remove the solid-state drive. 4. Remove the display panel. 13. Procedure 1. Remove the camera. 11. Peel off the display cable, logo-board...assembly. 9. After performing all the above steps, you are left with your computer and follow the instructions in Before working inside your computer. Remove the battery. 7. Remove the logo board. 12. Remove the display hinges. Removing the display back-cover and antenna assembly NOTE: Before working inside your computer, ...
For more safety best practices, see the Regulatory Compliance home page at www.dell.com/ regulatory_compliance. Remove the solid-state drive. 4. Remove the display panel. 13. Procedure 1. Remove the camera. 11. Peel off the display cable, logo-board...assembly. 9. After performing all the above steps, you are left with your computer and follow the instructions in Before working inside your computer. Remove the battery. 7. Remove the logo board. 12. Remove the display hinges. Removing the display back-cover and antenna assembly NOTE: Before working inside your computer, ...


