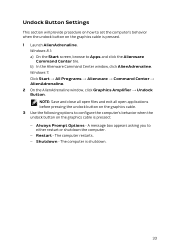
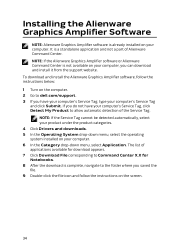
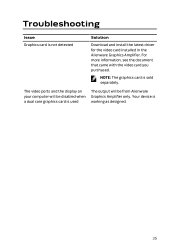
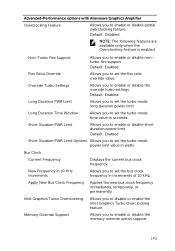
Alienware Graphics Amplifier Users Guide
Page 1
Alienware Graphics Amplifier User's Guide Regulatory Model: Z01G Regulatory Type: Z01G001
Alienware Graphics Amplifier Users Guide
Page 3
... Inside Your Alienware Graphics Amplifier 5 Before You Begin 5 Safety Instructions 5 Recommended Tools 6 After Working Inside Your Alienware Graphics Amplifier 7 Views 8 Front View...8 Back View...9 Graphics Cable 10 Specifications 11 Using the Alienware Graphics Amplifier 13 Installing the Graphics Card 14 Removing the Graphics Card 21 Setting Up Your Alienware Graphics Amplifier......27 Computer is Turned On 29 Disconnecting Alienware Graphics Amplifier..........31 Alternate Methods to Disconnect Alienware Graphics Amplifier 32 Using...
Alienware Graphics Amplifier Users Guide
Page 5
... screws before opening the device cover or panels. CAUTION: To avoid damaging the device, make sure that ships with your device. Before Working Inside Your Alienware Graphics Amplifier CAUTION: To avoid damaging the components and cards, handle them by their electrical outlets. 2 Disconnect all cables such as telephone cables, network cables and so... Instructions Use the following safety guidelines to the power source. After you ordered. For more safety best practices, see the Regulatory Compliance home page at dell.com/regulatory_compliance.
Alienware Graphics Amplifier Users Guide
Page 7
After Working Inside Your Alienware Graphics Amplifier CAUTION: Leaving stray or loose screws inside your device may severely damage your device. 1 Replace all screws and make sure that no stray screws remain inside your device. 2 Connect any external devices, peripherals, and cables you removed before working on your device. 3 Replace any media cards, discs, and any other part(s) that you removed before working on your device. 4 Connect your device and all attached devices to their electrical outlets. 5 Turn on your device. 7
Alienware Graphics Amplifier Users Guide
Page 8
Views This chapter lists out the features available on your Alienware Graphics Amplifier. Front View 1 AlienHead/Docking status light 2 Service Tag/Regulatory labels 8
Alienware Graphics Amplifier Users Guide
Page 13
Hold the graphics card at its edges. 13 Using the Alienware Graphics Amplifier This section will provide procedures on how to install and uninstall the Graphics card. WARNING: Disconnect all cables before working inside your device. CAUTION: Handle the components with care.
Alienware Graphics Amplifier Users Guide
Page 27
Setting Up Your Alienware Graphics Amplifier 1 Install the graphics card. See "Installing the Graphics Card". 2 Connect the power cable to the power port on the Alienware graphics amplifier. 1 power port 2 power cable 27
Alienware Graphics Amplifier Users Guide
Page 28
3 NOTE: It is recommended to shut down the computer and connect the Graphics cable from the Alienware Graphics Amplifier to your computer and then powering on the computer to the external graphics port on the Alienware graphics amplifier. 1 external graphics port 3 graphics cable 2 release clips (2) 28 Press the release clips and connect one end of the graphics cable to dock with the graphics amplifier.
Alienware Graphics Amplifier Users Guide
Page 29
The light on the graphics cable turns on your computer before you connect the graphics cable. 4 NOTE: Shut down your computer. NOTE: If required, connect the display to use. Press the release clips and connect the other end of the graphics cable to the external graphics port on indicating the Alienware Graphics Amplifier is connected and ready to the Alienware graphics amplifier. 1 external graphics port 3 release clips 2 graphics cable Computer is Turned On 1 Save and close all open files and exit all open applications. 29
Alienware Graphics Amplifier Users Guide
Page 30
.... 3 Click YES to restart the computer. NOTE: The light on the graphics cable turns on your computer. 2 Connect the graphics cable from the Alienware Graphics Amplifier to the external graphics port on after the computer restarts. 30 NOTE: For the location of the external graphics port, see the documentation that shipped with your computer. NOTE: The AlienHead...
Alienware Graphics Amplifier Users Guide
Page 31
Disconnecting Alienware Graphics Amplifier CAUTION: Do not disconnect the graphics cable until the computer has shut down and the light on the graphics cable has turned off. 3 After the light on the graphics cable has turned off, press the release clips on the graphics cable to disconnect it from the external graphics port on the graphics cable has turned off...
Alienware Graphics Amplifier Users Guide
Page 32
... has turned off . 4 After the light on the graphics cable. CAUTION: Do not disconnect the graphics cable until the computer has shut down and the light on the graphics cable has turned off . Select SHUTDOWN. Alternate Methods to Disconnect Alienware Graphics Amplifier CAUTION: Do not disconnect the graphics cable until the computer has shut down and the...
Alienware Graphics Amplifier Users Guide
Page 33
... Center window, click AlienAdrenaline. A message box appears asking you to Apps and click the Alienware Command Center tile. The computer restarts. - Windows 7: Click Start → All Programs → Alienware → Command Center → AlienAdrenaline. 2 On the AlienAdrenaline window, click Graphics Amplifier → Undock Button. Shutdown - NOTE: Save and close all open files and exit...
Alienware Graphics Amplifier Users Guide
Page 34
... computer. 2 Go to Command Center X.X for download appears. 7 Click Download File corresponding to dell.com/support. 3 If you do not have your computer's Service Tag, type your computer's Service Tag and click Submit. Installing the Alienware Graphics Amplifier Software NOTE: Alienware Graphics Amplifier software is not available on your computer, you can download and install it from...
Alienware Graphics Amplifier Users Guide
Page 35
Your device is used The output will be from Alienware Graphics Amplifier only. The video ports and the display on your computer will be disabled when a dual core graphics card is working as designed. 35 Troubleshooting Issue Graphics card is sold separately. NOTE: The graphics card is not detected Solution Download and install the latest driver for the video card installed in the Alienware Graphics Amplifier. For more information, see the document that came with the video card you purchased.
Service Manual
Page 143
Advanced-Performance options with Alienware Graphics Amplifier Overclocking Feature Allows you to enable or disable the override turbo settings. Allows you to set the turbo mode time value in watts. Long Duration...Frequency Displays the current bus clock frequency. Applies the new bus clock frequency immediately, temporarily, or permanently. Intel Graphics Turbo Overclocking Memory Override Support Allows you to disable or enable the Intel Graphics Turbo Overclocking feature. Short Duration PWR Limit Allows you to enable or disable short duration power limit. Default: ...
Service Manual
Page 144
... Tag is present. The administrator password controls access to the computer at boot. Default: Not set NOTE: The password is unlocked. Advanced-Performance options with Alienware Graphics Amplifier Default: Disabled Security Unlock Setup Status Admin Password Status System password Status HDD password Status Service Tag Admin Password System Password HDD password Displays if...