
Manual
Page 18
This light automatically turns off , as the light is turned on the light to view the back panel connectors. NOTE: In Alienware Aurora Standard, the back light will function even when the computer is turned off after a few seconds. In Alienware Aurora ALX, the back light will function only when the computer is powered by internal batteries. 18 CHAPTER 2: GETTING TO KNOW YOUR DESKTOP Back Light Button Press the back light button to turn on .
This light automatically turns off , as the light is turned on the light to view the back panel connectors. NOTE: In Alienware Aurora Standard, the back light will function even when the computer is turned off after a few seconds. In Alienware Aurora ALX, the back light will function only when the computer is powered by internal batteries. 18 CHAPTER 2: GETTING TO KNOW YOUR DESKTOP Back Light Button Press the back light button to turn on .

Manual
Page 19
... audio conversion process (available on page 59. 1 Optical S/PDIF connector - NOTE: For information on audio connectors, see "Specifications" on Aurora and Aurora ALX only). 2 eSATA connector - For details, see "Connecting External Speakers" on Aurora and Aurora ALX only). Connect to amplifiers, speakers, or TVs for digital audio output through coaxial digital cables. This format carries an...
... audio conversion process (available on page 59. 1 Optical S/PDIF connector - NOTE: For information on audio connectors, see "Specifications" on Aurora and Aurora ALX only). 2 eSATA connector - For details, see "Connecting External Speakers" on Aurora and Aurora ALX only). Connect to amplifiers, speakers, or TVs for digital audio output through coaxial digital cables. This format carries an...

Manual
Page 22
..., or is either turned off when pressed. Connect to headphones. Connects to USB devices, such as digital video cameras. 4 Power button - Turns the computer on Aurora and Aurora ALX only) at the back of the button rim indicates the power status. • Off -
..., or is either turned off when pressed. Connect to headphones. Connects to USB devices, such as digital video cameras. 4 Power button - Turns the computer on Aurora and Aurora ALX only) at the back of the button rim indicates the power status. • Off -

Manual
Page 27
...more information, see the help file of the utility. For more information on Aurora and Aurora ALX only), that allow you to optimize your computer. Performance Tuning Using System Setup...your computer's performance. CAUTION: Technical support verifies the full functionality of applications. Alienware does not provide technical support for any hardware or software issues arising from operating... the computer beyond the preset settings in resource intensive applications including gaming and multimedia development. CHAPTER 4: USING YOUR DESKTOP 27 Doing so may have...
...more information, see the help file of the utility. For more information on Aurora and Aurora ALX only), that allow you to optimize your computer. Performance Tuning Using System Setup...your computer's performance. CAUTION: Technical support verifies the full functionality of applications. Alienware does not provide technical support for any hardware or software issues arising from operating... the computer beyond the preset settings in resource intensive applications including gaming and multimedia development. CHAPTER 4: USING YOUR DESKTOP 27 Doing so may have...

Manual
Page 29
...in the computer. System Setup Options NOTE: The items listed in this section may or may not appear exactly as listed depending on Aurora and Aurora ALX only) Displays the QPI speed. System Information Current (QPI) Speed Cache L2 Cache L3 (available on your computer model and installed... 3 SATA 4 SATA 5 SATA 6 Displays the current time. NOTE: For the updated system setup information, see the Service Manual at support.dell.com/manuals. Displays the BIOS version number and date information. Displays the type of memory installed on the computer. Displays the processor L3 cache size...
...in the computer. System Setup Options NOTE: The items listed in this section may or may not appear exactly as listed depending on Aurora and Aurora ALX only) Displays the QPI speed. System Information Current (QPI) Speed Cache L2 Cache L3 (available on your computer model and installed... 3 SATA 4 SATA 5 SATA 6 Displays the current time. NOTE: For the updated system setup information, see the Service Manual at support.dell.com/manuals. Displays the BIOS version number and date information. Displays the type of memory installed on the computer. Displays the processor L3 cache size...
Manual
Page 31
... Sets the system to wake up at a certain time. Integrated Devices Configure SATA#1-6 as (available on Aurora and Aurora ALX only)/ SATA Mode (available on Aurora-R2 only) Allows you to enable or disable the integrated USB controller. Allows you to enable or disable... on Aurora and Aurora ALX only)/ Onboard LAN Controller (available on Aurora-R2 only) LAN1 Option ROM (available on Aurora and Aurora ALX only)/ Onboard LAN Boot ROM (available on Aurora-R2 only) SiL3132 E-Sata Device (available on Aurora and Aurora ALX only)/ JMicron-362 E-SATA Device (available on Aurora-R2 ...
... Sets the system to wake up at a certain time. Integrated Devices Configure SATA#1-6 as (available on Aurora and Aurora ALX only)/ SATA Mode (available on Aurora-R2 only) Allows you to enable or disable the integrated USB controller. Allows you to enable or disable... on Aurora and Aurora ALX only)/ Onboard LAN Controller (available on Aurora-R2 only) LAN1 Option ROM (available on Aurora and Aurora ALX only)/ Onboard LAN Boot ROM (available on Aurora-R2 only) SiL3132 E-Sata Device (available on Aurora and Aurora ALX only)/ JMicron-362 E-SATA Device (available on Aurora-R2 ...

Manual
Page 33
Adjust PCI Frequency (MHz) (available on Aurora and Aurora ALX only) Limit ratio for cores 1-4 (XE processors only). Overclock Configuration Submenu Turbo Mode TDC Limit Override Turbo Mode TDP Limit Override Allows you to program ... thresholds for the processor while in Manual Mode). Allows you to run at faster frequencies than marked. [1-4] Core CPU Turbo Ratio Limit (available on Aurora and Aurora ALX only) Allows you to adjust PCI frequency. Intel® TurboMode tech If enabled, allows processor to program the power thresholds for the processor while in...
Adjust PCI Frequency (MHz) (available on Aurora and Aurora ALX only) Limit ratio for cores 1-4 (XE processors only). Overclock Configuration Submenu Turbo Mode TDC Limit Override Turbo Mode TDP Limit Override Allows you to program ... thresholds for the processor while in Manual Mode). Allows you to run at faster frequencies than marked. [1-4] Core CPU Turbo Ratio Limit (available on Aurora and Aurora ALX only) Allows you to adjust PCI frequency. Intel® TurboMode tech If enabled, allows processor to program the power thresholds for the processor while in...

Manual
Page 38
... REPLACEMENT COMPONENTS 1 release panel 3 latch 4 2 security cable slot 4 side panel Lift the release panel to unlock the release panel. 3. NOTE: Theater lighting (available only on Alienware Aurora ALX) turns on page 36. To remove the side panel: 1. NOTE: Ensure that you remove the security cable from your desktop. Slide the latch to the...
... REPLACEMENT COMPONENTS 1 release panel 3 latch 4 2 security cable slot 4 side panel Lift the release panel to unlock the release panel. 3. NOTE: Theater lighting (available only on Alienware Aurora ALX) turns on page 36. To remove the side panel: 1. NOTE: Ensure that you remove the security cable from your desktop. Slide the latch to the...

Manual
Page 40
To replace memory module(s): Aurora/Aurora ALX Aurora-R2 Recommended memory configuration: Type 1066 MHz and I333 MHz DDR3 1600 MHz XMP Slots Slots 1, 3, and 5 or slots 1 - 6 Slots 1, 3, and 5 40 CHAPTER 5: INSTALLING ADDITIONAL OR REPLACEMENT COMPONENTS Recommended memory configuration: Type 1066 MHz and I333 MHz DDR3 Slots Slots 1 and 2 or slots 1 - 4
To replace memory module(s): Aurora/Aurora ALX Aurora-R2 Recommended memory configuration: Type 1066 MHz and I333 MHz DDR3 1600 MHz XMP Slots Slots 1, 3, and 5 or slots 1 - 6 Slots 1, 3, and 5 40 CHAPTER 5: INSTALLING ADDITIONAL OR REPLACEMENT COMPONENTS Recommended memory configuration: Type 1066 MHz and I333 MHz DDR3 Slots Slots 1 and 2 or slots 1 - 4

Manual
Page 60
Computer Model Alienware Aurora/Aurora ALX Alienware Aurora-R2 Dimensions Height (with top vents open) 426 mm to 447 mm ...your desktop will vary depending on the configuration and the manufacturing variability. 60 CHAPTER 8: SPECIFICATIONS Processor and System Chipset Aurora/Aurora ALX Processor Intel® Core™ i7 L2 cache 256 KB L3 cache up to 12 MB System chipset Intel X58... Express QPI speed 6.4 GT/s DRAM bus width 64 bits Processor address bus width 64 bits Aurora-R2 Processor Intel Core i7 Intel Core i5 Intel Core i3 L2 cache 256 KB L3 cache up to...
Computer Model Alienware Aurora/Aurora ALX Alienware Aurora-R2 Dimensions Height (with top vents open) 426 mm to 447 mm ...your desktop will vary depending on the configuration and the manufacturing variability. 60 CHAPTER 8: SPECIFICATIONS Processor and System Chipset Aurora/Aurora ALX Processor Intel® Core™ i7 L2 cache 256 KB L3 cache up to 12 MB System chipset Intel X58... Express QPI speed 6.4 GT/s DRAM bus width 64 bits Processor address bus width 64 bits Aurora-R2 Processor Intel Core i7 Intel Core i5 Intel Core i3 L2 cache 256 KB L3 cache up to...

Manual
Page 61
channel DDR3 and DDR3-XMP Aurora-R2 2- CHAPTER 8: SPECIFICATIONS 61 channel DDR3 NOTE: For instructions on upgrading the memory, see "Removing and Replacing Memory Module(s)" on page 39. Processor and System ...) RAID 0 RAID 1 RAID 5 RAID 10 32 MB Memory Connectors Aurora/Aurora ALX six internally-accessible DDR3 DIMM sockets Aurora-R2 four internally-accessible DDR3 DIMM sockets Capacities 1 GB, 2 GB, and 4 GB 1066 MHz and I333 MHz Minimum 3 GB Maximum Aurora/Aurora ALX 24 GB Aurora-R2 16 GB 1600 MHz XMP (Aurora/Aurora ALX) Minimum 3 GB Maximum 12 GB Memory types...
channel DDR3 and DDR3-XMP Aurora-R2 2- CHAPTER 8: SPECIFICATIONS 61 channel DDR3 NOTE: For instructions on upgrading the memory, see "Removing and Replacing Memory Module(s)" on page 39. Processor and System ...) RAID 0 RAID 1 RAID 5 RAID 10 32 MB Memory Connectors Aurora/Aurora ALX six internally-accessible DDR3 DIMM sockets Aurora-R2 four internally-accessible DDR3 DIMM sockets Capacities 1 GB, 2 GB, and 4 GB 1066 MHz and I333 MHz Minimum 3 GB Maximum Aurora/Aurora ALX 24 GB Aurora-R2 16 GB 1600 MHz XMP (Aurora/Aurora ALX) Minimum 3 GB Maximum 12 GB Memory types...

Manual
Page 62
Back Panel Connectors IEEE 1394 Network adapter USB eSATA Audio S/PDIF (available on Aurora/Aurora ALX only) one 6-pin serial connector one RJ45 connector six 4-pin USB 2.0-compliant connectors one 4-pin eSATA connector 7.1 channel line output, stereo microphone and stereo line ...
Back Panel Connectors IEEE 1394 Network adapter USB eSATA Audio S/PDIF (available on Aurora/Aurora ALX only) one 6-pin serial connector one RJ45 connector six 4-pin USB 2.0-compliant connectors one 4-pin eSATA connector 7.1 channel line output, stereo microphone and stereo line ...

Manual
Page 63
... to 35,000 ft) Airborne contaminant level G2 or lower as defined by ISA-S71.04-1985 CHAPTER 8: SPECIFICATIONS 63 Audio Type Aurora/Aurora ALX Aurora-R2 Controller Video Type Operating speed (Aurora-R2) Power Voltage integrated 7.1 channel, High Definition Audio with a change in velocity of 20 in /s (813 cm/s) Altitude (maximum): Operating -15.2 to...
... to 35,000 ft) Airborne contaminant level G2 or lower as defined by ISA-S71.04-1985 CHAPTER 8: SPECIFICATIONS 63 Audio Type Aurora/Aurora ALX Aurora-R2 Controller Video Type Operating speed (Aurora-R2) Power Voltage integrated 7.1 channel, High Definition Audio with a change in velocity of 20 in /s (813 cm/s) Altitude (maximum): Operating -15.2 to...

Service Manual
Page 11
... the left side-panel 011 /011 Slide the latch to unlock the release panel. 3. Replacing the Left Side-Panel 1. NOTE: Theater lighting (available only in Alienware Aurora ALX) turns on the side of the computer and push the panel in a secure location. Slide the latch to lock the release panel. 1 2 3 1 release panel 3 latch...
... the left side-panel 011 /011 Slide the latch to unlock the release panel. 3. Replacing the Left Side-Panel 1. NOTE: Theater lighting (available only in Alienware Aurora ALX) turns on the side of the computer and push the panel in a secure location. Slide the latch to lock the release panel. 1 2 3 1 release panel 3 latch...
Service Manual
Page 14
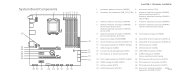
...) (Aurora and Aurora ALX ) memory-module connector (DIMM3) (Aurora-R2) 5 memory-module connector (DIMM1) 6 memory-module connector (DIMM4) 7 memory-module connector (DIMM3) (Aurora and Aurora ALX) memory-module connector (DIMM2) (Aurora-R2) 8 memory-module connector (DIMM6) (Aurora and Aurora ALX only) 9 memory-module connector (DIMM5) (Aurora and Aurora ALX only... IEEE 1394 connector (1394) 12 21 PCI-Express x1 connector (SLOT4) 22 S/PDIF connector (SPDIF) 13 (Aurora and Aurora ALX only) 14 23 front audio connector (FRONT AUDIO) 24 PCI-Express x16 connector (SLOT3) 25 CMOS jumper (...
...) (Aurora and Aurora ALX ) memory-module connector (DIMM3) (Aurora-R2) 5 memory-module connector (DIMM1) 6 memory-module connector (DIMM4) 7 memory-module connector (DIMM3) (Aurora and Aurora ALX) memory-module connector (DIMM2) (Aurora-R2) 8 memory-module connector (DIMM6) (Aurora and Aurora ALX only) 9 memory-module connector (DIMM5) (Aurora and Aurora ALX only... IEEE 1394 connector (1394) 12 21 PCI-Express x1 connector (SLOT4) 22 S/PDIF connector (SPDIF) 13 (Aurora and Aurora ALX only) 14 23 front audio connector (FRONT AUDIO) 24 PCI-Express x16 connector (SLOT3) 25 CMOS jumper (...

Service Manual
Page 38
Follow the instructions in "Before You Begin" on page 6. Recommended memory configuration: Aurora/Aurora ALX Aurora-R2 CHAPTER 7: MEMORY MODULE(S) Type 1066 MHz and I333 MHz DDR3 1600 MHz XMP Slots Slots 1, 3, and 5 or slots 1 - 6 Slots 1, 3, and 5 Type 1066 MHz and I333 MHz DDR3 Slots Slots 1 and 2 or slots 1 - 4 038 /038 Replacing the Memory Module(s) 1.
Follow the instructions in "Before You Begin" on page 6. Recommended memory configuration: Aurora/Aurora ALX Aurora-R2 CHAPTER 7: MEMORY MODULE(S) Type 1066 MHz and I333 MHz DDR3 1600 MHz XMP Slots Slots 1, 3, and 5 or slots 1 - 6 Slots 1, 3, and 5 Type 1066 MHz and I333 MHz DDR3 Slots Slots 1 and 2 or slots 1 - 4 038 /038 Replacing the Memory Module(s) 1.

Service Manual
Page 84
Remove the drive-bay shroud (see "Removing the Drive-Bay Shroud" on page 18). 4. Open the PCI shroud (see "Removing the Left Side-Panel" on page 6. 2. Remove the screw that secures the right top-panel to the chassis. 1 screw CHAPTER 17: ACTIVE-VENTING ASSEMBLY 1 084 /084 Follow the instructions in Alienware Aurora ALX. 1. Removing the Active-Venting Assembly NOTE: Active-venting assembly is available only in "Before You Begin" on page 11). 3. Remove the left side-panel (see "Opening the PCI Shroud" on page 19). 5.
Remove the drive-bay shroud (see "Removing the Drive-Bay Shroud" on page 18). 4. Open the PCI shroud (see "Removing the Left Side-Panel" on page 6. 2. Remove the screw that secures the right top-panel to the chassis. 1 screw CHAPTER 17: ACTIVE-VENTING ASSEMBLY 1 084 /084 Follow the instructions in Alienware Aurora ALX. 1. Removing the Active-Venting Assembly NOTE: Active-venting assembly is available only in "Before You Begin" on page 11). 3. Remove the left side-panel (see "Opening the PCI Shroud" on page 19). 5.

Service Manual
Page 108
...in the computer. Displays the asset tag of memory technology used. CHAPTER 22: SYSTEM SETUP System Information Current (QPI) Speed (available on Aurora and Aurora ALX only) Current (DMI) Speed (available on the computer. Displays the processor L3 cache size. Displays the amount of the computer. Displays ...integrated in the computer. 0108 /0108 Displays the SATA 1 drive integrated in the computer. Displays the amount of memory installed on Aurora-R2 only) Cache L2 Cache L3 Displays the QPI speed. System Information Product Name BIOS Version Service Tag Asset Tag Memory Installed ...
...in the computer. Displays the asset tag of memory technology used. CHAPTER 22: SYSTEM SETUP System Information Current (QPI) Speed (available on Aurora and Aurora ALX only) Current (DMI) Speed (available on the computer. Displays the processor L3 cache size. Displays the amount of the computer. Displays ...integrated in the computer. 0108 /0108 Displays the SATA 1 drive integrated in the computer. Displays the amount of memory installed on Aurora-R2 only) Cache L2 Cache L3 Displays the QPI speed. System Information Product Name BIOS Version Service Tag Asset Tag Memory Installed ...

Service Manual
Page 110
... you to enable and disable the network controller's boot option. CHAPTER 22: SYSTEM SETUP Integrated Devices Configure SATA#1-6 as (available on Aurora and Aurora ALX only) SATA Mode (available on Aurora and Aurora ALX only) Auto Power On Sets the energy-saving mode of the ACPI function. Sets the system to AHCI or RAID. Allows you...
... you to enable and disable the network controller's boot option. CHAPTER 22: SYSTEM SETUP Integrated Devices Configure SATA#1-6 as (available on Aurora and Aurora ALX only) SATA Mode (available on Aurora and Aurora ALX only) Auto Power On Sets the energy-saving mode of the ACPI function. Sets the system to AHCI or RAID. Allows you...

Service Manual
Page 111
... change the memory ratio. Frequency/Voltage Control CPU Speed Memory Speed Current QPI Speed (available on Aurora and Aurora ALX only) Current DMI Speed (available on Aurora-R2 only) QPI Frequency (available on Aurora and Aurora ALX only) DMI Frequency (available on Aurora-R2 only) Memory Ratio Core (Non-Turbo) Ratio Advance DRAM Configuration Overclock Configuration Displays the...
... change the memory ratio. Frequency/Voltage Control CPU Speed Memory Speed Current QPI Speed (available on Aurora and Aurora ALX only) Current DMI Speed (available on Aurora-R2 only) QPI Frequency (available on Aurora and Aurora ALX only) DMI Frequency (available on Aurora-R2 only) Memory Ratio Core (Non-Turbo) Ratio Advance DRAM Configuration Overclock Configuration Displays the...


