
Owner's Manual
Page 1
Dell™ Personal All-In-One Printer A960 Owner's Manual Look Inside For: • Ordering Supplies • Getting Started • Understanding the Software • Ink Cartridge Maintenance • Troubleshooting www.dell.com/supplies | support.dell.com
Dell™ Personal All-In-One Printer A960 Owner's Manual Look Inside For: • Ordering Supplies • Getting Started • Understanding the Software • Ink Cartridge Maintenance • Troubleshooting www.dell.com/supplies | support.dell.com
Owner's Manual
Page 2
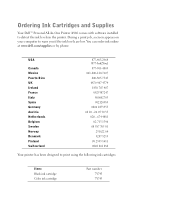
... the ink levels are low. During a print job, a screen appears on your computer to print using the following ink cartridges: Item: Black ink cartridge Color ink cartridge Part number: 7Y743 7Y745 Ordering Ink Cartridges and Supplies Your Dell™ Personal All-In-One Printer A960 comes with software installed to detect the ink levels in the...
... the ink levels are low. During a print job, a screen appears on your computer to print using the following ink cartridges: Item: Black ink cartridge Color ink cartridge Part number: 7Y743 7Y745 Ordering Ink Cartridges and Supplies Your Dell™ Personal All-In-One Printer A960 comes with software installed to detect the ink levels in the...
Owner's Manual
Page 5
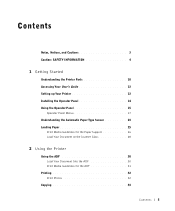
Contents Notes, Notices, and Cautions 3 Caution: SAFETY INFORMATION 4 1 Getting Started Understanding the Printer Parts 10 Accessing Your User's Guide 13 Setting up Your Printer 13 Installing the Operator Panel 14 Using the Operator Panel 15 Operator Panel Menus 17 Understanding the Automatic Paper Type Sensor 23 Loading Paper 25 Print Media Guidelines for the Paper Support 26 Load Your Document on the Scanner Glass 28 2 Using the Printer Using the ADF 30 Load Your Document Into the ADF 30 Print Media Guidelines for the ADF 31 Printing 32 Print Photos 32 Copying 33 Contents 5
Contents Notes, Notices, and Cautions 3 Caution: SAFETY INFORMATION 4 1 Getting Started Understanding the Printer Parts 10 Accessing Your User's Guide 13 Setting up Your Printer 13 Installing the Operator Panel 14 Using the Operator Panel 15 Operator Panel Menus 17 Understanding the Automatic Paper Type Sensor 23 Loading Paper 25 Print Media Guidelines for the Paper Support 26 Load Your Document on the Scanner Glass 28 2 Using the Printer Using the ADF 30 Load Your Document Into the ADF 30 Print Media Guidelines for the ADF 31 Printing 32 Print Photos 32 Copying 33 Contents 5

Owner's Manual
Page 6
... 37 Save an Image on Your Computer 38 E-mail a Scanned Image or Document 38 Enlarge or Reduce Images or Documents 39 Faxing 40 Using Dell Printer Fax Tools Fax Software 41 Using Fax Console (Windows XP Only 43 Access the Fax Setup Utility 44 Send a Fax 46 Receive Faxes 48 ...the Status of a Fax 51 Using Special Fax Features 52 3 Understanding the Software Understanding the Printer Software 56 Using the Dell All-In-One Center 56 Access the Dell All-In-One Center 56 The All-In-One Main Page 57 Using Print Properties 59 Access Print Properties 59 Print Properties Tabs 59 Using the...
... 37 Save an Image on Your Computer 38 E-mail a Scanned Image or Document 38 Enlarge or Reduce Images or Documents 39 Faxing 40 Using Dell Printer Fax Tools Fax Software 41 Using Fax Console (Windows XP Only 43 Access the Fax Setup Utility 44 Send a Fax 46 Receive Faxes 48 ...the Status of a Fax 51 Using Special Fax Features 52 3 Understanding the Software Understanding the Printer Software 56 Using the Dell All-In-One Center 56 Access the Dell All-In-One Center 56 The All-In-One Main Page 57 Using Print Properties 59 Access Print Properties 59 Print Properties Tabs 59 Using the...
Owner's Manual
Page 7
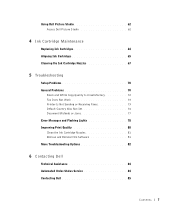
... Studio 62 Access Dell Picture Studio 62 4 Ink Cartridge Maintenance Replacing Ink Cartridges 64 Aligning Ink Cartridges 65 Cleaning the Ink Cartridge Nozzles 67 5 Troubleshooting Setup Problems 70 General Problems 70 Black and White Copy Quality Is Unsatisfactory 72 Fax Does Not Work 73 Printer Is Not Sending or Receiving Faxes 73...
... Studio 62 Access Dell Picture Studio 62 4 Ink Cartridge Maintenance Replacing Ink Cartridges 64 Aligning Ink Cartridges 65 Cleaning the Ink Cartridge Nozzles 67 5 Troubleshooting Setup Problems 70 General Problems 70 Black and White Copy Quality Is Unsatisfactory 72 Fax Does Not Work 73 Printer Is Not Sending or Receiving Faxes 73...
Owner's Manual
Page 9
SECTION 1 Getting Started Understanding the Printer Parts Accessing Your User's Guide Setting up Your Printer Installing the Operator Panel Using the Operator Panel Understanding the Automatic Paper Type Sensor Loading Paper 1
SECTION 1 Getting Started Understanding the Printer Parts Accessing Your User's Guide Setting up Your Printer Installing the Operator Panel Using the Operator Panel Understanding the Automatic Paper Type Sensor Loading Paper 1
Owner's Manual
Page 10
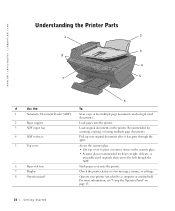
... Pick up your original document after it exits the printer. 7 Display Check the printer status or view messages, menus, or settings. 8 Operator panel Operate your printer (attached to place or remove items on page 15. 10 Getting Started www.dell.com/supplies | support.dell.com Understanding the Printer Parts 1 2 3 8 4 5 7 6 # Use the: To: 1 Automatic Document Feeder (ADF...
... Pick up your original document after it exits the printer. 7 Display Check the printer status or view messages, menus, or settings. 8 Operator panel Operate your printer (attached to place or remove items on page 15. 10 Getting Started www.dell.com/supplies | support.dell.com Understanding the Printer Parts 1 2 3 8 4 5 7 6 # Use the: To: 1 Automatic Document Feeder (ADF...
Owner's Manual
Page 11
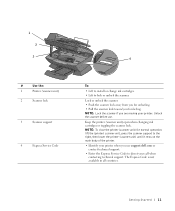
Unlock the scanner before use support.dell.com or contact technical support. • Enter the Express Service Code to direct your printer. Keep the printer (scanner unit) open when changing ink cartridges or toggling the scanner lock. 1 2 3 # Use the: 1 Printer (scanner unit) 2 Scanner lock 3 Scanner support 4... install or change ink cartridges. • Lift to the right, then lower the printer (scanner unit) until it rests on the main body of the printer. • Identify your printer when you are moving your call when contacting technical support. NOTE: Lock the scanner if...
Unlock the scanner before use support.dell.com or contact technical support. • Enter the Express Service Code to direct your printer. Keep the printer (scanner unit) open when changing ink cartridges or toggling the scanner lock. 1 2 3 # Use the: 1 Printer (scanner unit) 2 Scanner lock 3 Scanner support 4... install or change ink cartridges. • Lift to the right, then lower the printer (scanner unit) until it rests on the main body of the printer. • Identify your printer when you are moving your call when contacting technical support. NOTE: Lock the scanner if...
Owner's Manual
Page 12
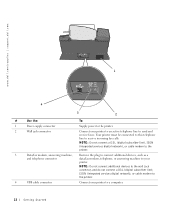
...dell.com/supplies | support.dell.com 1 4 3 2 # Use the: To: 1 Power supply connector Supply power to the printer. 2 Wall jack connector Connect your printer. Your printer must be connected to this telephone line to send and receive faxes. NOTE: Do not connect a DSL (digital subscriber line), ISDN (integrated services digital network), or cable modem to the printer... line), ISDN (integrated services digital network), or cable modem to the printer. 4 USB cable connector Connect your printer to your printer to an active telephone line to receive incoming fax calls.
...dell.com/supplies | support.dell.com 1 4 3 2 # Use the: To: 1 Power supply connector Supply power to the printer. 2 Wall jack connector Connect your printer. Your printer must be connected to this telephone line to send and receive faxes. NOTE: Do not connect a DSL (digital subscriber line), ISDN (integrated services digital network), or cable modem to the printer... line), ISDN (integrated services digital network), or cable modem to the printer. 4 USB cable connector Connect your printer to your printer to an active telephone line to receive incoming fax calls.
Owner's Manual
Page 13
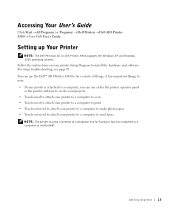
... You do need to attach your printer to a computer to print. • You do not need to attach your printer Setup Diagram to a computer or unattached). Getting Started 13 Setting up Your Printer NOTE: The Dell Personal All-In-One Printer A960 supports the Windows XP and Windows ...2000 operating systems. Follow the instructions on your printer to a computer to make photocopies....
... You do need to attach your printer to a computer to print. • You do not need to attach your printer Setup Diagram to a computer or unattached). Getting Started 13 Setting up Your Printer NOTE: The Dell Personal All-In-One Printer A960 supports the Windows XP and Windows ...2000 operating systems. Follow the instructions on your printer to a computer to make photocopies....
Owner's Manual
Page 14
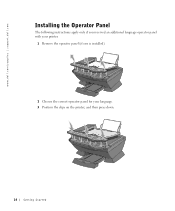
www.dell.com/supplies | support.dell.com Installing the Operator Panel The following instructions apply only if you received an additional language operator panel with your printer. 1 Remove the operator panel (if one is installed). 2 Choose the correct operator panel for your language. 3 Position the clips on the printer, and then press down. 14 Getting Started
www.dell.com/supplies | support.dell.com Installing the Operator Panel The following instructions apply only if you received an additional language operator panel with your printer. 1 Remove the operator panel (if one is installed). 2 Choose the correct operator panel for your language. 3 Position the clips on the printer, and then press down. 14 Getting Started
Owner's Manual
Page 15
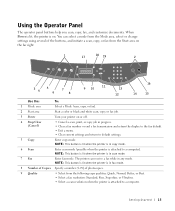
... 13 12 16 14 15 Use the: To: 1 Mode area Select a Mode (scan, copy, or fax). 2 Start area Start a color or black and white scan, copy, or fax job. 3 Power Turn your printer on . Using the Operator Panel The operator panel buttons help you scan, copy, fax, and customize documents. When Power...
... 13 12 16 14 15 Use the: To: 1 Mode area Select a Mode (scan, copy, or fax). 2 Start area Start a color or black and white scan, copy, or fax job. 3 Power Turn your printer on . Using the Operator Panel The operator panel buttons help you scan, copy, fax, and customize documents. When Power...
Owner's Manual
Page 16
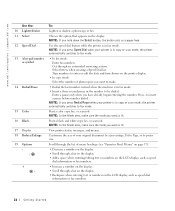
www.dell.com/supplies | support.dell.com Use the: 10 Lighter/Darker 11 Select 12 Speed Dial 13 A keypad number or symbol 14 Redial/Pause 15 Color 16 Black 17 Display 18 Reduce/Enlarge 19 Options - + To: Lighten or darken a photocopy or fax. Select letters when creating a Speed Dial list. ... entering/editing text or numbers on the display. • Scroll through an automated answering system. NOTE: If you want is in fax mode. View printer status, messages, and menus. Enter a pause only when you hold down the Select button, the button acts as speed dial information or fax numbers...
www.dell.com/supplies | support.dell.com Use the: 10 Lighter/Darker 11 Select 12 Speed Dial 13 A keypad number or symbol 14 Redial/Pause 15 Color 16 Black 17 Display 18 Reduce/Enlarge 19 Options - + To: Lighten or darken a photocopy or fax. Select letters when creating a Speed Dial list. ... entering/editing text or numbers on the display. • Scroll through an automated answering system. NOTE: If you want is in fax mode. View printer status, messages, and menus. Enter a pause only when you hold down the Select button, the button acts as speed dial information or fax numbers...
Owner's Manual
Page 17
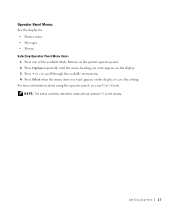
... with an asterisk (*) on the display. 3 Press + or - Operator Panel Menus See the display for: • Printer status • Messages • Menus Selecting Operator Panel Menu items 1 Press one of the available Mode buttons on the printer operator panel. 2 Press Options repeatedly until the menu heading you want appears on the display to...
... with an asterisk (*) on the display. 3 Press + or - Operator Panel Menus See the display for: • Printer status • Messages • Menus Selecting Operator Panel Menu items 1 Press one of the available Mode buttons on the printer operator panel. 2 Press Options repeatedly until the menu heading you want appears on the display to...
Owner's Manual
Page 23
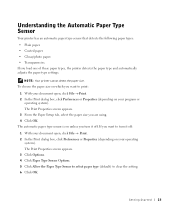
...In the Print dialog box, click Preferences or Properties (depending on which you want to clear the setting. 6 Click OK. NOTE: Your printer cannot detect the paper size. The automatic paper type sensor is on your program or operating system). Getting Started 23 If you want to ...With your document open , click File → Print. 2 In the Print dialog box, click Preferences or Properties (depending on unless you load one of these paper types, the printer detects the paper type and automatically adjusts the paper type settings. Understanding the Automatic Paper Type Sensor Your...
...In the Print dialog box, click Preferences or Properties (depending on which you want to clear the setting. 6 Click OK. NOTE: Your printer cannot detect the paper size. The automatic paper type sensor is on your program or operating system). Getting Started 23 If you want to ...With your document open , click File → Print. 2 In the Print dialog box, click Preferences or Properties (depending on unless you load one of these paper types, the printer detects the paper type and automatically adjusts the paper type settings. Understanding the Automatic Paper Type Sensor Your...
Owner's Manual
Page 24
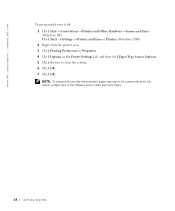
www.dell.com/supplies | support.dell.com To permanently turn it off: 1 Click Start → Control Panel → Printers and Other Hardware → Printers and Faxes (Windows XP). Click Start → Settings → Printers and Faxes or Printers (Windows 2000). 2 Right-click the printer icon. 3 Click Printing Preferences or Properties. 4 Click Options or the Printer Settings tab, and then...
www.dell.com/supplies | support.dell.com To permanently turn it off: 1 Click Start → Control Panel → Printers and Other Hardware → Printers and Faxes (Windows XP). Click Start → Settings → Printers and Faxes or Printers (Windows 2000). 2 Right-click the printer icon. 3 Click Printing Preferences or Properties. 4 Click Options or the Printer Settings tab, and then...
Owner's Manual
Page 25
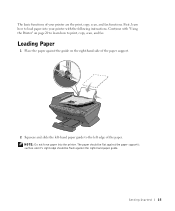
... the paper support's surface and it's right edge should be flush against the guide on page 29 to learn how to load paper into the printer. First, learn how to print, copy, scan, and fax. Continue with the following instructions. Loading Paper 1 Place the paper against the right-hand ...paper guide. The basic functions of your printer with "Using the Printer" on the right-hand side of the paper support. 2 Squeeze and slide the left-hand paper guide to the left edge of the ...
... the paper support's surface and it's right edge should be flush against the guide on page 29 to learn how to load paper into the printer. First, learn how to print, copy, scan, and fax. Continue with the following instructions. Loading Paper 1 Place the paper against the right-hand ...paper guide. The basic functions of your printer with "Using the Printer" on the right-hand side of the paper support. 2 Squeeze and slide the left-hand paper guide to the left edge of the ...

Owner's Manual
Page 26
... the left and right margins so that your envelope text will be correctly positioned. NOTE: You can load a single envelope into the printer upside down with Landscape orientation. • You select the correct envelope size. NOTE: Load letterhead paper into the paper support without removing... plain paper. 26 Getting Started www.dell.com/supplies | support.dell.com Print Media Guidelines for the Paper Support Load up to print the envelopes with the letterhead facing you. • The...
... the left and right margins so that your envelope text will be correctly positioned. NOTE: You can load a single envelope into the printer upside down with Landscape orientation. • You select the correct envelope size. NOTE: Load letterhead paper into the paper support without removing... plain paper. 26 Getting Started www.dell.com/supplies | support.dell.com Print Media Guidelines for the Paper Support Load up to print the envelopes with the letterhead facing you. • The...
Owner's Manual
Page 27
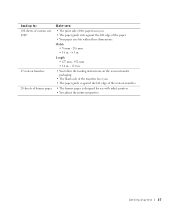
... guide rests against the left edge of custom size paper 25 iron-on transfers. • The banner paper is designed for use with inkjet printers. • You adjust the printer properties. Getting Started 27 Load up to: 100 sheets of the paper. • Your paper size fits within these dimensions: Width • 76...
... guide rests against the left edge of custom size paper 25 iron-on transfers. • The banner paper is designed for use with inkjet printers. • You adjust the printer properties. Getting Started 27 Load up to: 100 sheets of the paper. • Your paper size fits within these dimensions: Width • 76...
Owner's Manual
Page 29
SECTION 2 Using the Printer Using the ADF Printing Copying Scanning Faxing 2
SECTION 2 Using the Printer Using the ADF Printing Copying Scanning Faxing 2


