

Owner's Manual
Page 1
Dell™ Personal All-In-One Printer A920 Owner's Manual Look Inside For: • Learning about your printer • Understanding the software • Maintenance and Troubleshooting www.dell.com/supplies | support.dell.com
Dell™ Personal All-In-One Printer A920 Owner's Manual Look Inside For: • Learning about your printer • Understanding the software • Maintenance and Troubleshooting www.dell.com/supplies | support.dell.com
Owner's Manual
Page 3
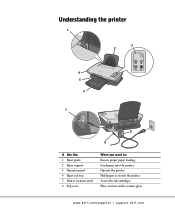
Access the ink cartridges. Hold paper as it exits the printer. Operate the printer. Understanding the printer 1 3 2 6 5 4 7 8 9 # Use the: 1 Paper guide 2 Paper support 3 Operator panel 4 Paper exit tray 5 Printer (scanner unit) 6 Top cover When you want to: Ensure proper paper feeding. Load paper into the printer. www.dell.com/supplies | support.dell.com Place an item on the scanner glass.
Access the ink cartridges. Hold paper as it exits the printer. Operate the printer. Understanding the printer 1 3 2 6 5 4 7 8 9 # Use the: 1 Paper guide 2 Paper support 3 Operator panel 4 Paper exit tray 5 Printer (scanner unit) 6 Top cover When you want to: Ensure proper paper feeding. Load paper into the printer. www.dell.com/supplies | support.dell.com Place an item on the scanner glass.
Owner's Manual
Page 4
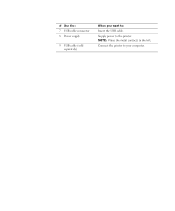
Connect the printer to : Insert the USB cable. # Use the: 7 USB cable connector 8 Power supply 9 USB cable (sold separately) When you want to your computer. NOTE: Place the metal contacts to the printer. Supply power to the left.
Connect the printer to : Insert the USB cable. # Use the: 7 USB cable connector 8 Power supply 9 USB cable (sold separately) When you want to your computer. NOTE: Place the metal contacts to the printer. Supply power to the left.
Owner's Manual
Page 5
...used in this text: Dell and DELL logo are trademarks of your printer. Dell Computer Corporation disclaims any manner whatsoever without the written permission of Dell Computer Corporation is subject ... names other than its own. CAUTION: A CAUTION indicates a potential for property damage, personal, injury, or death. Reproduction in subparagraph (c)(1)(ii) of Microsoft Corporation. NOTICE: A... to restrictions as set forth in any proprietary interest in applicable FAR provisions: Dell Computer Corporation, One Dell Way, Round Rock, Texas, 78682, USA. Notes, Notices, and Cautions ...
...used in this text: Dell and DELL logo are trademarks of your printer. Dell Computer Corporation disclaims any manner whatsoever without the written permission of Dell Computer Corporation is subject ... names other than its own. CAUTION: A CAUTION indicates a potential for property damage, personal, injury, or death. Reproduction in subparagraph (c)(1)(ii) of Microsoft Corporation. NOTICE: A... to restrictions as set forth in any proprietary interest in applicable FAR provisions: Dell Computer Corporation, One Dell Way, Round Rock, Texas, 78682, USA. Notes, Notices, and Cautions ...
Owner's Manual
Page 7
Contents Understanding the printer i Caution: SAFETY INFORMATION iv 1 Learning about your printer Setting up the printer 2 Using the operator panel 2 2 Understanding the software Accessing the Dell All-In-One Center 4 The All-In-One Main page 4 View Saved Images page 5 Maintain/Troubleshoot page 6 Accessing Print Properties 6 The I Want To menu 7 Print Properties tabs 7 Save Settings menu 8 Options menu 8 Using the Dell Printer Solution Center 8 Using the Dell Image Expert 10 3 Using the printer Loading paper 12 Contents v
Contents Understanding the printer i Caution: SAFETY INFORMATION iv 1 Learning about your printer Setting up the printer 2 Using the operator panel 2 2 Understanding the software Accessing the Dell All-In-One Center 4 The All-In-One Main page 4 View Saved Images page 5 Maintain/Troubleshoot page 6 Accessing Print Properties 6 The I Want To menu 7 Print Properties tabs 7 Save Settings menu 8 Options menu 8 Using the Dell Printer Solution Center 8 Using the Dell Image Expert 10 3 Using the printer Loading paper 12 Contents v
Owner's Manual
Page 11
SECTION 1 Learning about your printer Setting up the printer Using the operator panel 1
SECTION 1 Learning about your printer Setting up the printer Using the operator panel 1

Owner's Manual
Page 12
...installation. www.dell.com/supplies | support.dell.com Setting up the printer If you scan and copy with the press of a button. 1 2 5 4 3 NOTE: Both the computer and the printer must be turned on to make copies. # Press: 1 Power 2 Scan 3 Black Copy 4 Color Copy 5 Paper Feed To: Turn the printer on and ...panel The printer has an operator panel that lets you have not already done so, follow the steps on page 34. If problems occur during the setup process, see Setup troubleshooting on the Placemat (poster) to open the Dell All-In-One Center. Feed paper through the printer. 2 Learning...
...installation. www.dell.com/supplies | support.dell.com Setting up the printer If you scan and copy with the press of a button. 1 2 5 4 3 NOTE: Both the computer and the printer must be turned on to make copies. # Press: 1 Power 2 Scan 3 Black Copy 4 Color Copy 5 Paper Feed To: Turn the printer on and ...panel The printer has an operator panel that lets you have not already done so, follow the steps on page 34. If problems occur during the setup process, see Setup troubleshooting on the Placemat (poster) to open the Dell All-In-One Center. Feed paper through the printer. 2 Learning...
Owner's Manual
Page 13
SECTION 2 Understanding the software Accessing the Dell All-In-One Center Accessing Print Properties Using the Dell Printer Solution Center Using the Dell Image Expert 2
SECTION 2 Understanding the software Accessing the Dell All-In-One Center Accessing Print Properties Using the Dell Printer Solution Center Using the Dell Image Expert 2
Owner's Manual
Page 14
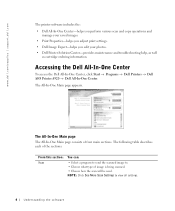
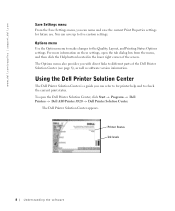
... table describes each of four main sections. Accessing the Dell All-In-One Center To access the Dell All-In-One Center, click Start → Programs → Dell Printers → Dell AIO Printer A920 → Dell All-In-One Center. www.dell.com/supplies | support.dell.com The printer software includes the: • Dell All-In-One Center-helps you perform various scan and copy operations...
... table describes each of four main sections. Accessing the Dell All-In-One Center To access the Dell All-In-One Center, click Start → Programs → Dell Printers → Dell AIO Printer A920 → Dell All-In-One Center. www.dell.com/supplies | support.dell.com The printer software includes the: • Dell All-In-One Center-helps you perform various scan and copy operations...
Owner's Manual
Page 16
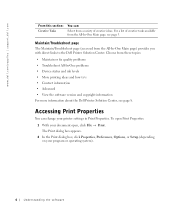
...from these topics: • Maintain or fix quality problems • Troubleshoot All-In-One problems • Device status and ink levels • More printing ideas and how to the Dell Printer Solution Center. To open , click File → Print. Maintain/Troubleshoot page The Maintain.../Troubleshoot page (accessed from the All-In-One Main page, see page 8. Accessing Print Properties You can : Select...
...from these topics: • Maintain or fix quality problems • Troubleshoot All-In-One problems • Device status and ink levels • More printing ideas and how to the Dell Printer Solution Center. To open , click File → Print. Maintain/Troubleshoot page The Maintain.../Troubleshoot page (accessed from the All-In-One Main page, see page 8. Accessing Print Properties You can : Select...
Owner's Manual
Page 17
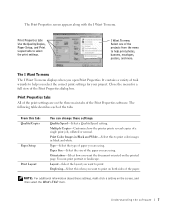
...Print Properties software. You can change these settings, right-click a setting on the three main tabs of paper you are using . Print Color Images in black and white. Duplexing-Select this tab: Quality/Copies Paper Setup Print Layout You can print portrait or landscape. From this ... on both sides of the projects from the menu to print on the printed page. I Want To menu Select one of the paper. Multiple Copies-Customize how the printer prints several copies of the tabs. NOTE: For additional information about these settings: Quality/Speed-Select a Quality/Speed setting...
...Print Properties software. You can change these settings, right-click a setting on the three main tabs of paper you are using . Print Color Images in black and white. Duplexing-Select this tab: Quality/Copies Paper Setup Print Layout You can print portrait or landscape. From this ... on both sides of the projects from the menu to print on the printed page. I Want To menu Select one of the paper. Multiple Copies-Customize how the printer prints several copies of the tabs. NOTE: For additional information about these settings: Quality/Speed-Select a Quality/Speed setting...
Owner's Manual
Page 18
... provides you can name and save up to five custom settings. For more information on these settings, open the Dell Printer Solution Center, click Start → Programs → Dell Printers → Dell AIO Printer A920 → Dell Printer Solution Center. Printer Status Ink levels 8 Understanding the software You can refer to the Quality, Layout, and Printing Status Options settings. To...
... provides you can name and save up to five custom settings. For more information on these settings, open the Dell Printer Solution Center, click Start → Programs → Dell Printers → Dell AIO Printer A920 → Dell Printer Solution Center. Printer Status Ink levels 8 Understanding the software You can refer to the Quality, Layout, and Printing Status Options settings. To...
Owner's Manual
Page 19
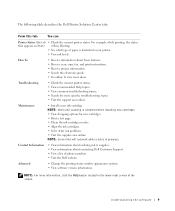
...Dell Printer Solution Center tabs. From this tab: You can: Printer Status (the tab • Check the current printer status. NOTE: Some links will not work while a job is loaded into your printer. • View ink levels. Understanding the software 9 How To • Receive information about contacting Dell.... NOTE: For more specific troubleshooting topics. • Visit the support area online. Troubleshooting • Check the current printer status. • View recommended Help topics. • View common troubleshooting topics. • Search for new cartridges. ...
...Dell Printer Solution Center tabs. From this tab: You can: Printer Status (the tab • Check the current printer status. NOTE: Some links will not work while a job is loaded into your printer. • View ink levels. Understanding the software 9 How To • Receive information about contacting Dell.... NOTE: For more specific troubleshooting topics. • Visit the support area online. Troubleshooting • Check the current printer status. • View recommended Help topics. • View common troubleshooting topics. • Search for new cartridges. ...

Owner's Manual
Page 20
...Flood Fill • Paint Brush • Line • Eraser NOTE: Move your graphic editing needs. To access the Dell Photo Editor: • From the All-In-One Center send a scanned image to the documentation. The User's Guide can : Eliminate red eye Add text to images ...; Programs → Dell Computer → Dell Image Expert. • From the All-In-One Center send a scanned image to list, select Dell Image Expert. www.dell.com/supplies | support.dell.com Using the Dell Image Expert The Dell Image Expert lets you purchased your printer separately Use the Dell Photo Editor for your...
...Flood Fill • Paint Brush • Line • Eraser NOTE: Move your graphic editing needs. To access the Dell Photo Editor: • From the All-In-One Center send a scanned image to the documentation. The User's Guide can : Eliminate red eye Add text to images ...; Programs → Dell Computer → Dell Image Expert. • From the All-In-One Center send a scanned image to list, select Dell Image Expert. www.dell.com/supplies | support.dell.com Using the Dell Image Expert The Dell Image Expert lets you purchased your printer separately Use the Dell Photo Editor for your...
Owner's Manual
Page 21
SECTION 3 Using the printer Loading paper Placing your document on the scanner glass Printing Copying Scanning Editing scanned images Using special scan features Faxing Creating other projects 3
SECTION 3 Using the printer Loading paper Placing your document on the scanner glass Printing Copying Scanning Editing scanned images Using special scan features Faxing Creating other projects 3
Owner's Manual
Page 22
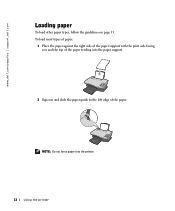
NOTE: Do not force paper into the paper support. 2 Squeeze and slide the paper guide to the left edge of the paper feeding into the printer. 12 Using the printer www.dell.com/supplies | support.dell.com Loading paper To load other paper types, follow the guidelines on page 13. To load most types of paper: 1 Place the paper against the right side of the paper support with the print side facing you and the top of the paper.
NOTE: Do not force paper into the paper support. 2 Squeeze and slide the paper guide to the left edge of the paper feeding into the printer. 12 Using the printer www.dell.com/supplies | support.dell.com Loading paper To load other paper types, follow the guidelines on page 13. To load most types of paper: 1 Place the paper against the right side of the paper support with the print side facing you and the top of the paper.
Owner's Manual
Page 23
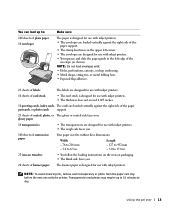
...each transparency or photo from the paper exit tray before the next one exits the printer. Transparencies and photos may require up to: 100 sheets of plain paper 10 envelopes Make sure: The paper is designed for use with inkjet printers. • The envelopes are loaded vertically against the right side ... you . 20 sheets of banner paper The banner paper is in the upper left corner. • The envelopes are designed for use with inkjet printers. • You squeeze and slide the paper guide to the left edge of custom size paper Your paper size fits within these dimensions: Width...
...each transparency or photo from the paper exit tray before the next one exits the printer. Transparencies and photos may require up to: 100 sheets of plain paper 10 envelopes Make sure: The paper is designed for use with inkjet printers. • The envelopes are loaded vertically against the right side ... you . 20 sheets of banner paper The banner paper is in the upper left corner. • The envelopes are designed for use with inkjet printers. • You squeeze and slide the paper guide to the left edge of custom size paper Your paper size fits within these dimensions: Width...
Owner's Manual
Page 24
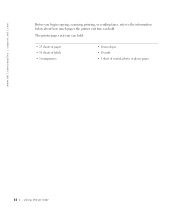
www.dell.com/supplies | support.dell.com Before you begin copying, scanning, printing, or sending faxes, refer to the information below about how much paper the printer exit tray can hold . The printer paper exit tray can hold : • 25 sheets of paper • 10 sheets of labels • 1 transparency • 10 envelopes • 10 cards • 1 sheet of coated, photo, or glossy paper 14 Using the printer
www.dell.com/supplies | support.dell.com Before you begin copying, scanning, printing, or sending faxes, refer to the information below about how much paper the printer exit tray can hold . The printer paper exit tray can hold : • 25 sheets of paper • 10 sheets of labels • 1 transparency • 10 envelopes • 10 cards • 1 sheet of coated, photo, or glossy paper 14 Using the printer
Owner's Manual
Page 25
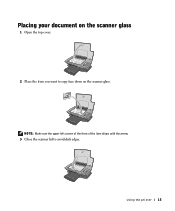
NOTE: Make sure the upper left corner of the front of the item aligns with the arrow. 3 Close the scanner lid to copy face down on the scanner glass 1 Open the top cover. 2 Place the item you want to avoid dark edges. Using the printer 15 Placing your document on the scanner glass.
NOTE: Make sure the upper left corner of the front of the item aligns with the arrow. 3 Close the scanner lid to copy face down on the scanner glass 1 Open the top cover. 2 Place the item you want to avoid dark edges. Using the printer 15 Placing your document on the scanner glass.
Owner's Manual
Page 26
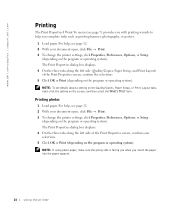
...For help, see page 12. 2 With your selections. 5 Click OK or Print (depending on the program or operating system). www.dell.com/supplies | support.dell.com Printing The Print Properties I Want To menu (see details about a setting on the Quality/Copies, Paper Setup, or Print ...Copies, Paper Setup, and Print Layout) of the Print Properties screen, confirm your document open , click File → Print. 3 To change the printer settings, click Properties, Preferences, Options, or Setup (depending on the program or operating system). NOTE: To see page 7) provides you insert the paper ...
...For help, see page 12. 2 With your selections. 5 Click OK or Print (depending on the program or operating system). www.dell.com/supplies | support.dell.com Printing The Print Properties I Want To menu (see details about a setting on the Quality/Copies, Paper Setup, or Print ...Copies, Paper Setup, and Print Layout) of the Print Properties screen, confirm your document open , click File → Print. 3 To change the printer settings, click Properties, Preferences, Options, or Setup (depending on the program or operating system). NOTE: To see page 7) provides you insert the paper ...


