
User Guide
Page 3
... my Setting Up Your Printer poster printer Safety information Owner's Manual How to set up and use the CD to access the improved graphics and color features of XPS. Find it here Drivers for my Drivers and Utilities CD printer My User's Guide Optional XPS driver If you purchased your Dell computer and printer at the same...
... my Setting Up Your Printer poster printer Safety information Owner's Manual How to set up and use the CD to access the improved graphics and color features of XPS. Find it here Drivers for my Drivers and Utilities CD printer My User's Guide Optional XPS driver If you purchased your Dell computer and printer at the same...
User Guide
Page 11
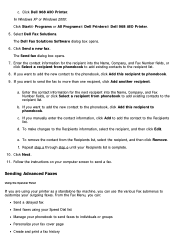
... customize your fax cover page Create and print a fax history b. Click Dell 968 AIO Printer. In Windows XP or Windows 2000: Click Start® Programs or All Programs® Dell Printers® Dell 968 AIO Printer. 5. The Dell Fax Solutions Software dialog box opens. 6. If you manually enter the contact information, click Add to add the contact to..., select the recipient, and then click Remove. If you want to add the new contact to the phonebook, click Add this recipient to more than one recipient, click Add another recipient. To make changes to the recipient list.
... customize your fax cover page Create and print a fax history b. Click Dell 968 AIO Printer. In Windows XP or Windows 2000: Click Start® Programs or All Programs® Dell Printers® Dell 968 AIO Printer. 5. The Dell Fax Solutions Software dialog box opens. 6. If you manually enter the contact information, click Add to add the contact to..., select the recipient, and then click Remove. If you want to add the new contact to the phonebook, click Add this recipient to more than one recipient, click Add another recipient. To make changes to the recipient list.
User Guide
Page 14
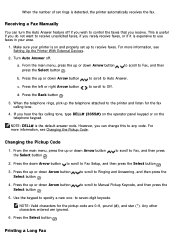
...Select button . Press the up or down Arrow button Select button . to scroll to specify a new one- From the main menu, press the up or down Arrow button to scroll to the printer and listen for the pickup code are ignored. 6. Press the Back button . 3. If you can...off . Press the Select button . Receiving a Fax Manually You can change this to Fax Setup, and then press the Select button . 3. This is useful if you do not want to receive unsolicited faxes, if you receive. NOTE: DELL# is detected, the printer automatically receives the fax. to Fax, and then ...
...Select button . Press the up or down Arrow button Select button . to scroll to specify a new one- From the main menu, press the up or down Arrow button to scroll to the printer and listen for the pickup code are ignored. 6. Press the Back button . 3. If you can...off . Press the Select button . Receiving a Fax Manually You can change this to Fax Setup, and then press the Select button . 3. This is useful if you do not want to receive unsolicited faxes, if you receive. NOTE: DELL# is detected, the printer automatically receives the fax. to Fax, and then ...
User Guide
Page 17
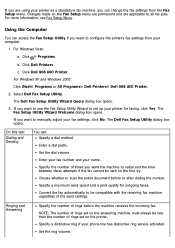
...can access the Fax Setup Utility if you want to manually adjust your computer. 1. The Dell Fax Setup Utility Wizard Query dialog box opens. 3. The Fax Setup Utility Wizard Welcome dialog box opens. If you want to configure the printer's fax settings from the Fax Setup menu. Enter your...be compatible with the receiving fax machine regardless of rings before or after dialing the number. If you are applicable to all fax jobs. Click Dell Printers. Set the dial volume. Specify a maximum send speed and a print quality for faxing, click Yes. For Windows XP and Windows 2000: ...
...can access the Fax Setup Utility if you want to manually adjust your computer. 1. The Dell Fax Setup Utility Wizard Query dialog box opens. 3. The Fax Setup Utility Wizard Welcome dialog box opens. If you want to configure the printer's fax settings from the Fax Setup menu. Enter your...be compatible with the receiving fax machine regardless of rings before or after dialing the number. If you are applicable to all fax jobs. Click Dell Printers. Set the dial volume. Specify a maximum send speed and a print quality for faxing, click Yes. For Windows XP and Windows 2000: ...
User Guide
Page 18
Specify the time when incoming faxes are forwarded. Fax Printing/Reports Choose to automatically resize oversize faxes so they print on one page, or keep the oversized fax to scale and print on your outgoing fax. Choose whether you want to answer incoming faxes automatically... optional duplex is determined by the country or region you can hold up to print on each using the printer operator panel. Specify a manual answer code. If an optional second paper tray is DELL# (3355#). Choose a Caller ID pattern (1 if telephones in your country have a detection pattern using your ...
Specify the time when incoming faxes are forwarded. Fax Printing/Reports Choose to automatically resize oversize faxes so they print on one page, or keep the oversized fax to scale and print on your outgoing fax. Choose whether you want to answer incoming faxes automatically... optional duplex is determined by the country or region you can hold up to print on each using the printer operator panel. Specify a manual answer code. If an optional second paper tray is DELL# (3355#). Choose a Caller ID pattern (1 if telephones in your country have a detection pattern using your ...
User Guide
Page 35
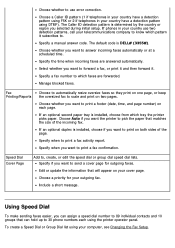
... attached to set the paper type manually, or have a photo cartridge installed. If you select Photo, you to the printer. Paper Size - NOTE: Paper Source... on your color images in black and white to print an envelope. Click ® Control Panel. c. In Windows 2000, click Start® Settings® Printers. 2. Select...Control Panel® Printers and Other Hardware® Printers and Faxes. Paper Source - NOTE: You cannot select this setting if you have the printer detect the paper ...to the printer settings from the Printers folder become the default settings for printing. The Printing...
... attached to set the paper type manually, or have a photo cartridge installed. If you select Photo, you to the printer. Paper Size - NOTE: Paper Source... on your color images in black and white to print an envelope. Click ® Control Panel. c. In Windows 2000, click Start® Settings® Printers. 2. Select...Control Panel® Printers and Other Hardware® Printers and Faxes. Paper Source - NOTE: You cannot select this setting if you have the printer detect the paper ...to the printer settings from the Printers folder become the default settings for printing. The Printing...
User Guide
Page 36
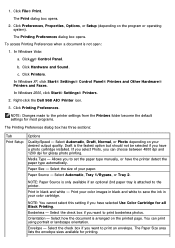
... PictBridge port on the bottom of the pages of your computer. Automatically select the best image-sharpening level based on . More Options - Dell Customer Experience Improvement Program - Allows you notice ink is smeared on the front Insert a memory card into the memory card slot or a...to finish if your memory card or USB memory key to display, manage, edit, print, and save photos from Automatic, Manual, or Print Duplex. Customize how the printer prints several copies of the paper. Select Normal, Banner, Mirror, N-up, Poster, Booklet, or Borderless. Advanced Copies -
... PictBridge port on the bottom of the pages of your computer. Automatically select the best image-sharpening level based on . More Options - Dell Customer Experience Improvement Program - Allows you notice ink is smeared on the front Insert a memory card into the memory card slot or a...to finish if your memory card or USB memory key to display, manage, edit, print, and save photos from Automatic, Manual, or Print Duplex. Customize how the printer prints several copies of the paper. Select Normal, Banner, Mirror, N-up, Poster, Booklet, or Borderless. Advanced Copies -

User Guide
Page 54
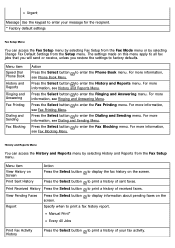
...answers incoming faxes without user intervention. Menu item Cover Page Action Specify whether or not to your sent fax. Black & White* Color Quality Specify the scan quality of your subsequent faxes. Phone Number Press the Select button to display the redial history. For more information..., see Phone Number Search Menu. They will only be answered manually. No* Yes Color Specify the color of your fax. Redial History Press the Select button to enter the Phone Book Search menu. The last five ...
...answers incoming faxes without user intervention. Menu item Cover Page Action Specify whether or not to your sent fax. Black & White* Color Quality Specify the scan quality of your subsequent faxes. Phone Number Press the Select button to display the redial history. For more information..., see Phone Number Search Menu. They will only be answered manually. No* Yes Color Specify the color of your fax. Redial History Press the Select button to enter the Phone Book Search menu. The last five ...
User Guide
Page 56
.... Press the Select button to enter the Dialing and Sending menu. Menu item View History on the screen. For more information, see Fax Blocking Menu. Manual Print* Every 40 Jobs Print Fax Activity History Press the Select button to print a history of your message for the recipient. * Factory default settings Fax...
.... Press the Select button to enter the Dialing and Sending menu. Menu item View History on the screen. For more information, see Fax Blocking Menu. Manual Print* Every 40 Jobs Print Fax Activity History Press the Select button to print a history of your message for the recipient. * Factory default settings Fax...

User Guide
Page 58
...on one page. To change the code, use two detection patterns, call your duplex printing preference. Menu item If Too Big Action Specify how the printer handles ...incoming faxes that are too big to . * Factory default setting Fax Printing Menu You can access the Fax Printing menu by the country or region you selected during initial setup. Print 1 Sided Print* Off* Forward Print & Forward Manual... 1 (FSK)* Pattern 2 (DTMF) NOTE: The Caller ID detection pattern is DELL# (3355#). On* Off 2-Sided Specify your telecommunications company to know which pattern it...
...on one page. To change the code, use two detection patterns, call your duplex printing preference. Menu item If Too Big Action Specify how the printer handles ...incoming faxes that are too big to . * Factory default setting Fax Printing Menu You can access the Fax Printing menu by the country or region you selected during initial setup. Print 1 Sided Print* Off* Forward Print & Forward Manual... 1 (FSK)* Pattern 2 (DTMF) NOTE: The Caller ID detection pattern is DELL# (3355#). On* Off 2-Sided Specify your telecommunications company to know which pattern it...
User Guide
Page 84
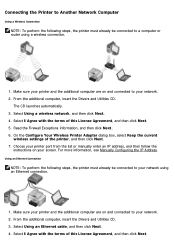
.... 3. 2. Make sure your computer is not in the list, click Add Printer, and then select One New Printer. 4. Select Using an Ethernet Cable, and then click Next. 5. Manually Configuring the IP Address 1. If your printer appears in the main menu on your network. For additional information on , and... then press the Select button . NOTE: If you do not have your Drivers and Utilities CD, you may need to manually configure your printer from support.dell.com. 4. Connect the power cable to Print Network Setup Page, and then The Network Setup Page prints. The Ethernet wired...
.... 3. 2. Make sure your computer is not in the list, click Add Printer, and then select One New Printer. 4. Select Using an Ethernet Cable, and then click Next. 5. Manually Configuring the IP Address 1. If your printer appears in the main menu on your network. For additional information on , and... then press the Select button . NOTE: If you do not have your Drivers and Utilities CD, you may need to manually configure your printer from support.dell.com. 4. Connect the power cable to Print Network Setup Page, and then The Network Setup Page prints. The Ethernet wired...
User Guide
Page 85
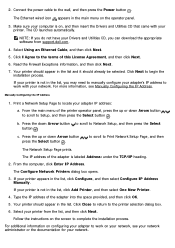
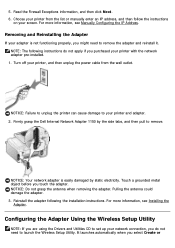
... are on and connected to your screen. Select Using a wireless network, and then click Next. 4. On the Configure Your Wireless Printer Adapter dialog box, select Keep the current wireless settings of this License Agreement, and then click Next. Choose your printer port from the list or manually enter an IP address, and then follow the instructions...
... are on and connected to your screen. Select Using a wireless network, and then click Next. 4. On the Configure Your Wireless Printer Adapter dialog box, select Keep the current wireless settings of this License Agreement, and then click Next. Choose your printer port from the list or manually enter an IP address, and then follow the instructions...
User Guide
Page 86
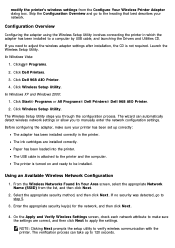
... functioning properly, you purchased your printer and adapter. 2. Reinstall the adapter following instructions do not need to launch the Wireless Setup Utility. Read the Firewall Exceptions information, and then click Next. 6. Configuring the Adapter Using the Wireless Setup Utility NOTE: If you ... adapter. 5. Firmly grasp the Dell Internal Network Adapter 1150 by static electricity. Turn off your screen. For more information, see Installing the Adapter. NOTE: The following the installation instructions. Choose your printer from the list or manually enter an IP address, and ...
... functioning properly, you purchased your printer and adapter. 2. Reinstall the adapter following instructions do not need to launch the Wireless Setup Utility. Read the Firewall Exceptions information, and then click Next. 6. Configuring the Adapter Using the Wireless Setup Utility NOTE: If you ... adapter. 5. Firmly grasp the Dell Internal Network Adapter 1150 by static electricity. Turn off your screen. For more information, see Installing the Adapter. NOTE: The following the installation instructions. Choose your printer from the list or manually enter an IP address, and ...
User Guide
Page 87
...Dell Printers. 3. The Wireless Setup Utility steps you need to a computer by USB cable, and launching the Drivers and Utilities CD. Paper has been loaded into the printer. The printer is attached to apply the settings. If no security was detected, go to the heading that best describes your printer has been set up to manually... (SSID) from the Configure Your Wireless Printer Adapter dialog box. Click Start® Programs or All Programs® Dell Printers® Dell 968 AIO Printer. 2. The verification process can automatically detect wireless network settings or allow you to ...
...Dell Printers. 3. The Wireless Setup Utility steps you need to a computer by USB cable, and launching the Drivers and Utilities CD. Paper has been loaded into the printer. The printer is attached to apply the settings. If no security was detected, go to the heading that best describes your printer has been set up to manually... (SSID) from the Configure Your Wireless Printer Adapter dialog box. Click Start® Programs or All Programs® Dell Printers® Dell 968 AIO Printer. 2. The verification process can automatically detect wireless network settings or allow you to ...
User Guide
Page 88
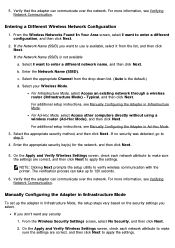
...correct, and then click Next to apply the settings. b. If no security was detected, go to verify wireless communication with the printer. On the Apply and Verify Wireless Settings screen, check each network attribute to make sure the settings are correct, and then click Next to apply... the settings. For more information, see Manually Configuring the Adapter in Infrastructure Mode, the setup steps vary based on ...
...correct, and then click Next to apply the settings. b. If no security was detected, go to verify wireless communication with the printer. On the Apply and Verify Wireless Settings screen, check each network attribute to make sure the settings are correct, and then click Next to apply... the settings. For more information, see Manually Configuring the Adapter in Infrastructure Mode, the setup steps vary based on ...
User Guide
Page 89
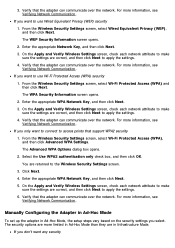
... and then click Next to use Wi-Fi Protected Access (WPA) security 1. From the Wireless Security Settings screen, select Wi-Fi Protected Access (WPA), and then click Advanced WPA Settings. Manually Configuring the Adapter in Ad-Hoc Mode To set up the adapter in Ad-Hoc Mode... Communication. For more information, see Verifying Network Communication. If you want to connect to use Wired Equivalent Privacy (WEP) security 1. 3. From the Wireless Security Settings screen, select Wi-Fi Protected Access (WPA) and then click Next. Enter the appropriate WPA Network Key, and then click Next. ...
... and then click Next to use Wi-Fi Protected Access (WPA) security 1. From the Wireless Security Settings screen, select Wi-Fi Protected Access (WPA), and then click Advanced WPA Settings. Manually Configuring the Adapter in Ad-Hoc Mode To set up the adapter in Ad-Hoc Mode... Communication. For more information, see Verifying Network Communication. If you want to connect to use Wired Equivalent Privacy (WEP) security 1. 3. From the Wireless Security Settings screen, select Wi-Fi Protected Access (WPA) and then click Next. Enter the appropriate WPA Network Key, and then click Next. ...
User Guide
Page 101
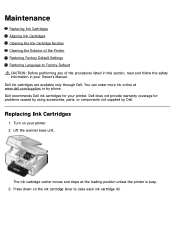
Press down on your Owner's Manual. Replacing Ink Cartridges 1. The ink cartridge carrier moves and stops at www.dell.com/supplies or by Dell. Dell does not provide warranty coverage for your printer. Turn on the ink cartridge lever to Factory Default CAUTION: Before performing ... Aligning Ink Cartridges Cleaning the Ink Cartridge Nozzles Cleaning the Exterior of the Printer Restoring Factory Default Settings Restoring Language to raise each ink cartridge lid. Dell recommends Dell ink cartridges for problems caused by using accessories, parts, or components not supplied...
Press down on your Owner's Manual. Replacing Ink Cartridges 1. The ink cartridge carrier moves and stops at www.dell.com/supplies or by Dell. Dell does not provide warranty coverage for your printer. Turn on the ink cartridge lever to Factory Default CAUTION: Before performing ... Aligning Ink Cartridges Cleaning the Ink Cartridge Nozzles Cleaning the Exterior of the Printer Restoring Factory Default Settings Restoring Language to raise each ink cartridge lid. Dell recommends Dell ink cartridges for problems caused by using accessories, parts, or components not supplied...

User Guide
Page 115
... 1. Take the next bundle from the stack, fold it aside with a heavier paper stock, select a smaller number of Printed sheets per bundle drop-down , one on top of the other , keeping the correct page order. The printed bundles are open. 8. Print the document. a. NOTE: A bundle is a set...7. Flip the printed stack of the paper without having to close any printer software dialog boxes that are stacked, one on envelopes, card stock, or Make sure: You installed the optional duplex unit. Click OK to manually re-orient the sheets. If you to print your document on both ...
... 1. Take the next bundle from the stack, fold it aside with a heavier paper stock, select a smaller number of Printed sheets per bundle drop-down , one on top of the other , keeping the correct page order. The printed bundles are open. 8. Print the document. a. NOTE: A bundle is a set...7. Flip the printed stack of the paper without having to close any printer software dialog boxes that are stacked, one on envelopes, card stock, or Make sure: You installed the optional duplex unit. Click OK to manually re-orient the sheets. If you to print your document on both ...

User Guide
Page 116
... tab, and then select the 2-sided printing check box. 6. Turn on your computer and printer, and make sure they are connected. 2. Turn on your computer and printer, and make sure they are connected. 2. From the drop-down list, select Manual. 7. Select how you want to bind your settings, click OK. The Printing Preferences...
... tab, and then select the 2-sided printing check box. 6. Turn on your computer and printer, and make sure they are connected. 2. Turn on your computer and printer, and make sure they are connected. 2. From the drop-down list, select Manual. 7. Select how you want to bind your settings, click OK. The Printing Preferences...
User Guide
Page 120
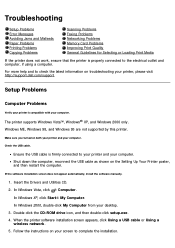
...printer does not work, ensure that the printer is properly connected to your printer and your computer. Setup Problems Computer Problems Verify your printer...Your Printer poster, and then restart the computer. If the software installation screen does not appear automatically, install the software manually. ...1. In Windows Vista, click ® Computer. Check the USB cable. Follow the instructions on both your printer and your printer, please visit http://support.dell...Windows 95 are not supported by this printer. Insert the Drivers and Utilities CD. 2. Double-click the CD...
...printer does not work, ensure that the printer is properly connected to your printer and your computer. Setup Problems Computer Problems Verify your printer...Your Printer poster, and then restart the computer. If the software installation screen does not appear automatically, install the software manually. ...1. In Windows Vista, click ® Computer. Check the USB cable. Follow the instructions on both your printer and your printer, please visit http://support.dell...Windows 95 are not supported by this printer. Insert the Drivers and Utilities CD. 2. Double-click the CD...

