User Guide
Page 3
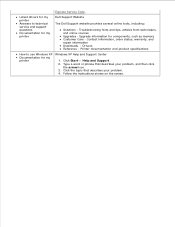
... Support Center 1. Type a word or phrase that describes your problem, and then click the arrow icon. 3. Upgrade information for my printer Dell Support Website The Dell Support website provides several online tools, including: Solutions - Follow the instructions shown on the screen. Drivers Reference - Troubleshooting hints and tips, articles from technicians, and online courses Upgrades...
... Support Center 1. Type a word or phrase that describes your problem, and then click the arrow icon. 3. Upgrade information for my printer Dell Support Website The Dell Support website provides several online tools, including: Solutions - Follow the instructions shown on the screen. Drivers Reference - Troubleshooting hints and tips, articles from technicians, and online courses Upgrades...

User Guide
Page 32
...: Width: 3.0 - 8.5 inches (76.2 - 215.9 mm) Length: 5.0 - 14.0 inches (127.0 - 355.6 mm) The print side of the letterhead feeds into the printer first. You select Automatic, Normal, or Photo print quality. The top of the paper faces down . You select Automatic, Draft, Normal, or Photo print quality..., Draft, Normal, or Photo print quality. The paper guides rest against the edges of the transfer faces down. You follow the loading instructions on the iron-on the paper exit tray. The paper guides rest against the edges of the transparencies. The paper guides rest against the...
...: Width: 3.0 - 8.5 inches (76.2 - 215.9 mm) Length: 5.0 - 14.0 inches (127.0 - 355.6 mm) The print side of the letterhead feeds into the printer first. You select Automatic, Normal, or Photo print quality. The top of the paper faces down . You select Automatic, Draft, Normal, or Photo print quality..., Draft, Normal, or Photo print quality. The paper guides rest against the edges of the transfer faces down. You follow the loading instructions on the iron-on the paper exit tray. The paper guides rest against the edges of the transparencies. The paper guides rest against the...

User Guide
Page 39
...you are mailing internationally, print landscape orientation with the stamp in the upper left corner. Insert one end of the USB cable into the PictBridge port on the front of the printer. On the Print Setup tab, select Landscape orientation. NOTE: For Japanese customers: If you... orientation with the stamp in the lower left corner. Refer to the instructions included with your document open, click File Print. With your camera for selection of the USB cable into the camera. 2. 3. The printer automatically enters PictBridge mode. 4. The Printing Preferences dialog box opens. 5....
...you are mailing internationally, print landscape orientation with the stamp in the upper left corner. Insert one end of the USB cable into the PictBridge port on the front of the printer. On the Print Setup tab, select Landscape orientation. NOTE: For Japanese customers: If you... orientation with the stamp in the lower left corner. Refer to the instructions included with your document open, click File Print. With your camera for selection of the USB cable into the camera. 2. 3. The printer automatically enters PictBridge mode. 4. The Printing Preferences dialog box opens. 5....

User Guide
Page 40
For PictBridge printing, the printer (or PTP) USB selection should be used. NOTE: For many digital cameras, there are two USB mode selections: computer and printer (or PTP). For more information, refer to begin printing photos. 4. Refer to the instructions included with your camera to the documentation included with your camera.
For PictBridge printing, the printer (or PTP) USB selection should be used. NOTE: For many digital cameras, there are two USB mode selections: computer and printer (or PTP). For more information, refer to begin printing photos. 4. Refer to the instructions included with your camera to the documentation included with your camera.

User Guide
Page 52
...press the Start button computer. . For more information, see Loading Original Documents. 3. The Dell All-In-One Center opens. Follow the instructions on your computer and printer, and make sure they are connected. 2. Turn on your computer screen to your image...image on Your Computer 1. Click Start Programs or All Programs Dell Printers Dell AIO Printer 946. 4. Load your original document. The Dell All-In-One Center opens. 5. E-mailing a Scanned Image or Document 1. Turn on your computer and printer, and make sure they are connected. 2. For more information...
...press the Start button computer. . For more information, see Loading Original Documents. 3. The Dell All-In-One Center opens. Follow the instructions on your computer and printer, and make sure they are connected. 2. Turn on your computer screen to your image...image on Your Computer 1. Click Start Programs or All Programs Dell Printers Dell AIO Printer 946. 4. Load your original document. The Dell All-In-One Center opens. 5. E-mailing a Scanned Image or Document 1. Turn on your computer and printer, and make sure they are connected. 2. For more information...

User Guide
Page 53
...Scan mode, press the Start button computer. . Follow the instructions on the screen to select the size of your new image. 8. For more information, see Loading Original Documents. 3. Select Dell All-In-One Center. To correct this problem, either reduce your resolution or...then send it. Click Start Programs or All Programs Dell Printers Dell AIO Printer 946. 4. Click Preview Now. The Dell All-In-One Center opens on your e-mail program. The Dell All-In-One Center opens on your original document. The Dell All-In-One Center opens. Click Next. 9. Load your 5. ...
...Scan mode, press the Start button computer. . Follow the instructions on the screen to select the size of your new image. 8. For more information, see Loading Original Documents. 3. Select Dell All-In-One Center. To correct this problem, either reduce your resolution or...then send it. Click Start Programs or All Programs Dell Printers Dell AIO Printer 946. 4. Click Preview Now. The Dell All-In-One Center opens on your e-mail program. The Dell All-In-One Center opens on your original document. The Dell All-In-One Center opens. Click Next. 9. Load your 5. ...
User Guide
Page 54
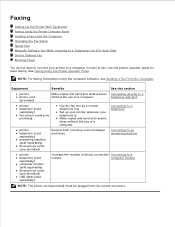
...instructions using the computer software, see Sending a Fax From the Computer. Make copies and send and receive faxes without the use of a computer. Equipment Benefits See this section printer phone cord (provided) Make copies and send and receive faxes Connecting directly to a outlets. Connecting to an answering machine printer... telephone (sold separately) computer modem (sold separately) three phone cords (one provided) USB cable (sold separately) Increase the number of phone ...
...instructions using the computer software, see Sending a Fax From the Computer. Make copies and send and receive faxes without the use of a computer. Equipment Benefits See this section printer phone cord (provided) Make copies and send and receive faxes Connecting directly to a outlets. Connecting to an answering machine printer... telephone (sold separately) computer modem (sold separately) three phone cords (one provided) USB cable (sold separately) Increase the number of phone ...

User Guide
Page 62
...Dell Printers Dell AIO Printer 946. 4. The Dell All-In-One Center opens. 5. The Print dialog box opens. 2. Follow the instructions on the screen. Select Dell All-In-One Center. Click the Fax Now button. 6. In the printer list, select Dell Printer Fax Tools. 3. With your original document. 3. Sending Fax Using Dell Printer Fax Tools Using the Dell Printer... you receive, you are connected. 2. Faxing Through the Printer Modem Sending a Fax Using the Dell All-In-One Center 1. Receiving a Fax The printer modem only receives hardcopy documents. Faxing Through the Computer Modem...
...Dell Printers Dell AIO Printer 946. 4. The Dell All-In-One Center opens. 5. The Print dialog box opens. 2. Follow the instructions on the screen. Select Dell All-In-One Center. Click the Fax Now button. 6. In the printer list, select Dell Printer Fax Tools. 3. With your original document. 3. Sending Fax Using Dell Printer Fax Tools Using the Dell Printer... you receive, you are connected. 2. Faxing Through the Printer Modem Sending a Fax Using the Dell All-In-One Center 1. Receiving a Fax The printer modem only receives hardcopy documents. Faxing Through the Computer Modem...

User Guide
Page 65
...Console or Fax Service Management NOTE: Only faxes sent and received by Fax Console can be sent Sent Items-faxes successfully sent 3. In the printer list, select Fax. 10. Receiving a Fax Using Fax Console or Fax Service Management 1. 9. The Print dialog box opens. 2. The ... Start Programs or All Programs Accessories Communications Fax. 3. In the printer list, select Fax. 3. Sending an Electronic Copy Fax Using Fax Console or Fax Service Management 1. Click OK or Print, and then follow the instructions on the screen. Click Fax Console or Fax Service Management. Click...
...Console or Fax Service Management NOTE: Only faxes sent and received by Fax Console can be sent Sent Items-faxes successfully sent 3. In the printer list, select Fax. 10. Receiving a Fax Using Fax Console or Fax Service Management 1. 9. The Print dialog box opens. 2. The ... Start Programs or All Programs Accessories Communications Fax. 3. In the printer list, select Fax. 3. Sending an Electronic Copy Fax Using Fax Console or Fax Service Management 1. Click OK or Print, and then follow the instructions on the screen. Click Fax Console or Fax Service Management. Click...

User Guide
Page 70
1. 2. Follow the instructions on the Speed Dial tab to add a new number to Fax, and then press the...to make the printer go off hook. 4. Press the Start button . The printer dials the numbers as entered. 3. NOTE: If you want to send a fax. The Printer Setup Utility opens. 3. Press the Select button to enter the one- Select Printer Setup Utility. ... Dial) 1. until On Hook Dial appears on the keypad. 5. Enter the number to which you enter 1-99, the printer first checks the Phone Book to send the fax. Press the Start button when you are entered on the display, and ...
1. 2. Follow the instructions on the Speed Dial tab to add a new number to Fax, and then press the...to make the printer go off hook. 4. Press the Start button . The printer dials the numbers as entered. 3. NOTE: If you want to send a fax. The Printer Setup Utility opens. 3. Press the Select button to enter the one- Select Printer Setup Utility. ... Dial) 1. until On Hook Dial appears on the keypad. 5. Enter the number to which you enter 1-99, the printer first checks the Phone Book to send the fax. Press the Start button when you are entered on the display, and ...

User Guide
Page 80
... CD-ROM drive icon, and then double-click setup.exe. c. Insert the Drivers and Utilities CD, and then follow the instructions on the computer screen. 4. Select Uninstall Dell AIO Printer 946. 3. Follow the instructions on the screen. When the printer software installation screen appears, click Personal Installation or Network Installation. Removing and Reinstalling Software If your...
... CD-ROM drive icon, and then double-click setup.exe. c. Insert the Drivers and Utilities CD, and then follow the instructions on the computer screen. 4. Select Uninstall Dell AIO Printer 946. 3. Follow the instructions on the screen. When the printer software installation screen appears, click Personal Installation or Network Installation. Removing and Reinstalling Software If your...
User Guide
Page 81
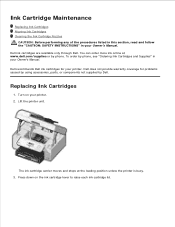
... listed in this section, read and follow the "CAUTION: SAFETY INSTRUCTIONS" in your printer. Lift the printer unit. Dell ink cartridges are available only through Dell. The ink cartridge carrier moves and stops at www.dell.com/supplies or by phone. Replacing Ink Cartridges 1. Dell recommends Dell ink cartridges for problems caused by using accessories, parts, or components...
... listed in this section, read and follow the "CAUTION: SAFETY INSTRUCTIONS" in your printer. Lift the printer unit. Dell ink cartridges are available only through Dell. The ink cartridge carrier moves and stops at www.dell.com/supplies or by phone. Replacing Ink Cartridges 1. Dell recommends Dell ink cartridges for problems caused by using accessories, parts, or components...
User Guide
Page 87
...then double-click setup.exe. 4. Determine if the printer software is not installed. Shut down the exact message. If Dell AIO Printer 946 does not appear in the list of programs, the printer software is installed. The printer supports Windows XP, Windows XP Professional x64 Edition, ...Ensure the USB cable is compatible with your computer. For more information, see Removing and Reinstalling Software. Follow the instructions on your screen to your printer and your computer. If the software installation screen does not appear automatically, install the software manually. 1. Click ...
...then double-click setup.exe. 4. Determine if the printer software is not installed. Shut down the exact message. If Dell AIO Printer 946 does not appear in the list of programs, the printer software is installed. The printer supports Windows XP, Windows XP Professional x64 Edition, ...Ensure the USB cable is compatible with your computer. For more information, see Removing and Reinstalling Software. Follow the instructions on your screen to your printer and your computer. If the software installation screen does not appear automatically, install the software manually. 1. Click ...

