User Guide
Page 5
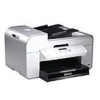
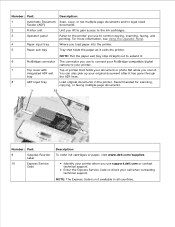
... documents in all countries. Number: Part: 9 Supplies Reorder Label 10 Express Service Code Description: To order ink cartridges or paper, visit www.dell.com/supplies. NOTE: The Express Code is not available in the printer. For more information, see Using the Operator Panel. 4 Paper input tray Where you use support..., faxing, and printing. Number: Part: Description: 1 Automatic Document Scan, copy, or fax multiple page documents and/or legal sized Feeder (ADF) documents. 2 Printer unit Unit you lift to gain access to the ink cartridges. 3 Operator panel Panel on the...
... documents in all countries. Number: Part: 9 Supplies Reorder Label 10 Express Service Code Description: To order ink cartridges or paper, visit www.dell.com/supplies. NOTE: The Express Code is not available in the printer. For more information, see Using the Operator Panel. 4 Paper input tray Where you use support..., faxing, and printing. Number: Part: Description: 1 Automatic Document Scan, copy, or fax multiple page documents and/or legal sized Feeder (ADF) documents. 2 Printer unit Unit you lift to gain access to the ink cartridges. 3 Operator panel Panel on the...

User Guide
Page 26
...the Select button to print a test page. Maintenance Mode Main menu Mode Main Menu Copy Scan Fax Setup Maintenance Ink Levels Clean Cartridges Align Cartridges Print Test Page 1. Press the Select button . 3. You may discard the page when printing is complete. Use the left and... right Arrow buttons to scroll to clean the ink cartridges. Align Cartridges Press the Select button to scroll through the available maintenance tasks. 5. Clean Cartridges Press the Select button to Maintenance. 2. An alignment page prints. You may discard the...
...the Select button to print a test page. Maintenance Mode Main menu Mode Main Menu Copy Scan Fax Setup Maintenance Ink Levels Clean Cartridges Align Cartridges Print Test Page 1. Press the Select button . 3. You may discard the page when printing is complete. Use the left and... right Arrow buttons to scroll to clean the ink cartridges. Align Cartridges Press the Select button to scroll through the available maintenance tasks. 5. Clean Cartridges Press the Select button to Maintenance. 2. An alignment page prints. You may discard the...

User Guide
Page 31
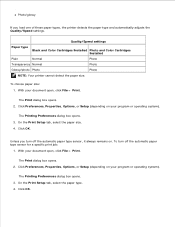
...with the stamp in the lower right corner, or in Landscape orientation, with the stamp in the first sheet. If you have a photo cartridge installed. 20 sheets of the paper. You select the correct envelope size. You load letterhead paper with Landscape orientation. You use banner paper ... Load up to: 100 sheets of plain paper Make sure: The paper guides rest against the edges of the letterhead going into the printer first. The envelopes are mailing internationally, print Landscape orientation with the stamp in the lower left corner. Select the next biggest You print...
...with the stamp in the lower right corner, or in Landscape orientation, with the stamp in the first sheet. If you have a photo cartridge installed. 20 sheets of the paper. You select the correct envelope size. You load letterhead paper with Landscape orientation. You use banner paper ... Load up to: 100 sheets of plain paper Make sure: The paper guides rest against the edges of the letterhead going into the printer first. The envelopes are mailing internationally, print Landscape orientation with the stamp in the lower left corner. Select the next biggest You print...
User Guide
Page 33
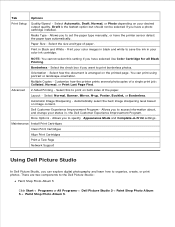
...select the paper type. 4. Quality/Speed settings Paper type Black and Color Cartridges Installed Photo and Color Cartridges Installed Plain Normal Photo Transparency Normal Photo Glossy/photo Photo Photo NOTE: Your printer cannot detect the paper size. The Print dialog box opens. 2. To .... With your program or operating system). On the Print Setup tab, select the paper size. 4. Unless you load one of these paper types, the printer detects the paper type and automatically adjusts the Quality/Speed settings. The Printing Preferences dialog box opens. 3. Click Preferences...
...select the paper type. 4. Quality/Speed settings Paper type Black and Color Cartridges Installed Photo and Color Cartridges Installed Plain Normal Photo Transparency Normal Photo Glossy/photo Photo Photo NOTE: Your printer cannot detect the paper size. The Print dialog box opens. 2. To .... With your program or operating system). On the Print Setup tab, select the paper size. 4. Unless you load one of these paper types, the printer detects the paper type and automatically adjusts the Quality/Speed settings. The Printing Preferences dialog box opens. 3. Click Preferences...

User Guide
Page 37
...see Loading Paper. 3. On the Print Setup and Advanced tabs, make sure they are connected. 2. When you use a color cartridge and a photo cartridge for printing photos. 1. The Print dialog box opens. 4. With your document. 6. Printing Printing a Document Printing Photos Printing ... (depending on the program or operating system). The Printing Preferences dialog box opens. 5. Printing Photos NOTE: Dell recommends you finish customizing your computer and printer, and make any necessary changes for printing photos. 3. Load the paper. For more information, see Loading ...
...see Loading Paper. 3. On the Print Setup and Advanced tabs, make sure they are connected. 2. When you use a color cartridge and a photo cartridge for printing photos. 1. The Print dialog box opens. 4. With your document. 6. Printing Printing a Document Printing Photos Printing ... (depending on the program or operating system). The Printing Preferences dialog box opens. 5. Printing Photos NOTE: Dell recommends you finish customizing your computer and printer, and make any necessary changes for printing photos. 3. Load the paper. For more information, see Loading ...
User Guide
Page 78
...select this to save the ink in black and white to print on your color ink cartridge. Select Normal, Banner, Mirror, N-up, Poster, Booklet, or Borderless. Dell Customer Experience Improvement Program - Select the size and type of a single print job: Collated... you have the printer sensor detect the paper type automatically. Allows you can print using portrait or landscape orientation. Orientation - Layout - Maintenance Install Print Cartridges Clean Print Cartridges Align Print Cartridges Print a Test Page Network Support Using Dell Picture Studio In Dell Picture Studio, you...
...select this to save the ink in black and white to print on your color ink cartridge. Select Normal, Banner, Mirror, N-up, Poster, Booklet, or Borderless. Dell Customer Experience Improvement Program - Select the size and type of a single print job: Collated... you have the printer sensor detect the paper type automatically. Allows you can print using portrait or landscape orientation. Orientation - Layout - Maintenance Install Print Cartridges Clean Print Cartridges Align Print Cartridges Print a Test Page Network Support Using Dell Picture Studio In Dell Picture Studio, you...
User Guide
Page 79
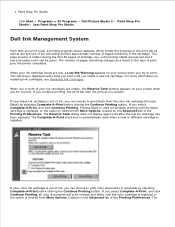
The number of print jobs the printer completes. If you continue printing, the print job may not print as a result of the type of pages remaining changes as you expect. Dell Ink Management System Each time you print a job, a printing progress screen appears, which shows the ... Advanced tab of the Printing Preferences. This warning is installed. When one or both of your ink cartridges are empty, the Reserve Tank window appears on your color ink cartridge is cleared from the color ink cartridge (Process Black) by selecting Complete-A-Print before clicking the Continue Printing ...
The number of print jobs the printer completes. If you continue printing, the print job may not print as a result of the type of pages remaining changes as you expect. Dell Ink Management System Each time you print a job, a printing progress screen appears, which shows the ... Advanced tab of the Printing Preferences. This warning is installed. When one or both of your ink cartridges are empty, the Reserve Tank window appears on your color ink cartridge is cleared from the color ink cartridge (Process Black) by selecting Complete-A-Print before clicking the Continue Printing ...

User Guide
Page 80
... Windows XP, click Start My Computer. Restart your desktop. d. The Complete-A-Print check box is automatically reset when a new or different cartridge is installed. Select Uninstall Dell AIO Printer 946. 3. When the printer software installation screen appears, click Personal Installation or Network Installation. Follow the instructions on the screen. Click Start Programs or All Programs...
... Windows XP, click Start My Computer. Restart your desktop. d. The Complete-A-Print check box is automatically reset when a new or different cartridge is installed. Select Uninstall Dell AIO Printer 946. 3. When the printer software installation screen appears, click Personal Installation or Network Installation. Follow the instructions on the screen. Click Start Programs or All Programs...
User Guide
Page 81
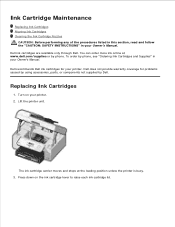
Replacing Ink Cartridges 1. Press down on your printer. Dell recommends Dell ink cartridges for problems caused by using accessories, parts, or components not supplied by phone, see "Ordering Ink Cartridges and Supplies" in your Owner's Manual. Dell ink cartridges are available only through Dell. Dell does not provide warranty coverage for your printer. 2. Lift the printer unit. You can order more ink online...
Replacing Ink Cartridges 1. Press down on your printer. Dell recommends Dell ink cartridges for problems caused by using accessories, parts, or components not supplied by phone, see "Ordering Ink Cartridges and Supplies" in your Owner's Manual. Dell ink cartridges are available only through Dell. Dell does not provide warranty coverage for your printer. 2. Lift the printer unit. You can order more ink online...
User Guide
Page 82
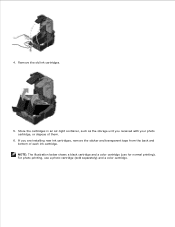
NOTE: The illustration below shows a black cartridge and a color cartridge (use a photo cartridge (sold separately) and a color cartridge. Remove the old ink cartridges. 5. If you received with your photo cartridge, or dispose of each ink cartridge. For photo printing, use for normal printing). Store the cartridges in an air-tight container, such as the storage unit you are installing new ink cartridges, remove the sticker and transparent tape from the back and bottom of them. 6. 3. 4.
NOTE: The illustration below shows a black cartridge and a color cartridge (use a photo cartridge (sold separately) and a color cartridge. Remove the old ink cartridges. 5. If you received with your photo cartridge, or dispose of each ink cartridge. For photo printing, use for normal printing). Store the cartridges in an air-tight container, such as the storage unit you are installing new ink cartridges, remove the sticker and transparent tape from the back and bottom of them. 6. 3. 4.
User Guide
Page 83
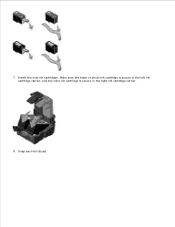
Insert the new ink cartridges. Make sure the black or photo ink cartridge is secure in the left ink cartridge carrier, and the color ink cartridge is secure in the right ink cartridge carrier. 8. 7. Snap each lid closed. 9.
Insert the new ink cartridges. Make sure the black or photo ink cartridge is secure in the left ink cartridge carrier, and the color ink cartridge is secure in the right ink cartridge carrier. 8. 7. Snap each lid closed. 9.

User Guide
Page 84
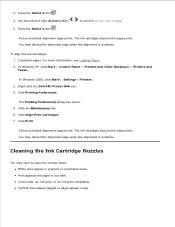
... lines appear wavy. Aligning Ink Cartridges Your printer automatically aligns the ink cartridges when they are not aligned at the left and right Arrow buttons 3. Load plain paper. After you want to Maintenance. You may also need to align ink cartridges when characters are not properly formed... or are installed or replaced. Close the printer unit. For more information, see Loading Paper. 2. to scroll to verify your ink cartridges are aligned, you can print an alignment page. An...
... lines appear wavy. Aligning Ink Cartridges Your printer automatically aligns the ink cartridges when they are not aligned at the left and right Arrow buttons 3. Load plain paper. After you want to Maintenance. You may also need to align ink cartridges when characters are not properly formed... or are installed or replaced. Close the printer unit. For more information, see Loading Paper. 2. to scroll to verify your ink cartridges are aligned, you can print an alignment page. An...
User Guide
Page 85
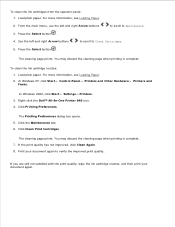
...Dell AIO Printer 946 icon. 4. Click Print. The ink cartridges align as the page prints. Colors fade, do not print, or do not print completely. Use the left and right Arrow buttons 5. To align the ink cartridges: 1. In Windows XP, click Start Control Panel Printers and Other Hardware Printers... when the alignment is complete. 2. 3. In Windows 2000, click Start Settings Printers. 3. Click Align Print Cartridges. 7. A blue and black alignment page prints. You may need to Align Cartridges. The Printing Preferences dialog box opens. 5. to scroll to clean the nozzles when...
...Dell AIO Printer 946 icon. 4. Click Print. The ink cartridges align as the page prints. Colors fade, do not print, or do not print completely. Use the left and right Arrow buttons 5. To align the ink cartridges: 1. In Windows XP, click Start Control Panel Printers and Other Hardware Printers... when the alignment is complete. 2. 3. In Windows 2000, click Start Settings Printers. 3. Click Align Print Cartridges. 7. A blue and black alignment page prints. You may need to Align Cartridges. The Printing Preferences dialog box opens. 5. to scroll to clean the nozzles when...
User Guide
Page 86
.... Press the Select button . Click Printing Preferences. Right-click the Dell™ All-In-One Printer 946 icon. 4. Click the Maintenance tab. 6. If the print quality has not improved, click Clean Again. 8. If you are still not satisfied with the print quality, wipe the ink cartridge nozzles, and then print your document again to Clean...
.... Press the Select button . Click Printing Preferences. Right-click the Dell™ All-In-One Printer 946 icon. 4. Click the Maintenance tab. 6. If the print quality has not improved, click Clean Again. 8. If you are still not satisfied with the print quality, wipe the ink cartridge nozzles, and then print your document again to Clean...

User Guide
Page 88
... cable from the Drivers and Utilities CD. Restart your Printers folder, make sure you installed the ink cartridges correctly and removed the sticker and tape from the electrical outlet. In Windows 2000, click Start Settings Printers. 2. Right-click Dell AIO Printer 946, and select Set as the default printer. 1. Set that was originally used for your computer...
... cable from the Drivers and Utilities CD. Restart your Printers folder, make sure you installed the ink cartridges correctly and removed the sticker and tape from the electrical outlet. In Windows 2000, click Start Settings Printers. 2. Right-click Dell AIO Printer 946, and select Set as the default printer. 1. Set that was originally used for your computer...
User Guide
Page 93
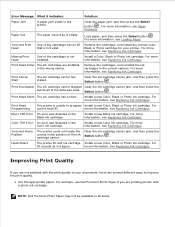
...program Install a new Color, Black or Photo ink cartridge. Clear the paper jam, and then press the Select button . Missing Print Head One of the data was used. Print Head Programming The printer is empty. NOTE: Dell Premium Photo Paper may not be available in the Color... ink cartridge. For more information, see Replacing Ink Cartridges. Clear the ink cartridge carrier jam, and then press the ...
...program Install a new Color, Black or Photo ink cartridge. Clear the paper jam, and then press the Select button . Missing Print Head One of the data was used. Print Head Programming The printer is empty. NOTE: Dell Premium Photo Paper may not be available in the Color... ink cartridge. For more information, see Replacing Ink Cartridges. Clear the ink cartridge carrier jam, and then press the ...
User Guide
Page 94
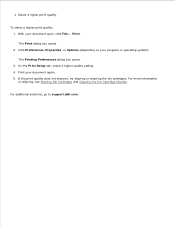
..., Properties, or Options (depending on aligning, see Aligning Ink Cartridges and Cleaning the Ink Cartridge Nozzles. The Printing Preferences dialog box opens. 3. For additional solutions, go to support.dell.com. If the print quality does not improve, try aligning or cleaning the ink cartridges. Print your program or operating system). To select a higher print...
..., Properties, or Options (depending on aligning, see Aligning Ink Cartridges and Cleaning the Ink Cartridge Nozzles. The Printing Preferences dialog box opens. 3. For additional solutions, go to support.dell.com. If the print quality does not improve, try aligning or cleaning the ink cartridges. Print your program or operating system). To select a higher print...


