
User's Guide
Page 5
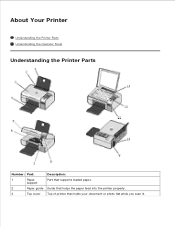
About Your Printer Understanding the Printer Parts Understanding the Operator Panel Understanding the Printer Parts Number: Part: Description: 1 Paper Part that holds your document or photo flat while you scan it. support 2 Paper guide Guide that helps the paper feed into the printer properly. 3 Top cover Top of printer that supports loaded paper.
About Your Printer Understanding the Printer Parts Understanding the Operator Panel Understanding the Printer Parts Number: Part: Description: 1 Paper Part that holds your document or photo flat while you scan it. support 2 Paper guide Guide that helps the paper feed into the printer properly. 3 Top cover Top of printer that supports loaded paper.
User's Guide
Page 6
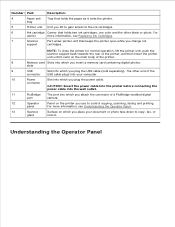
... that keeps the printer open while you place your computer. 10 Power Slot into which you plug the USB cable (sold separately). Number: Part: Description: 4 Paper exit Tray that holds two ink cartridges, one color and the other end of the connector USB cable plugs into which ...you attach the connector of a PictBridge-enabled digital port camera. 12 Operator Panel on the main body of the printer, and then lower the printer unit until...
... that keeps the printer open while you place your computer. 10 Power Slot into which you plug the USB cable (sold separately). Number: Part: Description: 4 Paper exit Tray that holds two ink cartridges, one color and the other end of the connector USB cable plugs into which ...you attach the connector of a PictBridge-enabled digital port camera. 12 Operator Panel on the main body of the printer, and then lower the printer unit until...

User's Guide
Page 7
... items. Increase or decrease a numeric value option. Access the currently displayed menu. View the characters under the icons to the previous menu. Turn your printer on a memory card or digital camera. NOTE: Pressing the power button does not turn off . Cancel a scan, print, or copy job in ..., copying, faxing, and printing options as well as status and error messages. Scroll through photos and Microsoft Office files on or off your printer if a PictBridge camera with an active session is an error. Check if there is inserted into the PictBridge port. For missing or invalid ink...
... items. Increase or decrease a numeric value option. Access the currently displayed menu. View the characters under the icons to the previous menu. Turn your printer on a memory card or digital camera. NOTE: Pressing the power button does not turn off . Cancel a scan, print, or copy job in ..., copying, faxing, and printing options as well as status and error messages. Scroll through photos and Microsoft Office files on or off your printer if a PictBridge camera with an active session is an error. Check if there is inserted into the PictBridge port. For missing or invalid ink...
User's Guide
Page 8
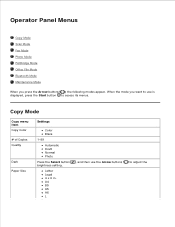
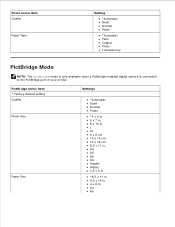
Operator Panel Menus Copy Mode Scan Mode Fax Mode Photo Mode PictBridge Mode Office File Mode Bluetooth Mode Maintenance Mode When you want to use the Arrow buttons to access its menus. Copy Mode Copy menu item Copy Color # of Copies Quality Dark Paper Size Settings Color Black 1-99 Automatic Draft Normal Photo Press the Select button brightness setting. Letter Legal 4 x 6 in. A4 B5 A5 A6 L , and then use is displayed, press the Start button to adjust the When the mode you press the Arrow buttons , the following modes appear.
Operator Panel Menus Copy Mode Scan Mode Fax Mode Photo Mode PictBridge Mode Office File Mode Bluetooth Mode Maintenance Mode When you want to use the Arrow buttons to access its menus. Copy Mode Copy menu item Copy Color # of Copies Quality Dark Paper Size Settings Color Black 1-99 Automatic Draft Normal Photo Press the Select button brightness setting. Letter Legal 4 x 6 in. A4 B5 A5 A6 L , and then use is displayed, press the Start button to adjust the When the mode you press the Arrow buttons , the following modes appear.

User's Guide
Page 9
Scan menu item Settings Copy menu item Settings 2L Hagaki 3 x 5 in. 3.5 x 5 in. 10x15 cm 5 x 7 in. 13x18 cm Paper Type Automatic Plain Coated Photo Transparency Zoom 100% 125% 150% 175% 200% 4 x 6 in. 5 x 7 in. Letter A4 B5 L 2L Hagaki 25% 50% 75% Skew Correction Off On Scan Mode The Scan Menu is only available if the printer is connected to a computer or a network adapter.
Scan menu item Settings Copy menu item Settings 2L Hagaki 3 x 5 in. 3.5 x 5 in. 10x15 cm 5 x 7 in. 13x18 cm Paper Type Automatic Plain Coated Photo Transparency Zoom 100% 125% 150% 175% 200% 4 x 6 in. 5 x 7 in. Letter A4 B5 L 2L Hagaki 25% 50% 75% Skew Correction Off On Scan Mode The Scan Menu is only available if the printer is connected to a computer or a network adapter.
User's Guide
Page 11
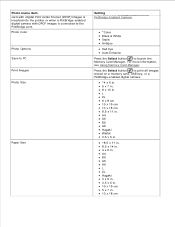
Press the Select button to the PictBridge port. Photo menu item card with Digital Print Order Format (DPOF) images is inserted into the printer or when a PictBridge-enabled digital camera with DPOF images is connected to print all images stored on a memory card, USB key, or a PictBridge-enabled ...digital camera. *4 x 6 in. 5 x 7 in. 8 x 10 in. Photo Color Photo Options Save to PC Print Images Photo Size Paper Size Sinefottrimnagtion, see Using Memory Card Manager. L 2L 6 x 8 cm 10 x 15 cm 13 x 18 cm 8.5 x 11 in . 13 x 18 cm A4 B5 A5 A6 L 2L...
Press the Select button to the PictBridge port. Photo menu item card with Digital Print Order Format (DPOF) images is inserted into the printer or when a PictBridge-enabled digital camera with DPOF images is connected to print all images stored on a memory card, USB key, or a PictBridge-enabled ...digital camera. *4 x 6 in. 5 x 7 in. 8 x 10 in. Photo Color Photo Options Save to PC Print Images Photo Size Paper Size Sinefottrimnagtion, see Using Memory Card Manager. L 2L 6 x 8 cm 10 x 15 cm 13 x 18 cm 8.5 x 11 in . 13 x 18 cm A4 B5 A5 A6 L 2L...
User's Guide
Page 12
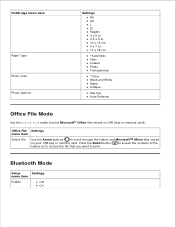
A4 A5 B5 A6 Hagaki Wallet 3.5 x 5 in. *8.5 x 11 in. 8.5 x 14 in. 4 x 6 in . PictBridge menu item * Factory default setting Quality Photo Size Paper Size Settings *Automatic Draft Normal Photo *4 x 6 in. 5 x 7 in. 8 x 10 in . L 2L 6 x 8 cm 10 x 15 cm 13 x 18 cm 8.5 x 11 in. A4 B5 Photo menu item Quality Paper Type Setting *Automatic Draft Normal Photo *Automatic Plain Coated Photo Transparency PictBridge Mode NOTE: The PictBridge mode is only available when a PictBridge-enabled digital camera is connected to the PictBridge port of your printer.
A4 A5 B5 A6 Hagaki Wallet 3.5 x 5 in. *8.5 x 11 in. 8.5 x 14 in. 4 x 6 in . PictBridge menu item * Factory default setting Quality Photo Size Paper Size Settings *Automatic Draft Normal Photo *4 x 6 in. 5 x 7 in. 8 x 10 in . L 2L 6 x 8 cm 10 x 15 cm 13 x 18 cm 8.5 x 11 in. A4 B5 Photo menu item Quality Paper Type Setting *Automatic Draft Normal Photo *Automatic Plain Coated Photo Transparency PictBridge Mode NOTE: The PictBridge mode is only available when a PictBridge-enabled digital camera is connected to the PictBridge port of your printer.
User's Guide
Page 13
... choose the file that you want to scroll through the folders and MicrosoftTM Office files stored on USB keys or memory cards. PictBridge menu item Paper Type Photo Color Photo Options Settings A5 A6 L 2L Hagaki 3 x 5 in. 3.5 x 5 in. 10 x 15 cm 5 x 7 in. 13 x 18 cm *Automatic Plain Coated Photo Transparency *Color...
... choose the file that you want to scroll through the folders and MicrosoftTM Office files stored on USB keys or memory cards. PictBridge menu item Paper Type Photo Color Photo Options Settings A5 A6 L 2L Hagaki 3 x 5 in. 3.5 x 5 in. 10 x 15 cm 5 x 7 in. 13 x 18 cm *Automatic Plain Coated Photo Transparency *Color...

User's Guide
Page 15
... force paper into the Paper Support 1. The paper should be flat against the paper support surface, and the edges should be flush against the edges of the paper. Loading Paper and Originals Loading Paper into the Paper Support Understanding the Automatic Paper Type Sensor Loading Original Documents on the paper support. 3. Center the paper on the Scanner Glass Loading Paper into the printer...
... force paper into the Paper Support 1. The paper should be flat against the paper support surface, and the edges should be flush against the edges of the paper. Loading Paper and Originals Loading Paper into the Paper Support Understanding the Automatic Paper Type Sensor Loading Original Documents on the paper support. 3. Center the paper on the Scanner Glass Loading Paper into the printer...

User's Guide
Page 16
..., print in Landscape orientation with Landscape orientation. You select Automatic, Normal, or Photo print quality. You use banner paper designed for inkjet printers. The paper guides rest against the edges of the paper. You load letterhead paper with the stamp in the upper left and right margins so your envelope is correctly positioned. You print the...
..., print in Landscape orientation with Landscape orientation. You select Automatic, Normal, or Photo print quality. You use banner paper designed for inkjet printers. The paper guides rest against the edges of the paper. You load letterhead paper with the stamp in the upper left and right margins so your envelope is correctly positioned. You print the...
User's Guide
Page 17
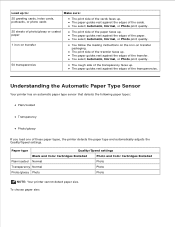
... the Automatic Paper Type Sensor Your printer has an automatic paper type sensor that detects the following paper types: Plain/coated Transparency Photo/glossy If you load one of the paper. The paper guides rest against the edges of these paper types, the printer detects the paper type and ...automatically adjusts the Quality/Speed settings. Paper type Quality/Speed settings Black and Color Cartridges Installed...
... the Automatic Paper Type Sensor Your printer has an automatic paper type sensor that detects the following paper types: Plain/coated Transparency Photo/glossy If you load one of the paper. The paper guides rest against the edges of these paper types, the printer detects the paper type and ...automatically adjusts the Quality/Speed settings. Paper type Quality/Speed settings Black and Color Cartridges Installed...
User's Guide
Page 18
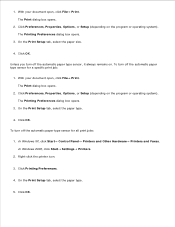
...on . In Windows XP, click Start Control Panel Printers and Other Hardware Printers and Faxes. Click Printing Preferences. 4. Click OK. Click OK. 1. To turn off the automatic paper type sensor for all print jobs: 1. Right-click the printer icon. 3. The Print dialog box opens. 2. On...dialog box opens. 3. Click OK. On the Print Setup tab, select the paper type. 5. In Windows 2000, click Start Settings Printers. 2. The Printing Preferences dialog box opens. 3. To turn off the automatic paper type sensor for a specific print job: 1. Click Preferences, Properties, Options, or...
...on . In Windows XP, click Start Control Panel Printers and Other Hardware Printers and Faxes. Click Printing Preferences. 4. Click OK. Click OK. 1. To turn off the automatic paper type sensor for all print jobs: 1. Right-click the printer icon. 3. The Print dialog box opens. 2. On...dialog box opens. 3. Click OK. On the Print Setup tab, select the paper type. 5. In Windows 2000, click Start Settings Printers. 2. The Printing Preferences dialog box opens. 3. To turn off the automatic paper type sensor for a specific print job: 1. Click Preferences, Properties, Options, or...

User's Guide
Page 20
Click Preferences, Properties, Options, or Setup (depending on your computer and printer, and make any necessary changes to your document open, click File Print. Load the paper. When you use a color cartridge and a photo cartridge for printing photos. The Printing Preferences dialog box... closes. 7. Printing Documents 1. With your document. 6. For more information, see Loading Paper into the Paper Support. 3. The Print dialog box opens. 4. The Printing Preferences dialog box opens. 5. On the Print Setup and Advanced ...
Click Preferences, Properties, Options, or Setup (depending on your computer and printer, and make any necessary changes to your document open, click File Print. Load the paper. When you use a color cartridge and a photo cartridge for printing photos. The Printing Preferences dialog box... closes. 7. Printing Documents 1. With your document. 6. For more information, see Loading Paper into the Paper Support. 3. The Print dialog box opens. 4. The Printing Preferences dialog box opens. 5. On the Print Setup and Advanced ...

User's Guide
Page 21
...check box on the Print Setup tab, and then select the borderless paper size from sticking together or smudging. On the Print Setup and Advanced tabs, make sure they are using Dell Picture StudioTM, select Printer Settings to prevent your document open, click File Print. The printout ...on non-photo paper contains a 2mm margin on the program or operating system). The Printing Preferences dialog box...
...check box on the Print Setup tab, and then select the borderless paper size from sticking together or smudging. On the Print Setup and Advanced tabs, make sure they are using Dell Picture StudioTM, select Printer Settings to prevent your document open, click File Print. The printout ...on non-photo paper contains a 2mm margin on the program or operating system). The Printing Preferences dialog box...
User's Guide
Page 25
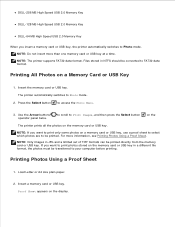
...a Proof Sheet 1. Load Letter or A4 size plain paper. 2. to scroll to Print Images, and then press the Select button on the The printer prints all the photos on the display. Proof Sheet appears... on the memory card or USB key. DELL-256 MB High Speed USB 2.0 Memory Key DELL-128 MB High Speed USB 2.0 Memory Key DELL-64...limited set of TIFF formats can be printed. For more than one memory card or USB key at a time. The printer automatically switches to access the Photo Menu. 3. Insert the memory card or USB...
...a Proof Sheet 1. Load Letter or A4 size plain paper. 2. to scroll to Print Images, and then press the Select button on the The printer prints all the photos on the display. Proof Sheet appears... on the memory card or USB key. DELL-256 MB High Speed USB 2.0 Memory Key DELL-128 MB High Speed USB 2.0 Memory Key DELL-64...limited set of TIFF formats can be printed. For more than one memory card or USB key at a time. The printer automatically switches to access the Photo Menu. 3. Insert the memory card or USB...

User's Guide
Page 26
... prints. 7. Load the proof sheet facedown on the memory card or USB key in JPG and TIFF formats can be selected. Load the paper. NOTE: Photo/glossy paper is recommended for printing photos. 10. NOTE: Only images in a different file format, the photos must be printed directly from All Last .... to scroll to access the Proof Sheet menu. 4. An * appears on the Scanner Glass. 9. NOTE: Make sure the size of the paper you loaded in the printer matches the paper size you completely fill in a certain date range. Press the left or right Arrow button print on the proof sheet to select...
... prints. 7. Load the proof sheet facedown on the memory card or USB key in JPG and TIFF formats can be selected. Load the paper. NOTE: Photo/glossy paper is recommended for printing photos. 10. NOTE: Only images in a different file format, the photos must be printed directly from All Last .... to scroll to access the Proof Sheet menu. 4. An * appears on the Scanner Glass. 9. NOTE: Make sure the size of the paper you loaded in the printer matches the paper size you completely fill in a certain date range. Press the left or right Arrow button print on the proof sheet to select...
User's Guide
Page 27
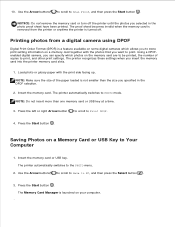
...paper loaded is launched on a memory card together with the print side facing up. Saving Photos on the memory card are to store print setting information on your computer. 4. The Memory Card Manager is not smaller than one memory card or USB key at a time. 3. 10. Printing photos from the printer... or anytime the printer is a feature available on some digital cameras which photos on a Memory Card or USB...
...paper loaded is launched on a memory card together with the print side facing up. Saving Photos on the memory card are to store print setting information on your computer. 4. The Memory Card Manager is not smaller than one memory card or USB key at a time. 3. 10. Printing photos from the printer... or anytime the printer is a feature available on some digital cameras which photos on a Memory Card or USB...
User's Guide
Page 34
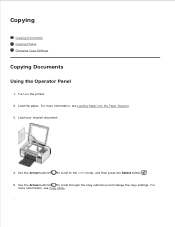
Copying Copying Documents Copying Photos Changing Copy Settings Copying Documents Using the Operator Panel 1. Load the paper. For more information, see Loading Paper into the Paper Support. 3. Use the Arrow buttons to scroll to scroll through the copy submenus and change the copy settings. Load your original document. 4. For more information, see Copy Mode. 6. Turn on the printer. 2. Use the Arrow buttons to the COPY mode, and then press the Select button . 5.
Copying Copying Documents Copying Photos Changing Copy Settings Copying Documents Using the Operator Panel 1. Load the paper. For more information, see Loading Paper into the Paper Support. 3. Use the Arrow buttons to scroll to scroll through the copy submenus and change the copy settings. Load your original document. 4. For more information, see Copy Mode. 6. Turn on the printer. 2. Use the Arrow buttons to the COPY mode, and then press the Select button . 5.

User's Guide
Page 35
...Start Programs or All Programs Dell Printers Dell Photo AIO Printer 926. 5. When you press the Start button without changing the copy settings from the Copy drop-down menu. 7. Load your computer and printer, and make sure they are connected. 2. Select Dell All-In-One Center. Select the number of...the copy is printed in the current default settings. Load paper. Click See More Copy Settings to customize your settings, click Copy Now. 6. For more information, see Loading Paper into the Paper Support. 3. The Dell All-In-One Center opens. 6. NOTE: If you finish customizing your...
...Start Programs or All Programs Dell Printers Dell Photo AIO Printer 926. 5. When you press the Start button without changing the copy settings from the Copy drop-down menu. 7. Load your computer and printer, and make sure they are connected. 2. Select Dell All-In-One Center. Select the number of...the copy is printed in the current default settings. Load paper. Click See More Copy Settings to customize your settings, click Copy Now. 6. For more information, see Loading Paper into the Paper Support. 3. The Dell All-In-One Center opens. 6. NOTE: If you finish customizing your...
User's Guide
Page 36
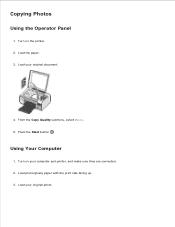
Load your original photo. Press the Start button . Using Your Computer 1. Copying Photos Using the Operator Panel 1. Turn on your computer and printer, and make sure they are connected. 2. Load the paper. 3. Load your original document. 4. Turn on the printer. 2. Load photo/glossy paper with the print side facing up. 3. From the Copy Quality submenu, select Photo. 5.
Load your original photo. Press the Start button . Using Your Computer 1. Copying Photos Using the Operator Panel 1. Turn on your computer and printer, and make sure they are connected. 2. Load the paper. 3. Load your original document. 4. Turn on the printer. 2. Load photo/glossy paper with the print side facing up. 3. From the Copy Quality submenu, select Photo. 5.


