Owner's Manual
Page 5
... Type Sensor 17 Loading Paper 18 Print Media Guidelines for the Paper Support 19 Placing Your Document on the Scanner Glass 21 2 Using Your Printer Printing 24 Printing a Document 24 Printing Photos 24 Printing Borderless Photos 25 Printing Other Projects 26 Copying 26 Copying Documents Using the Operator Panel 26 Copying Documents Using Your...
... Type Sensor 17 Loading Paper 18 Print Media Guidelines for the Paper Support 19 Placing Your Document on the Scanner Glass 21 2 Using Your Printer Printing 24 Printing a Document 24 Printing Photos 24 Printing Borderless Photos 25 Printing Other Projects 26 Copying 26 Copying Documents Using the Operator Panel 26 Copying Documents Using Your...
Owner's Manual
Page 13
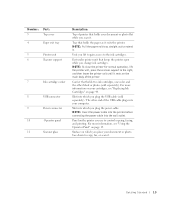
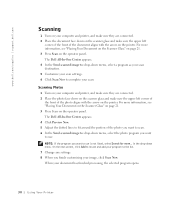
... you place your document or photo flat while you change ink cartridges. Part under printer unit that holds the paper as it . Carrier that holds your document or photo face down to copy, fax, or scan it. Panel on the printer you lift to gain access to... exit tray straight out to the ink cartridges. Number: 3 Part: Top cover 4 Paper exit tray 5 Printer unit 6 Scanner support 7 Ink cartridge carrier 8 USB connector 9 Power connector 10 Operator panel 11 Scanner glass Description: Top of printer that holds two ink cartridges, one color and the other end of the...
... you place your document or photo flat while you change ink cartridges. Part under printer unit that holds the paper as it . Carrier that holds your document or photo face down to copy, fax, or scan it. Panel on the printer you lift to gain access to... exit tray straight out to the ink cartridges. Number: 3 Part: Top cover 4 Paper exit tray 5 Printer unit 6 Scanner support 7 Ink cartridge carrier 8 USB connector 9 Power connector 10 Operator panel 11 Scanner glass Description: Top of printer that holds two ink cartridges, one color and the other end of the...

Owner's Manual
Page 21
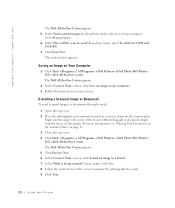
... into the paper support without removing plain paper. • You select Normal or Photo print quality. • The transparencies are loaded vertically against the left edge of the paper support. Placing Your Document on the scanner glass in the lower right corner. Load up to copy face down on the... Scanner Glass 1 Open the top cover. 2 Place the item you want to : 20 transparencies Make sure: &#...
... into the paper support without removing plain paper. • You select Normal or Photo print quality. • The transparencies are loaded vertically against the left edge of the paper support. Placing Your Document on the scanner glass in the lower right corner. Load up to copy face down on the... Scanner Glass 1 Open the top cover. 2 Place the item you want to : 20 transparencies Make sure: &#...

Owner's Manual
Page 26
...Properties, Options, or Setup (depending on the operator panel to print a photo, print on an envelope, print a banner, make copies, you can use the printer operator panel or your printer. 2 Load the paper. For more than one -touch color or black and white copies, press Color Copy or Black ..., see "Changing Copy Settings" on your computer. The Print Properties dialog box appears along with the arrow on the scanner glass. For more printing ideas. 4 Follow the instructions on page 16. www.dell.com/supplies | support.dell.com 7 Click OK or Print (depending on the operator panel.
...Properties, Options, or Setup (depending on the operator panel to print a photo, print on an envelope, print a banner, make copies, you can use the printer operator panel or your printer. 2 Load the paper. For more than one -touch color or black and white copies, press Color Copy or Black ..., see "Changing Copy Settings" on your computer. The Print Properties dialog box appears along with the arrow on the scanner glass. For more printing ideas. 4 Follow the instructions on page 16. www.dell.com/supplies | support.dell.com 7 Click OK or Print (depending on the operator panel.
Owner's Manual
Page 27
...; Dell Printers→ Dell Photo AIO Printer 922→ Dell All-In-One Center. U si n g Yo u r Pri n te r 27 The Dell All-In-One Center appears. 7 Select a copy quantity (1-99) and color. 8 Click See More Copy Settings to create a black and white copy. The Dell All-In-One Center appears. For more information, see "Placing Your Document on the Scanner Glass" on the printer...
...; Dell Printers→ Dell Photo AIO Printer 922→ Dell All-In-One Center. U si n g Yo u r Pri n te r 27 The Dell All-In-One Center appears. 7 Select a copy quantity (1-99) and color. 8 Click See More Copy Settings to create a black and white copy. The Dell All-In-One Center appears. For more information, see "Placing Your Document on the Scanner Glass" on the printer...
Owner's Manual
Page 30
...printer, and make sure they are connected. 2 Place the photo face down on the scanner glass and make sure the upper left corner of the front of the photo aligns with the arrow on the operator panel. NOTE: If the program you finish customizing your image, click Scan Now. The Dell All-In-One...of the photo you want to complete your document has finished processing, the selected program opens. 3 0 Us ing Yo ur Pri n te r For more information, see "Placing Your Document on the Scanner Glass" on page 21. 3 Press Scan on the printer. www.dell.com/supplies | support.dell.com Scanning...
...printer, and make sure they are connected. 2 Place the photo face down on the scanner glass and make sure the upper left corner of the front of the photo aligns with the arrow on the operator panel. NOTE: If the program you finish customizing your image, click Scan Now. The Dell All-In-One...of the photo you want to complete your document has finished processing, the selected program opens. 3 0 Us ing Yo ur Pri n te r For more information, see "Placing Your Document on the Scanner Glass" on page 21. 3 Press Scan on the printer. www.dell.com/supplies | support.dell.com Scanning...

Owner's Manual
Page 31
...→ Programs or All Programs→ Dell Printers→ Dell Photo AIO Printer 922→ Dell All-In-One Center. For more information, see "Placing Your Document on the Scanner Glass" on page 21. 3 Close the top cover. 4 Click Start→ Programs or All Programs→ Dell Printers→ Dell AIO Printer A922→ Dell All-In-One Center. Editing Scanned Text Using Optical Character...
...→ Programs or All Programs→ Dell Printers→ Dell Photo AIO Printer 922→ Dell All-In-One Center. For more information, see "Placing Your Document on the Scanner Glass" on page 21. 3 Close the top cover. 4 Click Start→ Programs or All Programs→ Dell Printers→ Dell AIO Printer A922→ Dell All-In-One Center. Editing Scanned Text Using Optical Character...
Owner's Manual
Page 32
... an Image on page 21. 3 Close the top cover. 4 Click Start→ Programs or All Programs→ Dell Printers→ Dell Photo AIO Printer 922→ Dell All-In-One Center. E-mailing a Scanned Image or Document To send scanned images or documents through e-mail: 1 Open the top cover..., see "Placing Your Document on the Scanner Glass" on Your Computer 1 Click Start→ Programs or All Programs→ Dell Printers→ Dell Photo AIO Printer 922→ Dell All-In-One Center. www.dell.com/supplies | support.dell.com The Dell All-In-One Center appears. 5 In the Send scanned...
... an Image on page 21. 3 Close the top cover. 4 Click Start→ Programs or All Programs→ Dell Printers→ Dell Photo AIO Printer 922→ Dell All-In-One Center. E-mailing a Scanned Image or Document To send scanned images or documents through e-mail: 1 Open the top cover..., see "Placing Your Document on the Scanner Glass" on Your Computer 1 Click Start→ Programs or All Programs→ Dell Printers→ Dell Photo AIO Printer 922→ Dell All-In-One Center. www.dell.com/supplies | support.dell.com The Dell All-In-One Center appears. 5 In the Send scanned...
Owner's Manual
Page 33
...appears, continue with the arrow on the scanner glass. Make sure the upper left corner of the front of your new image. 7 When you can enlarge or reduce your document by: 25, 50, 100, 150, 200 percent, and Fit-to options using your printer without a computer, you must have ... 2 Place your e-mail program, write a note to see Fax in Windows XP" on page 21. 3 Click Start→ Programs or All Programs→ Dell Printers→ Dell Photo AIO Printer 922→ Dell All-In-One Center. Enlarging or Reducing Images or Documents If you are using the operator panel. 1 Load the paper.
...appears, continue with the arrow on the scanner glass. Make sure the upper left corner of the front of your new image. 7 When you can enlarge or reduce your document by: 25, 50, 100, 150, 200 percent, and Fit-to options using your printer without a computer, you must have ... 2 Place your e-mail program, write a note to see Fax in Windows XP" on page 21. 3 Click Start→ Programs or All Programs→ Dell Printers→ Dell Photo AIO Printer 922→ Dell All-In-One Center. Enlarging or Reducing Images or Documents If you are using the operator panel. 1 Load the paper.
Owner's Manual
Page 34
... sure your fax job by answering the questions that appear on the scanner glass and make sure they are multiple pages in Windows XP 1 Click Start →Settings →Control Panel. For more than one page. Installing Microsoft Fax in your fax, you should choose Yes,... image and follow the instructions on page 21. 3 Click Start→ Programs or All Programs→ Dell Printers→ Dell Photo AIO Printer 922→ Dell All-In-One Center. www.dell.com/supplies | support.dell.com For Windows 2000, Fax Service Management is connected to an active analog phone line. If you want...
... sure your fax job by answering the questions that appear on the scanner glass and make sure they are multiple pages in Windows XP 1 Click Start →Settings →Control Panel. For more than one page. Installing Microsoft Fax in your fax, you should choose Yes,... image and follow the instructions on page 21. 3 Click Start→ Programs or All Programs→ Dell Printers→ Dell Photo AIO Printer 922→ Dell All-In-One Center. www.dell.com/supplies | support.dell.com For Windows 2000, Fax Service Management is connected to an active analog phone line. If you want...

Owner's Manual
Page 44
... order more ink online at the loading position unless the printer is busy. 44 Ink Cartridge Maintenance Dell does not provide warranty coverage for your printer. 2 Lift the printer unit and position the scanner support between the tabs to keep it open. To order by Dell. 1 Turn on page 9. The ink cartridge carrier moves and stops...
... order more ink online at the loading position unless the printer is busy. 44 Ink Cartridge Maintenance Dell does not provide warranty coverage for your printer. 2 Lift the printer unit and position the scanner support between the tabs to keep it open. To order by Dell. 1 Turn on page 9. The ink cartridge carrier moves and stops...
Owner's Manual
Page 47
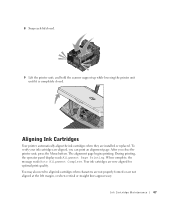
... verify your ink cartridges are installed or replaced. Aligning Ink Cartridges Your printer automatically aligns the ink cartridges when they are aligned, you close the printer unit, press the Menu button. 8 Snap each lid closed. 9 Lift the printer unit, and hold the scanner support up while lowering the printer unit until it is completely closed.
... verify your ink cartridges are installed or replaced. Aligning Ink Cartridges Your printer automatically aligns the ink cartridges when they are aligned, you close the printer unit, press the Menu button. 8 Snap each lid closed. 9 Lift the printer unit, and hold the scanner support up while lowering the printer unit until it is completely closed.

Owner's Manual
Page 56
... on the screen for clearing the paper jam. www.dell.com/supplies | support.dell.com CHECK FOR A PAPER JAM Using your printer and your printer. 2 Lift the printer unit and position the scanner support between the tabs to keep it from the printer. 4 Close the printer unit, turn on the printer, and print the document again. 56 Troubleshooting Using...
... on the screen for clearing the paper jam. www.dell.com/supplies | support.dell.com CHECK FOR A PAPER JAM Using your printer and your printer. 2 Lift the printer unit and position the scanner support between the tabs to keep it from the printer. 4 Close the printer unit, turn on the printer, and print the document again. 56 Troubleshooting Using...


