

Setup Guide
Page 5
... Media (Recommended 12 Connect to the Internet (Optional 13 Using Your Inspiron Desktop 16 Front View Features 16 Back View Features 18 Back Panel Connectors 20 Software Features 22 Dell Dock 23 Dell DataSafe Online Backup 24 Solving Problems 25 Beep Codes 25 Network Problems 26 ...Power Problems 27 Memory Problems 29 Lockups and Software Problems 30 Using Support Tools 32 Dell Support Center 32 My Dell Downloads 33 System Messages 33...
... Media (Recommended 12 Connect to the Internet (Optional 13 Using Your Inspiron Desktop 16 Front View Features 16 Back View Features 18 Back Panel Connectors 20 Software Features 22 Dell Dock 23 Dell DataSafe Online Backup 24 Solving Problems 25 Beep Codes 25 Network Problems 26 ...Power Problems 27 Memory Problems 29 Lockups and Software Problems 30 Using Support Tools 32 Dell Support Center 32 My Dell Downloads 33 System Messages 33...

Setup Guide
Page 7
... Computer When positioning your computer, ensure that you begin any of 5.1 cm (2 inches) on . 5 Restricting airflow around your Inspiron™ desktop. To prevent overheating ensure that shipped with your computer in this section, read the safety information that you leave at least 10.2 cm (4 ...inches) at www.dell.com/regulatory_compliance. INSPIRON Setting Up Your Inspiron Desktop This section provides information about setting up your computer may cause it is powered on all other sides. You...
... Computer When positioning your computer, ensure that you begin any of 5.1 cm (2 inches) on . 5 Restricting airflow around your Inspiron™ desktop. To prevent overheating ensure that shipped with your computer in this section, read the safety information that you leave at least 10.2 cm (4 ...inches) at www.dell.com/regulatory_compliance. INSPIRON Setting Up Your Inspiron Desktop This section provides information about setting up your computer may cause it is powered on all other sides. You...

Setup Guide
Page 8
NOTE: A DVI connector may be available if you purchased a discrete graphics card. Refer to the following table to ONLY ONE of the connectors on your computer. 6 NOTE: When connecting to a single display, connect the display to identify the connectors on your computer and display. Use the appropriate cable based on the connectors available on your computer and display. You can purchase the HDMI-to-DVI adapter and additional HDMI or DVI cables at www.dell.com. Setting Up Your Inspiron Desktop Connect the Display Your computer has integrated VGA and HDMI video connectors.
NOTE: A DVI connector may be available if you purchased a discrete graphics card. Refer to the following table to ONLY ONE of the connectors on your computer. 6 NOTE: When connecting to a single display, connect the display to identify the connectors on your computer and display. Use the appropriate cable based on the connectors available on your computer and display. You can purchase the HDMI-to-DVI adapter and additional HDMI or DVI cables at www.dell.com. Setting Up Your Inspiron Desktop Connect the Display Your computer has integrated VGA and HDMI video connectors.

Setup Guide
Page 9
Connection Type VGA-to-VGA (VGA cable) Computer DVI-to-DVI (DVI cable) HDMI-to-HDMI (HDMI cable) HDMI-to-DVI (HDMI-to-DVI adapter + DVI cable) Setting Up Your Inspiron Desktop Cable Display 7
Connection Type VGA-to-VGA (VGA cable) Computer DVI-to-DVI (DVI cable) HDMI-to-HDMI (HDMI cable) HDMI-to-DVI (HDMI-to-DVI adapter + DVI cable) Setting Up Your Inspiron Desktop Cable Display 7

Setup Guide
Page 10
Setting Up Your Inspiron Desktop Connect the Keyboard and Mouse Connect the USB keyboard and mouse to the USB connectors on the back panel of your computer. 8
Setting Up Your Inspiron Desktop Connect the Keyboard and Mouse Connect the USB keyboard and mouse to the USB connectors on the back panel of your computer. 8

Setup Guide
Page 11
Connect the telephone cable only to the modem connector (RJ11 connector) and not to the network connector (RJ45 connector). Setting Up Your Inspiron Desktop 9 Connect the other end of the network cable to the network connector (RJ45 connector) on the back panel of the network cable to the network ...
Connect the telephone cable only to the modem connector (RJ11 connector) and not to the network connector (RJ45 connector). Setting Up Your Inspiron Desktop 9 Connect the other end of the network cable to the network connector (RJ45 connector) on the back panel of the network cable to the network ...

Setup Guide
Page 12
Setting Up Your Inspiron Desktop Connect the Power Cable CAUTION: To help avoid damaging your computer, ensure that the voltage selector switch is set for the voltage that most closely matches the AC power available in your location. To locate the voltage selector switch, see "Back View Features" on page 18. 10
Setting Up Your Inspiron Desktop Connect the Power Cable CAUTION: To help avoid damaging your computer, ensure that the voltage selector switch is set for the voltage that most closely matches the AC power available in your location. To locate the voltage selector switch, see "Back View Features" on page 18. 10
Setup Guide
Page 13
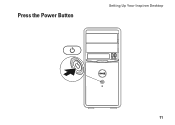
Press the Power Button Setting Up Your Inspiron Desktop 11
Press the Power Button Setting Up Your Inspiron Desktop 11

Setup Guide
Page 14
... operating system. CAUTION: Do not interrupt the operating system's setup process. NOTE: For optimal performance of your computer available at support.dell.com. Doing so may take you purchased the computer, while preserving data files (without the need to reinstall the operating system. You ... is recommended that you set up an Internet connection. NOTE: For more information on the screen. Setting Up Your Inspiron Desktop Set Up Microsoft Windows Your Dell computer is preconfigured with a minimum capacity of 8 GB or DVD-R/DVD+R/Blu-ray Disc™ The system recovery media...
... operating system. CAUTION: Do not interrupt the operating system's setup process. NOTE: For optimal performance of your computer available at support.dell.com. Doing so may take you purchased the computer, while preserving data files (without the need to reinstall the operating system. You ... is recommended that you set up an Internet connection. NOTE: For more information on the screen. Setting Up Your Inspiron Desktop Set Up Microsoft Windows Your Dell computer is preconfigured with a minimum capacity of 8 GB or DVD-R/DVD+R/Blu-ray Disc™ The system recovery media...

Setup Guide
Page 15
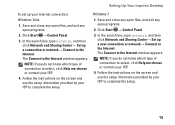
NOTE: Dell DataSafe Local Backup does not support rewritable discs. To create a system recovery media: 1. Setting Up Your Inspiron Desktop Connect to the Internet (Optional) To connect to the telephone wall jack before you need an external modem or network connection and an ... modem and to the Internet, you set up your wired Internet connection, follow the instructions in the computer. 3. Click Start → Programs→ Dell DataSafe Local Backup. 4. Ensure that the power cable is connected and the computer is not part of your ISP or cellular telephone service for setup...
NOTE: Dell DataSafe Local Backup does not support rewritable discs. To create a system recovery media: 1. Setting Up Your Inspiron Desktop Connect to the Internet (Optional) To connect to the telephone wall jack before you need an external modem or network connection and an ... modem and to the Internet, you set up your wired Internet connection, follow the instructions in the computer. 3. Click Start → Programs→ Dell DataSafe Local Backup. 4. Ensure that the power cable is connected and the computer is not part of your ISP or cellular telephone service for setup...

Setup Guide
Page 16
Setting Up Your Inspiron Desktop Setting Up a Wireless Connection NOTE: To set up your wireless router, see the documentation that shipped with your ISP to a wireless router: Windows Vista® 1. ...
Setting Up Your Inspiron Desktop Setting Up a Wireless Connection NOTE: To set up your wireless router, see the documentation that shipped with your ISP to a wireless router: Windows Vista® 1. ...
Setup Guide
Page 17
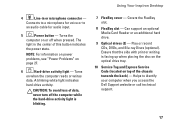
Setting Up Your Inspiron Desktop To set up a connection or network→ Connect to the Internet. In the search box, type network, and then click Network and Sharing Center→ ...
Setting Up Your Inspiron Desktop To set up a connection or network→ Connect to the Internet. In the search box, type network, and then click Network and Sharing Center→ ...

Setup Guide
Page 18
Connects to headphones. 5 NOTE: To connect to USB devices that are connected 2 3 occasionally such as memory keys, digital 7 cameras, and MP3 players. 4 3 Headphone connector - Connect 8 to a powered 6 speaker or sound system, use the audio connectors on your computer. 16 Eject the optical drive tray when pressed. 2 USB 2.0 connectors (2) - Front View Features 9 1 1 Optical drive eject buttons (2) - INSPIRON Using Your Inspiron Desktop This section provides information about the 10 features available on the back of your Inspiron™ desktop.
Connects to headphones. 5 NOTE: To connect to USB devices that are connected 2 3 occasionally such as memory keys, digital 7 cameras, and MP3 players. 4 3 Headphone connector - Connect 8 to a powered 6 speaker or sound system, use the audio connectors on your computer. 16 Eject the optical drive tray when pressed. 2 USB 2.0 connectors (2) - Front View Features 9 1 1 Optical drive eject buttons (2) - INSPIRON Using Your Inspiron Desktop This section provides information about the 10 features available on the back of your Inspiron™ desktop.
Setup Guide
Page 19
... or writes data. Covers the FlexBay slot. 8 FlexBay slot - Helps to an audio cable for voice or to identify your computer when you access the Dell Support website or call technical support. 17 Can support an optional Media Card Reader or an additional hard drive. 9 Optical drives (2) - Turns the computer on...: To avoid loss of data, never turn off when pressed. Ensure that the side with print or writing is blinking. 7 FlexBay cover - Using Your Inspiron Desktop 4 Line-in the center of this button indicates the power state. The light in or microphone connector -
... or writes data. Covers the FlexBay slot. 8 FlexBay slot - Helps to an audio cable for voice or to identify your computer when you access the Dell Support website or call technical support. 17 Can support an optional Media Card Reader or an additional hard drive. 9 Optical drives (2) - Turns the computer on...: To avoid loss of data, never turn off when pressed. Ensure that the side with print or writing is blinking. 7 FlexBay cover - Using Your Inspiron Desktop 4 Line-in the center of this button indicates the power state. The light in or microphone connector -
Setup Guide
Page 21
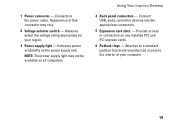
... padlock to prevent unauthorized access to the power cable. Indicates power availability on any installed PCI and PCI express cards. 6 Padlock rings - Using Your Inspiron Desktop 4 Back panel connectors - Connects to the interior of this connector may not be available on all computers. Connect USB, audio, and other devices into the...
... padlock to prevent unauthorized access to the power cable. Indicates power availability on any installed PCI and PCI express cards. 6 Padlock rings - Using Your Inspiron Desktop 4 Back panel connectors - Connects to the interior of this connector may not be available on all computers. Connect USB, audio, and other devices into the...

Setup Guide
Page 22
Using Your Inspiron Desktop Back Panel Connectors NOTE: Depending on your computer model, the exact location of connectors may be different. Inspiron 560 Inspiron 570 1 2 3 4 5 11 10 6 7 9 8 20
Using Your Inspiron Desktop Back Panel Connectors NOTE: Depending on your computer model, the exact location of connectors may be different. Inspiron 560 Inspiron 570 1 2 3 4 5 11 10 6 7 9 8 20
Setup Guide
Page 23
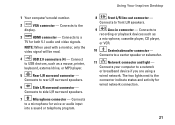
... to a center speaker or subwoofer. 11 Network connector and light - Connects to a network or broadband device if you are using a wired network. Using Your Inspiron Desktop 1 Your computer's model number. 2 VGA connector - Connects to a microphone for voice or audio input into a sound or telephony program. 8 Front L/R line-out connector - NOTE: When...
... to a center speaker or subwoofer. 11 Network connector and light - Connects to a network or broadband device if you are using a wired network. Using Your Inspiron Desktop 1 Your computer's model number. 2 VGA connector - Connects to a microphone for voice or audio input into a sound or telephony program. 8 Front L/R line-out connector - NOTE: When...

Setup Guide
Page 24
... use your computer to watch videos, play games, create your hard drive or at support.dell.com/manuals. Using Your Inspiron Desktop Software Features NOTE: For more information about the features described in this section, see the Dell Technology Guide available on your own CDs, listen to music and radio stations. After connecting...
... use your computer to watch videos, play games, create your hard drive or at support.dell.com/manuals. Using Your Inspiron Desktop Software Features NOTE: For more information about the features described in this section, see the Dell Technology Guide available on your own CDs, listen to music and radio stations. After connecting...
Setup Guide
Page 25
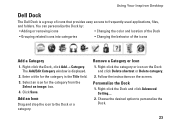
... Dock and click Advanced Setting.... 2. Choose the desired option to the Dock or a category. Right-click the Dock, click Add→ Category. Using Your Inspiron Desktop Dell Dock The Dell Dock is displayed. 2.
... Dock and click Advanced Setting.... 2. Choose the desired option to the Dock or a category. Right-click the Dock, click Add→ Category. Using Your Inspiron Desktop Dell Dock The Dell Dock is displayed. 2.

Setup Guide
Page 26
... theft, fire, or natural disasters. Double-click the Dell DataSafe Online icon on the screen. 24 Dell DataSafe Online is recommended for fast upload or download speeds. For more information, go to delldatasafe.com. To schedule backups: 1. Using Your Inspiron Desktop Dell DataSafe Online Backup NOTE: Dell DataSafe Online may not be available in all...
... theft, fire, or natural disasters. Double-click the Dell DataSafe Online icon on the screen. 24 Dell DataSafe Online is recommended for fast upload or download speeds. For more information, go to delldatasafe.com. To schedule backups: 1. Using Your Inspiron Desktop Dell DataSafe Online Backup NOTE: Dell DataSafe Online may not be available in all...


