
Owner's Manual
Page 5
... Photo Print Packs 2 Notes, Notices, and Cautions 3 CAUTION: SAFETY INSTRUCTIONS 9 1 Getting Started Accessing Your User's Guide 11 Understanding the Printer Parts 11 Setting Up Your Printer 14 Loading the Photo Cartridge 14 Loading the Photo Paper 15 Changing Settings-Press Menu 17 Select Menu Items 17 Print Options Menu 17 Photo Quality Menu 17 Photo Display Menu 18 Photo Management Menu 19 Printer Settings Menu 19 Maintenance Menu 20 2 Using Your Printer Printing Without a Computer 21 Printing Tips 21 Printing From a Memory Card 21 Selecting Photos to Print 22 Printing...
... Photo Print Packs 2 Notes, Notices, and Cautions 3 CAUTION: SAFETY INSTRUCTIONS 9 1 Getting Started Accessing Your User's Guide 11 Understanding the Printer Parts 11 Setting Up Your Printer 14 Loading the Photo Cartridge 14 Loading the Photo Paper 15 Changing Settings-Press Menu 17 Select Menu Items 17 Print Options Menu 17 Photo Quality Menu 17 Photo Display Menu 18 Photo Management Menu 19 Printer Settings Menu 19 Maintenance Menu 20 2 Using Your Printer Printing Without a Computer 21 Printing Tips 21 Printing From a Memory Card 21 Selecting Photos to Print 22 Printing...
Owner's Manual
Page 6
Windows-Based Operating System Requirements 25 Printing From a Computer 26 Choosing a Color Mode 27 Canceling printing 27 Saving and Copying Photos to Your Computer 28 3 Care and Maintenance General Care of the Printer 29 Cleaning the Paper Feed Roller 30 Handling and Storing the Photo Paper and Photo Cartridge 30 4 Troubleshooting Setup Problems 31 General Problems 32 Error Messages 32 Printing Problems 33 36 More Troubleshooting Options 37 5 Contacting Dell Technical Assistance 39 Automated Order-Status Service 39 Contacting Dell 39 6 Contents
Windows-Based Operating System Requirements 25 Printing From a Computer 26 Choosing a Color Mode 27 Canceling printing 27 Saving and Copying Photos to Your Computer 28 3 Care and Maintenance General Care of the Printer 29 Cleaning the Paper Feed Roller 30 Handling and Storing the Photo Paper and Photo Cartridge 30 4 Troubleshooting Setup Problems 31 General Problems 32 Error Messages 32 Printing Problems 33 36 More Troubleshooting Options 37 5 Contacting Dell Technical Assistance 39 Automated Order-Status Service 39 Contacting Dell 39 6 Contents
Owner's Manual
Page 9
... INSTRUCTIONS Use the following safety guidelines to help protect your Dell™ Photo Printer 540 and working environment from potential damage. The use of lead in the user documentation, to help ensure your own personal safety and to a professional service person. • Read and follow basic safety procedures. • The use only. NOTICE: Do not disassemble this does not resolve the problem, contact customer support (see page 39...
... INSTRUCTIONS Use the following safety guidelines to help protect your Dell™ Photo Printer 540 and working environment from potential damage. The use of lead in the user documentation, to help ensure your own personal safety and to a professional service person. • Read and follow basic safety procedures. • The use only. NOTICE: Do not disassemble this does not resolve the problem, contact customer support (see page 39...

Owner's Manual
Page 12
... compatible camera or USB storage device. Print color copy of the menus. Supply power to PC 4 Camera or USB storage device connector 5 Memory card slot 6 Memory card slot 7 Paper tray door Description Display photos, printer status, messages, menu options, or settings. Provides access to a computer. Connect your printer to insert the paper tray 12 Getting Started Memory card slot for CompactFlash (CF). Memory card slot for Secure Digital (SD), Memory Stick (MS), MMC (MultiMedia Card), and Smart Media (SM) cards. www.dell.com | support.dell.com Lights and Buttons...
... compatible camera or USB storage device. Print color copy of the menus. Supply power to PC 4 Camera or USB storage device connector 5 Memory card slot 6 Memory card slot 7 Paper tray door Description Display photos, printer status, messages, menu options, or settings. Provides access to a computer. Connect your printer to insert the paper tray 12 Getting Started Memory card slot for CompactFlash (CF). Memory card slot for Secure Digital (SD), Memory Stick (MS), MMC (MultiMedia Card), and Smart Media (SM) cards. www.dell.com | support.dell.com Lights and Buttons...

Owner's Manual
Page 14
... your Setting Up Your Printer poster to install the hardware (and software, if using your printer with a computer). NOTE: Be careful not to make. 2 Open the photo cartridge door. 14 Getting Started Doing so could reduce the number of one half turn. www.dell.com | support.dell.com Setting Up Your Printer NOTE: The Dell Photo Printer 540 supports Microsoft® Windows® 2000 and Windows XP. For setup troubleshooting, see page 31. Loading the Photo Cartridge NOTE: Use only the photo cartridge from a Dell Photo Print Pack. Do...
... your Setting Up Your Printer poster to install the hardware (and software, if using your printer with a computer). NOTE: Be careful not to make. 2 Open the photo cartridge door. 14 Getting Started Doing so could reduce the number of one half turn. www.dell.com | support.dell.com Setting Up Your Printer NOTE: The Dell Photo Printer 540 supports Microsoft® Windows® 2000 and Windows XP. For setup troubleshooting, see page 31. Loading the Photo Cartridge NOTE: Use only the photo cartridge from a Dell Photo Print Pack. Do...

Owner's Manual
Page 21
... removing it from a memory card, USB storage device, or PictBridgeenabled or other compatible camera. The photo paper cycles 4 times during printing, then printing will stop when the current photo is connected, and the photo cartridge and photo paper are loaded or connected. NOTE: If you print, make sure the power is printed. • For advanced print options (color and auto brightness, layouts, index prints, etc.), press the Menu button. NOTICE: Do not load more than 20 sheets into the paper tray. For help...
... removing it from a memory card, USB storage device, or PictBridgeenabled or other compatible camera. The photo paper cycles 4 times during printing, then printing will stop when the current photo is connected, and the photo cartridge and photo paper are loaded or connected. NOTE: If you print, make sure the power is printed. • For advanced print options (color and auto brightness, layouts, index prints, etc.), press the Menu button. NOTICE: Do not load more than 20 sheets into the paper tray. For help...

Owner's Manual
Page 24
.... 2 If your camera is PictBridge enabled, then use your camera is ejected into the camera port connector the printer. www.dell.com | support.dell.com Printing From Your Pictbridge-enabled or Other Compatible Camera You can print photos from prints only after printing. Make sure the card slots are empty before you plug the camera cable in the camera cable. 1 Plug the USB cable from the camera into the paper tray.
.... 2 If your camera is PictBridge enabled, then use your camera is ejected into the camera port connector the printer. www.dell.com | support.dell.com Printing From Your Pictbridge-enabled or Other Compatible Camera You can print photos from prints only after printing. Make sure the card slots are empty before you plug the camera cable in the camera cable. 1 Plug the USB cable from the camera into the paper tray.

Owner's Manual
Page 26
..., open the photos you want to print. 3 Access printer settings by selecting Print or Page Setup from the computer. 26 Using Your Printer USB connector to PC Printing From a Computer To Print 1 Turn on your computer and printer, and make sure they are not used when you may first need to return to install your photo editing software programs. Follow the on-screen instructions on the printer. Select Typical to install the printer drivers and printer documentation. www.dell.com | support.dell.com Installing Printer Drivers and Software 1 Make...
..., open the photos you want to print. 3 Access printer settings by selecting Print or Page Setup from the computer. 26 Using Your Printer USB connector to PC Printing From a Computer To Print 1 Turn on your computer and printer, and make sure they are not used when you may first need to return to install your photo editing software programs. Follow the on-screen instructions on the printer. Select Typical to install the printer drivers and printer documentation. www.dell.com | support.dell.com Installing Printer Drivers and Software 1 Make...

Owner's Manual
Page 27
...Color Mode Color mode is an automatic color correction feature that helps you want to disable automatic color correction. None-to cancel. 3 Select Document, then select Cancel. Canceling Printing From a Computer: 1 Double-click the Printer icon in the system tray. 2 Click the print job you easily create high-quality prints in no time. Change the color mode: 1 From the Start menu, select Settings, then select Printers. 2 Right-click the Photo Printer icon, then select Printing Preferences. 3 Click the Advanced button. 4 Under Document Options, select Printer Features, then select Color Mode...
...Color Mode Color mode is an automatic color correction feature that helps you want to disable automatic color correction. None-to cancel. 3 Select Document, then select Cancel. Canceling Printing From a Computer: 1 Double-click the Printer icon in the system tray. 2 Click the print job you easily create high-quality prints in no time. Change the color mode: 1 From the Start menu, select Settings, then select Printers. 2 Right-click the Photo Printer icon, then select Printing Preferences. 3 Click the Advanced button. 4 Under Document Options, select Printer Features, then select Color Mode...
Owner's Manual
Page 31
... proper slot). • Print a test page: • Click Start → All Programs (or Programs) → Dell Printers → Dell Photo Printer 540 → Printing Preferences. • Click the Maintenance tab. • From the Maintenance tab, click Print Test Page. PRINTER DOES NOT PRINT • Make sure the photo cartridge is properly installed and there is properly inserted (label side up your printer, make sure your printer. Troubleshooting 31 If you prefer, change the language: 1 Click Menu → Printer Settings → Language. 2 Use...
... proper slot). • Print a test page: • Click Start → All Programs (or Programs) → Dell Printers → Dell Photo Printer 540 → Printing Preferences. • Click the Maintenance tab. • From the Maintenance tab, click Print Test Page. PRINTER DOES NOT PRINT • Make sure the photo cartridge is properly installed and there is properly inserted (label side up your printer, make sure your printer. Troubleshooting 31 If you prefer, change the language: 1 Click Menu → Printer Settings → Language. 2 Use...

Owner's Manual
Page 32
... your User's Guide. Make sure camera is another printer connected.) • Restart your country as the default if there is in your printer. Follow the directions on the display, then press . 3 Use the navigation arrows and buttons to resolve the problem. 32 Troubleshooting For help, see "Uninstalling and reinstalling the software" in the correct file transfer mode. If problems persist, see "Loading the Photo Paper" on . Turn the power on page 15. • Unplug the power supply...
... your User's Guide. Make sure camera is another printer connected.) • Restart your country as the default if there is in your printer. Follow the directions on the display, then press . 3 Use the navigation arrows and buttons to resolve the problem. 32 Troubleshooting For help, see "Uninstalling and reinstalling the software" in the correct file transfer mode. If problems persist, see "Loading the Photo Paper" on . Turn the power on page 15. • Unplug the power supply...
Owner's Manual
Page 33
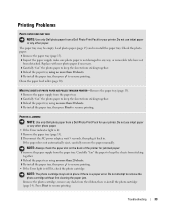
...automatically eject, carefully remove the paper manually. Press Print to resume printing. Check the photo paper: 1 Remove the paper tray (page 15). 2 Inspect the paper supply: make sure photo paper is a paper error. PRINTER IS JAMMED NOTE: Use only Dell photo paper from the paper tray. Troubleshooting 33 Load photo paper (page 15) and re-install the paper tray. Remove the photo cartridge, remove any other paper. Printing Problems PHOTO PAPER DOES NOT FEED NOTE: Use only Dell photo paper from the ribbon, then re-install the photo cartridge (page 14). Do not use inkjet...
...automatically eject, carefully remove the paper manually. Press Print to resume printing. Check the photo paper: 1 Remove the paper tray (page 15). 2 Inspect the paper supply: make sure photo paper is a paper error. PRINTER IS JAMMED NOTE: Use only Dell photo paper from the paper tray. Troubleshooting 33 Load photo paper (page 15) and re-install the paper tray. Remove the photo cartridge, remove any other paper. Printing Problems PHOTO PAPER DOES NOT FEED NOTE: Use only Dell photo paper from the ribbon, then re-install the photo cartridge (page 14). Do not use inkjet...

Owner's Manual
Page 34
... or by selecting Photo Quality--> Photo Brightness (page 17) or --> Automatic photo brightness. • Make sure the photo paper is loaded with the flash off. See your camera user's guide for your computer. Do not use a dry, lint-free cloth to see if the photo paper is dirty, and use inkjet paper or any other photo paper. • Check the photo paper: 1 Remove the paper tray. 2 Check the paper slot on glossy side of the printer. 3 Remove loose paper from the printer. 4 Inspect the paper supply: make sure removable tabs have...
... or by selecting Photo Quality--> Photo Brightness (page 17) or --> Automatic photo brightness. • Make sure the photo paper is loaded with the flash off. See your camera user's guide for your computer. Do not use a dry, lint-free cloth to see if the photo paper is dirty, and use inkjet paper or any other photo paper. • Check the photo paper: 1 Remove the paper tray. 2 Check the paper slot on glossy side of the printer. 3 Remove loose paper from the printer. 4 Inspect the paper supply: make sure removable tabs have...
Owner's Manual
Page 35
... try re-taking the photo with the flash on your camera user's guide for details. • Make sure the printer is not placed in direct sunlight or is at least one photo on the memory card (page 21). See your computer, select the proper paper size in the camera's internal memory or memory card. A SELECTED PHOTO DOES NOT PRINT The image file may be changed by selecting Photo Quality--> Photo Brightness (page 17) or --> Automatic photo brightness. • Try...
... try re-taking the photo with the flash on your camera user's guide for details. • Make sure the printer is not placed in direct sunlight or is at least one photo on the memory card (page 21). See your computer, select the proper paper size in the camera's internal memory or memory card. A SELECTED PHOTO DOES NOT PRINT The image file may be changed by selecting Photo Quality--> Photo Brightness (page 17) or --> Automatic photo brightness. • Try...

Owner's Manual
Page 36
... print ribbon as a result of jams or other is not operating in place if there is installed (page 25). Disconnect then reconnect the USB cable from the printer to use your computer meets the minimum system requirements (page 25). UNABLE TO REMOVE PHOTO CARTRIDGE (ERROR LIGHT GLOWS STEADY.) NOTE: The photo cartridge may be transferring images. Clear the jam if necessary, then try again. • Access the printer menu for your system if necessary. PHOTO PAPER...
... print ribbon as a result of jams or other is not operating in place if there is installed (page 25). Disconnect then reconnect the USB cable from the printer to use your computer meets the minimum system requirements (page 25). UNABLE TO REMOVE PHOTO CARTRIDGE (ERROR LIGHT GLOWS STEADY.) NOTE: The photo cartridge may be transferring images. Clear the jam if necessary, then try again. • Access the printer menu for your system if necessary. PHOTO PAPER...

Owner's Manual
Page 37
... PC button on the screen that may have been hidden by other windows. • Disconnect then reconnect the USB cable from a PictBridge-enabled camera (page 24), check the USB connections between the printer and the camera. • Close unnecessary software applications, and minimize remaining application windows. Install if necessary. • Uninstall, then reinstall Drivers and Utilities software (page 26). • Make sure your system if necessary. • More Troubleshooting...
... PC button on the screen that may have been hidden by other windows. • Disconnect then reconnect the USB cable from a PictBridge-enabled camera (page 24), check the USB connections between the printer and the camera. • Close unnecessary software applications, and minimize remaining application windows. Install if necessary. • Uninstall, then reinstall Drivers and Utilities software (page 26). • Make sure your system if necessary. • More Troubleshooting...
Owner's Manual
Page 60
... the product purchased. or Canada come with electrical power - DELL'S RESPONSIBILITY FOR MALFUNCTIONS AND DEFECTS IN HARDWARE IS LIMITED TO REPAIR AND REPLACEMENT AS SET FORTH IN THIS WARRANTY STATEMENT. What is covered by Dell - www.dell.com | support.dell.com Limited Warranties and Return Policy Dell-branded hardware products purchased in your packing slip or invoice. THIS IS THE MAXIMUM...
... the product purchased. or Canada come with electrical power - DELL'S RESPONSIBILITY FOR MALFUNCTIONS AND DEFECTS IN HARDWARE IS LIMITED TO REPAIR AND REPLACEMENT AS SET FORTH IN THIS WARRANTY STATEMENT. What is covered by Dell - www.dell.com | support.dell.com Limited Warranties and Return Policy Dell-branded hardware products purchased in your packing slip or invoice. THIS IS THE MAXIMUM...

Owner's Manual
Page 64
... the reloading of the software • Non-Dell branded and Solution Provider Direct products and accessories • Problems that the limited warranty on Dell-branded batteries lasts only 1 year and the limited warranty on the date of the packing slip or invoice. DELL'S RESPONSIBILITY FOR MALFUNCTIONS AND DEFECTS IN PRODUCT IS LIMITED TO REPAIR AND REPLACEMENT AS SET FORTH IN THIS...
... the reloading of the software • Non-Dell branded and Solution Provider Direct products and accessories • Problems that the limited warranty on Dell-branded batteries lasts only 1 year and the limited warranty on the date of the packing slip or invoice. DELL'S RESPONSIBILITY FOR MALFUNCTIONS AND DEFECTS IN PRODUCT IS LIMITED TO REPAIR AND REPLACEMENT AS SET FORTH IN THIS...

Owner's Manual
Page 68
...model and serial number, name and address of the customer, and details of sale within the guarantee period. Limitation and Statutory Rights Dell makes no other warranty, guarantee or like statement other than as explicitly stated above, and this Guarantee will be repaired or replaced at the time... parts removed from : improper or inadequate installation, use , for loss of malfunction, including peripherals and software used. accidental or willful damage; In the absence of its branded hardware products, purchased by the end user from Dell's repair/replacement center. Brasil Dell ...
...model and serial number, name and address of the customer, and details of sale within the guarantee period. Limitation and Statutory Rights Dell makes no other warranty, guarantee or like statement other than as explicitly stated above, and this Guarantee will be repaired or replaced at the time... parts removed from : improper or inadequate installation, use , for loss of malfunction, including peripherals and software used. accidental or willful damage; In the absence of its branded hardware products, purchased by the end user from Dell's repair/replacement center. Brasil Dell ...
Owner's Manual
Page 73
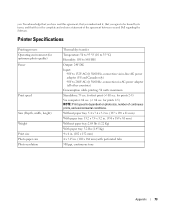
...) 4 x 7.25 in -line AC power adapter (US and Canada only) 90V to 132V AC @ 50/60 Hz, connection via AC power adapter (all other countries) Consumption while printing: 50 watts maximum Standalone: 75 sec. you and Dell regarding the Software. for prints 2-5) Via computer: 60 sec. (< 60 sec. for optimum photo quality) Power Print speed Size (Depth, width, height) Weight Print size Photo paper size Photo resolution Thermal dye transfer Temperature: 50...
...) 4 x 7.25 in -line AC power adapter (US and Canada only) 90V to 132V AC @ 50/60 Hz, connection via AC power adapter (all other countries) Consumption while printing: 50 watts maximum Standalone: 75 sec. you and Dell regarding the Software. for prints 2-5) Via computer: 60 sec. (< 60 sec. for optimum photo quality) Power Print speed Size (Depth, width, height) Weight Print size Photo paper size Photo resolution Thermal dye transfer Temperature: 50...


