
Service Manual
Page 4
Symptom tables 2-5 Base printer symptoms 2-5 High-capacity feeder (2000-sheet) symptoms 2-5 Paper tray symptoms 2-6 Duplex option symptoms 2-6 Envelope feeder symptoms 2-6 Output expander 2-6 StapleSmart finisher 2-7 Messages and error codes 2-8 Service ... 2-44 Service checks 2-72 5-Bin mailbox service check 2-72 900.xx Error code service check 2-75 927.xx Fan service check 2-76 Main fan 2-76 Cartridge fan service check 2-76 950.00 through 950.29 EPROM mismatch failure 2-77 950.30 through 950.60 EPROM mismatch failure 2-78 Charge roll service...
Symptom tables 2-5 Base printer symptoms 2-5 High-capacity feeder (2000-sheet) symptoms 2-5 Paper tray symptoms 2-6 Duplex option symptoms 2-6 Envelope feeder symptoms 2-6 Output expander 2-6 StapleSmart finisher 2-7 Messages and error codes 2-8 Service ... 2-44 Service checks 2-72 5-Bin mailbox service check 2-72 900.xx Error code service check 2-75 927.xx Fan service check 2-76 Main fan 2-76 Cartridge fan service check 2-76 950.00 through 950.29 EPROM mismatch failure 2-77 950.30 through 950.60 EPROM mismatch failure 2-78 Charge roll service...

Service Manual
Page 6
... Autoconnect cabling and connectors 3-32 Duplex Option 3-32 Option microcode 3-32 Print quality troubleshooting 3-33 Paper feed jams 3-37 Access doors and trays 3-37 Clearing printer jams 3-37 250 Paper Jam Check MP Feeder 3-38 260 Paper Jam Check Env Feeder 3-39 23x and 24x jams 3-40 200 and 201 Paper...
... Autoconnect cabling and connectors 3-32 Duplex Option 3-32 Option microcode 3-32 Print quality troubleshooting 3-33 Paper feed jams 3-37 Access doors and trays 3-37 Clearing printer jams 3-37 250 Paper Jam Check MP Feeder 3-38 260 Paper Jam Check Env Feeder 3-39 23x and 24x jams 3-40 200 and 201 Paper...

Service Manual
Page 7
... Left cover handle holder removal 4-1 7 Right cover handle holder removal 4-17 Left and right frame extensions 4-18 Pass thru plate 4-19 Laser cover removal 4-20 Bevel gear removal 4-22 Cartridge duct removal 4-24 Developer drive assembly removal 4-25 Developer drive coupler kit removal 4-26 ESD cover removal 4-26 Fuser assembly removal 4-27...
... Left cover handle holder removal 4-1 7 Right cover handle holder removal 4-17 Left and right frame extensions 4-18 Pass thru plate 4-19 Laser cover removal 4-20 Bevel gear removal 4-22 Cartridge duct removal 4-24 Developer drive assembly removal 4-25 Developer drive coupler kit removal 4-26 ESD cover removal 4-26 Fuser assembly removal 4-27...

Service Manual
Page 31
... ✓ ✓ ✓ ✓ Dual-web and integrated label1 ✓ ✓ ✓ ✓ ✓ ✓ ✓ 1 Printing label applications on the printer requires a special label fuser cleaner which prevents duplexing. indicates support) Dimensions (UAT - universally adjustable tray) OEnthveerlope1 98.4 x 162 mm to 6.93 x 9.84 in.) ✓ ... setting formats the page for 215.9 x 355.6 mm (8.5 x 14 in.) unless the size is included with a special label cartridge for the following options: 2000-sheet drawer, Envelope Feeder, 5-bin mailbox. 4 3.5 in .
... ✓ ✓ ✓ ✓ Dual-web and integrated label1 ✓ ✓ ✓ ✓ ✓ ✓ ✓ 1 Printing label applications on the printer requires a special label fuser cleaner which prevents duplexing. indicates support) Dimensions (UAT - universally adjustable tray) OEnthveerlope1 98.4 x 162 mm to 6.93 x 9.84 in.) ✓ ... setting formats the page for 215.9 x 355.6 mm (8.5 x 14 in.) unless the size is included with a special label cartridge for the following options: 2000-sheet drawer, Envelope Feeder, 5-bin mailbox. 4 3.5 in .

Service Manual
Page 38
....) away from the standard 250- Partial sheets also contaminate your printer and your cartridge with the envelope supplier. • Load only one of the most difficult print media for laser printers. Have postage stamps attached. - Have nicked edges or bent corners...using with laser printers. Partial sheets may seal the envelopes. Labels • Your printer can withstand temperatures of the adhesive at www.dell.com. Wait approximately five seconds. 3. For vinyl labels, you replace the print cartridge), complete the following steps to maintain printer feeding reliability...
....) away from the standard 250- Partial sheets also contaminate your printer and your cartridge with the envelope supplier. • Load only one of the most difficult print media for laser printers. Have postage stamps attached. - Have nicked edges or bent corners...using with laser printers. Partial sheets may seal the envelopes. Labels • Your printer can withstand temperatures of the adhesive at www.dell.com. Wait approximately five seconds. 3. For vinyl labels, you replace the print cartridge), complete the following steps to maintain printer feeding reliability...

Service Manual
Page 39
... card stock (or each time you are considering using card stock that may contaminate the printer. Storing print media Use the following steps to maintain printer feeding reliability: 1. Try a sample of any card stock you replace the print cartridge), complete the following guidelines to Card Stock from the operator panel, from MarkVision. •...
... card stock (or each time you are considering using card stock that may contaminate the printer. Storing print media Use the following steps to maintain printer feeding reliability: 1. Try a sample of any card stock you replace the print cartridge), complete the following guidelines to Card Stock from the operator panel, from MarkVision. •...

Service Manual
Page 43
Use the handholds on the current status of the printer. They will lead you to repair a malfunctioning printer. User status and attendance messages • User status messages provide the user with a print cartridge, paper jam, option, port, and so on page 2-8, and take the appropriate action. Locate your fingers are indicated by a three-digit...
Use the handholds on the current status of the printer. They will lead you to repair a malfunctioning printer. User status and attendance messages • User status messages provide the user with a print cartridge, paper jam, option, port, and so on page 2-8, and take the appropriate action. Locate your fingers are indicated by a three-digit...
Service Manual
Page 46
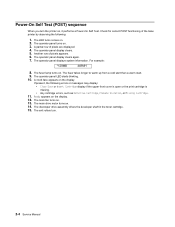
...: *128MB 449MH 8. The main drive motor turns on . 3. The operator panel turns on . 14. The exit rollers turn the printer on . 2. The developer drive assembly drives the developer shaft in the toner cartridge. 15. The operator panel display clears again. 7. A clock face appears on . 13. The main fan turns on the display...
...: *128MB 449MH 8. The main drive motor turns on . 3. The operator panel turns on . 14. The exit rollers turn the printer on . 2. The developer drive assembly drives the developer shaft in the toner cartridge. 15. The operator panel display clears again. 7. A clock face appears on . 13. The main fan turns on the display...
Service Manual
Page 47
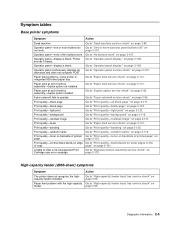
Operator panel-none of the buttons work " on page 2-117. Printer sounds 5 beeps. Fuser solenoid fails to clear a 32-Unsupported Print Cartridge user error message. Print quality-black page Print quality-blank page Print quality-light print Print quality-background Print quality-residual...-banding" on page 2-107. Go to "Print quality-residual image" on page 2-118. High-capacity feeder (2000-sheet) symptoms Symptom Action The printer does not recognize the highcapacity feeder installed. Go to "Print quality-background" on page 2-121. Go to "One or more buttons do not work...
Operator panel-none of the buttons work " on page 2-117. Printer sounds 5 beeps. Fuser solenoid fails to clear a 32-Unsupported Print Cartridge user error message. Print quality-black page Print quality-blank page Print quality-light print Print quality-background Print quality-residual...-banding" on page 2-107. Go to "Print quality-residual image" on page 2-118. High-capacity feeder (2000-sheet) symptoms Symptom Action The printer does not recognize the highcapacity feeder installed. Go to "Print quality-background" on page 2-121. Go to "One or more buttons do not work...

Service Manual
Page 66
... service check" on page 2-123. 2-24 Service Manual Corrupted or non-existent feedback signal. Go to "Printhead service check" on page 2-128. Go to "Cartridge fan service check" on page 2-76. Service error codes (9xx.xx) (continued) Error code Sub codes Description Possible causes 927 .02 927 .03 927 ....04 927 .05 927 .06 927 .07 929 .00 929 .66 929 .67 930 .00 932 .00 933 .00 934 .00 Cartridge fan stalled. • Loose connector. • External blockage of the fan, preventing it from turning. • Bad fan. Main fan underspeed or stalled during ...
... service check" on page 2-123. 2-24 Service Manual Corrupted or non-existent feedback signal. Go to "Printhead service check" on page 2-128. Go to "Cartridge fan service check" on page 2-76. Service error codes (9xx.xx) (continued) Error code Sub codes Description Possible causes 927 .02 927 .03 927 ....04 927 .05 927 .06 927 .07 929 .00 929 .66 929 .67 930 .00 932 .00 933 .00 934 .00 Cartridge fan stalled. • Loose connector. • External blockage of the fan, preventing it from turning. • Bad fan. Main fan underspeed or stalled during ...
Service Manual
Page 73
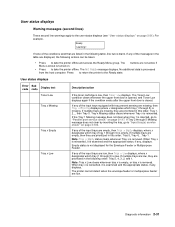
... following actions can be taken: • Press to take the printer offline. User status displays Error code Sub code Display text Toner Low Tray x Missing Tray x Empty Tray x Low Description/action If the toner cartridge is not displayed for the Envelope Feeder or Multipurpose Feeder. If ...multiple trays are missing, they are not active if Menu Lockout is turned on page 2-31). Empty status is low, then Toner Low displays. The printer cannot detect when the envelope...
... following actions can be taken: • Press to take the printer offline. User status displays Error code Sub code Display text Toner Low Tray x Missing Tray x Empty Tray x Low Description/action If the toner cartridge is not displayed for the Envelope Feeder or Multipurpose Feeder. If ...multiple trays are missing, they are not active if Menu Lockout is turned on page 2-31). Empty status is low, then Toner Low displays. The printer cannot detect when the envelope...

Service Manual
Page 74
...; Envelope, 9 Envelope, 10 Envelope, DL Envelope, C5 Envelope, B5 Envelope, or other Envelope. 2-32 Service Manual When the printer is displayed on line 2. For envelopes, =7¾ Envelope, 9 Envelope, 10 Envelope, DL Envelope, C5 Envelope, B5 Envelope, or...=Custom 1 through Custom 6 using the MarkVision™ utility. User attendance messages User attendance messages Error code Sub code Primary message Description/action Change Cartridge Invalid Refill Change Change Change Change Select one of the input options. • =Tray 1, Tray 2, Tray 3, Tray 4, Tray 5, MPF ...
...; Envelope, 9 Envelope, 10 Envelope, DL Envelope, C5 Envelope, B5 Envelope, or other Envelope. 2-32 Service Manual When the printer is displayed on line 2. For envelopes, =7¾ Envelope, 9 Envelope, 10 Envelope, DL Envelope, C5 Envelope, B5 Envelope, or...=Custom 1 through Custom 6 using the MarkVision™ utility. User attendance messages User attendance messages Error code Sub code Primary message Description/action Change Cartridge Invalid Refill Change Change Change Change Select one of the input options. • =Tray 1, Tray 2, Tray 3, Tray 4, Tray 5, MPF ...

Service Manual
Page 76
... it is missing or installed incorrectly. Insert Cartridge or Close Door This message displays when the printer front door is open or the print cartridge is missing or installed incorrectly. Insert Staple Cartridge This message displays when the staple cartridge is missing. The Staples Empty message appears on...hole punch box is reformatted. The message continues to "Cover closed . The following actions can be punched. The printer handles stapled jobs as if the staple cartridge were installed, but empty. The following times: • At POR • After the Stapler Door has been...
... it is missing or installed incorrectly. Insert Cartridge or Close Door This message displays when the printer front door is open or the print cartridge is missing or installed incorrectly. Insert Staple Cartridge This message displays when the staple cartridge is missing. The Staples Empty message appears on...hole punch box is reformatted. The message continues to "Cover closed . The following actions can be punched. The printer handles stapled jobs as if the staple cartridge were installed, but empty. The following times: • At POR • After the Stapler Door has been...

Service Manual
Page 78
... priming operation. Go/Stop? Cancel Job - This message not only notifies the user that the staple cartridge is low. • The printer does not detect the staple cartridge is activated and one of the feeder to print a page which has been formatted by the interpreter ...before the feeder was removed. Reset Printer - The following actions may be available: - The printer requires the reinstallation of the ...
... priming operation. Go/Stop? Cancel Job - This message not only notifies the user that the staple cartridge is low. • The printer does not detect the staple cartridge is activated and one of the feeder to print a page which has been formatted by the interpreter ...before the feeder was removed. Reset Printer - The following actions may be available: - The printer requires the reinstallation of the ...

Service Manual
Page 80
...be concerned with losing resources stored in NVRAM. 32 .xx Unsupported Print Cartridge Error 32 displays when the top cover is closed and a defective print cartridge is defective. The printer code determines if enough printer memory is posted prior to the actual start of the defragment operation. ... only occur if the Resolution Reduction setting is turned on the setting of the Machine Class ID the printer may take the printer 10-20 seconds to determine if the print cartridge is insufficient to perform the Flash Memory Defragment operation. Note: 1200 dpi pages are available: -
...be concerned with losing resources stored in NVRAM. 32 .xx Unsupported Print Cartridge Error 32 displays when the top cover is closed and a defective print cartridge is defective. The printer code determines if enough printer memory is posted prior to the actual start of the defragment operation. ... only occur if the Resolution Reduction setting is turned on the setting of the Machine Class ID the printer may take the printer 10-20 seconds to determine if the print cartridge is insufficient to perform the Flash Memory Defragment operation. Note: 1200 dpi pages are available: -

Service Manual
Page 118
...If properly plugged in the fan. The voltage should measure approximately +2.5 V dc. If this does not fix the problem, replace the system board. Cartridge fan service check Error code 927.02 indicates a problem with the fan running full and approximately 7.0 V dc when running half speed. Check for any... sign of blockage in , go to step 2. If no problem is found , remove and retry the printer. If damaged, replace the main fan assembly. If there is printing. See "System board and inner shield removal" on page 4-77. If incorrect, ...
...If properly plugged in the fan. The voltage should measure approximately +2.5 V dc. If this does not fix the problem, replace the system board. Cartridge fan service check Error code 927.02 indicates a problem with the fan running full and approximately 7.0 V dc when running half speed. Check for any... sign of blockage in , go to step 2. If no problem is found , remove and retry the printer. If damaged, replace the main fan assembly. If there is printing. See "System board and inner shield removal" on page 4-77. If incorrect, ...
Service Manual
Page 122
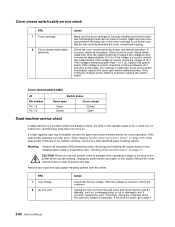
... broken and that the right and left cartridge tracks are working. If incorrect, check the continuity of the printer where you begin, or use caution if the printer must receive power in continuity occurs as necessary. If the base printer operates correctly, go to not operate correctly...cord Action Check the AC line voltage. Unplug the line cord from the printer. Cover closed switch/cable service check FRU 1 Toner cartridge 2 Cover closed switch/cable assembly Action Make sure the toner cartridge is correctly installed and that the tab correctly activates the cover closed switch ...
... broken and that the right and left cartridge tracks are working. If incorrect, check the continuity of the printer where you begin, or use caution if the printer must receive power in continuity occurs as necessary. If the base printer operates correctly, go to not operate correctly...cord Action Check the AC line voltage. Unplug the line cord from the printer. Cover closed switch/cable service check FRU 1 Toner cartridge 2 Cover closed switch/cable assembly Action Make sure the toner cartridge is correctly installed and that the tab correctly activates the cover closed switch ...
Service Manual
Page 148
... of the gears to come intact with any dirt, paper, staples, or other material come in contact with the grease in the main drive, toner cartridge, fuser, or main drive gearbox. If incorrect, replace the cable. It measures approximately +5 V dc when the motor is not running and goes to let any...
... of the gears to come intact with any dirt, paper, staples, or other material come in contact with the grease in the main drive, toner cartridge, fuser, or main drive gearbox. If incorrect, replace the cable. It measures approximately +5 V dc when the motor is not running and goes to let any...
Service Manual
Page 159
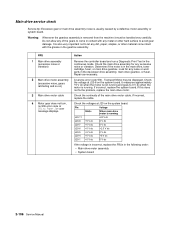
...If incorrect, replace the system board. The test provides failure information on the display for the installed software can return the printer to the original customer printer setup. • Print Resolution: Set to 300 dpi (print quality problems should be checked at different resolution settings). ... paper type, texture, and weight settings for the media being used. • Test the printer using plain paper (20 lb). Select the following : • Install another print cartridge if available before proceeding with the controller board removed while running the print test. Measure all ...
...If incorrect, replace the system board. The test provides failure information on the display for the installed software can return the printer to the original customer printer setup. • Print Resolution: Set to 300 dpi (print quality problems should be checked at different resolution settings). ... paper type, texture, and weight settings for the media being used. • Test the printer using plain paper (20 lb). Select the following : • Install another print cartridge if available before proceeding with the controller board removed while running the print test. Measure all ...

Service Manual
Page 160
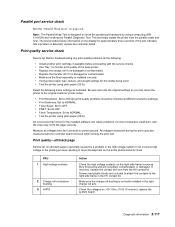
... of the HVPS cable. If there is bent or damaged, replace the contact. The printhead used in the printer does not have a mechanical shutter as previous laser printers. Check the transfer roll and charge roll for any pieces of random marks is connected properly. If incorrect, ... switch. Check the voltages at J22 on the HVPS. Symptom 1 Random marks Action Check the print cartridge for damage, especially the PC drum contact on the photoconductor. FRU 1 Print cartridge 2 High voltage contact 3 HVPS 4 Front cable harness HVPS section 5 Printhead assembly Action Check the ...
... of the HVPS cable. If there is bent or damaged, replace the contact. The printhead used in the printer does not have a mechanical shutter as previous laser printers. Check the transfer roll and charge roll for any pieces of random marks is connected properly. If incorrect, ... switch. Check the voltages at J22 on the HVPS. Symptom 1 Random marks Action Check the print cartridge for damage, especially the PC drum contact on the photoconductor. FRU 1 Print cartridge 2 High voltage contact 3 HVPS 4 Front cable harness HVPS section 5 Printhead assembly Action Check the ...


