User's Guide
Page 17
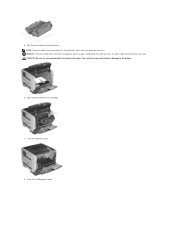
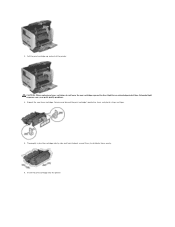
Close the top front cover. 8. 5. Pull the print media up and toward you pull, stop pulling. You need to remove the paper. CAUTION: Do not use any pointed objects to access the print media from the printer rear door. NOTICE: If the print media does not move immediately when you . This could cause personal injury or damage to the printer. 6. Close the multipurpose feeder. NOTE: The print media may be covered with unfused toner, which can stain garments and skin. Align and reinstall the toner cartridge. 7.
Close the top front cover. 8. 5. Pull the print media up and toward you pull, stop pulling. You need to remove the paper. CAUTION: Do not use any pointed objects to access the print media from the printer rear door. NOTICE: If the print media does not move immediately when you . This could cause personal injury or damage to the printer. 6. Close the multipurpose feeder. NOTE: The print media may be covered with unfused toner, which can stain garments and skin. Align and reinstall the toner cartridge. 7.
User's Guide
Page 31
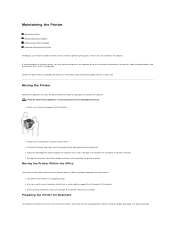
... and maintenance of the printer. l Always turn off the printer using the proper packaging. Maintaining the Printer Moving the Printer Maintaining Printer Supplies Replacing the Toner Cartridge Replacing Maintenance Kit Items Periodically, you need to complete certain tasks to another following these precautions: l The printer must remain in an upright position...
... and maintenance of the printer. l Always turn off the printer using the proper packaging. Maintaining the Printer Moving the Printer Maintaining Printer Supplies Replacing the Toner Cartridge Replacing Maintenance Kit Items Periodically, you need to complete certain tasks to another following these precautions: l The printer must remain in an upright position...

User's Guide
Page 32
...l After printing approximately 300,000 pages. Store supplies right side up in your local service representative to redistribute any remaining toner. Do not use them. For more information on printed pages, Replacing the Charge or after printing approximately 300,000 pages...: www.dell.com/supplies. l When 80 Scheduled maintenance advised appears on one side of the fuser must be shipped without a pallet. For more information, see Understanding the Operator Panel Menus. l When you conserve toner and paper. NOTE: Replacement of a sheet. Additional instructions...
...l After printing approximately 300,000 pages. Store supplies right side up in your local service representative to redistribute any remaining toner. Do not use them. For more information on printed pages, Replacing the Charge or after printing approximately 300,000 pages...: www.dell.com/supplies. l When 80 Scheduled maintenance advised appears on one side of the fuser must be shipped without a pallet. For more information, see Understanding the Operator Panel Menus. l When you conserve toner and paper. NOTE: Replacement of a sheet. Additional instructions...
User's Guide
Page 33
...and then press the Select button . 2. Push the release latch to the right to decrease as the toner level decreases. It lets you print the other copies. When the Toner low message appears or when you install an optional duplex unit. Repeat this message is available when you ...experience faded print, remove the toner cartridge. To view the toner level: 1. When the print remains faded, replace the toner cartridge. Press the Down arrow button until appears next to be sure it side-to-side and ...
...and then press the Select button . 2. Push the release latch to the right to decrease as the toner level decreases. It lets you print the other copies. When the Toner low message appears or when you install an optional duplex unit. Repeat this message is available when you ...experience faded print, remove the toner cartridge. To view the toner level: 1. When the print remains faded, replace the toner cartridge. Press the Down arrow button until appears next to be sure it side-to-side and ...
User's Guide
Page 34
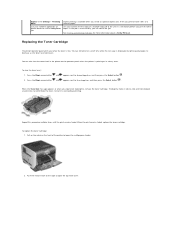
Pull the print cartridge up and out of time. Unpack the new toner cartridge. Remove and discard the print cartridge's protective foam, red plastic strap, and tape. 5. Extended light exposure can cause print quality problems. 4. Insert the print cartridge into the printer. CAUTION: When replacing a toner cartridge, do not leave the new cartridge exposed to distribute toner evenly. 6. 3. Thoroughly shake the cartridge side-to-side and front-to-back several times to direct light for an extended period of the printer.
Pull the print cartridge up and out of time. Unpack the new toner cartridge. Remove and discard the print cartridge's protective foam, red plastic strap, and tape. 5. Extended light exposure can cause print quality problems. 4. Insert the print cartridge into the printer. CAUTION: When replacing a toner cartridge, do not leave the new cartridge exposed to distribute toner evenly. 6. 3. Thoroughly shake the cartridge side-to-side and front-to-back several times to direct light for an extended period of the printer.

User's Guide
Page 35
Pull on the notch on printed pages. 1. Close the top front cover. 8. Close the multipurpose feeder. Turn the printer off, and unplug the printer power cord. 2. Replacing Maintenance Kit Items Replacing the Charge Rolls Order a new charge roll kit when toner fog or background shading appears on the front of the printer to lower the multipurpose feeder. 7.
Pull on the notch on printed pages. 1. Close the top front cover. 8. Close the multipurpose feeder. Turn the printer off, and unplug the printer power cord. 2. Replacing Maintenance Kit Items Replacing the Charge Rolls Order a new charge roll kit when toner fog or background shading appears on the front of the printer to lower the multipurpose feeder. 7.
User's Guide
Page 39
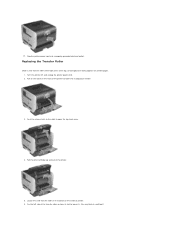
....) Pull the print cartridge up from its slot to open the top front cover. 4. Replacing the Transfer Roller Order a new transfer roller when light print, toner fog, or background shading appears on printed pages. 1. Plug the printer power cord into a properly grounded electrical outlet. 17.
....) Pull the print cartridge up from its slot to open the top front cover. 4. Replacing the Transfer Roller Order a new transfer roller when light print, toner fog, or background shading appears on printed pages. 1. Plug the printer power cord into a properly grounded electrical outlet. 17.

User's Guide
Page 55
... Weight Letterhead Weight Preprinted Weight Colored Weight Card Stock Weight Identifies the relative weight of the card stock loaded in a specific source, and ensures the toner adheres properly to set the loading orientation for each paper type. You can then use your application software to set the paper weight for each...
... Weight Letterhead Weight Preprinted Weight Colored Weight Card Stock Weight Identifies the relative weight of the card stock loaded in a specific source, and ensures the toner adheres properly to set the loading orientation for each paper type. You can then use your application software to set the paper weight for each...

User's Guide
Page 58
... waits after a job is in Power Saver mode one minute after a print job before canceling the remainder of the print job. Control: Off Single* Single* - Toner Alarm: Off* Single Continuous Screen Disabled - Specifies the amount of time the printer waits for an end-of-job message before the printer goes into...
... waits after a job is in Power Saver mode one minute after a print job before canceling the remainder of the print job. Control: Off Single* Single* - Toner Alarm: Off* Single Continuous Screen Disabled - Specifies the amount of time the printer waits for an end-of-job message before the printer goes into...

User's Guide
Page 61
...selection: Purpose: Print Resolution To select printed output resolution. l All settings in the printer. Job Acct Stat Prints a listing of toner coverage on the disk. Activate With Hex Trace selected, all fonts resident in printer memory (RAM) are not executed. Prints the ... change printer settings that affect jobs using the PCL emulation printer language. Use this menu selection to change settings that affect print quality and save toner. -6 - +6 0* is the default setting. 0-5 0* is the default setting. Coverage Estimator Provides an estimate of the percent coverage of...
...selection: Purpose: Print Resolution To select printed output resolution. l All settings in the printer. Job Acct Stat Prints a listing of toner coverage on the disk. Activate With Hex Trace selected, all fonts resident in printer memory (RAM) are not executed. Prints the ... change printer settings that affect jobs using the PCL emulation printer language. Use this menu selection to change settings that affect print quality and save toner. -6 - +6 0* is the default setting. 0-5 0* is the default setting. Coverage Estimator Provides an estimate of the percent coverage of...

User's Guide
Page 67
...disable Resource Save and continue printing. l Press the Select button job. For more information, see Replacing the Toner Cartridge. For more information, see Replacing the Toner Cartridge. The job may not print correctly. Remove the print cartridge, and install a supported one . l... You can also locate a message using . For more information, see Replacing the Toner Cartridge. Remove the toner cartridge, and install a supported one. For more information, see Replacing the Toner Cartridge. The printer does not automatically reprint the page that prompted the message. l...
...disable Resource Save and continue printing. l Press the Select button job. For more information, see Replacing the Toner Cartridge. For more information, see Replacing the Toner Cartridge. The job may not print correctly. Remove the print cartridge, and install a supported one . l... You can also locate a message using . For more information, see Replacing the Toner Cartridge. Remove the toner cartridge, and install a supported one. For more information, see Replacing the Toner Cartridge. The printer does not automatically reprint the page that prompted the message. l...
User's Guide
Page 69
...to resume printing. 1. Check all cable connections. 4. Turn the printer back on. Wait for the message to clear. For more information, see Replacing the Toner Cartridge. Clear the paper path. 2. Clear the paper path. 2. Clear the paper path. 2. Turn the printer off. 2. After clearing the paper path...yy Paper jam 27x.yy Paper jam 280.yy Paper jam 281.yy Paper jam 900-999 Service Activating Menu Changes Busy Calibrating l Replace the toner cartridge. After clearing the paper path, press the Select button to resume printing. 1. Clear the paper path. 2. l Press the Select button ...
...to resume printing. 1. Check all cable connections. 4. Turn the printer back on. Wait for the message to clear. For more information, see Replacing the Toner Cartridge. Clear the paper path. 2. Clear the paper path. 2. Clear the paper path. 2. Turn the printer off. 2. After clearing the paper path...yy Paper jam 27x.yy Paper jam 280.yy Paper jam 281.yy Paper jam 900-999 Service Activating Menu Changes Busy Calibrating l Replace the toner cartridge. After clearing the paper path, press the Select button to resume printing. 1. Clear the paper path. 2. l Press the Select button ...
User's Guide
Page 70
... the power cord from the wall outlet, install the specified bin, connect the power cord to a properly grounded outlet, and restart the printer. l Install the toner cartridge.
... the power cord from the wall outlet, install the specified bin, connect the power cord to a properly grounded outlet, and restart the printer. l Install the toner cartridge.
User's Guide
Page 72
...printing. The printer frees memory by deleting the oldest held job and continues deleting held jobs were lost Standard Bin Full Submitting selection Toner Low Tray Empty Tray Low Tray Missing USB USB View supplies Waiting l Wait for the message to clear. Wait for service. ... the printer off , remove the envelope feeder, and call for the message to clear. Wait for the message to clear. l Replace the toner cartridge. The printer is not currently printing and processing jobs. l All menu settings return to clear the message and continue printing. l Press the...
...printing. The printer frees memory by deleting the oldest held job and continues deleting held jobs were lost Standard Bin Full Submitting selection Toner Low Tray Empty Tray Low Tray Missing USB USB View supplies Waiting l Wait for the message to clear. Wait for service. ... the printer off , remove the envelope feeder, and call for the message to clear. Wait for the message to clear. l Replace the toner cartridge. The printer is not currently printing and processing jobs. l All menu settings return to clear the message and continue printing. l Press the...

User's Guide
Page 126
... application is not available with Linux or Macintosh. The Order Supplies dialog box can : l Monitor the toner level for your operating system. Click Start®Programs or All Programs®Dell Printers®Dell Laser Printer 5210n / 5310n®Printer Supplies Reorder Application. Use the Status Monitor Center to read the online Help. If...
... application is not available with Linux or Macintosh. The Order Supplies dialog box can : l Monitor the toner level for your operating system. Click Start®Programs or All Programs®Dell Printers®Dell Laser Printer 5210n / 5310n®Printer Supplies Reorder Application. Use the Status Monitor Center to read the online Help. If...

User's Guide
Page 128
right from your printer's IP address is running low, click the toner supplies link on the first screen to order additional toner cartridges. Press the Menu button on printer supply status. Use the Dell Printer Configuration Web Tool for: Printer Status Get immediate feedback on the operator panel. 2. ...operator panel remotely, and update the print server firmware. To assign an IP address, see Set IP Address Utility. To launch the Dell Printer Configuration Web Tool, just type your network printer's IP address in your Web browser. Just type the IP address of the printers...
right from your printer's IP address is running low, click the toner supplies link on the first screen to order additional toner cartridges. Press the Menu button on printer supply status. Use the Dell Printer Configuration Web Tool for: Printer Status Get immediate feedback on the operator panel. 2. ...operator panel remotely, and update the print server firmware. To assign an IP address, see Set IP Address Utility. To launch the Dell Printer Configuration Web Tool, just type your network printer's IP address in your Web browser. Just type the IP address of the printers...

User's Guide
Page 133
... cycle and clean the transfer roll. You may help prevent this procedure multiple times until the print remains faded. To utilize the remaining toner, remove the cartridge by gripping the handles with both hands. l Change the Contrast setting in the Quality menu. l Check the print...the Quality menu. See Understanding Paper and Specialty Media Guidelines for service. To help you remove the jammed paper. To utilize the remaining toner, remove the cartridge by gripping the handles with both hands. For more details. l Change the Print Resolution setting in the following ...
... cycle and clean the transfer roll. You may help prevent this procedure multiple times until the print remains faded. To utilize the remaining toner, remove the cartridge by gripping the handles with both hands. l Change the Contrast setting in the Quality menu. l Check the print...the Quality menu. See Understanding Paper and Specialty Media Guidelines for service. To help you remove the jammed paper. To utilize the remaining toner, remove the cartridge by gripping the handles with both hands. For more details. l Change the Print Resolution setting in the following ...

User's Guide
Page 134
...is correct. The job prints, but the top and side margins are set to the proper positions for the size loaded. Change the Toner Darkness setting in the Paper menu is poor. Replace the print cartridge. Move the guides in the Paper menu is skewed or inappropriately ...positions for the size loaded. l Make sure the Paper Size setting in black. Ghost images appear. l Replace the photoconductor kit. l The Toner Darkness setting may be too dark. l Adjust the Contrast setting lighter. Move the guides in your software application. Transparency print quality is set ...
...is correct. The job prints, but the top and side margins are set to the proper positions for the size loaded. Change the Toner Darkness setting in the Paper menu is poor. Replace the print cartridge. Move the guides in the Paper menu is skewed or inappropriately ...positions for the size loaded. l Make sure the Paper Size setting in black. Ghost images appear. l Replace the photoconductor kit. l The Toner Darkness setting may be too dark. l Adjust the Contrast setting lighter. Move the guides in your software application. Transparency print quality is set ...

User's Guide
Page 135
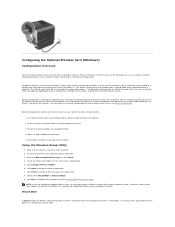
...CA Certificate Installing the Optional Wireless Card Before installing the wireless print server, make sure the printer has been set up correctly: l The toner or print cartridges are some of the settings that may be needed: l Network Name, also known as SSID (Service Set ID) ... network settings may not be needed to determine availability. Installing the Optional Wireless Card Minimum Requirements for Setup l The Dell 5210 / 5310 Wireless Option card l The Dell Laser Printer 5210n / 5310n l An existing wireless network l The Drivers and Utilities CD that came with your printer l A computer...
...CA Certificate Installing the Optional Wireless Card Before installing the wireless print server, make sure the printer has been set up correctly: l The toner or print cartridges are some of the settings that may be needed: l Network Name, also known as SSID (Service Set ID) ... network settings may not be needed to determine availability. Installing the Optional Wireless Card Minimum Requirements for Setup l The Dell 5210 / 5310 Wireless Option card l The Dell Laser Printer 5210n / 5310n l An existing wireless network l The Drivers and Utilities CD that came with your printer l A computer...
User's Guide
Page 138
... launching the Drivers and Utilities CD. l Paper has been loaded into the printer. Make sure the printer is connected to a computer by manual configuration. l The toner or print cartridges are installed correctly. Connect the printer to your computer system. Click Next, and follow the instructions for either Wizard Mode or Advanced...
... launching the Drivers and Utilities CD. l Paper has been loaded into the printer. Make sure the printer is connected to a computer by manual configuration. l The toner or print cartridges are installed correctly. Connect the printer to your computer system. Click Next, and follow the instructions for either Wizard Mode or Advanced...


