
Tech Sheet
Page 1
...either the entities claiming the marks and names or their products. disclaims any manner whatsoever without notice. © 2008 Dell Inc. Dell™ Laser Printer 5210n/5310n Supported Envelope Sizes If you have installed an optional envelope feeder, the information below replaces the supported envelope sizes ...strictly forbidden. All rights reserved. Reproduction in any proprietary interest in this document is subject to change without the written permission of Dell Inc. Other trademarks and trade names may be used in trademarks and trade names other than its own. Media Size 7 ...
...either the entities claiming the marks and names or their products. disclaims any manner whatsoever without notice. © 2008 Dell Inc. Dell™ Laser Printer 5210n/5310n Supported Envelope Sizes If you have installed an optional envelope feeder, the information below replaces the supported envelope sizes ...strictly forbidden. All rights reserved. Reproduction in any proprietary interest in this document is subject to change without the written permission of Dell Inc. Other trademarks and trade names may be used in trademarks and trade names other than its own. Media Size 7 ...

User's Guide
Page 1
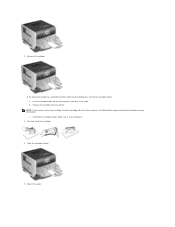
....dell.com or contact your Dell Sales Representative. For more like the fully configured model. Configured Models 5310n 600 sheets (500-sheet tray + 100-sheet multipurpose feeder) 250 sheets 128MB 640MB The following table indicates some of the options below, go to the printer,... operator panel. Items denoted with the option. The following illustrations show a standard network and fully configured printer. To purchase any of the differences between the models. 5210n Input capacity 600 sheets (500-sheet tray + 100-sheet multipurpose feeder) Output capacity 250 sheets Standard ...
....dell.com or contact your Dell Sales Representative. For more like the fully configured model. Configured Models 5310n 600 sheets (500-sheet tray + 100-sheet multipurpose feeder) 250 sheets 128MB 640MB The following table indicates some of the options below, go to the printer,... operator panel. Items denoted with the option. The following illustrations show a standard network and fully configured printer. To purchase any of the differences between the models. 5210n Input capacity 600 sheets (500-sheet tray + 100-sheet multipurpose feeder) Output capacity 250 sheets Standard ...

User's Guide
Page 2
...Operator Panel Number: Use the: 1 Indicator light 2 Menu button 3 Navigation buttons To: Determine whether the printer is on , busy, idle, processing a job, or requires operator intervention. Printer is on , but idle. Pressing the Down arrow button at a time. Operator intervention is not ready. ...l Off - l Solid amber - NOTE: The printer must use either a printer stand or printer base if you are unavailable will appear if the printer is required. A message indicating the menus are using the Up or Down arrow button,...
...Operator Panel Number: Use the: 1 Indicator light 2 Menu button 3 Navigation buttons To: Determine whether the printer is on , busy, idle, processing a job, or requires operator intervention. Printer is on , but idle. Pressing the Down arrow button at a time. Operator intervention is not ready. ...l Off - l Solid amber - NOTE: The printer must use either a printer stand or printer base if you are unavailable will appear if the printer is required. A message indicating the menus are using the Up or Down arrow button,...

User's Guide
Page 3
... 4-line, back-lit, grayscale display that will not be applied if you must resolve. Using the Operator Panel Menus A number of the printer. After pressing Cancel, the message Stopping appears. The table shows the menu index on a selection. View messages and graphics describing the current state... stopped, the status line in the operator panel shows Stopped, and a list of the printer and indicating possible printer problems you press the Back button. Return to change printer settings. Stop the mechanical operation of menus are available to make it easy for you to the ...
... 4-line, back-lit, grayscale display that will not be applied if you must resolve. Using the Operator Panel Menus A number of the printer. After pressing Cancel, the message Stopping appears. The table shows the menu index on a selection. View messages and graphics describing the current state... stopped, the status line in the operator panel shows Stopped, and a list of the printer and indicating possible printer problems you press the Back button. Return to change printer settings. Stop the mechanical operation of menus are available to make it easy for you to the ...

User's Guide
Page 4
... Support Policy Technician-assisted technical support requires the cooperation and participation of the customer in the troubleshooting process and provides for restoration of the printer and all Dell-installed hardware. In addition to this technician assisted technical support, online technical support is provided by the original manufacturer, including those purchased and/or...
... Support Policy Technician-assisted technical support requires the cooperation and participation of the customer in the troubleshooting process and provides for restoration of the printer and all Dell-installed hardware. In addition to this technician assisted technical support, online technical support is provided by the original manufacturer, including those purchased and/or...

User's Guide
Page 6
... XP Help and Support Center 1. Drivers l Reference - Type a word or phrase that describes your printer or advanced technical reference material for my printer Dell Support Website: support.dell.com The Dell Support website provides several online tools, including: l Solutions - Click the topic that describes your documentation. Contact information, order status, warranty, and repair information l Downloads...
... XP Help and Support Center 1. Drivers l Reference - Type a word or phrase that describes your printer or advanced technical reference material for my printer Dell Support Website: support.dell.com The Dell Support website provides several online tools, including: l Solutions - Click the topic that describes your documentation. Contact information, order status, warranty, and repair information l Downloads...

User's Guide
Page 14
...important information that helps you have the Dell printer Service Tag available. disclaims any manner whatsoever without notice. © 2005 Dell Inc. A00 To order supplies from Dell: 1. See Express Service Code and Service Tag number. Model 5210n / 5310n August 2005 Rev. is subject...in trademarks and trade names other documentation included with your printer. Reproduction in any proprietary interest in this text: Dell and the DELL logo are registered trademarks of Microsoft Corporation. Dell™ Laser Printer 5210n / 5310n User's Guide Click the links to the ...
...important information that helps you have the Dell printer Service Tag available. disclaims any manner whatsoever without notice. © 2005 Dell Inc. A00 To order supplies from Dell: 1. See Express Service Code and Service Tag number. Model 5210n / 5310n August 2005 Rev. is subject...in trademarks and trade names other documentation included with your printer. Reproduction in any proprietary interest in this text: Dell and the DELL logo are registered trademarks of Microsoft Corporation. Dell™ Laser Printer 5210n / 5310n User's Guide Click the links to the ...
User's Guide
Page 15
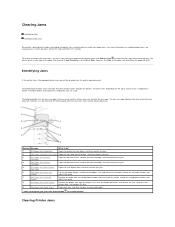
... Jam Check Duplex Remove the duplex tray from the duplex unit, raise the duplex deflector, and remove the jam. The path varies depending on the printer, and then remove the jam. 3 201 Paper Jam Remove Cartridge Open the top front cover, remove the print cartridge, and then remove the jam. 4 ... and then remove the jam. However, it properly, you must clear the entire paper path and then press the Select button to resume printing. The printer prints a new copy of the page that can occur and the action necessary to clear the message. The jam message indicates the area where the...
... Jam Check Duplex Remove the duplex tray from the duplex unit, raise the duplex deflector, and remove the jam. The path varies depending on the printer, and then remove the jam. 3 201 Paper Jam Remove Cartridge Open the top front cover, remove the print cartridge, and then remove the jam. 4 ... and then remove the jam. However, it properly, you must clear the entire paper path and then press the Select button to resume printing. The printer prints a new copy of the page that can occur and the action necessary to clear the message. The jam message indicates the area where the...
User's Guide
Page 16
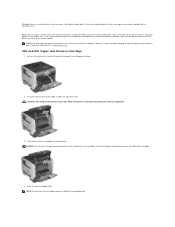
... jam message or messages displayed on the operator panel. To go to light for extended periods. Pull on the notch on the underside of the printer to cool before touching any internal components. 3. Push the release latch to the right to help you are several places a jam can also occur...photoconductor drum on the front of the cartridge. However, they have been grouped to open the top front cover. Jams in the front of the printer occur in two locations and require the removal of the output options. Use the cartridge handle whenever you quickly clear the print path. NOTE: The...
... jam message or messages displayed on the operator panel. To go to light for extended periods. Pull on the notch on the underside of the printer to cool before touching any internal components. 3. Push the release latch to the right to help you are several places a jam can also occur...photoconductor drum on the front of the cartridge. However, they have been grouped to open the top front cover. Jams in the front of the printer occur in two locations and require the removal of the output options. Use the cartridge handle whenever you quickly clear the print path. NOTE: The...
User's Guide
Page 17
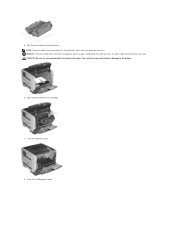
5. You need to remove the paper. Align and reinstall the toner cartridge. 7. NOTICE: If the print media does not move immediately when you . NOTE: The print media may be covered with unfused toner, which can stain garments and skin. Close the top front cover. 8. CAUTION: Do not use any pointed objects to access the print media from the printer rear door. Close the multipurpose feeder. This could cause personal injury or damage to the printer. 6. Pull the print media up and toward you pull, stop pulling.
5. You need to remove the paper. Align and reinstall the toner cartridge. 7. NOTICE: If the print media does not move immediately when you . NOTE: The print media may be covered with unfused toner, which can stain garments and skin. Close the top front cover. 8. CAUTION: Do not use any pointed objects to access the print media from the printer rear door. Close the multipurpose feeder. This could cause personal injury or damage to the printer. 6. Pull the print media up and toward you pull, stop pulling.

User's Guide
Page 18
Otherwise, continue with step 2. 2. Open the printer rear door. This could cause personal injury or damage to remove the paper. Close the rear door. 5. Remove the jammed media. Allow the printer to cool before touching any pointed objects to the printer. 4. CAUTION: The inside of the printer may be hot. CAUTION: Do not use any internal components. 3. 9. Press the Select button . 202 Paper Jam Open Rear Door 1. Press the Select button . If the paper is exiting the printer, pull the media straight out, and press the Select button .
Otherwise, continue with step 2. 2. Open the printer rear door. This could cause personal injury or damage to remove the paper. Close the rear door. 5. Remove the jammed media. Allow the printer to cool before touching any pointed objects to the printer. 4. CAUTION: The inside of the printer may be hot. CAUTION: Do not use any internal components. 3. 9. Press the Select button . 202 Paper Jam Open Rear Door 1. Press the Select button . If the paper is exiting the printer, pull the media straight out, and press the Select button .

User's Guide
Page 19
Remove the jammed media. Make sure it snaps into place. 4. Press the Select button . 23x and 24x Jams Paper jams in these areas: 1. To clear these areas can occur on the media location, pull the media either up or down. 3. Open the duplex rear door. 2. Close the duplex rear door. Open the printer paper tray, and remove any jammed media. Depending on the incline surface of a tray or across more than one tray. 23x Paper Jam Open Duplex Rear Door 1.
Remove the jammed media. Make sure it snaps into place. 4. Press the Select button . 23x and 24x Jams Paper jams in these areas: 1. To clear these areas can occur on the media location, pull the media either up or down. 3. Open the duplex rear door. 2. Close the duplex rear door. Open the printer paper tray, and remove any jammed media. Depending on the incline surface of a tray or across more than one tray. 23x Paper Jam Open Duplex Rear Door 1.
User's Guide
Page 22
a. Load the envelope feeder. 5. b. c. Reinstall the envelope feeder. Adjust the guide. NOTE: If you cannot remove the envelope, the print cartridge will have to be pulled out, remove the envelope feeder. 2. Lift the envelope feeder up out of the printer, and then set it snaps into place. 3. See 200 and 201 Paper Jam Remove Cartridge for more information. If the jammed envelope has entered the printer and cannot be removed. Make sure it aside. Remove the envelope from the printer. Remove all envelopes. Flex and stack the envelopes. 4.
a. Load the envelope feeder. 5. b. c. Reinstall the envelope feeder. Adjust the guide. NOTE: If you cannot remove the envelope, the print cartridge will have to be pulled out, remove the envelope feeder. 2. Lift the envelope feeder up out of the printer, and then set it snaps into place. 3. See 200 and 201 Paper Jam Remove Cartridge for more information. If the jammed envelope has entered the printer and cannot be removed. Make sure it aside. Remove the envelope from the printer. Remove all envelopes. Flex and stack the envelopes. 4.

User's Guide
Page 25
... licensed under the terms of the document you any rights to the Dell- See the warranty disclaimers in this printer. or third-party-copyrighted software in the referenced licenses for the Dell modified GNU licensed software, launch the Drivers and Utilities CD that is... Warranty Statements l GNU License l Other Third-Party Licenses (Software) The Dell modified GNU licensed software is free software; To obtain source code files for additional details. Licensing Notice The printer resident software contains: l Software developed and copyrighted by the Apache Software Foundation...
... licensed under the terms of the document you any rights to the Dell- See the warranty disclaimers in this printer. or third-party-copyrighted software in the referenced licenses for the Dell modified GNU licensed software, launch the Drivers and Utilities CD that is... Warranty Statements l GNU License l Other Third-Party Licenses (Software) The Dell modified GNU licensed software is free software; To obtain source code files for additional details. Licensing Notice The printer resident software contains: l Software developed and copyrighted by the Apache Software Foundation...

User's Guide
Page 26
...If the Drivers and Utilities CD appears, click Cancel. 2. In Windows XP, click Start®Control Panel®Printers and Other Hardware®Printers and Faxes. Computer Operating System: Windows XP Professional x64 Windows XP Windows 2003 Server Windows 2000 Windows Me Windows 98...browse to the computer using a USB or parallel cable. NOTE: Installing a custom driver will be created and appear in the Printers folder. A separate printer object will not replace the system driver. Select Typical Installation (recommended), and then click Install. Installing Drivers for use on your ...
...If the Drivers and Utilities CD appears, click Cancel. 2. In Windows XP, click Start®Control Panel®Printers and Other Hardware®Printers and Faxes. Computer Operating System: Windows XP Professional x64 Windows XP Windows 2003 Server Windows 2000 Windows Me Windows 98...browse to the computer using a USB or parallel cable. NOTE: Installing a custom driver will be created and appear in the Printers folder. A separate printer object will not replace the system driver. Select Typical Installation (recommended), and then click Install. Installing Drivers for use on your ...

User's Guide
Page 27
... screen, click Install. Enter the password, and click OK. Click Close when installation is turned on. After the printer appears in Print Center/Printer Setup Utility (Mac OS X) 1. Double-click Classic, and double-click the installer package for your CD drive and...been created for your computer, the PCL driver for the printer. Install a PostScript Printer Description (PPD) file on the computer. b. Select Local printer attached to a USB-attached printer, create a desktop printer icon (Mac OS 9), or create a queue in the Printers list, and then click Next. 11. Open Finder, ...
... screen, click Install. Enter the password, and click OK. Click Close when installation is turned on. After the printer appears in Print Center/Printer Setup Utility (Mac OS X) 1. Double-click Classic, and double-click the installer package for your CD drive and...been created for your computer, the PCL driver for the printer. Install a PostScript Printer Description (PPD) file on the computer. b. Select Local printer attached to a USB-attached printer, create a desktop printer icon (Mac OS 9), or create a queue in the Printers list, and then click Next. 11. Open Finder, ...

User's Guide
Page 28
...: l Mac OS 9.0: Open Apple LaserWriter. Click Create, and click Save. 9. Set up an administrative user group. The printer drivers package can NFS mount the printer drivers package files. d. f. Do one of the following before you are installed on the Drivers and Utilities CD. In the...appliances and Sun workstations. If you have enough disk space available for Sun Solaris supports USB connections to use that group as the printer drivers administrative group. l One host, while other workstations can be asked if you want to the Macintosh computer. Click Continue ...
...: l Mac OS 9.0: Open Apple LaserWriter. Click Create, and click Save. 9. Set up an administrative user group. The printer drivers package can NFS mount the printer drivers package files. d. f. Do one of the following before you are installed on the Drivers and Utilities CD. In the...appliances and Sun workstations. If you have enough disk space available for Sun Solaris supports USB connections to use that group as the printer drivers administrative group. l One host, while other workstations can be asked if you want to the Macintosh computer. Click Continue ...
User's Guide
Page 29
.../mnt/cdrom: # cd /mnt/cdrom/unix/packages 4. If you mounted your CD-ROM to complete the installation: # /usr/local/dell/setup.dellprint NOTE: Your specific printer driver may not be included in the standard package. Run the following setup script to /mnt/cdrom: # cd /mnt/cdrom/unix/packages..., and then press Enter. Change the directory to TRUE. 2. For example, if the path to complete the installation: # /usr/local/dell/setup.dellprint NOTE: Your specific printer driver may not be included in /usr/local. Continue with the instructions on RedHat Linux or SuSE Linux 1. Change your...
.../mnt/cdrom: # cd /mnt/cdrom/unix/packages 4. If you mounted your CD-ROM to complete the installation: # /usr/local/dell/setup.dellprint NOTE: Your specific printer driver may not be included in the standard package. Run the following setup script to /mnt/cdrom: # cd /mnt/cdrom/unix/packages..., and then press Enter. Change the directory to TRUE. 2. For example, if the path to complete the installation: # /usr/local/dell/setup.dellprint NOTE: Your specific printer driver may not be included in /usr/local. Continue with the instructions on RedHat Linux or SuSE Linux 1. Change your...
User's Guide
Page 30
... When a message appears telling you want to remove on your operating system documentation for removal after removing all of the printer drivers package names you the installation was successful, type q to be removed manually. Depending on the command line. See... your operating system, you mark the printer drivers packages for more than one package. b. c. Removing Print Drivers A system administrator removes printer drivers using the utilities listed in the following location: /usr/local/dell/unix_prt_drivers. a. To see if any directories remain ...
... When a message appears telling you want to remove on your operating system documentation for removal after removing all of the printer drivers package names you the installation was successful, type q to be removed manually. Depending on the command line. See... your operating system, you mark the printer drivers packages for more than one package. b. c. Removing Print Drivers A system administrator removes printer drivers using the utilities listed in the following location: /usr/local/dell/unix_prt_drivers. a. To see if any directories remain ...
User's Guide
Page 31
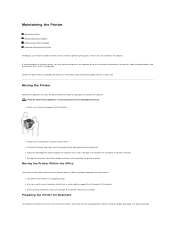
... problems and maintenance tasks to the printer and must be repackaged for shipment can be safely moved from the printer before attempting to support the full footprint of the printer. Moving the Printer Follow these precautions: l The printer must be avoided. l Disconnect all...Any cart used to move the printer should have a surface able to move the printer within an office to prepare the printer for Shipment To transport the printer by vehicle or by the printer warranty. Maintaining the Printer Moving the Printer Maintaining Printer Supplies Replacing the Toner Cartridge ...
... problems and maintenance tasks to the printer and must be repackaged for shipment can be safely moved from the printer before attempting to support the full footprint of the printer. Moving the Printer Follow these precautions: l The printer must be avoided. l Disconnect all...Any cart used to move the printer should have a surface able to move the printer within an office to prepare the printer for Shipment To transport the printer by vehicle or by the printer warranty. Maintaining the Printer Moving the Printer Maintaining Printer Supplies Replacing the Toner Cartridge ...


