
Tech Sheet
Page 1
... to either the entities claiming the marks and names or their products. Information in this document to refer to change without the written permission of Dell Inc. Media Size 7 ¾ Envelope 3.875 x 7.5 in. (98 x 191 mm) 9 Envelope 3.875 x 8.9 in. (98 x 225 mm) 10 Envelope 4.12 x...Sensing is strictly forbidden. All rights reserved. Other trademarks and trade names may be used in the User's Guide. Dell™ Laser Printer 5210n/5310n Supported Envelope Sizes If you have installed an optional envelope feeder, the information below replaces the supported envelope sizes...
... to either the entities claiming the marks and names or their products. Information in this document to refer to change without the written permission of Dell Inc. Media Size 7 ¾ Envelope 3.875 x 7.5 in. (98 x 191 mm) 9 Envelope 3.875 x 8.9 in. (98 x 225 mm) 10 Envelope 4.12 x...Sensing is strictly forbidden. All rights reserved. Other trademarks and trade names may be used in the User's Guide. Dell™ Laser Printer 5210n/5310n Supported Envelope Sizes If you have installed an optional envelope feeder, the information below replaces the supported envelope sizes...

User's Guide
Page 1
...on the operator panel. The following illustrations show a standard network and fully configured printer. For more like the fully configured model. To purchase any of the differences between the models. 5210n Input capacity 600 sheets (500-sheet tray + 100-sheet multipurpose feeder) Output ... Operator panel Multipurpose feeder (100 sheets) Standard tray (500 sheets) If you attach print media handling options to www.dell.com or contact your Dell Sales Representative. Configured Models 5310n 600 sheets (500-sheet tray + 100-sheet multipurpose feeder) 250 sheets 128MB 640MB The...
...on the operator panel. The following illustrations show a standard network and fully configured printer. For more like the fully configured model. To purchase any of the differences between the models. 5210n Input capacity 600 sheets (500-sheet tray + 100-sheet multipurpose feeder) Output ... Operator panel Multipurpose feeder (100 sheets) Standard tray (500 sheets) If you attach print media handling options to www.dell.com or contact your Dell Sales Representative. Configured Models 5310n 600 sheets (500-sheet tray + 100-sheet multipurpose feeder) 250 sheets 128MB 640MB The...

User's Guide
Page 2
... a time. You must be in the Ready state to another. NOTE: The printer must use either a printer stand or printer base if you are unavailable will appear if the printer is warming up, processing data, or printing a job. Move within a screen such... index. Understanding the Operator Panel Number: Use the: 1 Indicator light 2 Menu button 3 Navigation buttons To: Determine whether the printer is on , busy, idle, processing a job, or requires operator intervention. Printer is on , but idle. l Blinking green - The Left or Right arrow button is required. l Solid amber - Number:...
... a time. You must be in the Ready state to another. NOTE: The printer must use either a printer stand or printer base if you are unavailable will appear if the printer is warming up, processing data, or printing a job. Move within a screen such... index. Understanding the Operator Panel Number: Use the: 1 Indicator light 2 Menu button 3 Navigation buttons To: Determine whether the printer is on , busy, idle, processing a job, or requires operator intervention. Printer is on , but idle. l Blinking green - The Left or Right arrow button is required. l Solid amber - Number:...

User's Guide
Page 3
...Stop the mechanical operation of options appears. View messages and graphics describing the current state of menus are available to change printer settings. For more information about menus and menu items, see Understanding the Operator Panel Menus. The operator panel display ... l Network l Standard USB l USB l Parallel l Parallel l NetWare l AppleTalk Using the Operator Panel Menus A number of the printer and indicating possible printer problems you want such as following a link, submitting a configuration item, or when you must resolve. Return to the last screen you...
...Stop the mechanical operation of options appears. View messages and graphics describing the current state of menus are available to change printer settings. For more information about menus and menu items, see Understanding the Operator Panel Menus. The operator panel display ... l Network l Standard USB l USB l Parallel l Parallel l NetWare l AppleTalk Using the Operator Panel Menus A number of the printer and indicating possible printer problems you want such as following a link, submitting a configuration item, or when you must resolve. Return to the last screen you...

User's Guide
Page 4
...and peripherals is available at support.dell.com. Support for your printer, refer to the original default configuration as shipped from Dell, as well as your email address as the verification of appropriate functionality of the printer and all Dell-installed hardware. Additional technical support ...options may be available for the printer and any Dell-installed software and peripherals. Select your region on the WELCOME TO DELL SUPPORT page, and fill in as user:...
...and peripherals is available at support.dell.com. Support for your printer, refer to the original default configuration as shipped from Dell, as well as your email address as the verification of appropriate functionality of the printer and all Dell-installed hardware. Additional technical support ...options may be available for the printer and any Dell-installed software and peripherals. Select your region on the WELCOME TO DELL SUPPORT page, and fill in as user:...

User's Guide
Page 6
... to set up and use Windows XP l Documentation for my printer Windows XP Help and Support Center 1. Printer documentation and product specifications l How to uninstall/reinstall drivers or access your printer or advanced technical reference material for my printer Dell Support Website: support.dell.com The Dell Support website provides several online tools, including: l Solutions - Type a word...
... to set up and use Windows XP l Documentation for my printer Windows XP Help and Support Center 1. Printer documentation and product specifications l How to uninstall/reinstall drivers or access your printer or advanced technical reference material for my printer Dell Support Website: support.dell.com The Dell Support website provides several online tools, including: l Solutions - Type a word...

User's Guide
Page 14
... hardware or loss of data and tells you how to change without the written permission of your printer. A00 Dell Inc. Dell™ Laser Printer 5210n / 5310n User's Guide Click the links to the Owner's Manual for the correct phone number for your country... of Microsoft Corporation. Model 5210n / 5310n August 2005 Rev. Double-click the icon on other than its own. All rights reserved. Notes, Notices, and Cautions NOTE: A NOTE indicates important information that helps you have the Dell printer Service Tag available. Order Dell printer supplies by phone. CAUTION:...
... hardware or loss of data and tells you how to change without the written permission of your printer. A00 Dell Inc. Dell™ Laser Printer 5210n / 5310n User's Guide Click the links to the Owner's Manual for the correct phone number for your country... of Microsoft Corporation. Model 5210n / 5310n August 2005 Rev. Double-click the icon on other than its own. All rights reserved. Notes, Notices, and Cautions NOTE: A NOTE indicates important information that helps you have the Dell printer Service Tag available. Order Dell printer supplies by phone. CAUTION:...
User's Guide
Page 15
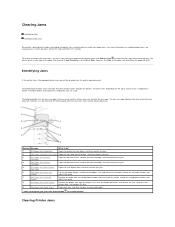
...the Auto setting does not guarantee the page will be able to do occur, follow the steps outlined in this section. Identifying Jams If the printer jams, the appropriate jam message will print. The following illustration shows the path that jammed if Jam Recovery is best to clear the entire paper... path to ensure you should be displayed on the printer, and then remove the jam. 3 201 Paper Jam Remove Cartridge Open the top front cover, remove the print cartridge, and then remove the jam. 4...
...the Auto setting does not guarantee the page will be able to do occur, follow the steps outlined in this section. Identifying Jams If the printer jams, the appropriate jam message will print. The following illustration shows the path that jammed if Jam Recovery is best to clear the entire paper... path to ensure you should be displayed on the printer, and then remove the jam. 3 201 Paper Jam Remove Cartridge Open the top front cover, remove the print cartridge, and then remove the jam. 4...
User's Guide
Page 16
... cartridge aside. Jams in the input options or the duplex tray. Jams can occur in three areas: the front of the printer, inside the printer occur in one of the printer. To go to open the top front cover. Push the release latch to the right to a specific jam, see Identifying ... several places a jam can occur, clearing the paper path is fairly easy depending on the jam message or messages displayed on the front of the printer to lower the multipurpose feeder. 2. NOTICE: Do not touch the photoconductor drum on the underside of numerical sequence. NOTE: Do not leave the cartridge...
... cartridge aside. Jams in the input options or the duplex tray. Jams can occur in three areas: the front of the printer, inside the printer occur in one of the printer. To go to open the top front cover. Push the release latch to the right to a specific jam, see Identifying ... several places a jam can occur, clearing the paper path is fairly easy depending on the jam message or messages displayed on the front of the printer to lower the multipurpose feeder. 2. NOTICE: Do not touch the photoconductor drum on the underside of numerical sequence. NOTE: Do not leave the cartridge...
User's Guide
Page 17
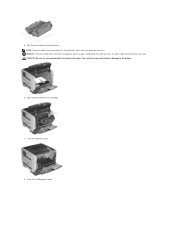
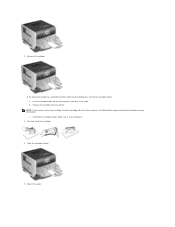
You need to the printer. 6. Align and reinstall the toner cartridge. 7. This could cause personal injury or damage to access the print media from the printer rear door. Close the top front cover. 8. Pull the print media up and toward you pull, stop pulling. NOTICE: If the print media does not move immediately when you . CAUTION: Do not use any pointed objects to remove the paper. 5. NOTE: The print media may be covered with unfused toner, which can stain garments and skin. Close the multipurpose feeder.
You need to the printer. 6. Align and reinstall the toner cartridge. 7. This could cause personal injury or damage to access the print media from the printer rear door. Close the top front cover. 8. Pull the print media up and toward you pull, stop pulling. NOTICE: If the print media does not move immediately when you . CAUTION: Do not use any pointed objects to remove the paper. 5. NOTE: The print media may be covered with unfused toner, which can stain garments and skin. Close the multipurpose feeder.

User's Guide
Page 18
Otherwise, continue with step 2. 2. Allow the printer to cool before touching any pointed objects to the printer. 4. Remove the jammed media. CAUTION: Do not use any internal components. 3. Open the printer rear door. CAUTION: The inside of the printer may be hot. Close the rear door. 5. This could cause personal injury or damage to remove the paper. 9. Press the Select button . Press the Select button . 202 Paper Jam Open Rear Door 1. If the paper is exiting the printer, pull the media straight out, and press the Select button .
Otherwise, continue with step 2. 2. Allow the printer to cool before touching any pointed objects to the printer. 4. Remove the jammed media. CAUTION: Do not use any internal components. 3. Open the printer rear door. CAUTION: The inside of the printer may be hot. Close the rear door. 5. This could cause personal injury or damage to remove the paper. 9. Press the Select button . Press the Select button . 202 Paper Jam Open Rear Door 1. If the paper is exiting the printer, pull the media straight out, and press the Select button .

User's Guide
Page 19
Press the Select button . 23x and 24x Jams Paper jams in these areas: 1. Open the duplex rear door. 2. Close the duplex rear door. Remove the jammed media. Depending on the incline surface of a tray or across more than one tray. Make sure it snaps into place. 4. Open the printer paper tray, and remove any jammed media. 23x Paper Jam Open Duplex Rear Door 1. To clear these areas can occur on the media location, pull the media either up or down. 3.
Press the Select button . 23x and 24x Jams Paper jams in these areas: 1. Open the duplex rear door. 2. Close the duplex rear door. Remove the jammed media. Depending on the incline surface of a tray or across more than one tray. Make sure it snaps into place. 4. Open the printer paper tray, and remove any jammed media. 23x Paper Jam Open Duplex Rear Door 1. To clear these areas can occur on the media location, pull the media either up or down. 3.
User's Guide
Page 22
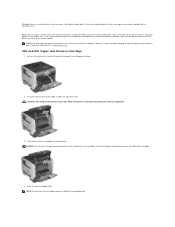
If the jammed envelope has entered the printer and cannot be removed. Adjust the guide. Lift the envelope feeder up out of the printer, and then set it snaps into place. 3. c. a. Remove the envelope from the printer. NOTE: If you cannot remove the envelope, the print cartridge will have to be pulled out, remove the envelope feeder. See 200 and 201 Paper Jam Remove Cartridge for more information. b. 2. Load the envelope feeder. 5. Reinstall the envelope feeder. Make sure it aside. Flex and stack the envelopes. 4. Remove all envelopes.
If the jammed envelope has entered the printer and cannot be removed. Adjust the guide. Lift the envelope feeder up out of the printer, and then set it snaps into place. 3. c. a. Remove the envelope from the printer. NOTE: If you cannot remove the envelope, the print cartridge will have to be pulled out, remove the envelope feeder. See 200 and 201 Paper Jam Remove Cartridge for more information. b. 2. Load the envelope feeder. 5. Reinstall the envelope feeder. Make sure it aside. Flex and stack the envelopes. 4. Remove all envelopes.

User's Guide
Page 25
Since the GNU licensed software that is required to the Dell- See the warranty disclaimers in this printer. This product includes software developed by Dell and/or third parties l Dell modified software licensed under the provisions of the GNU General Public License version 2 and the GNU Lesser ... any rights to be made available with your Owner's Manual. For source code that the Dell modifications are based upon is supplied explicitly without warranty, use of your printer and click Contact Dell, or refer to review: l BSD License and Warranty Statements l GNU License l Other ...
Since the GNU licensed software that is required to the Dell- See the warranty disclaimers in this printer. This product includes software developed by Dell and/or third parties l Dell modified software licensed under the provisions of the GNU General Public License version 2 and the GNU Lesser ... any rights to be made available with your Owner's Manual. For source code that the Dell modifications are based upon is supplied explicitly without warranty, use of your printer and click Contact Dell, or refer to review: l BSD License and Warranty Statements l GNU License l Other ...

User's Guide
Page 26
...and Utilities CD. Select Typical Installation (recommended), and then click Install. If the Drivers and Utilities CD appears, click Cancel. 2. If your printer is attached to a network instead of your computer, go to find the instructions you need for Network Printing. NOTE: Installing a custom driver will... be created and appear in the Printers folder. Computer Operating System: Windows XP Professional x64 Windows XP Windows 2003 Server Windows 2000 Windows Me Windows 98 SE Windows NT Use...
...and Utilities CD. Select Typical Installation (recommended), and then click Install. If the Drivers and Utilities CD appears, click Cancel. 2. If your printer is attached to a network instead of your computer, go to find the instructions you need for Network Printing. NOTE: Installing a custom driver will... be created and appear in the Printers folder. Computer Operating System: Windows XP Professional x64 Windows XP Windows 2003 Server Windows 2000 Windows Me Windows 98 SE Windows NT Use...

User's Guide
Page 27
...and then click Next. 7. Macintosh Mac OS 9.x or later is installed on the computer. Creating a Queue in the Printer list, quit Print Center or Printer Setup Utility. Click Continue on . e. All the necessary software is required for your operating system was installed by default.... a Destination, and click Continue. Do one of a printer to a USB-attached printer, create a desktop printer icon (Mac OS 9), or create a queue in the Printer list, quit Print Center or Printer Setup Utility. After the printer appears in Print Center/Printer Setup Utility (Mac OS X) 1. In all others, ...
...and then click Next. 7. Macintosh Mac OS 9.x or later is installed on the computer. Creating a Queue in the Printer list, quit Print Center or Printer Setup Utility. Click Continue on . e. All the necessary software is required for your operating system was installed by default.... a Destination, and click Continue. Do one of a printer to a USB-attached printer, create a desktop printer icon (Mac OS 9), or create a queue in the Printer list, quit Print Center or Printer Setup Utility. After the printer appears in Print Center/Printer Setup Utility (Mac OS X) 1. In all others, ...

User's Guide
Page 28
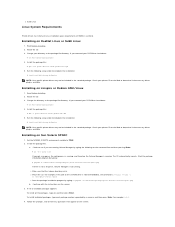
...2. Before Installing Do the following : l Mac OS 9.0: Open Apple LaserWriter. Non-administrative users cannot add or remove printer queues. 4. l One host, while other workstations can install printer drivers on many Linux and UNIX platforms, such as Sun Solaris and Red Hat. l Debian GNU/Linux l Linspire ...you might want to the Macintosh computer. During the installation of the agreement. The default administrative group is complete. 2. The printer drivers package can be asked if you are available on . 6. Supported Operating Systems Make sure you want to change the administrative user...
...2. Before Installing Do the following : l Mac OS 9.0: Open Apple LaserWriter. Non-administrative users cannot add or remove printer queues. 4. l One host, while other workstations can install printer drivers on many Linux and UNIX platforms, such as Sun Solaris and Red Hat. l Debian GNU/Linux l Linspire ...you might want to the Macintosh computer. During the installation of the agreement. The default administrative group is complete. 2. The printer drivers package can be asked if you are available on . 6. Supported Operating Systems Make sure you want to change the administrative user...
User's Guide
Page 29
...Linux 1. Change the directory to TRUE. 2. Run the following setup script to complete the installation: # /usr/local/dell/setup.dellprint NOTE: Your specific printer driver may not be included in /usr/local. Check your directory to see if you are running Volume Manager by...For example, if the path to complete the installation: # /usr/local/dell/setup.dellprint NOTE: Your specific printer driver may not be included in the standard package. l SuSE Linux Linux System Requirements Printer drivers has minimum Linux installation space requirements of available packages appears: To ...
...Linux 1. Change the directory to TRUE. 2. Run the following setup script to complete the installation: # /usr/local/dell/setup.dellprint NOTE: Your specific printer driver may not be included in /usr/local. Check your directory to see if you are running Volume Manager by...For example, if the path to complete the installation: # /usr/local/dell/setup.dellprint NOTE: Your specific printer driver may not be included in the standard package. l SuSE Linux Linux System Requirements Printer drivers has minimum Linux installation space requirements of available packages appears: To ...
User's Guide
Page 30
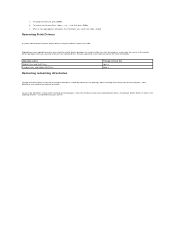
... the program, or you want to quit. b. Removing Print Drivers A system administrator removes printer drivers using the utilities listed in the following location: /usr/local/dell/unix_prt_drivers. To accept the defaults, press Enter. When a message appears telling you installed printer drivers. After removing all the packages, check the directory where you the installation...
... the program, or you want to quit. b. Removing Print Drivers A system administrator removes printer drivers using the utilities listed in the following location: /usr/local/dell/unix_prt_drivers. To accept the defaults, press Enter. When a message appears telling you installed printer drivers. After removing all the packages, check the directory where you the installation...
User's Guide
Page 31
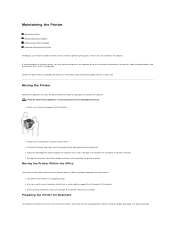
... may want to designate a key operator to maintain optimum print quality. l Always turn off the printer using the proper packaging. Moving the Printer Within the Office The printer can result in your area. The printer package Maintaining the Printer Moving the Printer Maintaining Printer Supplies Replacing the Toner Cartridge Replacing Maintenance Kit Items Periodically, you bought the...
... may want to designate a key operator to maintain optimum print quality. l Always turn off the printer using the proper packaging. Moving the Printer Within the Office The printer can result in your area. The printer package Maintaining the Printer Moving the Printer Maintaining Printer Supplies Replacing the Toner Cartridge Replacing Maintenance Kit Items Periodically, you bought the...


