
User's Guide
Page 5
OTHERS 44 Wireless Networking Installation 51 4610X WIRELESS PLUS Wireless Application Software 55 Managing the Projector From Web Management . . . . 59 Configuring the Network Setting 59 Accessing Web Management 59 Make Application Token 78 4 Troubleshooting Your Projector 79 Guiding Signals 83 Changing the Lamp 85 5 Specifications 87 6 Contacting Dell 92 7 Appendix: Glossary 93 Contents 5
OTHERS 44 Wireless Networking Installation 51 4610X WIRELESS PLUS Wireless Application Software 55 Managing the Projector From Web Management . . . . 59 Configuring the Network Setting 59 Accessing Web Management 59 Make Application Token 78 4 Troubleshooting Your Projector 79 Guiding Signals 83 Changing the Lamp 85 5 Specifications 87 6 Contacting Dell 92 7 Appendix: Glossary 93 Contents 5
User's Guide
Page 13
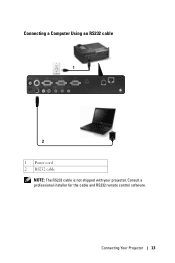
Connecting Your Projector 13 Consult a professional installer for the cable and RS232 remote control software. Connecting a Computer Using an RS232 cable 1 2 1 Power cord 2 RS232 cable NOTE: The RS232 cable is not shipped with your projector.
Connecting Your Projector 13 Consult a professional installer for the cable and RS232 remote control software. Connecting a Computer Using an RS232 cable 1 2 1 Power cord 2 RS232 cable NOTE: The RS232 cable is not shipped with your projector.
User's Guide
Page 54
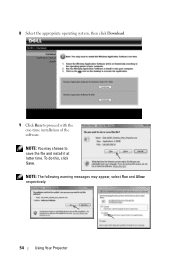
To do this, click Save. NOTE: You may appear, select Run and Allow respectively. 54 Using Your Projector 8 Select the appropriate operating system, then click Download. 9 Click Run to save the file and install it at latter time. NOTE: The following warning messages may choose to proceed with the one-time installation of the software.
To do this, click Save. NOTE: You may appear, select Run and Allow respectively. 54 Using Your Projector 8 Select the appropriate operating system, then click Download. 9 Click Run to save the file and install it at latter time. NOTE: The following warning messages may choose to proceed with the one-time installation of the software.

User's Guide
Page 55
... the bottom left corner of "Wireless Networking Installation, then click OK. Login To communicate with your projector, enter the Login Code provided for the projector automatically. 10 The installation software will search for in Step 4 of the screen. Using Your Projector 55 NOTE: If IP Address is complete, 4610X WIRELESS PLUS Wireless Application software will launch and will launch...
... the bottom left corner of "Wireless Networking Installation, then click OK. Login To communicate with your projector, enter the Login Code provided for the projector automatically. 10 The installation software will search for in Step 4 of the screen. Using Your Projector 55 NOTE: If IP Address is complete, 4610X WIRELESS PLUS Wireless Application software will launch and will launch...
User's Guide
Page 60
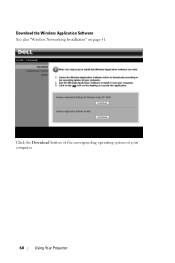
Click the Download button of the corresponding operating system of your computer. 60 Using Your Projector Download the Wireless Application Software See also "Wireless Networking Installation" on page 51.
Click the Download button of the corresponding operating system of your computer. 60 Using Your Projector Download the Wireless Application Software See also "Wireless Networking Installation" on page 51.
User's Guide
Page 78
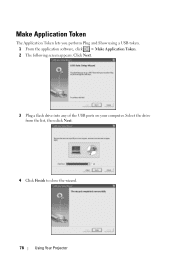
Make Application Token The Application Token lets you perform Plug and Show using a USB token. 1 From the application software, click > Make Application Token. 2 The following screen appears. Select the drive from the list, then click Next. 4 Click Finish to close the wizard. 78 Using Your Projector Click Next. 3 Plug a flash drive into any of the USB ports on your computer.
Make Application Token The Application Token lets you perform Plug and Show using a USB token. 1 From the application software, click > Make Application Token. 2 The following screen appears. Select the drive from the list, then click Next. 4 Click Finish to close the wizard. 78 Using Your Projector Click Next. 3 Plug a flash drive into any of the USB ports on your computer.


