User Guide
Page 3
Contents 1 About Your Dell™ E-Port 5 2 Using the Dell™ E-Port 9 Setting Up Your E-Port 9 Before You Dock for the First Time 9 Docking Your Laptop 10 Securing the E-Port 13 E-Port Laptop Power and Docking Status 14 Using the E-Port with Dual Monitors 15 Undocking Your Laptop 16 3 Specifications 17 4 Finding Information 19 Glossary 21 Contents 3
Contents 1 About Your Dell™ E-Port 5 2 Using the Dell™ E-Port 9 Setting Up Your E-Port 9 Before You Dock for the First Time 9 Docking Your Laptop 10 Securing the E-Port 13 E-Port Laptop Power and Docking Status 14 Using the E-Port with Dual Monitors 15 Undocking Your Laptop 16 3 Specifications 17 4 Finding Information 19 Glossary 21 Contents 3
User Guide
Page 5
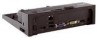
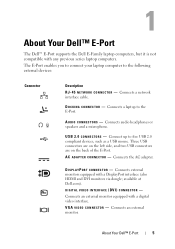
... as a USB mouse. Connects a network interface cable. Three USB connectors are on the left side, and two USB connectors are on the back of the E-Port. About Your Dell™ E-Port 5 D I D E O C O N N E C T O R - Connects an external monitor equipped with any previous series laptop computers. V G A V I S P L A Y P O R T C O N N E C T O R - Connects audio headphones or speakers and a microphone. A U D I N G C O N N E C T O R - Connects a laptop to the...
... as a USB mouse. Connects a network interface cable. Three USB connectors are on the left side, and two USB connectors are on the back of the E-Port. About Your Dell™ E-Port 5 D I D E O C O N N E C T O R - Connects an external monitor equipped with any previous series laptop computers. V G A V I S P L A Y P O R T C O N N E C T O R - Connects audio headphones or speakers and a microphone. A U D I N G C O N N E C T O R - Connects a laptop to the...

User Guide
Page 6
Connects to the monitor stand; U S B O R E S ATA C O N N E C T O R - E - M O N I T O R S T A N D C O N N E C T O R - available at Dell.com. 6 About Your Dell™ E-Port Connects and supports USB or Dell-powered E-Family or standard selfpowered eSATA devices.
Connects to the monitor stand; U S B O R E S ATA C O N N E C T O R - E - M O N I T O R S T A N D C O N N E C T O R - available at Dell.com. 6 About Your Dell™ E-Port Connects and supports USB or Dell-powered E-Family or standard selfpowered eSATA devices.
User Guide
Page 8
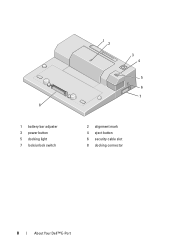
8 1 battery bar adjuster 3 power button 5 docking light 7 lock/unlock switch 1 2 3 4 5 6 7 2 alignment mark 4 eject button 6 security cable slot 8 docking connector 8 About Your Dell™ E-Port
8 1 battery bar adjuster 3 power button 5 docking light 7 lock/unlock switch 1 2 3 4 5 6 7 2 alignment mark 4 eject button 6 security cable slot 8 docking connector 8 About Your Dell™ E-Port
User Guide
Page 9
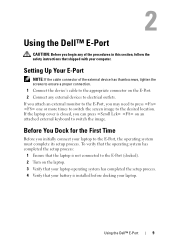
... to the desired location. Before You Dock for the First Time Before you initially connect your laptop to electrical outlets. Setting Up Your E-Port NOTE: If the cable connector of the external device has thumbscrews, tighten the screws to ensure a proper connection. 1 Connect the device's... attach an external monitor to the E-Port, you may need to press one or more times to switch the screen image to switch the image. Using the Dell™ E-Port 9 Using the Dell™ E-Port CAUTION: Before you begin any external devices to the E-Port, the operating system must complete its setup...
... to the desired location. Before You Dock for the First Time Before you initially connect your laptop to electrical outlets. Setting Up Your E-Port NOTE: If the cable connector of the external device has thumbscrews, tighten the screws to ensure a proper connection. 1 Connect the device's... attach an external monitor to the E-Port, you may need to press one or more times to switch the screen image to switch the image. Using the Dell™ E-Port 9 Using the Dell™ E-Port CAUTION: Before you begin any external devices to the E-Port, the operating system must complete its setup...

User Guide
Page 10
... use the AC adapter to the E-Port. 10 Using the Dell™ E-Port NOTICE: Always use any other commercially available AC adapter, you use the Dell AC adapter that there is enough flat space in "Before You Dock for the First Time" on its AC power adapter, the laptop's AC power ...or the laptop's battery. If you may damage the E-Port or the laptop. 2 1 1 AC adapter cable 2 AC adapter...
... use the AC adapter to the E-Port. 10 Using the Dell™ E-Port NOTICE: Always use any other commercially available AC adapter, you use the Dell AC adapter that there is enough flat space in "Before You Dock for the First Time" on its AC power adapter, the laptop's AC power ...or the laptop's battery. If you may damage the E-Port or the laptop. 2 1 1 AC adapter cable 2 AC adapter...
User Guide
Page 11
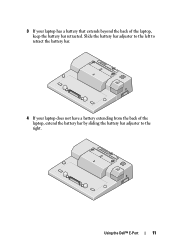
Using the Dell™ E-Port 11 3 If your laptop does not have a battery extending from the back of the laptop, keep the battery bar retracted. Slide the battery bar adjuster to the left to retract the battery bar. 4 If your laptop has a battery that extends beyond the back of the laptop, extend the battery bar by sliding the battery bar adjuster to the right.
Using the Dell™ E-Port 11 3 If your laptop does not have a battery extending from the back of the laptop, keep the battery bar retracted. Slide the battery bar adjuster to the left to retract the battery bar. 4 If your laptop has a battery that extends beyond the back of the laptop, extend the battery bar by sliding the battery bar adjuster to the right.
User Guide
Page 12
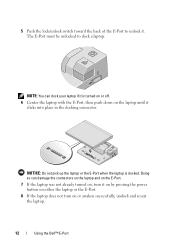
... a laptop. NOTICE: Do not pick up the laptop or the E-Port when the laptop is turned on or off. 6 Center the laptop with the E-Port, then push down on or awaken successfully, undock and reseat the laptop. 12 Using the Dell™ E-Port NOTE: You can damage the connectors on the laptop and on... the E-Port. 7 If the laptop was not already turned on, turn it on...
... a laptop. NOTICE: Do not pick up the laptop or the E-Port when the laptop is turned on or off. 6 Center the laptop with the E-Port, then push down on or awaken successfully, undock and reseat the laptop. 12 Using the Dell™ E-Port NOTE: You can damage the connectors on the laptop and on... the E-Port. 7 If the laptop was not already turned on, turn it on...
User Guide
Page 13
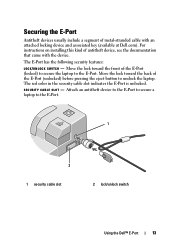
... instructions on installing this kind of the E-Port (unlocked) before pressing the eject button to the E-Port. 1 2 1 security cable slot 2 lock/unlock switch Using the Dell™ E-Port 13 The red color in the security cable slot indicates the E-Port is unlocked. Attach an antitheft device to the E-Port to secure a laptop to undock the laptop...
... instructions on installing this kind of the E-Port (unlocked) before pressing the eject button to the E-Port. 1 2 1 security cable slot 2 lock/unlock switch Using the Dell™ E-Port 13 The red color in the security cable slot indicates the E-Port is unlocked. Attach an antitheft device to the E-Port to secure a laptop to undock the laptop...
User Guide
Page 14
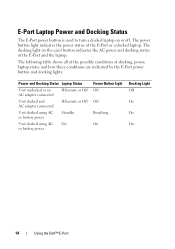
... on or off. The power button light indicates the power status of docking, power, laptop states and how these conditions are indicated by the E-Port power button and docking lights: Power and Docking Status Laptop Status Unit undocked or no AC adapter connected Hibernate or Off Unit docked and AC...using AC On or battery power Power Button Light Off Off Breathing On Docking Light Off On On On 14 Using the Dell™ E-Port E-Port Laptop Power and Docking Status The E-Port power button is used to turn a docked laptop on the eject button indicates the AC power and docking status of the...
... on or off. The power button light indicates the power status of docking, power, laptop states and how these conditions are indicated by the E-Port power button and docking lights: Power and Docking Status Laptop Status Unit undocked or no AC adapter connected Hibernate or Off Unit docked and AC...using AC On or battery power Power Button Light Off Off Breathing On Docking Light Off On On On 14 Using the Dell™ E-Port E-Port Laptop Power and Docking Status The E-Port power button is used to turn a docked laptop on the eject button indicates the AC power and docking status of the...
User Guide
Page 15
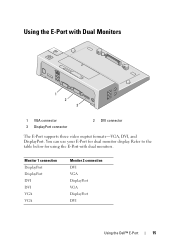
Monitor 1 connection DisplayPort DisplayPort DVI DVI VGA VGA Monitor 2 connection DVI VGA DisplayPort VGA DisplayPort DVI Using the Dell™ E-Port 15 Using the E-Port with dual monitors. Refer to the table below for dual monitor display. You can use your E-Port for using the E-Port with Dual Monitors 1 2 3 1 VGA connector 3 DisplayPort connector 2 DVI connector The E-Port supports three video ouptut formats-VGA, DVI, and DisplayPort.
Monitor 1 connection DisplayPort DisplayPort DVI DVI VGA VGA Monitor 2 connection DVI VGA DisplayPort VGA DisplayPort DVI Using the Dell™ E-Port 15 Using the E-Port with dual monitors. Refer to the table below for dual monitor display. You can use your E-Port for using the E-Port with Dual Monitors 1 2 3 1 VGA connector 3 DisplayPort connector 2 DVI connector The E-Port supports three video ouptut formats-VGA, DVI, and DisplayPort.
User Guide
Page 16
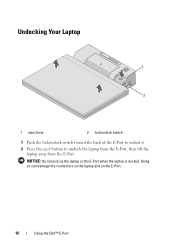
Doing so can damage the connectors on the laptop and on the E-Port. 16 Using the Dell™ E-Port Undocking Your Laptop 1 2 1 eject lever 2 lock/unlock switch 1 Push the lock/unlock switch toward the back of the E-Port to unlock it. 2 Press the eject button to undock the laptop from the E-Port, then lift the laptop away from the E-Port. NOTICE: Do not pick up the laptop or the E-Port when the laptop is docked.
Doing so can damage the connectors on the laptop and on the E-Port. 16 Using the Dell™ E-Port Undocking Your Laptop 1 2 1 eject lever 2 lock/unlock switch 1 Push the lock/unlock switch toward the back of the E-Port to unlock it. 2 Press the eject button to undock the laptop from the E-Port, then lift the laptop away from the E-Port. NOTICE: Do not pick up the laptop or the E-Port when the laptop is docked.
User Guide
Page 17
...headphones/speakers and microphone one RJ-45 port; 10/100/1000 GB Ethernet one custom connector (Dell E-Family only) VGA, DVI, DisplayPort (HDMI via dongle) one connector supporting USB or Dell-powered E-Family or standard self-powered eSATA devices one custom connector (Dell E-Family only) AC Adapter Power Input... Physical Height Depth Width 70 mm (2.76 inches) 180 mm (7.09 inches) 210 mm (8.27 inches) I/O Connectors USB Audio Network Dell™ E-Family docking connector Video USB or eSATA connector E-Monitor stand connector six USB connectors: five 4-pin, USB 2.0-compliant connectors;
...headphones/speakers and microphone one RJ-45 port; 10/100/1000 GB Ethernet one custom connector (Dell E-Family only) VGA, DVI, DisplayPort (HDMI via dongle) one connector supporting USB or Dell-powered E-Family or standard self-powered eSATA devices one custom connector (Dell E-Family only) AC Adapter Power Input... Physical Height Depth Width 70 mm (2.76 inches) 180 mm (7.09 inches) 210 mm (8.27 inches) I/O Connectors USB Audio Network Dell™ E-Family docking connector Video USB or eSATA connector E-Monitor stand connector six USB connectors: five 4-pin, USB 2.0-compliant connectors;
User Guide
Page 21
provides port replication, cable management, and security features to adapt your computer when you plug the AC adapter power cable in to an electrical outlet. Software that enters ...
provides port replication, cable management, and security features to adapt your computer when you plug the AC adapter power cable in to an electrical outlet. Software that enters ...
User Guide
Page 22
...speakers, printer, broadband devices (DSL and cable modems), imaging devices, or storage devices. U USB - serial connector - An I /O port often used to your computer or in to a multi-port hub that plugs in to a 4-pin socket on , and they can also be daisy-chained together. 22 Glossary A hardware interface for... while the computer is turned on your computer. universal serial bus - Devices are plugged directly in to as an LPT port. S SATA - serial ATA - An I /O port often used to connect a parallel printer to your computer. Also referred to your computer.
...speakers, printer, broadband devices (DSL and cable modems), imaging devices, or storage devices. U USB - serial connector - An I /O port often used to your computer or in to a multi-port hub that plugs in to a 4-pin socket on , and they can also be daisy-chained together. 22 Glossary A hardware interface for... while the computer is turned on your computer. universal serial bus - Devices are plugged directly in to as an LPT port. S SATA - serial ATA - An I /O port often used to connect a parallel printer to your computer. Also referred to your computer.
