

User's Guide
Page 3
... Configuration Handling 14 Rearranging Stacks 15 Replacing Stack Members 15 PowerConnect User Guide Overview 17 Installing the PowerConnect 3324/3348 Switch 17 Using the Dell OpenManage Switch Administrator 17 PowerConnect 3324/3348 CLI Documentation 18 2 Hardware Description PowerConnect 3324/3348 Description 20 PowerConnect 3324/3348 Dimensions 20 PowerConnect 3324/3348 Rear Panel 20 PowerConnect 3324/3348 Components 20 Ports Description 24 Ethernet Port Description 24 Console...
... Configuration Handling 14 Rearranging Stacks 15 Replacing Stack Members 15 PowerConnect User Guide Overview 17 Installing the PowerConnect 3324/3348 Switch 17 Using the Dell OpenManage Switch Administrator 17 PowerConnect 3324/3348 CLI Documentation 18 2 Hardware Description PowerConnect 3324/3348 Description 20 PowerConnect 3324/3348 Dimensions 20 PowerConnect 3324/3348 Rear Panel 20 PowerConnect 3324/3348 Components 20 Ports Description 24 Ethernet Port Description 24 Console...
User's Guide
Page 4
... 31 Package Contents 31 Unpacking 31 Device Rack Installation 32 Installing the Switch without a Rack 32 Stacking PowerConnect 3324/3348 33 Connecting Stacking Cables 33 Connecting the PowerConnect 3324/3348 to a Power Supply 34 Cable, Port, and Pinout Information 35 ...Port Connections 36 Cable Connections 38 4 Configuring the PowerConnect 3324/3348 Switch Configuration Overview 42 General Configuration Information 43 Auto-Negotiation 43 Switching Port Default Settings 44 Baud Rate 45 Terminal Connection Configuration 45 Other Configuration ...
... 31 Package Contents 31 Unpacking 31 Device Rack Installation 32 Installing the Switch without a Rack 32 Stacking PowerConnect 3324/3348 33 Connecting Stacking Cables 33 Connecting the PowerConnect 3324/3348 to a Power Supply 34 Cable, Port, and Pinout Information 35 ...Port Connections 36 Cable Connections 38 4 Configuring the PowerConnect 3324/3348 Switch Configuration Overview 42 General Configuration Information 43 Auto-Negotiation 43 Switching Port Default Settings 44 Baud Rate 45 Terminal Connection Configuration 45 Other Configuration ...
User's Guide
Page 5
... to Stacking Units 80 Downloading the Software Sequentially Using the CLI . . . . . 81 Downloading the Software Individually Using the CLI 82 Downloading the Software Via the PowerConnect 3324/3348 Dell OpenManage Switch Administrator 84 Contents 5
... to Stacking Units 80 Downloading the Software Sequentially Using the CLI . . . . . 81 Downloading the Software Individually Using the CLI 82 Downloading the Software Via the PowerConnect 3324/3348 Dell OpenManage Switch Administrator 84 Contents 5
User's Guide
Page 6
... 88 Understanding the Interface 88 Tree View 89 Device View 90 Device Representation 90 Using the Switch Administrator Buttons 92 Information Buttons 93 About PageDevice Management Buttons 95 Using the CLI 97 Command Mode 97 User EXEC Mode 97 Privileged EXEC Mode ...
... 88 Understanding the Interface 88 Tree View 89 Device View 90 Device Representation 90 Using the Switch Administrator Buttons 92 Information Buttons 93 About PageDevice Management Buttons 95 Using the CLI 97 Command Mode 97 User EXEC Mode 97 Privileged EXEC Mode ...
User's Guide
Page 8
7 Configuring Switch Information Configuring Network Security 190 Network Security Overview 191 Configuring Port Security 193 Defining IP-Based ACLs 196 Defining MAC-Based ACLs 200 Binding ACLs ...
7 Configuring Switch Information Configuring Network Security 190 Network Security Overview 191 Configuring Port Security 193 Defining IP-Based ACLs 196 Defining MAC-Based ACLs 200 Binding ACLs ...
User's Guide
Page 12
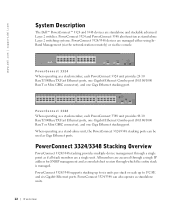
...stacking port. www.dell.com | support.dell.com System Description The Dell™ PowerConnect™ 3324 and 3348 devices are managed either using InBand Management (via the network station remotely) or via the console. PowerConnect 3324 and PowerConnect 3348 also function as ...unit. When operating as a stand-alone unit, the PowerConnect 3324/3348 stacking ports can also operate as stand-alone Layer 2 switching systems. PowerConnect 3324/3348 devices are standalone and stackable advanced Layer 2 switches. PowerConnect 3348 When operating as if all stack members are accessed through ...
...stacking port. www.dell.com | support.dell.com System Description The Dell™ PowerConnect™ 3324 and 3348 devices are managed either using InBand Management (via the network station remotely) or via the console. PowerConnect 3324 and PowerConnect 3348 also function as ...unit. When operating as a stand-alone unit, the PowerConnect 3324/3348 stacking ports can also operate as stand-alone Layer 2 switching systems. PowerConnect 3324/3348 devices are standalone and stackable advanced Layer 2 switches. PowerConnect 3348 When operating as if all stack members are accessed through ...
User's Guide
Page 13
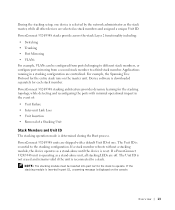
... If a stack member reboots without a stacking module, the device operates as stack members and assigned a unique Unit ID. PowerConnect 3324/3348 stacking architecture provides dynamic learning for each stack member. If the stacking module is inserted in a stacking configuration are off. ... master unit. For example, the Spanning Tree Protocol for the stack to a third stack member. PowerConnect 3324/3348 stacks provide across-the-stack Layer 2 functionality including: • Switching • Trunking • Port Mirroring • VLANs For example, VLANs can be inserted into...
... If a stack member reboots without a stacking module, the device operates as stack members and assigned a unique Unit ID. PowerConnect 3324/3348 stacking architecture provides dynamic learning for each stack member. If the stacking module is inserted in a stacking configuration are off. ... master unit. For example, the Spanning Tree Protocol for the stack to a third stack member. PowerConnect 3324/3348 stacks provide across-the-stack Layer 2 functionality including: • Switching • Trunking • Port Mirroring • VLANs For example, VLANs can be inserted into...

User's Guide
Page 14
... and stand-alone mode. www.dell.com | support.dell.com When the master unit boots or when inserting or removing a stack member, the master unit initiates a stacking discover process. Configuration Handling In a PowerConnect 3324/3348 operative stack, the stack master is... reset and/or the ports are discovered with the original device configuration. In addition, Configuration files are not automatically modified when: • Units are added. • Units are removed. • Units are displayed in the Dell OpenManage™ Switch...
... and stand-alone mode. www.dell.com | support.dell.com When the master unit boots or when inserting or removing a stack member, the master unit initiates a stacking discover process. Configuration Handling In a PowerConnect 3324/3348 operative stack, the stack master is... reset and/or the ports are discovered with the original device configuration. In addition, Configuration files are not automatically modified when: • Units are added. • Units are removed. • Units are displayed in the Dell OpenManage™ Switch...

User's Guide
Page 17
... connectors and cables. • Configuring the PowerConnect 3324/3348 Switch-Contains instructions about installing PowerConnect 3324/3348 in either a rack or on a flat surface. PowerConnect User Guide Overview The PowerConnect User Guide is divided into two parts: • About Installing the PowerConnect 3324/3348 Switch • Using the Dell OpenManage Switch Administrator Installing the PowerConnect 3324/3348 Switch This section contains the following information about...
... connectors and cables. • Configuring the PowerConnect 3324/3348 Switch-Contains instructions about installing PowerConnect 3324/3348 in either a rack or on a flat surface. PowerConnect User Guide Overview The PowerConnect User Guide is divided into two parts: • About Installing the PowerConnect 3324/3348 Switch • Using the Dell OpenManage Switch Administrator Installing the PowerConnect 3324/3348 Switch This section contains the following information about...

User's Guide
Page 29
SECTION 3 Installing the PowerConnect 3324/3348 Switch Installation Precautions Site Requirements Unpacking and Installation Cable, Port, and Pinout Information
SECTION 3 Installing the PowerConnect 3324/3348 Switch Installation Precautions Site Requirements Unpacking and Installation Cable, Port, and Pinout Information
User's Guide
Page 30
... is correctly installed. 30 I n s t a llin g t h e Po we rC on the same circuit as the switch. Opening or removing covers marked with a triangular symbol with a lighting bolt may cause a fire or electric shock. Site Requirements Dell™ PowerConnect™ 3324/3348 series equipment can be mounted in an environment where the operating ambient temperature might...
... is correctly installed. 30 I n s t a llin g t h e Po we rC on the same circuit as the switch. Opening or removing covers marked with a triangular symbol with a lighting bolt may cause a fire or electric shock. Site Requirements Dell™ PowerConnect™ 3324/3348 series equipment can be mounted in an environment where the operating ambient temperature might...

User's Guide
Page 31
... temperature range is 0 to 40ºC (32 to 122ºF) at a relative humidity of the unit. Installing the PowerConnect 3324/3348 Switch 31 Verify that water or moisture cannot enter the case of up to 95%, non-condensing. It is preferred that the following... phased supply. • Clearance-There is adequate frontal clearance for rack installation. • Documentation CD. Unpacking NOTE: Before unpacking the PowerConnect 3324/3348 switch, inspect the package and report any evidence of a grounded, easily accessible outlet 100-250 VAC, 50-60 Hz. Unpacking and Installation Package...
... temperature range is 0 to 40ºC (32 to 122ºF) at a relative humidity of the unit. Installing the PowerConnect 3324/3348 Switch 31 Verify that water or moisture cannot enter the case of up to 95%, non-condensing. It is preferred that the following... phased supply. • Clearance-There is adequate frontal clearance for rack installation. • Documentation CD. Unpacking NOTE: Before unpacking the PowerConnect 3324/3348 switch, inspect the package and report any evidence of a grounded, easily accessible outlet 100-250 VAC, 50-60 Hz. Unpacking and Installation Package...

User's Guide
Page 32
For information about contacting Dell, see "Getting Help". Installing the Switch without a Rack The PowerConnect 3324/3348 must be installed on a flat surface if it is evenly distributed during installation. Report any damage immediately. Ensure that the device has ... rack and secure the unit to a metal surface. 2 Place the PowerConnect 3324/3348 switch on a flat and stable surface. 3 Place the supplied rack-mounting bracket on n e c t 3324/3348 Sw itc h When securing, fasten the lower pair of PowerConnect 3324/3348. 6 Insert the unit into the rack-mounting holes and tighten with ...
For information about contacting Dell, see "Getting Help". Installing the Switch without a Rack The PowerConnect 3324/3348 must be installed on a flat surface if it is evenly distributed during installation. Report any damage immediately. Ensure that the device has ... rack and secure the unit to a metal surface. 2 Place the PowerConnect 3324/3348 switch on a flat and stable surface. 3 Place the supplied rack-mounting bracket on n e c t 3324/3348 Sw itc h When securing, fasten the lower pair of PowerConnect 3324/3348. 6 Insert the unit into the rack-mounting holes and tighten with ...
User's Guide
Page 33
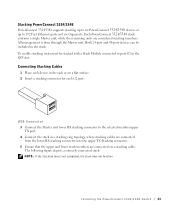
.... USB Connector 3 Connect the Master unit lower RX stacking connector to 192 Fast Ethernet ports and six Giga ports. Installing the PowerConnect 3324/3348 Switch 33 Stacking PowerConnect 3324/3348 PowerConnect 3324/3348 supports stacking up to six PowerConnect 3324/3348 devices or up to the selected member upper TX port. 4 Connect the stack in the SFP slot. Each...
.... USB Connector 3 Connect the Master unit lower RX stacking connector to 192 Fast Ethernet ports and six Giga ports. Installing the PowerConnect 3324/3348 Switch 33 Stacking PowerConnect 3324/3348 PowerConnect 3324/3348 supports stacking up to six PowerConnect 3324/3348 devices or up to the selected member upper TX port. 4 Connect the stack in the SFP slot. Each...
User's Guide
Page 35
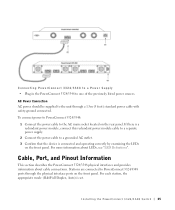
.... 3 Confirm that the device is set. Connecting PowerConnect 3324/3348 to a Power Supply • Plug in the PowerConnect 3324/3348 to the unit through the physical interface ports on the rear panel. Installing the PowerConnect 3324/3348 Switch 35 If there is a redundant power module, connect... this redundant power module cable to a separate power supply. 2 Connect the power cable to PowerConnect 3324/3348 ports through a 1.5m (5 foot) standard power...
.... 3 Confirm that the device is set. Connecting PowerConnect 3324/3348 to a Power Supply • Plug in the PowerConnect 3324/3348 to the unit through the physical interface ports on the rear panel. Installing the PowerConnect 3324/3348 Switch 35 If there is a redundant power module, connect... this redundant power module cable to a separate power supply. 2 Connect the power cable to PowerConnect 3324/3348 ports through a 1.5m (5 foot) standard power...
User's Guide
Page 36
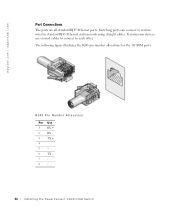
RJ45 Pin Number Allocation Pin Use 1 RX + 2 RX 3 TX + 4 5 -6 TX 78- 36 I n s t a llin g t h e Po we rC on n e c t 3324/3348 Sw itc h Switching ports can connect to each other. Transmission devices use crossed cables to connect to stations wired in standard RJ45 Ethernet station mode using straight cables. The following figure illustrates the RJ45 pin number allocations for the 10/100M ports. www.dell.com | support.dell.com Port Connections The ports are all standard RJ45 Ethernet ports.
RJ45 Pin Number Allocation Pin Use 1 RX + 2 RX 3 TX + 4 5 -6 TX 78- 36 I n s t a llin g t h e Po we rC on n e c t 3324/3348 Sw itc h Switching ports can connect to each other. Transmission devices use crossed cables to connect to stations wired in standard RJ45 Ethernet station mode using straight cables. The following figure illustrates the RJ45 pin number allocations for the 10/100M ports. www.dell.com | support.dell.com Port Connections The ports are all standard RJ45 Ethernet ports.

User's Guide
Page 37
The following figure illustrates the Gigaport Connector: GigaPort Connector A serial cable connects PowerConnect 3324/3348 to a terminal for the initial setup and configuration. (A PC running terminal emulation software can also be used.) The serial cable is a female-to-female DB-9 crossover cable. Installing the PowerConnect 3324/3348 Switch 37
The following figure illustrates the Gigaport Connector: GigaPort Connector A serial cable connects PowerConnect 3324/3348 to a terminal for the initial setup and configuration. (A PC running terminal emulation software can also be used.) The serial cable is a female-to-female DB-9 crossover cable. Installing the PowerConnect 3324/3348 Switch 37
User's Guide
Page 39
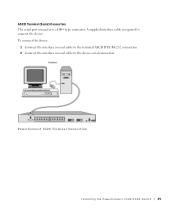
ASCII Terminal (Serial) Connection The serial port connector is required to the device serial connection. A supplied interface cable is a DB-9 type connector. PowerConnect 3324 Terminal Connection Installing the PowerConnect 3324/3348 Switch 39 To connect the device: 1 Connect the interface crossed cable to the terminal ASCII DTE RS-232 connection. 2 Connect the interface crossed cable to connect the device.
ASCII Terminal (Serial) Connection The serial port connector is required to the device serial connection. A supplied interface cable is a DB-9 type connector. PowerConnect 3324 Terminal Connection Installing the PowerConnect 3324/3348 Switch 39 To connect the device: 1 Connect the interface crossed cable to the terminal ASCII DTE RS-232 connection. 2 Connect the interface crossed cable to connect the device.
User's Guide
Page 41
SECTION 4 Configuring the PowerConnect 3324/3348 Switch Configuration Overview General Configuration Information Terminal Connection Configuration Other Configuration Requirements Booting the Device Device Configuration Introduction Initial Configuration Advanced Configuration Sample Configuration Process Configuring Stacking Rebooting the Device Startup Menu Functions Downloading the Software to Stacking Units Defining SNMP Settings Connecting Devices
SECTION 4 Configuring the PowerConnect 3324/3348 Switch Configuration Overview General Configuration Information Terminal Connection Configuration Other Configuration Requirements Booting the Device Device Configuration Introduction Initial Configuration Advanced Configuration Sample Configuration Process Configuring Stacking Rebooting the Device Startup Menu Functions Downloading the Software to Stacking Units Defining SNMP Settings Connecting Devices

User's Guide
Page 43
...installation is inherent in the auto-negotiation standard. There are provided in the preceding sections. Configuring the PowerConnect 3324/3348 Switch 43 Autonegotiation allows the ports to significant frame loss. This is performed. Instructions for the highest-...switch to the network interface controller (NIC) of operation and share information with another device that does not support auto-negotiation or is described later in this suspends the installation process and results in half duplex. General Configuration Information Dell™ PowerConnect™ 3324/3348...
...installation is inherent in the auto-negotiation standard. There are provided in the preceding sections. Configuring the PowerConnect 3324/3348 Switch 43 Autonegotiation allows the ports to significant frame loss. This is performed. Instructions for the highest-...switch to the network interface controller (NIC) of operation and share information with another device that does not support auto-negotiation or is described later in this suspends the installation process and results in half duplex. General Configuration Information Dell™ PowerConnect™ 3324/3348...


