
User Manual
Page 2
... Printer configurations...18 Selecting a location for the printer...20 Basic functions of the scanner...21 Understanding the ADF and scanner glass...22 Understanding the printer control panel...23 Understanding the home screen...24 Using the touch-screen buttons...25 Additional printer setup 29 Installing internal options...29 Available internal options...29 Accessing...
... Printer configurations...18 Selecting a location for the printer...20 Basic functions of the scanner...21 Understanding the ADF and scanner glass...22 Understanding the printer control panel...23 Understanding the home screen...24 Using the touch-screen buttons...25 Additional printer setup 29 Installing internal options...29 Available internal options...29 Accessing...

User Manual
Page 4
Dell Printer Alert Utility...93 Printing 95 Printing a document...95 Printing on both sides of the paper (duplexing)...95 Printing on specialty media...96 Tips on ... a font sample list...101 Printing a directory list...101 Printing the print quality test pages...101 Canceling a print job...102 Canceling a print job from the printer control panel ...102 Canceling a print job from the computer ...102 Copying 104 Making copies...104 Making a quick copy...104 Copying using the ADF...104 Copying using the...
Dell Printer Alert Utility...93 Printing 95 Printing a document...95 Printing on both sides of the paper (duplexing)...95 Printing on specialty media...96 Tips on ... a font sample list...101 Printing a directory list...101 Printing the print quality test pages...101 Canceling a print job...102 Canceling a print job from the printer control panel ...102 Canceling a print job from the computer ...102 Copying 104 Making copies...104 Making a quick copy...104 Copying using the ADF...104 Copying using the...
User Manual
Page 6
... fax setup...136 Setting the date and time...136 Turning daylight saving time on or off ...136 Sending a fax...137 Sending a fax using the printer control panel...137 Sending a fax using the computer ...137 Creating shortcuts...138 Creating a fax destination shortcut using the Embedded Web Server 138 Creating a fax destination shortcut using...
... fax setup...136 Setting the date and time...136 Turning daylight saving time on or off ...136 Sending a fax...137 Sending a fax using the printer control panel...137 Sending a fax using the computer ...137 Creating shortcuts...138 Creating a fax destination shortcut using the Embedded Web Server 138 Creating a fax destination shortcut using...
User Manual
Page 9
... Adjusting scanner registration...229 Storing supplies...230 Checking the status of supplies...230 Checking the status of supplies from the printer control panel 230 Checking the status of supplies from a network computer 230 Ordering supplies...231 Printer attached to a network ...231 Printer...attached locally to a computer ...231 Replacing supplies...231 Replacing the toner cartridge ...231 Replacing the photoconductor kit ...233 Recycling Dell products...236 Moving the printer to another location...236 Shipping the printer...237 Administrative support 238 Using the Embedded Web Server......
... Adjusting scanner registration...229 Storing supplies...230 Checking the status of supplies...230 Checking the status of supplies from the printer control panel 230 Checking the status of supplies from a network computer 230 Ordering supplies...231 Printer attached to a network ...231 Printer...attached locally to a computer ...231 Replacing supplies...231 Replacing the toner cartridge ...231 Replacing the photoconductor kit ...233 Recycling Dell products...236 Moving the printer to another location...236 Shipping the printer...237 Administrative support 238 Using the Embedded Web Server......

User Manual
Page 10
...-249 paper jams...247 250 paper jam...248 251 paper jam...249 290-294 paper jams...250 Troubleshooting 254 Solving basic printer problems...254 Printer control panel display is blank or displays only diamonds 254 Understanding printer messages...254 Change to ...254 Change to ...255 Change to ...255 Change to modem, fax...
...-249 paper jams...247 250 paper jam...248 251 paper jam...249 290-294 paper jams...250 Troubleshooting 254 Solving basic printer problems...254 Printer control panel display is blank or displays only diamonds 254 Understanding printer messages...254 Change to ...254 Change to ...255 Change to ...255 Change to modem, fax...

User Manual
Page 19
Basic model 1 Front door release button 2 Printer control panel 3 Automatic Document Feeder (ADF) 4 Standard exit bin with overhead light 5 Paper stop 6 Standard 250-sheet tray 7 Multipurpose feeder door 8 Front door Learning about the printer 19
Basic model 1 Front door release button 2 Printer control panel 3 Automatic Document Feeder (ADF) 4 Standard exit bin with overhead light 5 Paper stop 6 Standard 250-sheet tray 7 Multipurpose feeder door 8 Front door Learning about the printer 19

User Manual
Page 21
... models only. Away from direct sunlight, humidity extremes, or temperature fluctuations - Note: The fax function is available on the printer control panel to perform specific copy jobs. • Send a fax using the printer control panel. • Send a fax to multiple fax destinations at the same time. • Scan documents and send them to your...
... models only. Away from direct sunlight, humidity extremes, or temperature fluctuations - Note: The fax function is available on the printer control panel to perform specific copy jobs. • Send a fax using the printer control panel. • Send a fax to multiple fax destinations at the same time. • Scan documents and send them to your...
User Manual
Page 23
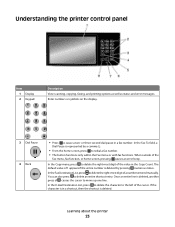
... by pressing numerous times. In the Fax Destination List, press to move up one line. If the character is in a fax number. Understanding the printer control panel Item 1 2 Display Keypad Description View scanning, copying, faxing, and printing options as well as status and error messages. In the Copy menu, press to delete...
... by pressing numerous times. In the Fax Destination List, press to move up one line. If the character is in a fax number. Understanding the printer control panel Item 1 2 Display Keypad Description View scanning, copying, faxing, and printing options as well as status and error messages. In the Copy menu, press to delete...
User Manual
Page 25
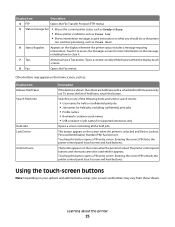
...may vary from those shown. Searches on any of held faxes, touch this button. Entering the correct PIN locks the printer control panel (touch screen and hard buttons). The printer control panel buttons and shortcuts cannot be used while it . 7 Tips All menus have a Tips button. Entering the correct PIN ...unlocks the printer control panel (touch screen and hard buttons). This button appears on the home screen, such as Close door. 6 Status/Supplies Appears on your options...
...may vary from those shown. Searches on any of held faxes, touch this button. Entering the correct PIN locks the printer control panel (touch screen and hard buttons). The printer control panel buttons and shortcuts cannot be used while it . 7 Tips All menus have a Tips button. Entering the correct PIN ...unlocks the printer control panel (touch screen and hard buttons). This button appears on the home screen, such as Close door. 6 Status/Supplies Appears on your options...

User Manual
Page 56
..., and then turn the printer on the Software and Documentation CD. Make sure the printer and computer are fully on the screen. 2 From the printer control panel, select your language and country or region, and then touch Continue. Do not connect the USB cable until instructed to do so on and ready...
..., and then turn the printer on the Software and Documentation CD. Make sure the printer and computer are fully on the screen. 2 From the printer control panel, select your language and country or region, and then touch Continue. Do not connect the USB cable until instructed to do so on and ready...

User Manual
Page 59
...: MAC address 2 Connect the power cable to the printer and then to a properly grounded electrical outlet, and then turn the printer on. 3 From the printer control panel, select your language and country or region, and then touch Continue. 4 Select your printer. • Your wireless network is set up and working properly. •...
...: MAC address 2 Connect the power cable to the printer and then to a properly grounded electrical outlet, and then turn the printer on. 3 From the printer control panel, select your language and country or region, and then touch Continue. 4 Select your printer. • Your wireless network is set up and working properly. •...

User Manual
Page 67
... click Add Printer. c Make any other optional software you must match the serial parameters you set the serial parameters in the printer: a From the printer control panel, navigate to the printer driver. h Make sure the correct COM port is installed, you want to accept the Printer Software License Agreement. It launches automatically...
... click Add Printer. c Make any other optional software you must match the serial parameters you set the serial parameters in the printer: a From the printer control panel, navigate to the printer driver. h Make sure the correct COM port is installed, you want to accept the Printer Software License Agreement. It launches automatically...

User Manual
Page 70
... accuracy. Note: See the table for accuracy Before printing or making a paper output of inactivity. • When the printer enters Power Saver mode, the printer control panel display and the standard exit bin lights are turned off print log features.
... accuracy. Note: See the table for accuracy Before printing or making a paper output of inactivity. • When the printer enters Power Saver mode, the printer control panel display and the standard exit bin lights are turned off print log features.

User Manual
Page 71
... until Timeouts appears. 6 Touch Timeouts. 7 Touch the arrows next to Power Saver Mode to wait before the printer enters Power Saver mode. Using the printer control panel 1 Make sure the printer is 30 minutes. Using the Embedded Web Server 1 Type the printer IP address into the address field of minutes you want...
... until Timeouts appears. 6 Touch Timeouts. 7 Touch the arrows next to Power Saver Mode to wait before the printer enters Power Saver mode. Using the printer control panel 1 Make sure the printer is 30 minutes. Using the Embedded Web Server 1 Type the printer IP address into the address field of minutes you want...

User Manual
Page 72
... the TCP/IP section. 2 Click Settings, and then click General Settings. 3 In the Screen Brightness box, type in Ready or Standby mode. Using the printer control panel 1 Make sure the printer is Bright. Setting the standard exit bin light To save energy, or if you are Off, Dim, and Bright. Available settings...
... the TCP/IP section. 2 Click Settings, and then click General Settings. 3 In the Screen Brightness box, type in Ready or Standby mode. Using the printer control panel 1 Make sure the printer is Bright. Setting the standard exit bin light To save energy, or if you are Off, Dim, and Bright. Available settings...

User Manual
Page 73
... printer. Choose On Off To select a Quiet Mode setting: 1 On the home screen, touch . 2 Touch Settings. 3 Touch General Settings. 4 Touch Quiet Mode. Using the printer control panel 1 Make sure the printer is on page 71. 8 Touch Submit. 9 Touch .
... printer. Choose On Off To select a Quiet Mode setting: 1 On the home screen, touch . 2 Touch Settings. 3 Touch General Settings. 4 Touch Quiet Mode. Using the printer control panel 1 Make sure the printer is on page 71. 8 Touch Submit. 9 Touch .

User Manual
Page 76
... the display. Avoiding jams The following hints can help you avoid jams: Paper tray recommendations • Make sure the paper lies flat in the printer control panel menus. • Store paper per the manufacturer's recommendations. Load it prior to printing, or wait for a prompt to load it . • Do not use paper...
... the display. Avoiding jams The following hints can help you avoid jams: Paper tray recommendations • Make sure the paper lies flat in the printer control panel menus. • Store paper per the manufacturer's recommendations. Load it prior to printing, or wait for a prompt to load it . • Do not use paper...

User Manual
Page 85
.... Note: To link the multipurpose feeder, Configure MP must be properly processed if an inaccurate Paper Type is not bent or wrinkled. 6 From the printer control panel, set to the position of any other tray. Loading paper and specialty media 85 The printer automatically senses the Paper Size setting according to Cassette...
.... Note: To link the multipurpose feeder, Configure MP must be properly processed if an inaccurate Paper Type is not bent or wrinkled. 6 From the printer control panel, set to the position of any other tray. Loading paper and specialty media 85 The printer automatically senses the Paper Size setting according to Cassette...
User Manual
Page 95
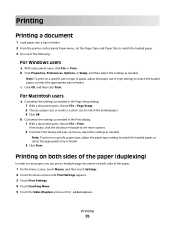
... of the paper (duplexing) In order to match the loaded paper. 3 Click OK. Printing Printing a document 1 Load paper into a tray or feeder. 2 From the printer control panel Paper menu, set the Paper Type and Paper Size to match the loaded paper, or select the appropriate tray or feeder.
... of the paper (duplexing) In order to match the loaded paper. 3 Click OK. Printing Printing a document 1 Load paper into a tray or feeder. 2 From the printer control panel Paper menu, set the Paper Type and Paper Size to match the loaded paper, or select the appropriate tray or feeder.

User Manual
Page 96
... lb bond) weight. • Use only new envelopes. For information on page 76 - When printing on using the Embedded Web Server, or from the printer control panel Paper menu. • For the best performance, use before buying large quantities. Check with the manufacturer or vendor to Rough. Select these settings using transparencies...
... lb bond) weight. • Use only new envelopes. For information on page 76 - When printing on using the Embedded Web Server, or from the printer control panel Paper menu. • For the best performance, use before buying large quantities. Check with the manufacturer or vendor to Rough. Select these settings using transparencies...


