
User Guide
Page 14
You can change the printer settings through the Dell Printer Configuration Web Tool . The default user name is admin , and the default password is left blank (NULL). Details of ... " "System Settings " "Parallel Settings " "Network Settings "*4 "USB Settings "*4 "PCL Settings " "PS Settings "*4 "Panel Settings " "Printer Maintenance " "Paper Density " "Adjust BTR " "Adjust Fuser " "Auto Registration Adjustment " "Color Registration Adjustments " "Adjust Altitude " "Reset Defaults " "Clear Storage "*1 Type a user name and password for more information. The user name cannot be...
You can change the printer settings through the Dell Printer Configuration Web Tool . The default user name is admin , and the default password is left blank (NULL). Details of ... " "System Settings " "Parallel Settings " "Network Settings "*4 "USB Settings "*4 "PCL Settings " "PS Settings "*4 "Panel Settings " "Printer Maintenance " "Paper Density " "Adjust BTR " "Adjust Fuser " "Auto Registration Adjustment " "Color Registration Adjustments " "Adjust Altitude " "Reset Defaults " "Clear Storage "*1 Type a user name and password for more information. The user name cannot be...
User Guide
Page 21
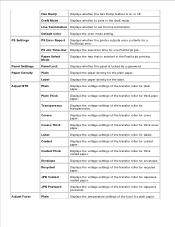
PS Settings Panel Settings Paper Density Adjust BTR Adjust Fuser Hex Dump Displays whether the Hex Dump feature is locked by a password. Draft Mode Displays whether to set the line termination. PS Error Report Displays ... settings of the transfer roller for coated paper. Line Termination Displays whether to print in the PostScript printing. Covers Displays the voltage settings of the fuser for recycled paper. JPN Postcard Displays the voltage settings of the transfer roller for plain paper. Recycled Displays the voltage settings of the transfer roller...
PS Settings Panel Settings Paper Density Adjust BTR Adjust Fuser Hex Dump Displays whether the Hex Dump feature is locked by a password. Draft Mode Displays whether to set the line termination. PS Error Report Displays ... settings of the transfer roller for coated paper. Line Termination Displays whether to print in the PostScript printing. Covers Displays the voltage settings of the fuser for recycled paper. JPN Postcard Displays the voltage settings of the transfer roller for plain paper. Recycled Displays the voltage settings of the transfer roller...
User Guide
Page 22
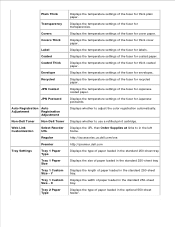
...Supplies at links to in the optional 550-sheet feeder. Displays the temperature settings of the fuser for thick coated paper. Displays the type of the fuser for transparencies. X Tray 2 Paper Type Displays the temperature settings of paper loaded in ... Transparency Covers Covers Thick Label Coated Coated Thick Envelope Recycled JPN Coated JPN Postcard Auto Registration Auto Adjustment Registration Adjustment Non-Dell Toner Non-Dell Toner Web Link Customization Select Reorder URL Regular Premier Tray Settings Tray 1 Paper Type Tray 1 Paper Size Tray 1 ...
...Supplies at links to in the optional 550-sheet feeder. Displays the temperature settings of the fuser for thick coated paper. Displays the type of the fuser for transparencies. X Tray 2 Paper Type Displays the temperature settings of paper loaded in ... Transparency Covers Covers Thick Label Coated Coated Thick Envelope Recycled JPN Coated JPN Postcard Auto Registration Auto Adjustment Registration Adjustment Non-Dell Toner Non-Dell Toner Web Link Customization Select Reorder URL Regular Premier Tray Settings Tray 1 Paper Type Tray 1 Paper Size Tray 1 ...
User Guide
Page 27
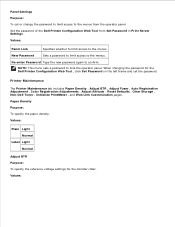
...the menus. Printer Maintenance The Printer Maintenance tab includes Paper Density , Adjust BTR , Adjust Fuser , Auto Registration Adjustment , Color Registration Adjustments , Adjust Altitude , Reset Defaults , Clear Storage , Non-Dell Toner , Initialize PrintMeter , and Web Link Customization pages. New Password Sets a password to... to confirm. Values: Plain Light Normal Label Light Normal Adjust BTR Purpose: To specify the reference voltage settings for the Dell Printer Configuration Web Tool , click Set Password on the left frame and set or change the password to limit access to...
...the menus. Printer Maintenance The Printer Maintenance tab includes Paper Density , Adjust BTR , Adjust Fuser , Auto Registration Adjustment , Color Registration Adjustments , Adjust Altitude , Reset Defaults , Clear Storage , Non-Dell Toner , Initialize PrintMeter , and Web Link Customization pages. New Password Sets a password to... to confirm. Values: Plain Light Normal Label Light Normal Adjust BTR Purpose: To specify the reference voltage settings for the Dell Printer Configuration Web Tool , click Set Password on the left frame and set or change the password to limit access to...

User Guide
Page 28
... postcards. Plain Thick Sets the reference voltage settings for the transfer roller for coated paper. Coated Sets the temperature settings for the fuser for thick plain paper. JPN Coated Sets the reference voltage settings of the transfer roller for recycled paper. JPN Postcard Sets the reference... voltage settings of the transfer roller for plain paper. Envelope Sets the reference voltage settings for the transfer roller for the fuser. Adjust Fuser Purpose: To specify the temperature settings value for envelopes. Coated Thick Sets the temperature settings for the...
... postcards. Plain Thick Sets the reference voltage settings for the transfer roller for coated paper. Coated Sets the temperature settings for the fuser for thick plain paper. JPN Coated Sets the reference voltage settings of the transfer roller for recycled paper. JPN Postcard Sets the reference... voltage settings of the transfer roller for plain paper. Envelope Sets the reference voltage settings for the transfer roller for the fuser. Adjust Fuser Purpose: To specify the temperature settings value for envelopes. Coated Thick Sets the temperature settings for the...
User Guide
Page 57
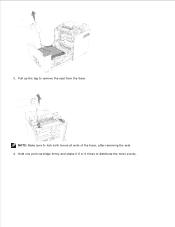
Hold one print cartridge firmly and shake it 5 or 6 times to lock both levers at ends of the fuser, after removing the seal. 4. 3. NOTE: Make sure to distribute the toner evenly. 5. Pull up the tag to remove the seal from the fuser.
Hold one print cartridge firmly and shake it 5 or 6 times to lock both levers at ends of the fuser, after removing the seal. 4. 3. NOTE: Make sure to distribute the toner evenly. 5. Pull up the tag to remove the seal from the fuser.
User Guide
Page 115
... cut or trimmed yourself. Preprinted papers with chemicals that may contaminate the printer Preprinted papers that can be affected by the temperature in the printer fuser Preprinted papers that require a registration (the precise print location on the page) greater than ±0.09 in., such as optical character recognition (OCR) forms In...
... cut or trimmed yourself. Preprinted papers with chemicals that may contaminate the printer Preprinted papers that can be affected by the temperature in the printer fuser Preprinted papers that require a registration (the precise print location on the page) greater than ±0.09 in., such as optical character recognition (OCR) forms In...
User Guide
Page 116
... preprinted letterhead you are not affected by the resin in toner or the silicone in xerographic copiers. Use the following table for use in the fuser. Use only forms and letterhead printed using an offset lithographic or engraved printing process. Inks that absorb ink, but do not bleed. Avoid papers with...
... preprinted letterhead you are not affected by the resin in toner or the silicone in xerographic copiers. Use the following table for use in the fuser. Use only forms and letterhead printed using an offset lithographic or engraved printing process. Inks that absorb ink, but do not bleed. Avoid papers with...

User Guide
Page 162
Purpose: To specify the temperature settings value for this item. Values: Label -3 - +3 0* Coated -3 - +3 0* Coated Thick -3 - +3 0* Envelope -3 - +3 0* Recycled -3 - +3 0* JPN Coated -3 - +3 0* JPN Postcard -3 - +3 0* Adjust Fuser NOTICE: The print quality changes depending on the setting values you select for the fuser.
Purpose: To specify the temperature settings value for this item. Values: Label -3 - +3 0* Coated -3 - +3 0* Coated Thick -3 - +3 0* Envelope -3 - +3 0* Recycled -3 - +3 0* JPN Coated -3 - +3 0* JPN Postcard -3 - +3 0* Adjust Fuser NOTICE: The print quality changes depending on the setting values you select for the fuser.
User Guide
Page 207
...additional memory module in the Owner's Manual. See "Contacting Dell" in the memory slot. The third and forth lines blink every second.) NNN-NNN Restart Printer Contact Support IfMessageReturns NNN-NNN Restart Printer Reseat Fuser Contact Support 016-316 Restart Printer Reseat Memory Contact Support What... this does not solve the problem, contact Dell. The outer levers on both sides of the fuser unit are not securely locked. Error NNN-NNN relates to printer problems. Confirm that the outer levers on . ...
...additional memory module in the Owner's Manual. See "Contacting Dell" in the memory slot. The third and forth lines blink every second.) NNN-NNN Restart Printer Contact Support IfMessageReturns NNN-NNN Restart Printer Reseat Fuser Contact Support 016-316 Restart Printer Reseat Memory Contact Support What... this does not solve the problem, contact Dell. The outer levers on both sides of the fuser unit are not securely locked. Error NNN-NNN relates to printer problems. Confirm that the outer levers on . ...

User Guide
Page 211
... Location of Paper Jams Removing Print Jams From the Multipurpose Feeder Removing Print Jams From the Standard Tray Removing Print Jams From the Fuser Removing Print Jams From the Optional Duplexer Removing Print Jams From the Optional Feeder NOTE: Before buying large quantities of appropriate print media...in the trays or multipurpose feeder with a cloth that is face up when you load it. Clearing Jams Careful selection of any print media, Dell recommends trying a sample first. Do not remove the feeding tray during a print job. Make sure the recommended print side is slightly dampened ...
... Location of Paper Jams Removing Print Jams From the Multipurpose Feeder Removing Print Jams From the Standard Tray Removing Print Jams From the Fuser Removing Print Jams From the Optional Duplexer Removing Print Jams From the Optional Feeder NOTE: Before buying large quantities of appropriate print media...in the trays or multipurpose feeder with a cloth that is face up when you load it. Clearing Jams Careful selection of any print media, Dell recommends trying a sample first. Do not remove the feeding tray during a print job. Make sure the recommended print side is slightly dampened ...

User Guide
Page 212
water if jams caused by misfeeding paper occur frequently. CAUTION: Do not attempt to clear any jams using tools or instruments. This may occur along the print media path. Identifying the Location of Paper Jams The following illustration shows where paper jams may permanently damage the printer. 1 Standard 250-sheet tray 2 Optional 550-sheet feeder 3 Multipurpose feeder 4 Optional duplexer 5 Fuser 6 Front cover
water if jams caused by misfeeding paper occur frequently. CAUTION: Do not attempt to clear any jams using tools or instruments. This may occur along the print media path. Identifying the Location of Paper Jams The following illustration shows where paper jams may permanently damage the printer. 1 Standard 250-sheet tray 2 Optional 550-sheet feeder 3 Multipurpose feeder 4 Optional duplexer 5 Fuser 6 Front cover

User Guide
Page 217
Removing Print Jams From the Fuser NOTICE: Make sure nothing touches or scratches the surface (black-colored film) of the print cartridges against bright light, close the front cover within 5 minutes. ... quality may reduce print quality. Lift the levers at both ends of the printer. Doing so could damage the tray or the inside of the fuser, and remove the jammed paper. NOTE: To resolve the error displayed on the operator panel, you must clear all print media from your hands on...
Removing Print Jams From the Fuser NOTICE: Make sure nothing touches or scratches the surface (black-colored film) of the print cartridges against bright light, close the front cover within 5 minutes. ... quality may reduce print quality. Lift the levers at both ends of the printer. Doing so could damage the tray or the inside of the fuser, and remove the jammed paper. NOTE: To resolve the error displayed on the operator panel, you must clear all print media from your hands on...

User Guide
Page 218
Close the cover of the fuser and press down the levers at both ends of the fuser and remove the jammed paper. 5. Open the cover of the fuser. CAUTION: The fuser is hot. Do not touch it, doing so may cause burns. 4. 3.
Close the cover of the fuser and press down the levers at both ends of the fuser and remove the jammed paper. 5. Open the cover of the fuser. CAUTION: The fuser is hot. Do not touch it, doing so may cause burns. 4. 3.
User Guide
Page 226
... operator panel, see "Understanding Printer Messages." NOTICE: If an error message appears, see "Understanding Printer Messages." How to replace Print cartridges How to replace the Fuser How to resolve. Troubleshooting Guide Basic Printer Problems Display Problems Printing Problems Print Quality Problems Option Problems Other Problems Contacting Service Troubleshooting Guide Installing Printer...
... operator panel, see "Understanding Printer Messages." NOTICE: If an error message appears, see "Understanding Printer Messages." How to replace Print cartridges How to replace the Fuser How to resolve. Troubleshooting Guide Basic Printer Problems Display Problems Printing Problems Print Quality Problems Option Problems Other Problems Contacting Service Troubleshooting Guide Installing Printer...

User Guide
Page 229
... · Change the print cartridges. See "System Settings". · Verify that the print media is within the printer specifications. · The fuser is blurred. · Check the print cartridges to make sure they are installed correctly. · The print cartridges may be low or need to...replaced. See "Replacing Print Cartridges." Toner spots appear on the page/printing is old or damaged. See "Replacing Print Cartridges." Replace the fuser. Streaks appear on the page. · The print cartridges may be low or need to be replaced. Confirm the amount Confirm the ...
... · Change the print cartridges. See "System Settings". · Verify that the print media is within the printer specifications. · The fuser is blurred. · Check the print cartridges to make sure they are installed correctly. · The print cartridges may be low or need to...replaced. See "Replacing Print Cartridges." Toner spots appear on the page/printing is old or damaged. See "Replacing Print Cartridges." Replace the fuser. Streaks appear on the page. · The print cartridges may be low or need to be replaced. Confirm the amount Confirm the ...

User Guide
Page 285
Dell fuser are available only through Dell. Dell recommends Dell fuser for the fuser to replace the Fuser CAUTION: To prevent electric shock, always turn off the printer and wait for 30 minutes for your printer. Removing the Used Fuser CAUTION: To avoid burns, do not replace the fuser immediately after printing, as the fuser gets very hot during this process. 1. NOTICE...
Dell fuser are available only through Dell. Dell recommends Dell fuser for the fuser to replace the Fuser CAUTION: To prevent electric shock, always turn off the printer and wait for 30 minutes for your printer. Removing the Used Fuser CAUTION: To avoid burns, do not replace the fuser immediately after printing, as the fuser gets very hot during this process. 1. NOTICE...

User Guide
Page 286
Lift the chute gate to its upright position. 4. 3. Release the levers at both ends of the fuser.
Lift the chute gate to its upright position. 4. 3. Release the levers at both ends of the fuser.

User Guide
Page 287
Hold both hands. 2. With the connector of the printer to release the connection on the right side, then lift upward to remove. Installing a New Fuser 1. Unpack a new fuser and hold both sides of the fuser with both sides of the installed fuser, pull it towards the front of the fuser toward the slot, push the connector into the slot firmly. 5.
Hold both hands. 2. With the connector of the printer to release the connection on the right side, then lift upward to remove. Installing a New Fuser 1. Unpack a new fuser and hold both sides of the fuser with both sides of the installed fuser, pull it towards the front of the fuser toward the slot, push the connector into the slot firmly. 5.

User Guide
Page 288
NOTE: Make sure that the fuser connector is firmly seated. 3. Lower the chute gate to its horizontal position. Lock both levers at the ends of the fuser. 4.
NOTE: Make sure that the fuser connector is firmly seated. 3. Lower the chute gate to its horizontal position. Lock both levers at the ends of the fuser. 4.


