User Guide
Page 2
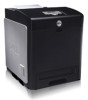
... button. 7 Optional duplexer 8 Operator panel 9 Power switch 10 Control board 11 Control board cover To order replacement print cartridges or supplies from Dell: 1. Notes, Notices, and Cautions NOTE: A NOTE indicates important information that helps you make better use of 3 trays (standard 250-sheet ...tray, optional 550-sheet feeder, and multipurpose feeder). 3 Multipurpose feeder 4 Side button 5 Belt unit 6 Front cover NOTE: The front cover opens by phone. For help locating your printer. 1 Standard 250-sheet tray 2 Optional 550-sheet...
... button. 7 Optional duplexer 8 Operator panel 9 Power switch 10 Control board 11 Control board cover To order replacement print cartridges or supplies from Dell: 1. Notes, Notices, and Cautions NOTE: A NOTE indicates important information that helps you make better use of 3 trays (standard 250-sheet ...tray, optional 550-sheet feeder, and multipurpose feeder). 3 Multipurpose feeder 4 Side button 5 Belt unit 6 Front cover NOTE: The front cover opens by phone. For help locating your printer. 1 Standard 250-sheet tray 2 Optional 550-sheet...

User Guide
Page 55
... space around the printer for a maximum of 3 trays (standard 250-sheet tray, optional 550-sheet feeder, and multipurpose feeder). 2 Multipurpose 8 Optional duplexer feeder 3 Side button 4 Belt unit 5 Operator panel 6 Front cover NOTE: When you use the printer with the multipurpose feeder opened, do not locate the printer in direct sunlight.
... space around the printer for a maximum of 3 trays (standard 250-sheet tray, optional 550-sheet feeder, and multipurpose feeder). 2 Multipurpose 8 Optional duplexer feeder 3 Side button 4 Belt unit 5 Operator panel 6 Front cover NOTE: When you use the printer with the multipurpose feeder opened, do not locate the printer in direct sunlight.

User Guide
Page 56
If the front cover remains open the front cover. 2. Scratches, dirt, or oil from the unit belt. Pull up the tag to remove the seal from your Owner's Manual. Installing the Print Cartridges 1. NOTICE: Make sure nothing touches or scratches the surface (...black-colored film) of the print cartridges against bright light, close the front cover within 5 minutes. NOTICE: To protect the drums of the belt unit. Push the side button and open for more than 5 minutes, print quality may reduce print quality. Installing the Print Cartridges Installing the Print Cartridges...
If the front cover remains open the front cover. 2. Scratches, dirt, or oil from the unit belt. Pull up the tag to remove the seal from your Owner's Manual. Installing the Print Cartridges 1. NOTICE: Make sure nothing touches or scratches the surface (...black-colored film) of the print cartridges against bright light, close the front cover within 5 minutes. NOTICE: To protect the drums of the belt unit. Push the side button and open for more than 5 minutes, print quality may reduce print quality. Installing the Print Cartridges Installing the Print Cartridges...
User Guide
Page 75
... using the PS driver, and then select Properties from your hands on the film of the belt unit may deteriorate. Click Start Settings Printers. 2. Mac OS X 1. Installing a Duplexer NOTICE: To protect the drums of the belt unit. Click Printers on the printer, and then click Apply Changes. Remove all packaging from the...
... using the PS driver, and then select Properties from your hands on the film of the belt unit may deteriorate. Click Start Settings Printers. 2. Mac OS X 1. Installing a Duplexer NOTICE: To protect the drums of the belt unit. Click Printers on the printer, and then click Apply Changes. Remove all packaging from the...

User Guide
Page 76
Remove the connector cap. 4. Pull up on the belt release levers and rotate the belt unit up as shown in the illustration. 5.
Remove the connector cap. 4. Pull up on the belt release levers and rotate the belt unit up as shown in the illustration. 5.

User Guide
Page 78
Close the belt unit by pulling it down. 8. NOTE: Make sure that the duplexer is correctly connected to the printer with connectors and cannot be moved easily. 7. Close the front cover.
Close the belt unit by pulling it down. 8. NOTE: Make sure that the duplexer is correctly connected to the printer with connectors and cannot be moved easily. 7. Close the front cover.
User Guide
Page 208
... this does not solve the problem, contact Dell. If this does not solve the problem, contact Dell. Confirm that you open. Paper Jam 077-901 Open Front Cover Remove Paper Paper Jam 077-907 Open Front Cover & Belt Unit Remove Paper The printer detects a paper jam. XXX and... YYY indicates a position that the unit is not fully inserted. See "Replacing Print Cartridges" See "Contacting Dell" in the Owner's Manual. 016-340 Restart Printer Contact ...
... this does not solve the problem, contact Dell. If this does not solve the problem, contact Dell. Confirm that you open. Paper Jam 077-901 Open Front Cover Remove Paper Paper Jam 077-907 Open Front Cover & Belt Unit Remove Paper The printer detects a paper jam. XXX and... YYY indicates a position that the unit is not fully inserted. See "Replacing Print Cartridges" See "Contacting Dell" in the Owner's Manual. 016-340 Restart Printer Contact ...

User Guide
Page 217
... and open for 30 minutes. 2. Removing Print Jams From the Fuser NOTICE: Make sure nothing touches or scratches the surface (black-colored film) of the belt unit may deteriorate. Scratches, dirt, or oil from the print media path. 1. NOTE: To resolve the error displayed on the tray. Lift the levers at... paper. CAUTION: Do not use excessive force on the operator panel, you must clear all print media from your hands on the film of the belt unit. Turn off the printer and wait for more than 5 minutes, print quality may reduce print quality.
... and open for 30 minutes. 2. Removing Print Jams From the Fuser NOTICE: Make sure nothing touches or scratches the surface (black-colored film) of the belt unit may deteriorate. Scratches, dirt, or oil from the print media path. 1. NOTE: To resolve the error displayed on the tray. Lift the levers at... paper. CAUTION: Do not use excessive force on the operator panel, you must clear all print media from your hands on the film of the belt unit. Turn off the printer and wait for more than 5 minutes, print quality may reduce print quality.
User Guide
Page 219
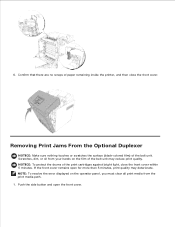
..., close the front cover. Removing Print Jams From the Optional Duplexer NOTICE: Make sure nothing touches or scratches the surface (black-colored film) of the belt unit may deteriorate. If the front cover remains open the front cover. Scratches, dirt, or oil from the print media path. 1. Push the side button... quality. NOTE: To resolve the error displayed on the operator panel, you must clear all print media from your hands on the film of the belt unit. 6.
..., close the front cover. Removing Print Jams From the Optional Duplexer NOTICE: Make sure nothing touches or scratches the surface (black-colored film) of the belt unit may deteriorate. If the front cover remains open the front cover. Scratches, dirt, or oil from the print media path. 1. Push the side button... quality. NOTE: To resolve the error displayed on the operator panel, you must clear all print media from your hands on the film of the belt unit. 6.

User Guide
Page 220
Pull out the jammed paper from the duplexer. If jammed paper cannot be found, go to the next step. 3. 2. Pull up on the belt release levers and rotate the belt unit up as shown in the illustration. 4. Remove the jammed paper and close the belt unit.
Pull out the jammed paper from the duplexer. If jammed paper cannot be found, go to the next step. 3. 2. Pull up on the belt release levers and rotate the belt unit up as shown in the illustration. 4. Remove the jammed paper and close the belt unit.
User Guide
Page 226
... Problems Other Problems Contacting Service Troubleshooting Guide Installing Printer Drivers Basic Printer Problems Some printer problems can be easy to replace Rollers Removing the Used Belt Unit The section will help you have checked all of the above and still have a problem, turn off at any switch or breaker. How to...
... Problems Other Problems Contacting Service Troubleshooting Guide Installing Printer Drivers Basic Printer Problems Some printer problems can be easy to replace Rollers Removing the Used Belt Unit The section will help you have checked all of the above and still have a problem, turn off at any switch or breaker. How to...

User Guide
Page 296
...light, close the multipurpose feeder cover before opening the front cover. 1. Dell recommends Dell belt units for more than 5 minutes, print quality may reduce print quality. Dell belt units are available only through Dell. Removing the Used Belt Unit NOTE: Remove any of the following procedures, read and follow the... safety instructions in your hands on the film of the belt unit. To order by Dell. Scratches, dirt, or oil from the center output tray, and close the front cover within 5 minutes. 3. NOTICE: ...
...light, close the multipurpose feeder cover before opening the front cover. 1. Dell recommends Dell belt units for more than 5 minutes, print quality may reduce print quality. Dell belt units are available only through Dell. Removing the Used Belt Unit NOTE: Remove any of the following procedures, read and follow the... safety instructions in your hands on the film of the belt unit. To order by Dell. Scratches, dirt, or oil from the center output tray, and close the front cover within 5 minutes. 3. NOTICE: ...

User Guide
Page 297
3. Then, shift the belt unit to remove parts in the illustration. Allow time for the printer to cool before attempting to the right and remove the unit from the printer. CAUTION: Do not touch the inside of the groove. Hold both sides of the belt unit with both hands and pull up as shown in this area. 4. Pull up on the belt release levers and rotate the belt unit up the left side of the unit until the peg on the left side comes out of the printer. Some parts may be hot.
3. Then, shift the belt unit to remove parts in the illustration. Allow time for the printer to cool before attempting to the right and remove the unit from the printer. CAUTION: Do not touch the inside of the groove. Hold both sides of the belt unit with both hands and pull up as shown in this area. 4. Pull up on the belt release levers and rotate the belt unit up the left side of the unit until the peg on the left side comes out of the printer. Some parts may be hot.

User Guide
Page 298
Close the belt unit by pulling it clicks. Insert the left peg into the corresponding left side belt unit hole, then align the right peg with the groove, and then push down until it down on the right side of the belt unit to seat into place. 3. Installing a New Belt Unit 1. Unpack a new belt unit. 2.
Close the belt unit by pulling it clicks. Insert the left peg into the corresponding left side belt unit hole, then align the right peg with the groove, and then push down until it down on the right side of the belt unit to seat into place. 3. Installing a New Belt Unit 1. Unpack a new belt unit. 2.

User Guide
Page 299
4. Remove the film cover from the installed belt unit and discard 5. Close the front cover.
4. Remove the film cover from the installed belt unit and discard 5. Close the front cover.
User Guide
Page 301
...of Supplies Conserving Supplies Ordering Supplies Storing Print Media Storing Consumables Replacing Print Cartridges Replacing the Fuser Replacing Separator Rollers Replacing the Belt Unit Adjusting Color Registration Determining the Status of the key operator in your software program or on remaining toner levels. On the...the printer requires new supplies, type your name or the name of Supplies If your printer is connected to the network, the Dell Printer Configuration Web Tool can change several people are using the printer, you to complete certain tasks to maintain optimum print quality...
...of Supplies Conserving Supplies Ordering Supplies Storing Print Media Storing Consumables Replacing Print Cartridges Replacing the Fuser Replacing Separator Rollers Replacing the Belt Unit Adjusting Color Registration Determining the Status of the key operator in your software program or on remaining toner levels. On the...the printer requires new supplies, type your name or the name of Supplies If your printer is connected to the network, the Dell Printer Configuration Web Tool can change several people are using the printer, you to complete certain tasks to maintain optimum print quality...

User Guide
Page 318
...cover before opening the front cover. 1. NOTICE: To protect the drums of the belt unit may deteriorate. Dell belt units are available only through Dell. Removing the Used Belt Unit NOTE: Remove any of the belt unit. Scratches, dirt, or oil from the center output tray, and close the ...cover. Push the side button and open for more than 5 minutes, print quality may reduce print quality. To order by Dell. Dell recommends Dell belt units for problems caused by using accessories, parts, or components not supplied by phone, see your printer. 3. Replace the tray into...
...cover before opening the front cover. 1. NOTICE: To protect the drums of the belt unit may deteriorate. Dell belt units are available only through Dell. Removing the Used Belt Unit NOTE: Remove any of the belt unit. Scratches, dirt, or oil from the center output tray, and close the ...cover. Push the side button and open for more than 5 minutes, print quality may reduce print quality. To order by Dell. Dell recommends Dell belt units for problems caused by using accessories, parts, or components not supplied by phone, see your printer. 3. Replace the tray into...

User Guide
Page 319
CAUTION: Do not touch the inside of the groove. Allow time for the printer to cool before attempting to the right and remove the unit from the printer. Then, shift the belt unit to remove parts in the illustration. Some parts may be hot. Hold both sides of the belt unit with both hands and pull up the left side of the unit until the peg on the belt release levers and rotate the belt unit up on the left side comes out of the printer. 3. Pull up as shown in this area. 4.
CAUTION: Do not touch the inside of the groove. Allow time for the printer to cool before attempting to the right and remove the unit from the printer. Then, shift the belt unit to remove parts in the illustration. Some parts may be hot. Hold both sides of the belt unit with both hands and pull up the left side of the unit until the peg on the belt release levers and rotate the belt unit up on the left side comes out of the printer. 3. Pull up as shown in this area. 4.

User Guide
Page 320
Close the belt unit by pulling it down on the right side of the belt unit to seat into place. 3. Unpack a new belt unit. 2. Insert the left peg into the corresponding left side belt unit hole, then align the right peg with the groove, and then push down until it clicks. Installing a New Belt Unit 1.
Close the belt unit by pulling it down on the right side of the belt unit to seat into place. 3. Unpack a new belt unit. 2. Insert the left peg into the corresponding left side belt unit hole, then align the right peg with the groove, and then push down until it clicks. Installing a New Belt Unit 1.

User Guide
Page 321
Close the front cover. 4. Adjusting Color Registration Remove the film cover from the installed belt unit and discard. 5.
Close the front cover. 4. Adjusting Color Registration Remove the film cover from the installed belt unit and discard. 5.


