Service Manual
Page 35
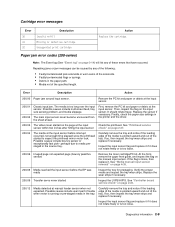
...or is too loose. 200.06 Imaged page not expected page (bouncy passthru sensor) Remove the toner cartridge/PC kit. Paper jam error codes (200-series) Note: The Event log (See "Event log" on page 2-...sensor when not expected. Error Description Action 200.00 Paper jam around input sensor. First, remove the PC kit and paper or debric at the input sensor. 200.01 200.02 Classic input jam. Inspect the ...and replace it if it does not rotate freely or is running or pre-staged media in the printer and the driver. 200.03 The video never started on the input sensor. Verify the proper media...
...or is too loose. 200.06 Imaged page not expected page (bouncy passthru sensor) Remove the toner cartridge/PC kit. Paper jam error codes (200-series) Note: The Event log (See "Event log" on page 2-...sensor when not expected. Error Description Action 200.00 Paper jam around input sensor. First, remove the PC kit and paper or debric at the input sensor. 200.01 200.02 Classic input jam. Inspect the ...and replace it if it does not rotate freely or is running or pre-staged media in the printer and the driver. 200.03 The video never started on the input sensor. Verify the proper media...
Service Manual
Page 38
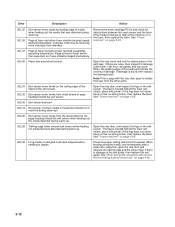
... continues to stop at fuser earlier than intended Remove the toner cartridge/PC kit and check for obstructions in the exit guide, then replace the exit... of page heading toward the exit sensor. If there is located behind the fuser exit rollers, about mid printer. See "Fuser removal" on page 4-20. 202.06 Exit sensor bounced 202.13 Exit sensor covered,...paper setting and correct if needed. If damage is located behind the fuser exit rollers, about mid printer. Error Description Action 201.25 Exit sensor never made by leading edge of media when feeding out...
... continues to stop at fuser earlier than intended Remove the toner cartridge/PC kit and check for obstructions in the exit guide, then replace the exit... of page heading toward the exit sensor. If there is located behind the fuser exit rollers, about mid printer. See "Fuser removal" on page 4-20. 202.06 Exit sensor bounced 202.13 Exit sensor covered,...paper setting and correct if needed. If damage is located behind the fuser exit rollers, about mid printer. Error Description Action 201.25 Exit sensor never made by leading edge of media when feeding out...
Service Manual
Page 56
... LVPS/HVPS Controller board Action Remove the toner cartridge, and gently shake it to Exit Config Menu and press . Try a different toner cartridge and PC kit. • If those fail, then replace the LVPS/HVPS, controller board, or the printhead in the opening for cartridge damage. e. Press to ...using the print quality test pages. Four pages print to Prt Quality Pgs. Try a different PC kit. • With the cartridge out, check the spring loaded contacts on page 2-34. 2-30 Unplug the printer, and check the cable continuity between the LVPS/HVPS connector marked OPC (at the end of...
... LVPS/HVPS Controller board Action Remove the toner cartridge, and gently shake it to Exit Config Menu and press . Try a different toner cartridge and PC kit. • If those fail, then replace the LVPS/HVPS, controller board, or the printhead in the opening for cartridge damage. e. Press to ...using the print quality test pages. Four pages print to Prt Quality Pgs. Try a different PC kit. • With the cartridge out, check the spring loaded contacts on page 2-34. 2-30 Unplug the printer, and check the cable continuity between the LVPS/HVPS connector marked OPC (at the end of...
Service Manual
Page 57
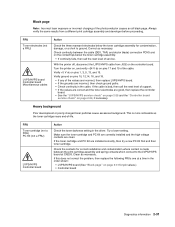
.... Correct as necessary. Clean as necessary. Heavy background Poor development or poorly charged toner particles cause excessive background. Black page Note: Incorrect laser exposure or incorrect charging of the cable. Verify +5 V dc on the contact tips below the toner cartridge assembly for pin values.) &#...8226; Controller board Diagnostics information 2-31 Turn the printer on, and verify +24 V dc on pins 10, 12,14, 16, and 18. • If any of -life. Make sure the toner cartridge and PC Kit are correctly installed and the high voltage contacts are incorrect, then...
.... Correct as necessary. Clean as necessary. Heavy background Poor development or poorly charged toner particles cause excessive background. Black page Note: Incorrect laser exposure or incorrect charging of the cable. Verify +5 V dc on the contact tips below the toner cartridge assembly for pin values.) &#...8226; Controller board Diagnostics information 2-31 Turn the printer on, and verify +24 V dc on pins 10, 12,14, 16, and 18. • If any of -life. Make sure the toner cartridge and PC Kit are correctly installed and the high voltage contacts are incorrect, then...
Service Manual
Page 58
Check the media settings in the printer driver. 2-32 Inspect the transfer roll for more information. Try a new PC Kit. Replace as necessary. Try changing the setting to prevent damage from finger oils or hand lotion. Check to make sure that the laser light path is low, then try a new one.... A heavier media may have an unbalanced force against the PC (photoconductor) drum. ...
Check the media settings in the printer driver. 2-32 Inspect the transfer roll for more information. Try a new PC Kit. Replace as necessary. Try changing the setting to prevent damage from finger oils or hand lotion. Check to make sure that the laser light path is low, then try a new one.... A heavier media may have an unbalanced force against the PC (photoconductor) drum. ...

Service Manual
Page 59
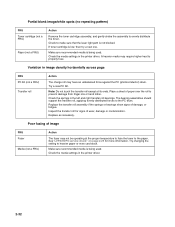
...the toner cartridge and PC Kit are installed correctly and that the laser beam is not blocked. Check the transfer roll for signs of toner buildup and contamination. Inspect the fuser for signs of contamination. Replace the fuser as it feeds through the printer, especially in the ... controller board Action Print a menu page found under Utilities, and check settings for continuity. Diagnostics information 2-33 Recheck condition before replacing PC Kit, if necessary. Inspect the transfer roll for contamination and its cable for media type. It may also be checked. Toner on toner...
...the toner cartridge and PC Kit are installed correctly and that the laser beam is not blocked. Check the transfer roll for signs of toner buildup and contamination. Inspect the fuser for signs of contamination. Replace the fuser as it feeds through the printer, especially in the ... controller board Action Print a menu page found under Utilities, and check settings for continuity. Diagnostics information 2-33 Recheck condition before replacing PC Kit, if necessary. Inspect the transfer roll for contamination and its cable for media type. It may also be checked. Toner on toner...
Service Manual
Page 60
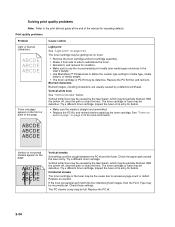
...by a defective printhead. The PC cleaner sump may be defective. Replace the PC Kit first, and recheck. Blurred characters Blurred images, including characters, are parallel and match the two intended ghost images, then the Form Type may be defective. Try a different toner cartridge. With the printer off , clear the path... print See "Light print" on page 2-33. Vertical white lines See "Vertical streaks" below. Vertical white lines may be caused by the laser beam, which may be partially blocked. With the printer off , clear the path or clean the lens. Replace the PC kit. 2-34
...by a defective printhead. The PC cleaner sump may be defective. Replace the PC Kit first, and recheck. Blurred characters Blurred images, including characters, are parallel and match the two intended ghost images, then the Form Type may be defective. Try a different toner cartridge. With the printer off , clear the path... print See "Light print" on page 2-33. Vertical white lines See "Vertical streaks" below. Vertical white lines may be caused by the laser beam, which may be partially blocked. With the printer off , clear the path or clean the lens. Replace the PC kit. 2-34
Service Manual
Page 67
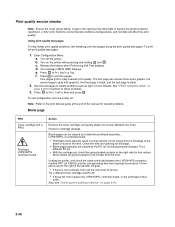
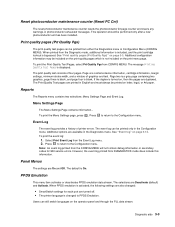
...printed on page 3-14. See "Event log" on letter, legal, or A4 paper. The print quality test consists of printer errors. The selections are available in the Configuration menu. Diagnostic aids 3-3 Page one contains device information, cartridge information, margin settings... minimum stroke width, and a mixture of graphics and text. Reset photoconductor maintenance counter (Reset PC Cnt) The reset photoconductor maintenance counter resets the photoconductor kit page counter and clears any warnings or photoconductor exhausted messages. Additional options are Deactivate (default)...
...printed on page 3-14. See "Event log" on letter, legal, or A4 paper. The print quality test consists of printer errors. The selections are available in the Configuration menu. Diagnostic aids 3-3 Page one contains device information, cartridge information, margin settings... minimum stroke width, and a mixture of graphics and text. Reset photoconductor maintenance counter (Reset PC Cnt) The reset photoconductor maintenance counter resets the photoconductor kit page counter and clears any warnings or photoconductor exhausted messages. Additional options are Deactivate (default)...
Service Manual
Page 78
...setting in the event log as well as the PC kit and maintenance counter resets and NVRAM resets initiated by one error per minute), but can be used when printing with a specific operating point. When deactivated, the printer disables. Identical errors in consecutive positions in position ...10 (if 10 errors have occurred). Gap Adjust Adjusts the minimum gap between sheets during printing. Each time this setting executes, the printer performs the following: • Calibrates its toner density sensor • Measures the reflectivity of increased gap. All 2xx and 9xx ...
...setting in the event log as well as the PC kit and maintenance counter resets and NVRAM resets initiated by one error per minute), but can be used when printing with a specific operating point. When deactivated, the printer disables. Identical errors in consecutive positions in position ...10 (if 10 errors have occurred). Gap Adjust Adjusts the minimum gap between sheets during printing. Each time this setting executes, the printer performs the following: • Calibrates its toner density sensor • Measures the reflectivity of increased gap. All 2xx and 9xx ...


